2016 MERCEDES-BENZ G-Class Tail light
[x] Cancel search: Tail lightPage 97 of 302

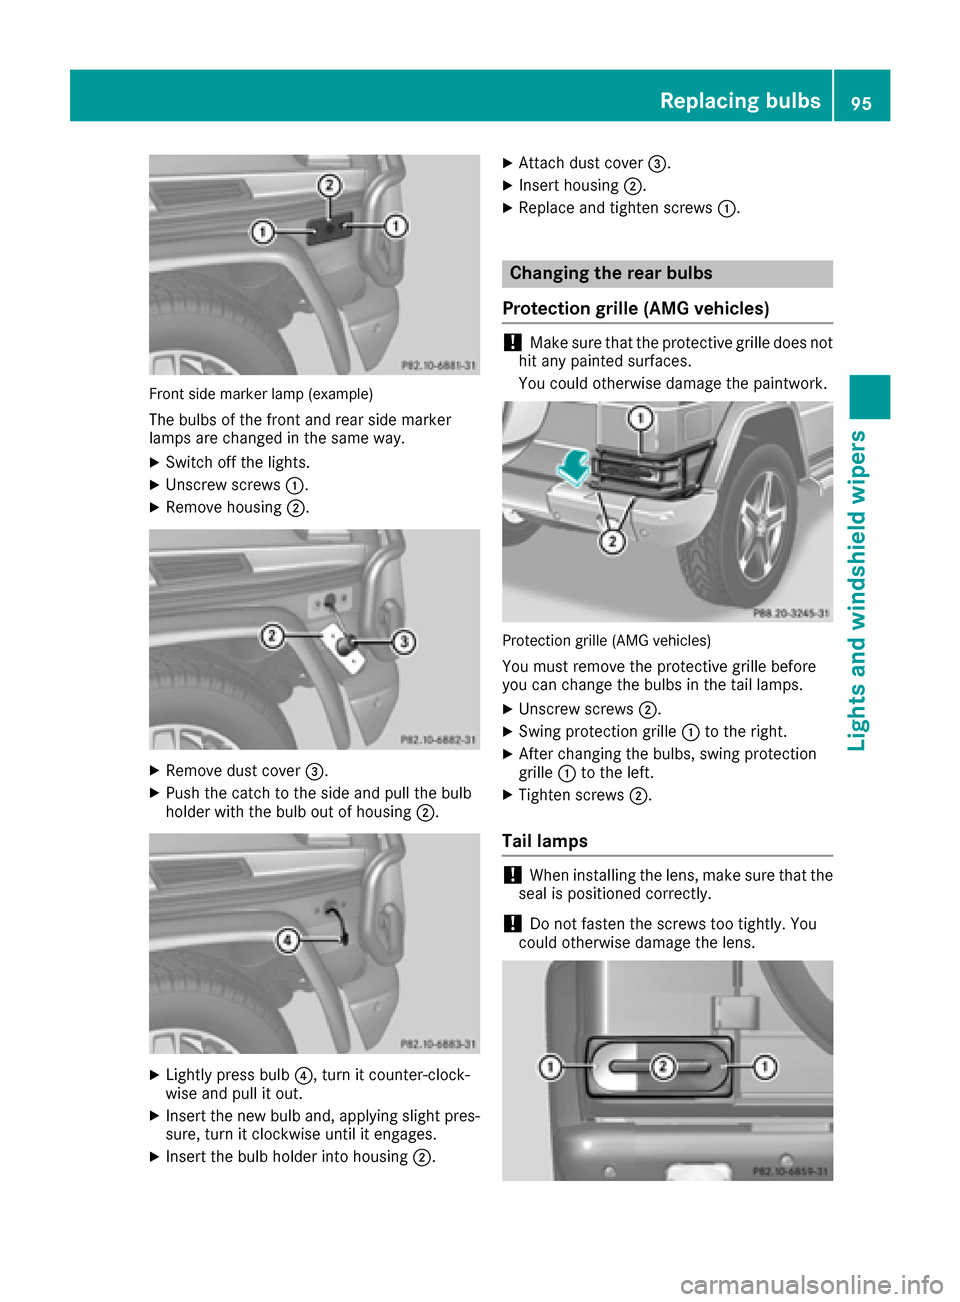
Front side marker lamp (example)
The bulbs of the front and rear side marker
lamps are changed in the same way.
XSwitch off the lights.
XUnscrew screws:.
XRemove housing ;.
XRemove dust cover =.
XPush the catch to the side and pull the bulb
holder with the bulb out of housing ;.
XLightly press bulb?, turn it counter-clock-
wise and pull it out.
XInsert the new bulb and, applying slight pres- sure, turn it clockwise until it engages.
XInsert the bulb holder into housing ;.
XAttach dust cover=.
XInsert housing;.
XReplace and tighten screws :.
Changing the rear bulbs
Protection grille (AMG vehicles)
!Make sure that the protective grille does not
hit any painted surfaces.
You could otherwise damage the paintwork.
Protection grille (AMG vehicles)
You must remove the protective grille before
you can change the bulbs in the tail lamps.
XUnscrew screws ;.
XSwing protection grille :to the right.
XAfter changing the bulbs, swing protection
grille :to the left.
XTighten screws ;.
Tail lamps
!When installing the lens, make sure that the
seal is positioned correctly.
!Do not fasten the screws too tightly. You
could otherwise damage the lens.
Replacing bulbs95
Lights and windshield wipers
Z
Page 98 of 302

XSwitch off the lights.
XUnscrew screws:.
XRemove lens;.
=Turn signal
?Brake/tail lamp
ATail lamps/standing lamps
XTurn the corresponding bulb counter-clock-
wise, applying slight pressure, and remove it
from the bulb holder.
XInsert the new bulb into the bulb holder and,
applying slight pressure, turn it clockwise
until it engages.
XInstall lens;.
XReplace and tighten screws :.
XAMG vehicles:secure the protection grille
(Ypage 95).
Backup lamp/rear fog lamp
!Do not fasten the screws too tightly. You
could otherwise damage the lens.
Example: rear fog lamp
XSwitch off the lights.
XUnscrew screws ;.
XRemove lens:.
XTurn bulb=counter-clockwise, applying
slight pressure, and remove it from the bulb
holder.
XInsert the new bulb into the bulb holder and,
applying slight pressure, turn it clockwise
until it engages.
XInstall lens :.
XReplace and tighten screws ;.
Windshield wipers
Switching the windshield wipers
on/off
!
Do not operate the windshield wipers when
the windshield is dry, as this could damage
the wiper blades. Moreover, dust that has col-
lected on the windshield/rear window can
scratch the glass if wiping takes place when
the windshield/rear window is dry.
If it is necessary to switch on the windshield
wipers in dry weather conditions, always use
washer fluid when operating the windshield
wipers.
!If the windshield wipers leave smears on the
windshield/rear window after the vehicle has
been washed in an automatic car wash, this
may be due to wax or other residue. Clean the
windshield/rear window with washer fluid
after an automatic car wash.
!Intermittent wiping with rain sensor: due to
optical influences and the windshield becom-
ing dirty in dry weather conditions, the wind-
shield wipers may be activated inadvertently.
This could then damage the windshield wiper
blades or scratch the windshield.
For this reason, you should always switch off
the windshield wipers in dry weather.
96Windshield wipers
Lights and windshield wipers
Page 135 of 302

affect your reflexes, perceptions and judg-
ment.
The possibility of a serious or even fatal acci-dent are greatly increased when you drink or
take drugs and drive.
Do not drink or take drugs and drive or allow
anyone to drive who has been drinking or tak-
ing drugs.
Pedals
GWARNING
Objects in the driver's footwell can restrict the pedal travel or obstruct a depressed pedal.
The operating and road safety of the vehicle is
jeopardized. There is a risk of an accident.
Make sure that all objects in the vehicle are
stowed correctly, and that they cannot enter
the driver's footwell. Install the floormats
securely and as specified in order to ensure
sufficient clearance for the pedals. Do not use
loose floormats and do not place floormats on
top of one another.
Emission control
GWARNING
Inhalation of exhaust gas is hazardous to your
health. All exhaust gas contains carbon mon-
oxide (CO), and inhaling it can cause uncon-
sciousness and possible death.
Do not run the engine in confined areas (such as a garage) which are not properly ventilated.
If you think that exhaust gas fumes are enter-
ing the vehicle while driving, have the cause
determined and corrected immediately. If you
must drive under these conditions, drive only
with at least one window fully open at all
times.
Certain engine systems are designed to keep
the level of poisonous components in exhaust
fumes within legal limits.
These systems only work at peak efficiency if
they are serviced exactly in accordance with the
manufacturer's specifications. For this reason,
all work on the engine should only be carried out by qualified and authorized Mercedes-Benz
technicians.
The engine settings must not be changed under
any circumstances. Furthermore, all specific
service work must be carried out at regular
intervals and in accordance with the Mercedes-
Benz service requirements. Details can be found
in the Maintenance Booklet.
Braking
Important safety notes
GWARNING
If you activate the LOW off-road gear while
driving on a slippery road surface, the wheels
may lose traction:
Rif you remove your foot from the accelera-
tor pedal when driving
Rif off road ABS intervenes when braking
If the wheels lose traction. the vehicle can no
longer be steered. There is an increased dan- ger of skidding and accidents.
Never activate the LOW off-road gear while
driving on a slippery road surface.
Downhill gradients
!On long and steep gradients, you must
reduce the load on the brakes by shifting early
to a lower gear. This allows you to take
advantage of the engine braking effect and
helps avoid overheating and excessive wear
of the brakes.
When you take advantage of the engine brak-
ing effect, a drive wheel may not turn for some
time, e.g. on a slippery road surface. This
could cause damage to the drive train. This
type of damage is not covered by the
Mercedes-Benz warranty.
Heavy and light loads
GWARNING
If you rest your foot on the brake pedal while
driving, the braking system can overheat. This increases the stopping distance and can even
cause the braking system to fail. There is a
risk of an accident.
Driving tips133
Driving and parking
Z
Page 191 of 302

Display messagesPossible causes/consequences andMSolutions
FrontPassengerAir‐bag Disabled SeeOperator' sManual
ABabySmart ™compatible child restrain tsystem is installed on th e
front-passenger seat .
The 45indicator lamp also lights up.
The front-passenger air bag is therefore disabled.
Further information on BabySmart™ (
Ypage 50).
FrontPassengerAir‐bag Enabled SeeOperator's Manual
The 45indicator lamp does not remain lit if a special Baby-
Smart™-compatible child restraint system has been installed on the
front-passenger seat.
The BabySmart™ system is malfunctioning.
GWARNING
The front-passenger front air bag can be triggered unintentionally in
the event of an accident.
There is a risk of an accident.
XMake sure there is nothing between the seat cushion and the child
seat.
XCheck for correct installation of the child restraint system.
XIf the 45indicator lamps do not light up, have the Baby-
Smart™ system checked as soon as possible at a qualified special-
ist workshop.
Do not transport a child on the front-passenger seat until the air bag
deactivation system has been repaired.
Lights
i
Display messages about LEDs:
This display message will only appear if all LEDs have failed.
Display messagesPossible causes/consequences and MSolutions
b
CheckLeftLowBeamorCheck Right LowBeam
The left or right-hand low-beam headlamp is defective.
XVisit a qualified specialist workshop.
b
Check Trailer LeftTail LamporCheckTrailer Right TailLamp
The left or right-hand trailer tail lamp is faulty.
XCheck whether you are permitted to replace the bulb yourself.
or
XVisit a qualified specialist workshop.
b
Check Trailer LeftTurn Signalor CheckTrailer Right TurnSignal
The left or right-hand trailer turn signal lamp is defective.
XCheck whether you are permitted to replace the bulb yourself.
or
XVisit a qualified specialist workshop.
Display messages189
On-board computer and displays
Z
Page 280 of 302

identify speed ratingBon the sidewall of the
tire (Ypage 276).
RIf no specification is given: no text (as in the
example above), represents a standard load
(SL) tire
RXL or Extra Load: represents a reinforced tire
RLight Load: represents a light load tire
RC, D, E: represents a load range that depends
on the maximum load that the tire can carry at
a certain pressure
iTire data is vehicle-specific and may deviate
from the data in the example.
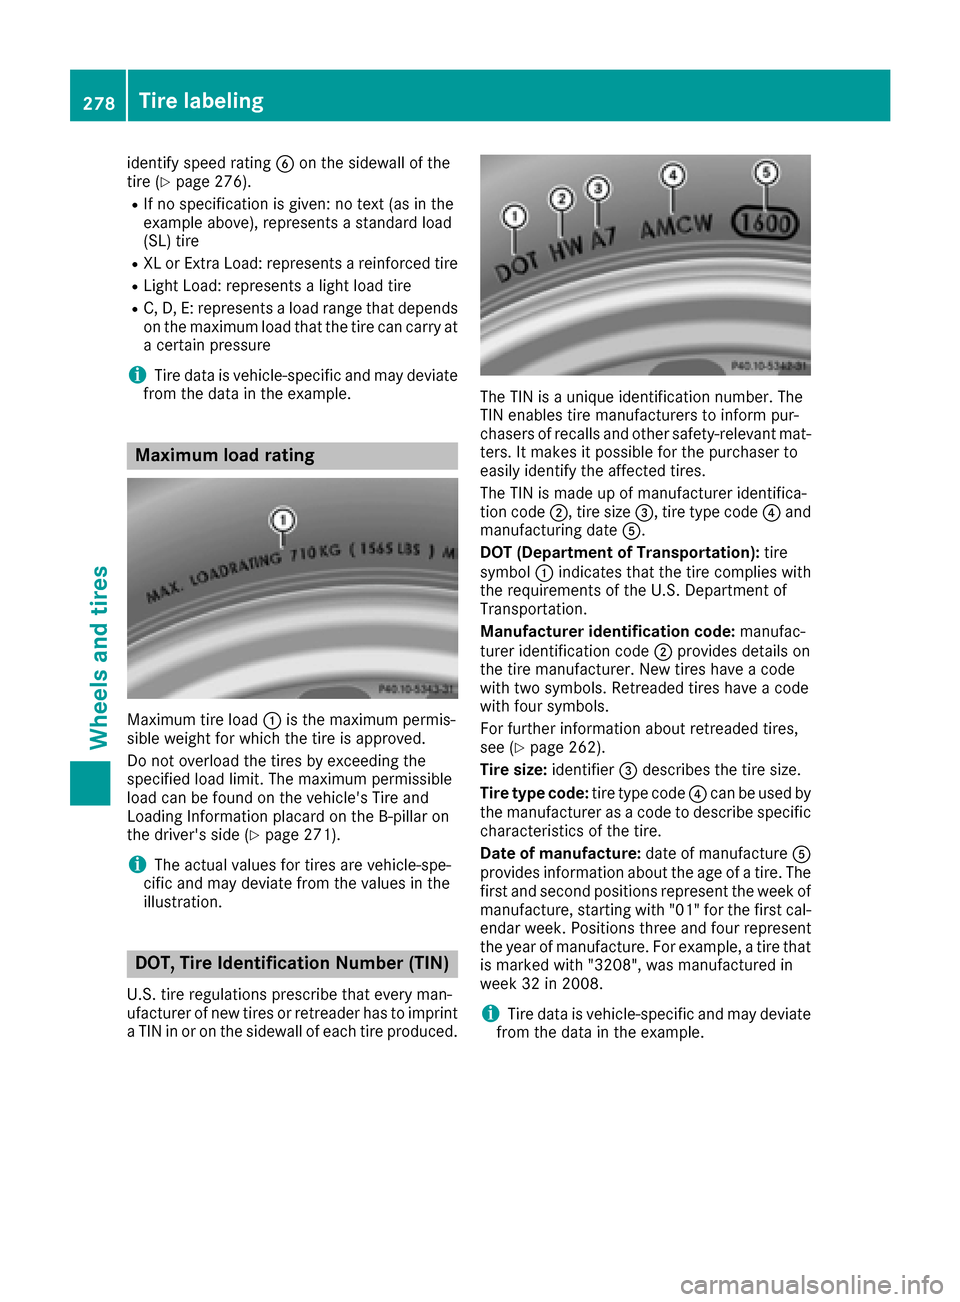
Maximum load rating
Maximum tire load :is the maximum permis-
sible weight for which the tire is approved.
Do not overload the tires by exceeding the
specified load limit. The maximum permissible
load can be found on the vehicle's Tire and
Loading Information placard on the B-pillar on
the driver's side (
Ypage 271).
iThe actual values for tires are vehicle-spe-
cific and may deviate from the values in the
illustration.
DOT, Tire Identification Number (TIN)
U.S. tire regulations prescribe that every man-
ufacturer of new tires or retreader has to imprint
a TIN in or on the sidewall of each tire produced.
The TIN is a unique identification number. The
TIN enables tire manufacturers to inform pur-
chasers of recalls and other safety-relevant mat-
ters. It makes it possible for the purchaser to
easily identify the affected tires.
The TIN is made up of manufacturer identifica-
tion code ;, tire size =, tire type code ?and
manufacturing date A.
DOT (Department of Transportation): tire
symbol :indicates that the tire complies with
the requirements of the U.S. Department of
Transportation.
Manufacturer identification code: manufac-
turer identification code ;provides details on
the tire manufacturer. New tires have a code
with two symbols. Retreaded tires have a code
with four symbols.
For further information about retreaded tires,
see (
Ypage 262).
Tire size: identifier=describes the tire size.
Tire type code: tire type code?can be used by
the manufacturer as a code to describe specific
characteristics of the tire.
Date of manufacture: date of manufactureA
provides information about the age of a tire. The
first and second positions represent the week of
manufacture, starting with "01" for the first cal-
endar week. Positions three and four represent
the year of manufacture. For example, a tire that
is marked with "3208", was manufactured in
week 32 in 2008.
iTire data is vehicle-specific and may deviate
from the data in the example.
278Tire labeling
Wheels and tires