2016 MERCEDES-BENZ E-SEDAN trunk release
[x] Cancel search: trunk releasePage 105 of 350
XInsert the mechanical key into the trunk lid
lock as far as it will go.
XTurn the mechanical key clockwise from
position1to position 2.
XRemove the mechanical key.
XInsert the mechanical key into the Smart-
Key.
Unlocking the trunk (Sedan)
!
The trunk lid swings upwards when
opened. Therefore, make sure that there is
sufficient clearance above the trunk lid.
If the trunk cannot be unlocked with the
SmartKey or KEYLESS-GO, use the mechani-
cal key.
If you use the mechanical key to unlock and
open the trunk lid, the anti-theft alarm system
will be triggered (
Ypage 87).
XTake the mechanical key out of the Smart-
Key (
Ypage 92).
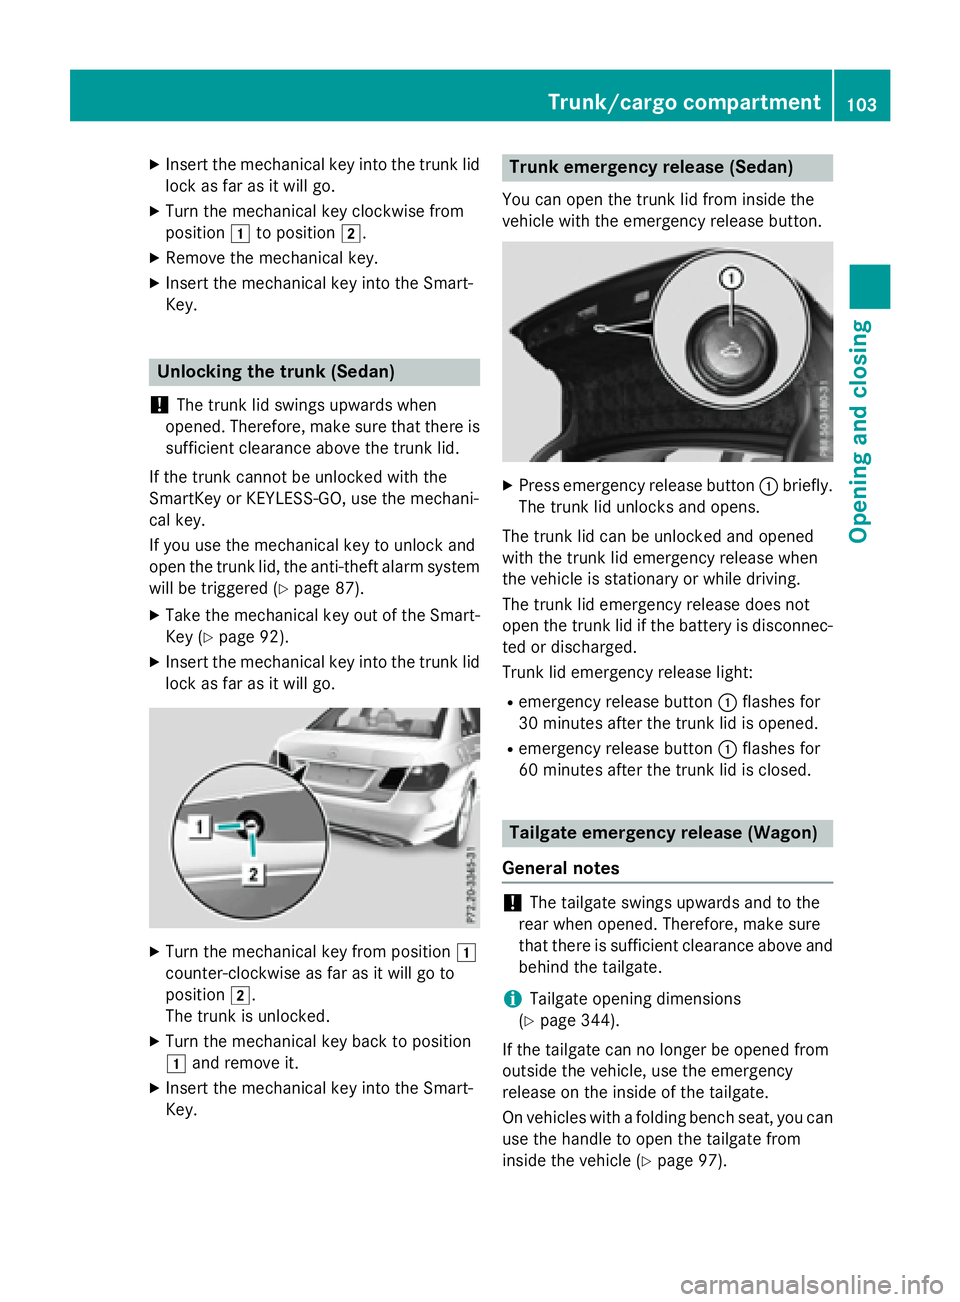
XInsert the mechanical key into the trunk lid
lock as far as it will go.
XTurn the mechanical key from position 1
counter-clockwise as far as it will go to
position 2.
The trunk is unlocked.
XTurn the mechanical key back to position
1 and remove it.
XInsert the mechanical key into the Smart-
Key.
Trunk emergency release (Sedan)
You can open the trunk lid from inside the
vehicle with the emergency release button.
XPress emergency release button :briefly.
The trunk lid unlocks and opens.
The trunk lid can be unlocked and opened
with the trunk lid emergency release when
the vehicle is stationary or while driving.
The trunk lid emergency release does not
open the trunk lid if the battery is disconnec- ted or discharged.
Trunk lid emergency release light:
Remergency release button :flashes for
30 minutes after the trunk lid is opened.
Remergency release button :flashes for
60 minutes after the trunk lid is closed.
Tailgate emergency release (Wagon)
General notes
!The tailgate swings upwards and to the
rear when opened. Therefore, make sure
that there is sufficient clearance above and
behind the tailgate.
iTailgate opening dimensions
(
Ypage 344).
If the tailgate can no longer be opened from
outside the vehicle, use the emergency
release on the inside of the tailgate.
On vehicles with a folding bench seat, you can
use the handle to open the tailgate from
inside the vehicle (
Ypage 97).
Trunk/cargo compartment103
Opening and closing
Z
Page 149 of 350
=Tire pressure table
?Instruction label for fuel type to be refu-
eled
XSwitch off the engine.
XRemove the SmartKey from the ignition
lock.
or, on vehicles with KEYLESS‑ GO:
XOpen the driver's door.
The on-board electronics now have status
0. This is the same as the SmartKey having
been removed.
The driver’s door can be closed again.
XPress the fuel filler flap in the direction of
arrow:.
The fuel filler flap opens slightly.
XOpen the fuel filler flap fully.
XTurn the fuel filler cap counterclockwise
and remove it.
XSedan: insert the fuel filler cap into the
bracket on the inside of fuel filler flap ;.
or
XWagon: insert the fuel filler cap into the
recesses in the fuel filler flap hinge arm
horizontally from above.
XCompletely insert the filler neck of the fuel pump nozzle into the tank, hook in place
and refuel.
XOnly fill the tank until the pump nozzle
switches off.
Do not add any more fuel after the pump
stops filling for the first time. Otherwise, fuel
may leak out.
Vehicles with a diesel engine: the filler neck is designed for refueling at diesel filling pumps.
Closing the fuel filler flap
XReplace the cap on the filler neck and turn
clockwise until it engages audibly.
XPress the fuel filler flap closed until it
engages audibly.
Close the fuel filler flap before locking the
vehicle. Otherwise, the locking pin of the cen- tral locking prevents the fuel filler flap from
closing.
If you are driving with the fuel filler cap open,
the
8 reserve fuel warning lamp flashes. A
message appears in the multifunction display
(
Ypage 191).
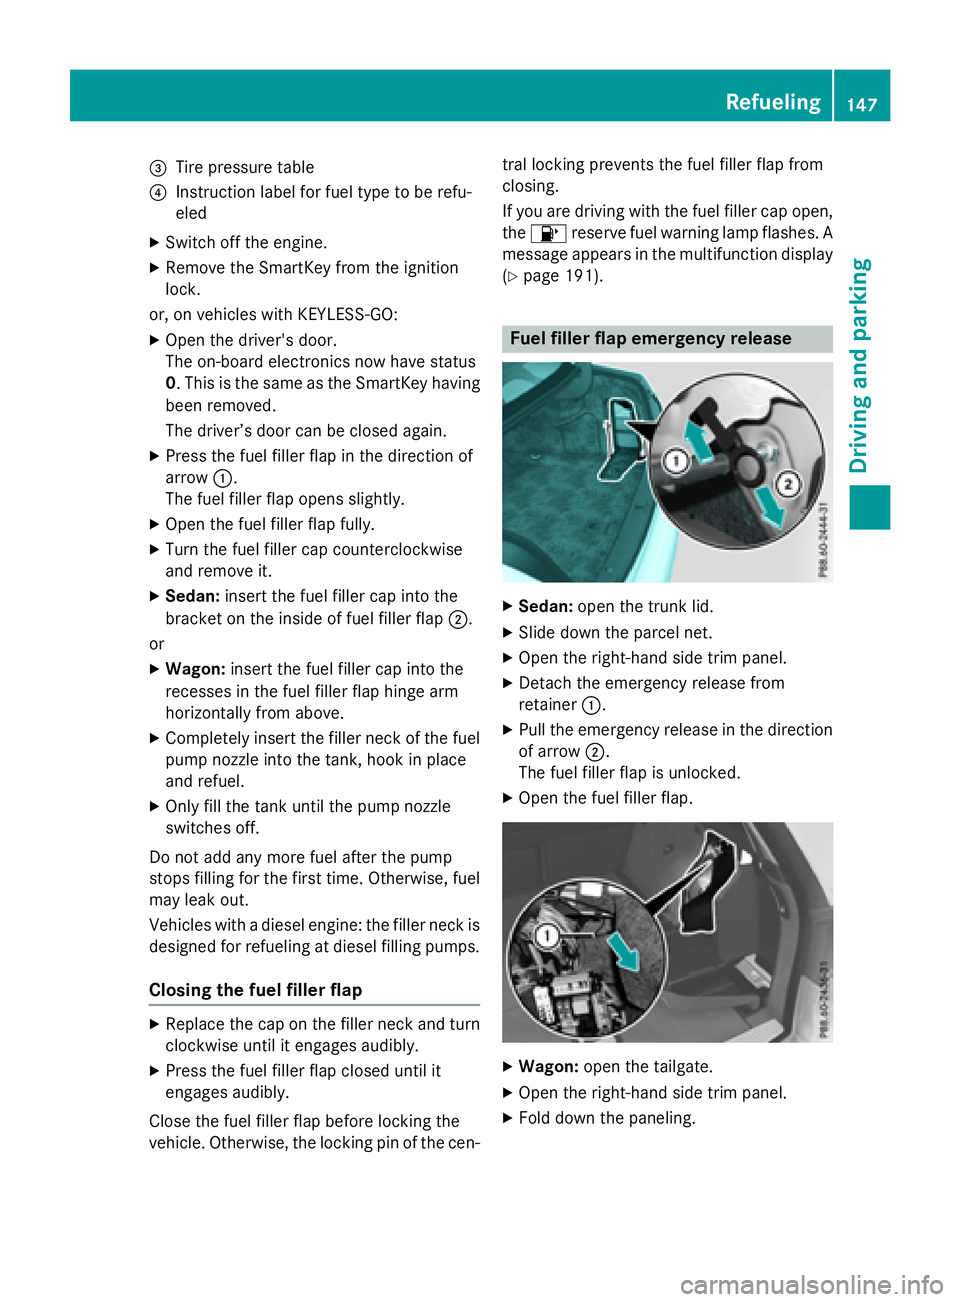
Fuel filler flap emergency release
XSedan: open the trunk lid.
XSlide down the parcel net.
XOpen the right-hand side trim panel.
XDetach the emergency release from
retainer :.
XPull the emergency release in the direction
of arrow ;.
The fuel filler flap is unlocked.
XOpen the fuel filler flap.
XWagon: open the tailgate.
XOpen the right-hand side trim panel.
XFold down the paneling.
Refueling147
Driving and parking
Z
Page 152 of 350
Important notes on topping up
DEFisa water-soluble fluid for the exhaust
gas aftertreatment of diesel engines. Itis:
Rnot pois onous
Rcolorless and odorless
Rnot flammable
When you open the DEF container, small
amounts of ammonia vapor may be released. Ammon iavapors have a pungent odor and are
particularly irr itating to the skin, to mucous
membranes and to the eyes. You may expe-
rience a burning sensation in your eyes, nose and throat. Coughing and watering of the
eyes are possible.
Do not inhale ammonia vapors. Fill the DEF
tank only in well- ventilated areas.
DEF must not come into contact with your
skin, eyes or clothing and must not beswal-
lowed. Keep DEF away from children.
If you or other persons come into contact with
DEF, observe the fol lowing:
RRinse DEF from your skin immediatelywith
soap and water.
RIf DEF comes into contact with your eyes,
immediately rinse them thoroughly with
clean water. Seek medical assistance with-
out delay.
RIf DEF has been swallowed,rinse your
mouth out immediately. Drink plenty of
water. Seek medical assistance without
delay.
RChange out of clothing contaminated with
DEF immediately.
!Only use DEF in accordance with
IS O 22241. Do not mix any additives with
DEF, and donot dilute DEF with water. This
may destroy th e B
lueTEC exhaust gas after-
treatment system.
!Rins e surfaces that have come into con-
tact with DEF immediately with water or
remove DEF using a damp cloth and co ld
water. Ifthe DEF has already crystallized,
use a sponge and co ldwater to clean it. DEF residues crystallize after time and contam-
inate the affected surfaces.
!DEF
isnot a fuel additive and must not be
added to the fuel tank. IfDEF isadded to
the fuel tank, th iscan lead to engine dam-
age.
!Only screw on the DEF ref illbottle hand-
tight. Itcould otherwise bedamaged.
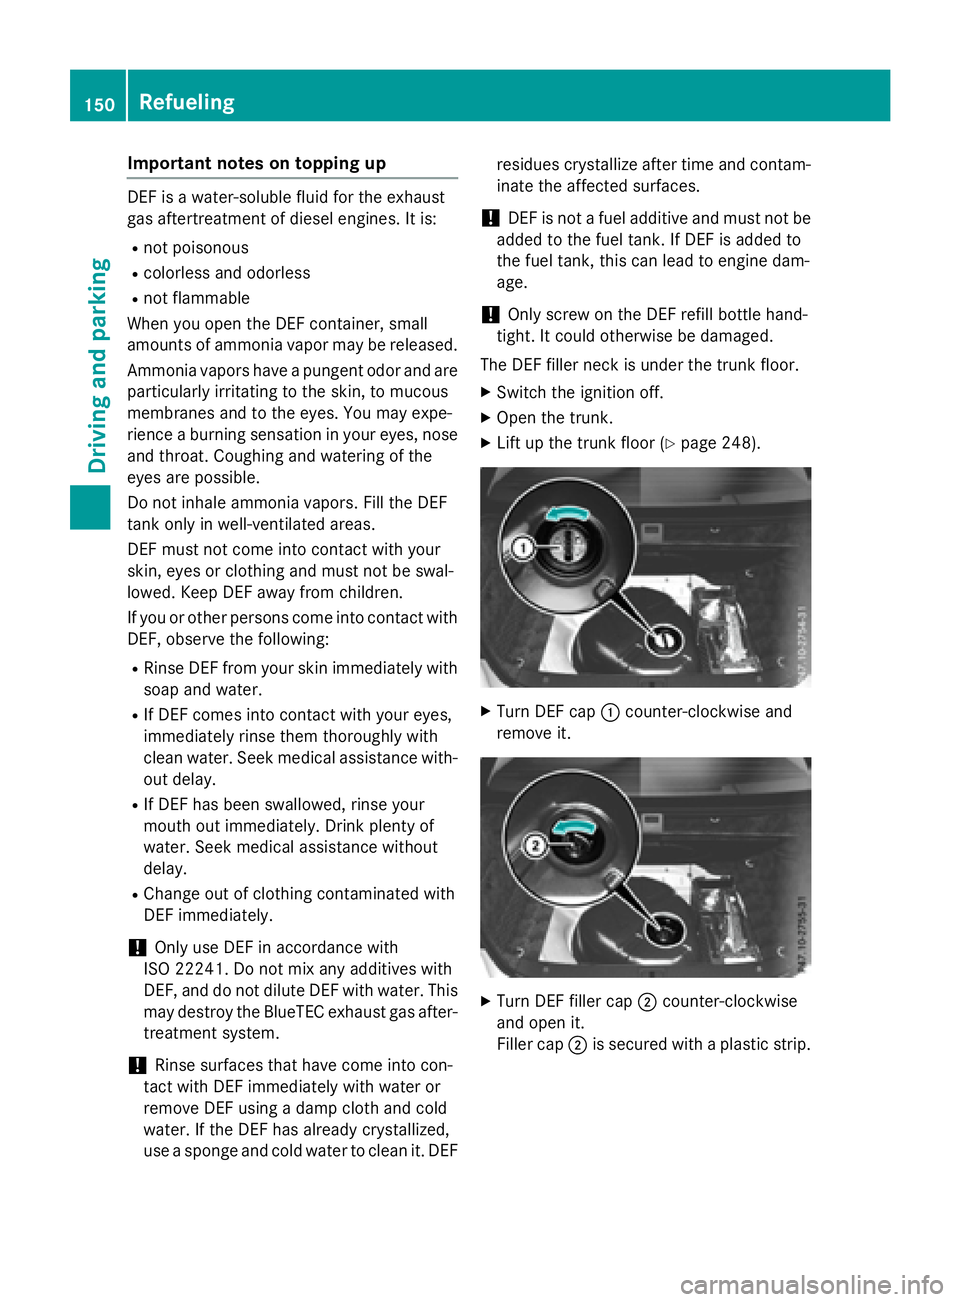
The DEF filler neck isunder the trunk floor.
XSwi tch the ignit ion off.
XOpen the trunk.
XLift up the trunk floor (Ypage 248).
XTurn DEF cap :counter-clock wiseand
remove it.
XTurn DEF filler cap ;counter-clockwise
and open it.
Filler cap ;issecured with a plastic strip.
150Refueling
Driving and parking
Page 153 of 350
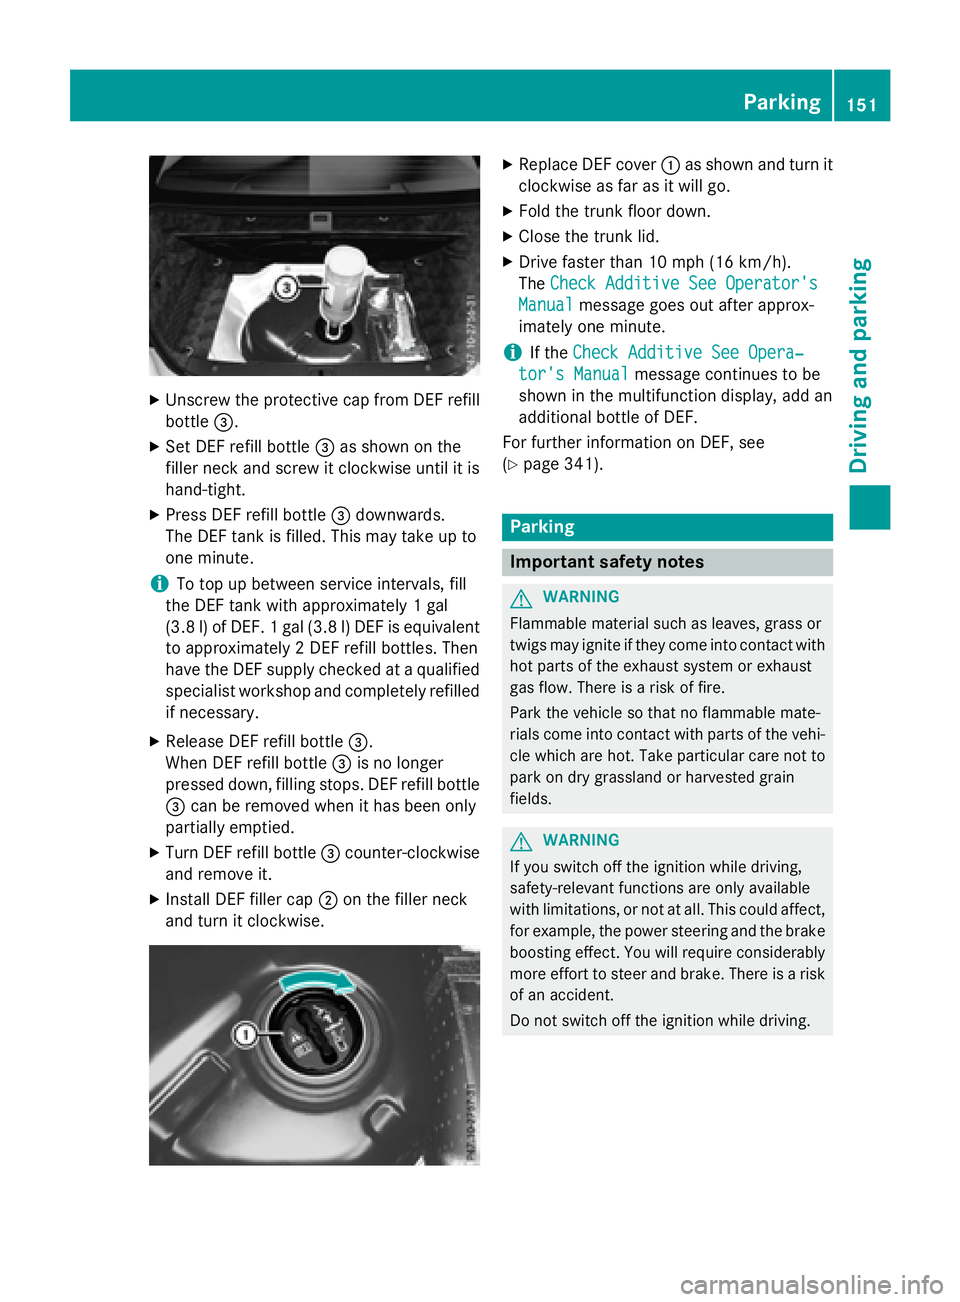
XUnscrew the protective cap from DEF refillbottle =.
XSet DEF refill bottle =as shown on the
filler neck and screw it clockwise until it is
hand-tight.
XPress DEF refill bottle =downwards.
The DEF tank is filled. This may take up to
one minute.
iTo top up between service intervals, fill
the DEF tank with approximately 1 gal
(3.8 l) of DEF. 1 gal (3.8 l)DEF is equivalent
to approximately 2 DEF refill bottles. Then
have the DEF supply checked at a qualified
specialist workshop and completely refilled
if necessary.
XRelease DEF refill bottle =.
When DEF refill bottle =is no longer
pressed down, filling stops. DEF refill bottle
= can be removed when it has been only
partially emptied.
XTurn DEF refill bottle =counter-clockwise
and remove it.
XInstall DEF filler cap ;on the filler neck
and turn it clockwise.
XReplace DEF cover :as shown and turn it
clockwise as far as it will go.
XFold the trunk floor down.
XClose the trunk lid.
XDrive faster than 10 mph (16 km/h).
The Check Additive See Operator's
Manualmessage goes out after approx-
imately one minute.
iIf the Check Additive See Opera‐
tor's Manualmessage continues to be
shown in the multifunction display, add an
additional bottle of DEF.
For further information on DEF, see
(
Ypage 341).
Parking
Important safety notes
GWARNING
Flammable material such as leaves, grass or
twigs may ignite if they come into contact with
hot parts of the exhaust system or exhaust
gas flow. There is a risk of fire.
Park the vehicle so that no flammable mate-
rials come into contact with parts of the vehi-
cle which are hot. Take particular care not to
park on dry grassland or harvested grain
fields.
GWARNING
If you switch off the ignition while driving,
safety-relevant functions are only available
with limitations, or not at all. This could affect, for example, the power steering and the brake
boosting effect. You will require considerably
more effort to steer and brake. There is a risk
of an accident.
Do not switch off the ignition while driving.
Parking151
Driving an d parking
Z
Page 241 of 350
Stowage spaces
Important safety notes
GWARNING
If objects in the passenger compartment are
stowed incorrectly, they can slide or be
thrown around and hit vehicle occupants.
There is a risk of injury, particularly in the
event of sudden braking or a sudden change
in direction.
RAlways stow objects so that they cannot be
thrown around in such situations.
RAlways make sure that objects do not pro-
trude from stowage spaces, parcel nets or
stowage nets.
RClose the lockable stowage spaces while
driving.
RAlways stow and secure heavy, hard, poin-
ted, sharp-edged, fragile or bulky objects in
the trunk/cargo compartment.
Observe the loading guidelines (Ypage 238).
Information in the Digital Operator's
Manual
In the Digital Operator's Manual you will find
information on the following topics:
RGlove box
REyeglasses compartment
RStowage compartment in the center con-
sole
RStowage compartment under the armrest
RStowage compartment under the front
seats
RStowage compartment in the rear
RStowage net in the rear
Stowage nets
Stowage nets are located in the front-
passenger footwell and on the left-hand side
of the trunk/cargo compartment. Observe the loading guidelines (
Ypage 238)
and the safety notes regarding stowage
spaces (
Ypage 239).
Through-loading facility in the rear
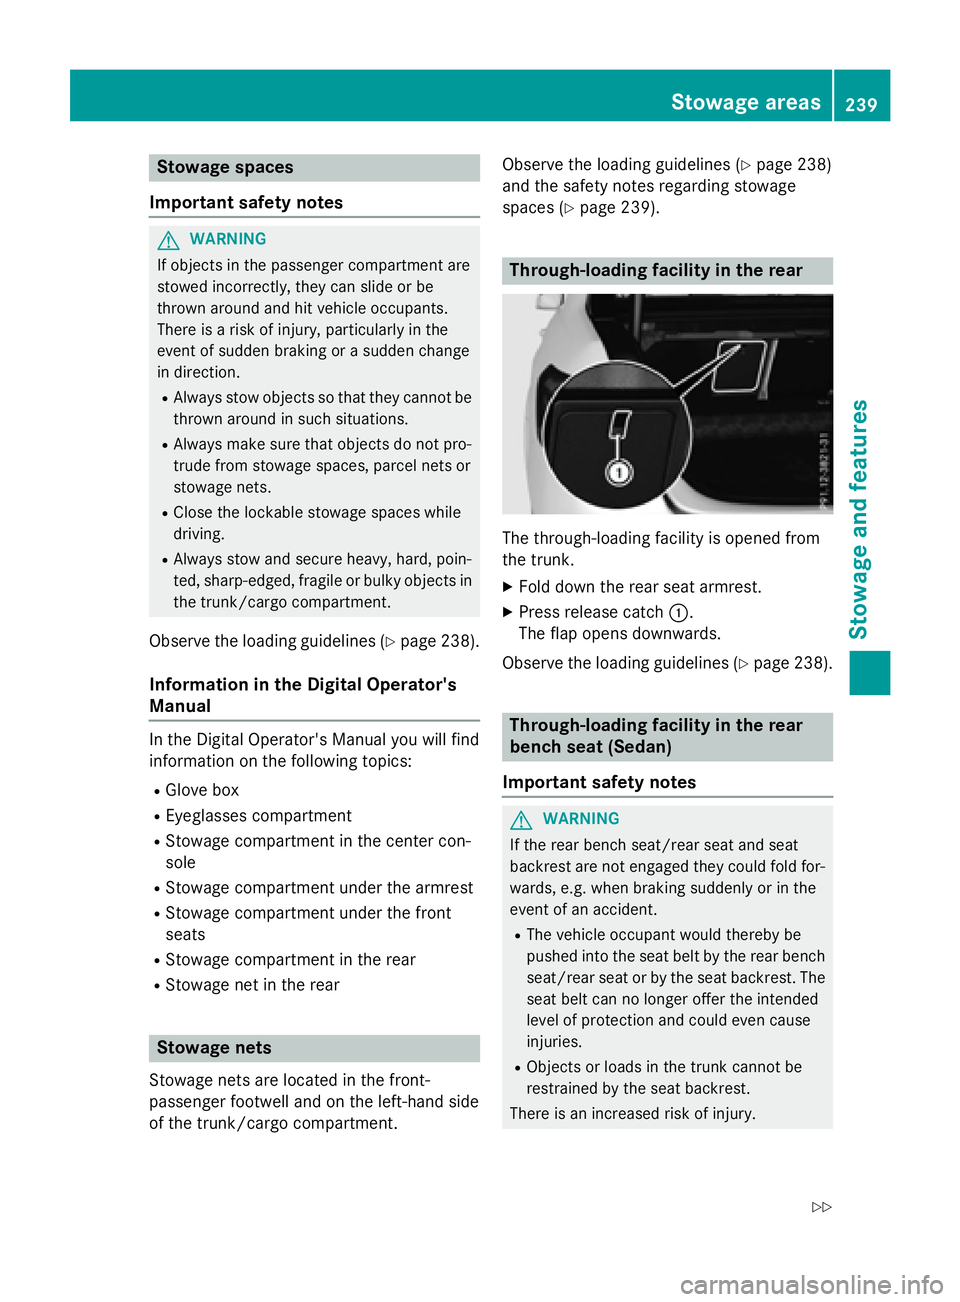
The through-loading facility is opened from
the trunk.
XFold down the rear seat armrest.
XPress release catch :.
The flap opens downwards.
Observe the loading guidelines (
Ypage 238).
Through-loading facility in the rear
bench seat (Sedan)
Important safety notes
GWARNING
If the rear bench seat/rear seat and seat
backrest are not engaged they could fold for-
wards, e.g. when braking suddenly or in the
event of an accident.
RThe vehicle occupant would thereby be
pushed into the seat belt by the rear bench
seat/rear seat or by the seat backrest. The
seat belt can no longer offer the intended
level of protection and could even cause
injuries.
RObjects or loads in the trunk cannot be
restrained by the seat backrest.
There is an increased risk of injury.
Stowage areas239
Stowage and features
Z
Page 242 of 350
Before every trip, make sure that the seat
backrests and the rear bench seat/rear seat
are engaged.
Observe the loading guidelines (Ypage 238).
The left-hand and right-hand rear seat backr-
ests can be folded down separately to
increase the trunk capacity.
Folding the seat backrest forward
iVehicles with memory function: when you
fold one or both parts of the rear seat back-
rest forwards, the respective front seat
moves forward slightly, when necessary, in
order to avoid contact.
XVehicles without memory function: if nec-
essary, move the driver's or front-
passenger seat forward.
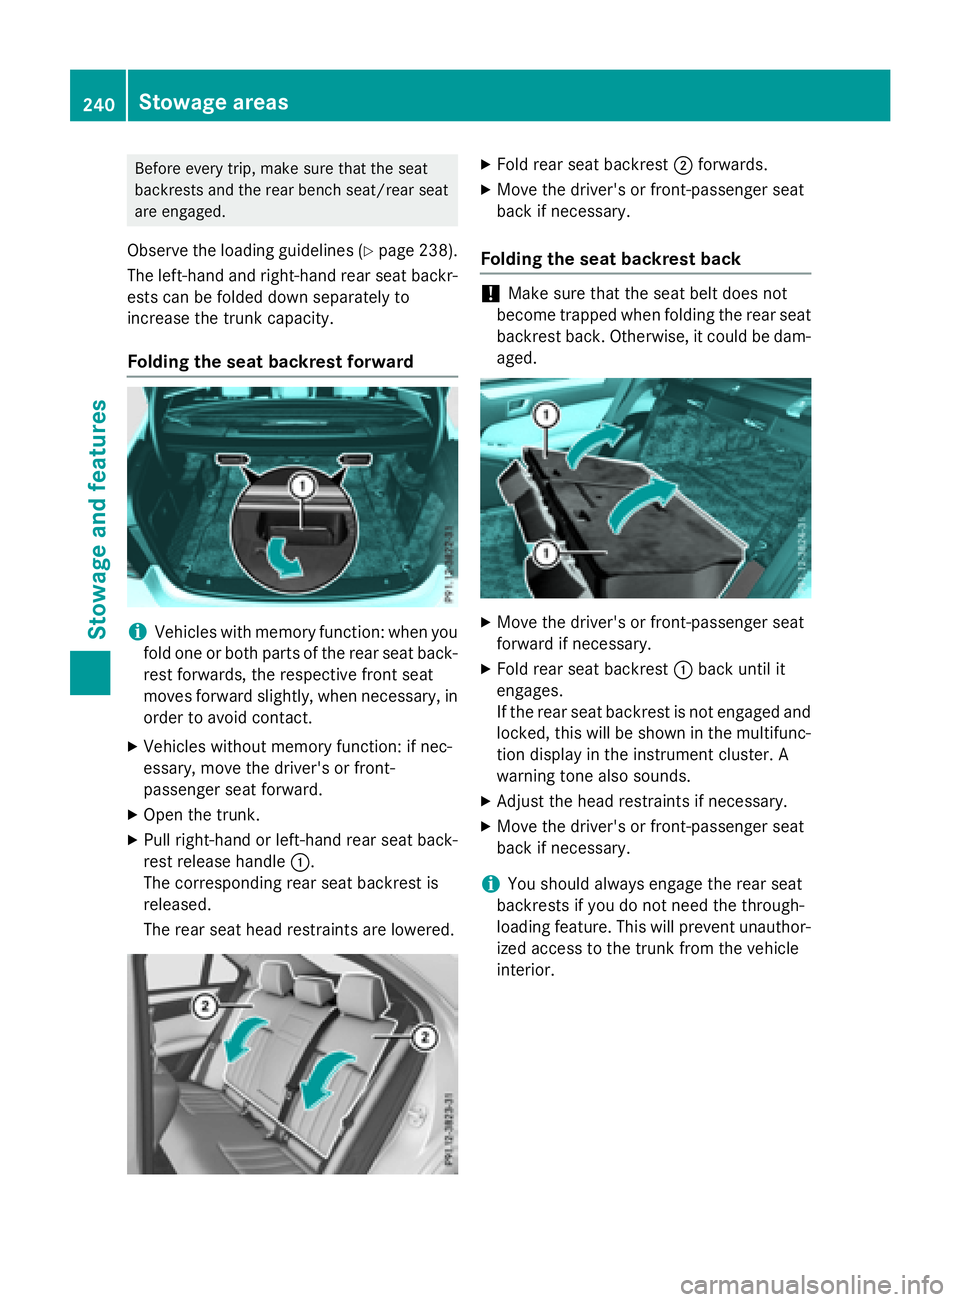
XOpen the trunk.
XPull right-hand or left-hand rear seat back-
rest release handle :.
The corresponding rear seat backrest is
released.
The rear seat head restraints are lowered.
XFold rear seat backrest ;forwards.
XMove the driver's or front-passenger seat
back if necessary.
Folding the seat backrest back
!Make sure that the seat belt does not
become trapped when folding the rear seat
backrest back. Otherwise, it could be dam-
aged.
XMove the driver's or front-passenger seat
forward if necessary.
XFold rear seat backrest :back until it
engages.
If the rear seat backrest is not engaged and
locked, this will be shown in the multifunc-
tion display in the instrument cluster. A
warning tone also sounds.
XAdjust the head restraints if necessary.
XMove the driver's or front-passenger seat
back if necessary.
iYou should always engage the rear seat
backrests if you do not need the through-
loading feature. This will prevent unauthor-
ized access to the trunk from the vehicle
interior.
240Stowage areas
Stowage and features
Page 243 of 350
EASY-PACK through-loading facility in
the rear bench seat (Wagon)
Important safety notes
GWARNING
If the rear bench seat/rear seat and seat
backrest are not engaged they could fold for-
wards, e.g. when braking suddenly or in the
event of an accident.
RThe vehicle occupant would thereby be
pushed into the seat belt by the rear bench
seat/rear seat or by the seat backrest. The
seat belt can no longer offer the intended
level of protection and could even cause
injuries.
RObjects or loads in the trunk/cargo com-
partment cannot be restrained by the seat
backrest.
There is an increased risk of injury.
Before every trip, make sure that the seat
backrests and the rear bench seat/rear seat
are engaged.
Observe the loading guidelines (Ypage 238).
Folding the rear seat backrests forward
!When folding the rear seat backrest for-
wards, ensure that there are no items lying
on the seat cushions. These items could
otherwise be damaged or could themselves
damage the rear seats.
The left-hand and right-hand rear seat backr-
ests can be folded forwards separately to
increase the cargo compartment capacity.
The combined cargo cover and net can
remain installed.
iWhen you fold one or both parts of the
rear seat backrests forwards, the headr-
ests are also lowered if necessary. In the
case of vehicles with memory function, the
respective front seat is moved forwards
slightly to avoid contact with the seat
behind it.
XVehicles without memory function: if nec-
essary, move the driver's or front-
passenger seat forward.
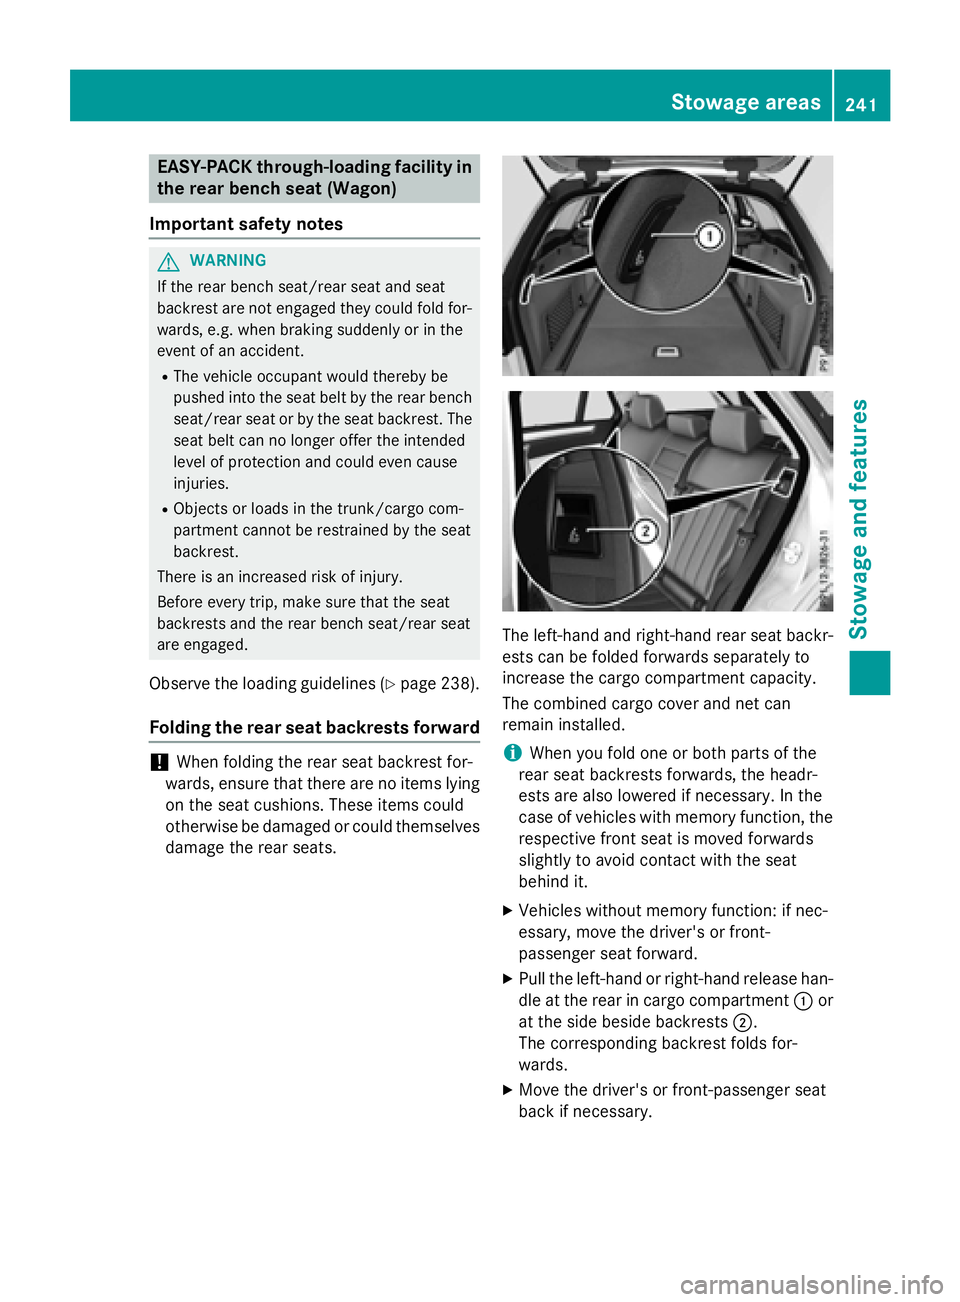
XPull the left-hand or right-hand release han-
dle at the rear in cargo compartment :or
at the side beside backrests ;.
The corresponding backrest folds for-
wards.
XMove the driver's or front-passenger seat
back if necessary.
Stowage areas241
Stowage and features
Z
Page 250 of 350
Telescopic rod
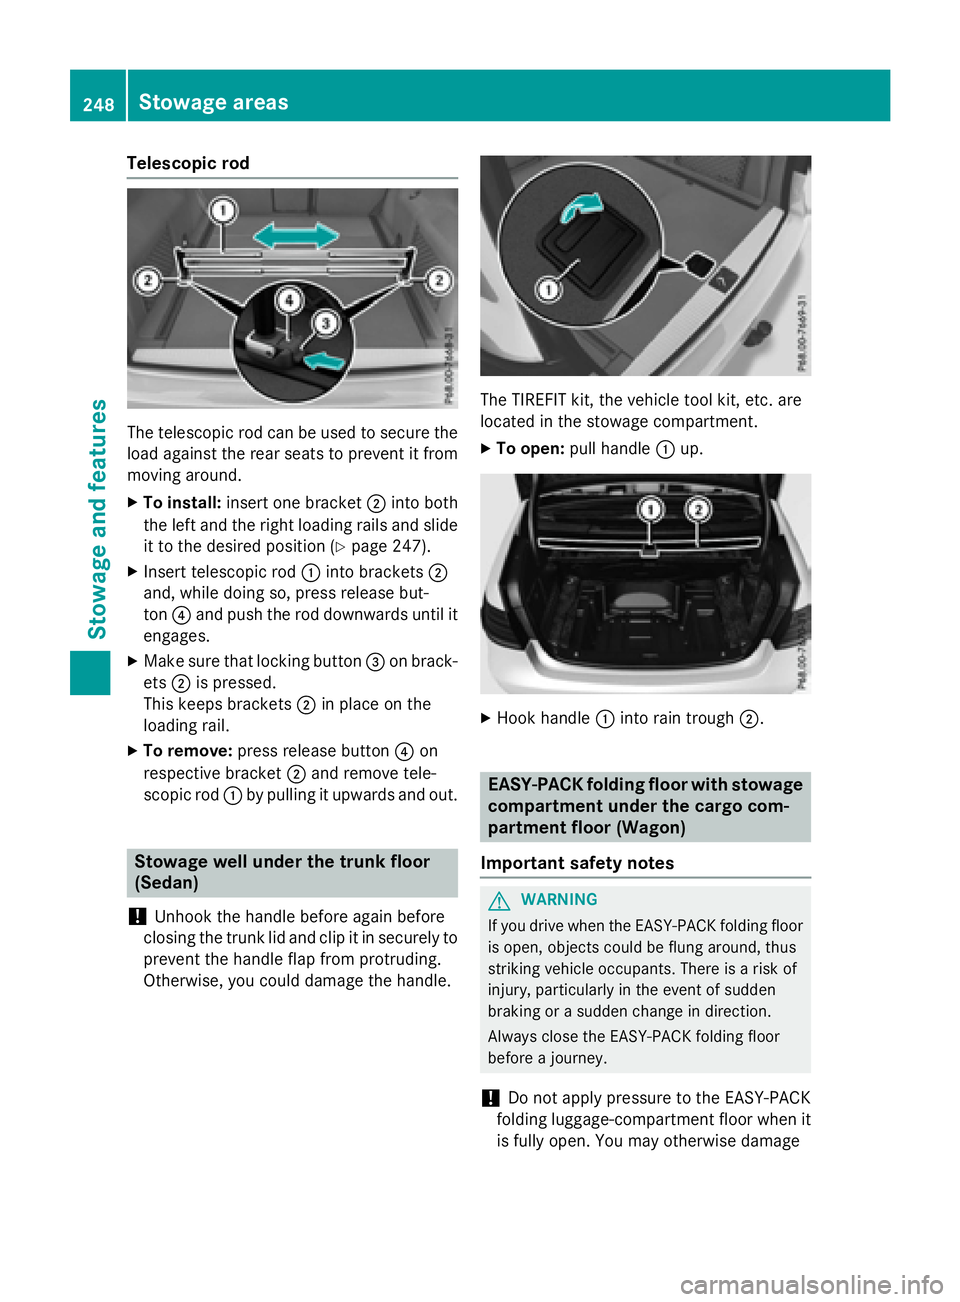
The telescopic rod can be used to secure the
load against the rear seats to prevent it from
moving around.
XTo install:insert one bracket ;into both
the left and the right loading rails and slide
it to the desired position (
Ypage 247).
XInsert telescopic rod :into brackets ;
and, while doing so, press release but-
ton ?and push the rod downwards until it
engages.
XMake sure that locking button =on brack-
ets ;is pressed.
This keeps brackets ;in place on the
loading rail.
XTo remove: press release button ?on
respective bracket ;and remove tele-
scopic rod :by pulling it upwards and out.
Stowage well under the trunk floor
(Sedan)
!
Unhook the handle before again before
closing the trunk lid and clip it in securely to
prevent the handle flap from protruding.
Otherwise, you could damage the handle.
The TIREFIT kit, the vehicle tool kit, etc. are
located in the stowage compartment.
XTo open: pull handle :up.
XHook handle :into rain trough ;.
EASY-PACK folding floor with stowage
compartment under the cargo com-
partment floor (Wagon)
Important safety notes
GWARNING
If you drive when the EASY-PACK folding floor is open, objects could be flung around, thus
striking vehicle occupants. There is a risk of
injury, particularly in the event of sudden
braking or a sudden change in direction.
Always close the EASY-PACK folding floor
before a journey.
!Do not apply pressure to the EASY-PACK
folding luggage-compartment floor when it
is fully open. You may otherwise damage
248Stowag eareas
Stowag ean d features