2016 MERCEDES-BENZ E-SEDAN light
[x] Cancel search: lightPage 233 of 350
the confirmation on the mobile phone (see
the manufacturer's operating instructions).The mobile phone is now authorized and
connected to Audio 20/COMAND. You can
now speak using the hands-free system.
The code is different
XAudio 20/COMAND: selectNo.
The process is canceled. Repeat the pro-
cedure.
If your mobile phone does not support Secure
Simple Pairing, you can find more information
about connecting the mobile phone in the
Digital Operator's Manual.
Reconnecting automatically
Audio 20/COMAND always searches for the
last connected mobile phone.
If no connection can be made to the most
recently connected mobile phone, the system
searches for the mobile phone that was con-
nected before that one.
Switching between mobile phones
If you have authorized more than one mobile
phone, you can switch between the individual
phones.
XTo call up the telephone menu: press the
% button.
XTo show the menu bar: slide 6the con-
troller.
XTo select Connect Device: turn the con-
troller and press to confirm.
The device list is displayed.
XTo select the desired mobile phone: turn
and press the controller.
The selected mobile phone is searched for
and connected if it is within Bluetooth
®
range and if Bluetooth®is activated.
Only one mobile phone can be connected at
any one time. The currently connected mobile
phone is indicated by the #dot in the device
list.
iYou can only switch to another authorized
mobile phone if you are not currently mak- ing a call.
De-authorizing (disconnecting) a mobile
phone
Mercedes-Benz USA, LLC recommends De-
authorization in Audio 20/COMAND and on
the mobile phone. Subsequent authorization
may otherwise fail.
XTo call up the telephone menu: press the
% button.
XTo show the menu bar: slide 6the con-
troller.
XTo select Connect Device: turn the con-
troller and press to confirm.
XTo highlight the desired mobile phone in the
device list: turn the controller.
XTo select G: slide 9the controller.
XTo select Deauthorize: turn and press the
controller.
A prompt appears, asking whether you
really wish to de-authorize this device.
XTo select Yes: turn and press the controller.
The mobile phone is de-authorized.
iBefore re-authorizing the mobile phone,
you should also delete the device name MB
Bluetoothfrom your mobile phone's Blue-
tooth®list.
Using the telephone
Accepting a call
XTo select Accept: press the controller.
or
XPress 6on the multifunction steering
wheel.
The call is accepted.
Further information on the functions you can
use during a call can be found in the Digital
Operator's Manual.
Audio 20/COMAND operating system231
Audio 20/COMAND
Z
Page 234 of 350
iYou can also accept the call by voice com-
mand using the Voice Control System (see
the separate operating instructions).
iIf the phone number of the caller is trans-
ferred, it appears in the display. If the
phone number is saved in the phone book,
the contact's name is also displayed. If the phone number is not transferred,
Unknown
is shown in the display.
Rejecting a call
XTo select Reject: turn the controller and
press to confirm.
or
XPress ~on the multifunction steering
wheel.
Ending an active call
XTo select =in the telephone menu: turn
and press the controller.
or
XPress ~on the multifunction steering
wheel.
The active call is ended.
Making a call
Using the telephone menu
XTo call up the telephone menu: press the
% button.
XTo select all numbers one after the other in
the telephone menu: turn and press the
controller each time.
XTo select win the telephone menu: turn
and press the controller.
The call is made.
Using call lists
XTo call up the telephone menu: press the
% button.
XTo switch to the menu bar: slide 6the
controller.
XTo select Call Lists: turn and press the
controller.
XTo select Calls ReceivedorCalls
Dialed: turn and press the controller.
The relevant list is displayed.
XTo select an entry and make a call: turn and
press the controller.
Using the phone book
XTo call up the telephone menu: press the
% button.
XTo select Namein the telephone menu: turn
and press the controller.
The phone book is displayed with an active
character bar.
XTo select characters: turn the controller
and press to confirm.
The first contact with the selected first
character is highlighted in the phone book.
XSelect the characters of the contact you are
searching for one by one, pressing and con- firming with the controller each time.
XTo end the search: select ¬.
The contacts in the phone book are dis-
played.
XTo select a contact: turn and press the con-
troller.
If a contact contains more than one phone
number:
XTo select a telephone number: turn and
press the controller.
Further information on the phone book can be
found in the Digital Operator's Manual.
Setting up an Internet connection
Procedure and general information
USA: to use Mercedes-Benz Apps and Inter-
net access, mbrace must be activated and
operational. Furthermore, mbrace must be
activated for Mercedes-Benz Apps and Inter-
net access. No further settings are required.
Canada: in order to set up a mobile phone for
Internet access, your mobile phone must be
connected via Bluetooth
®to Audio 20/
COMAND. If you are using Internet access for
232Audio 20/COMAND operating system
Audio 20/COMAND
Page 242 of 350
Before every trip, make sure that the seat
backrests and the rear bench seat/rear seat
are engaged.
Observe the loading guidelines (Ypage 238).
The left-hand and right-hand rear seat backr-
ests can be folded down separately to
increase the trunk capacity.
Folding the seat backrest forward
iVehicles with memory function: when you
fold one or both parts of the rear seat back-
rest forwards, the respective front seat
moves forward slightly, when necessary, in
order to avoid contact.
XVehicles without memory function: if nec-
essary, move the driver's or front-
passenger seat forward.
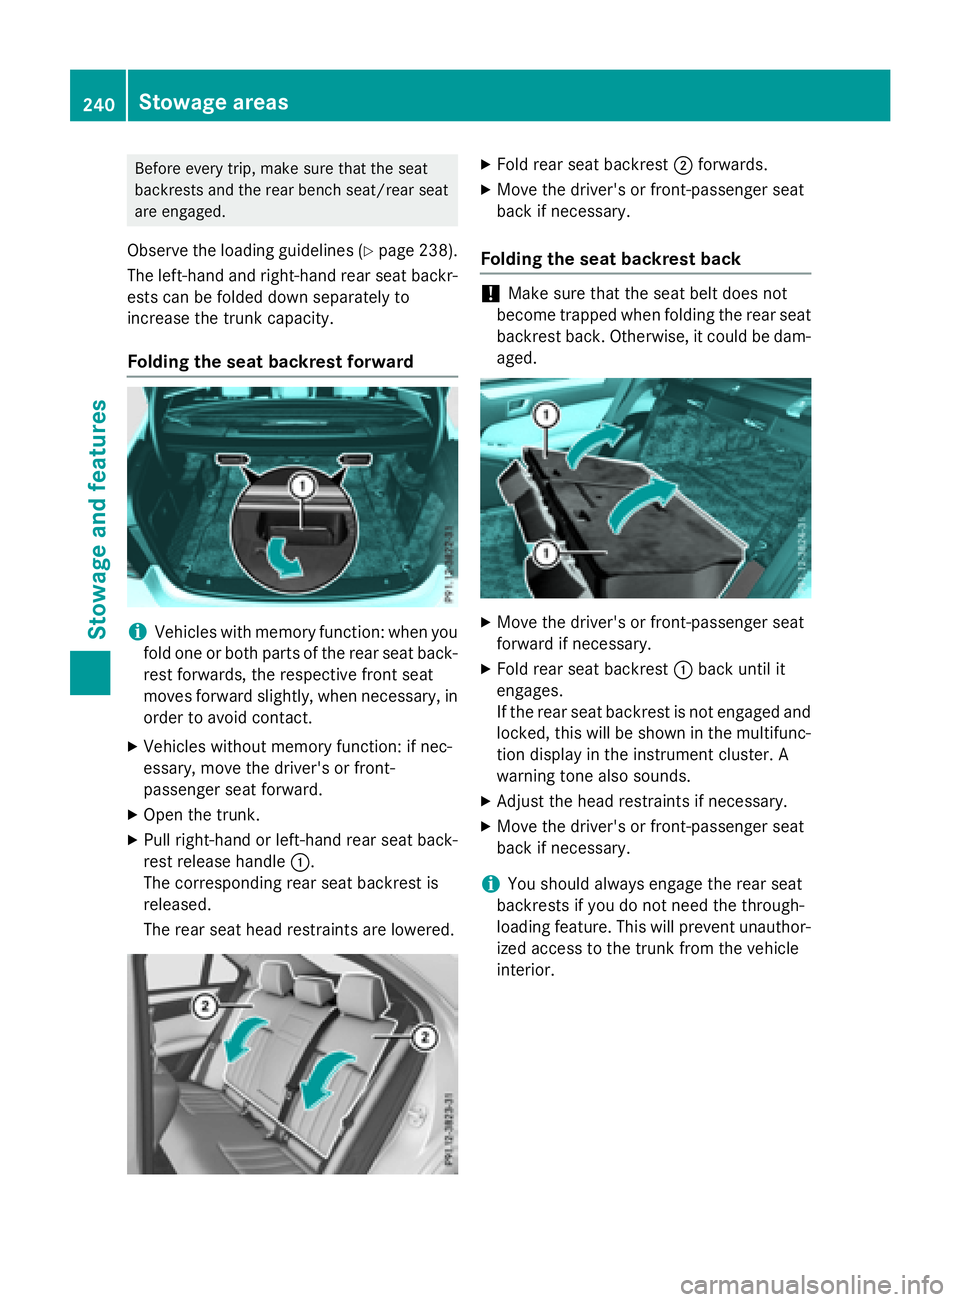
XOpen the trunk.
XPull right-hand or left-hand rear seat back-
rest release handle :.
The corresponding rear seat backrest is
released.
The rear seat head restraints are lowered.
XFold rear seat backrest ;forwards.
XMove the driver's or front-passenger seat
back if necessary.
Folding the seat backrest back
!Make sure that the seat belt does not
become trapped when folding the rear seat
backrest back. Otherwise, it could be dam-
aged.
XMove the driver's or front-passenger seat
forward if necessary.
XFold rear seat backrest :back until it
engages.
If the rear seat backrest is not engaged and
locked, this will be shown in the multifunc-
tion display in the instrument cluster. A
warning tone also sounds.
XAdjust the head restraints if necessary.
XMove the driver's or front-passenger seat
back if necessary.
iYou should always engage the rear seat
backrests if you do not need the through-
loading feature. This will prevent unauthor-
ized access to the trunk from the vehicle
interior.
240Stowage areas
Stowage and features
Page 243 of 350
EASY-PACK through-loading facility in
the rear bench seat (Wagon)
Important safety notes
GWARNING
If the rear bench seat/rear seat and seat
backrest are not engaged they could fold for-
wards, e.g. when braking suddenly or in the
event of an accident.
RThe vehicle occupant would thereby be
pushed into the seat belt by the rear bench
seat/rear seat or by the seat backrest. The
seat belt can no longer offer the intended
level of protection and could even cause
injuries.
RObjects or loads in the trunk/cargo com-
partment cannot be restrained by the seat
backrest.
There is an increased risk of injury.
Before every trip, make sure that the seat
backrests and the rear bench seat/rear seat
are engaged.
Observe the loading guidelines (Ypage 238).
Folding the rear seat backrests forward
!When folding the rear seat backrest for-
wards, ensure that there are no items lying
on the seat cushions. These items could
otherwise be damaged or could themselves
damage the rear seats.
The left-hand and right-hand rear seat backr-
ests can be folded forwards separately to
increase the cargo compartment capacity.
The combined cargo cover and net can
remain installed.
iWhen you fold one or both parts of the
rear seat backrests forwards, the headr-
ests are also lowered if necessary. In the
case of vehicles with memory function, the
respective front seat is moved forwards
slightly to avoid contact with the seat
behind it.
XVehicles without memory function: if nec-
essary, move the driver's or front-
passenger seat forward.
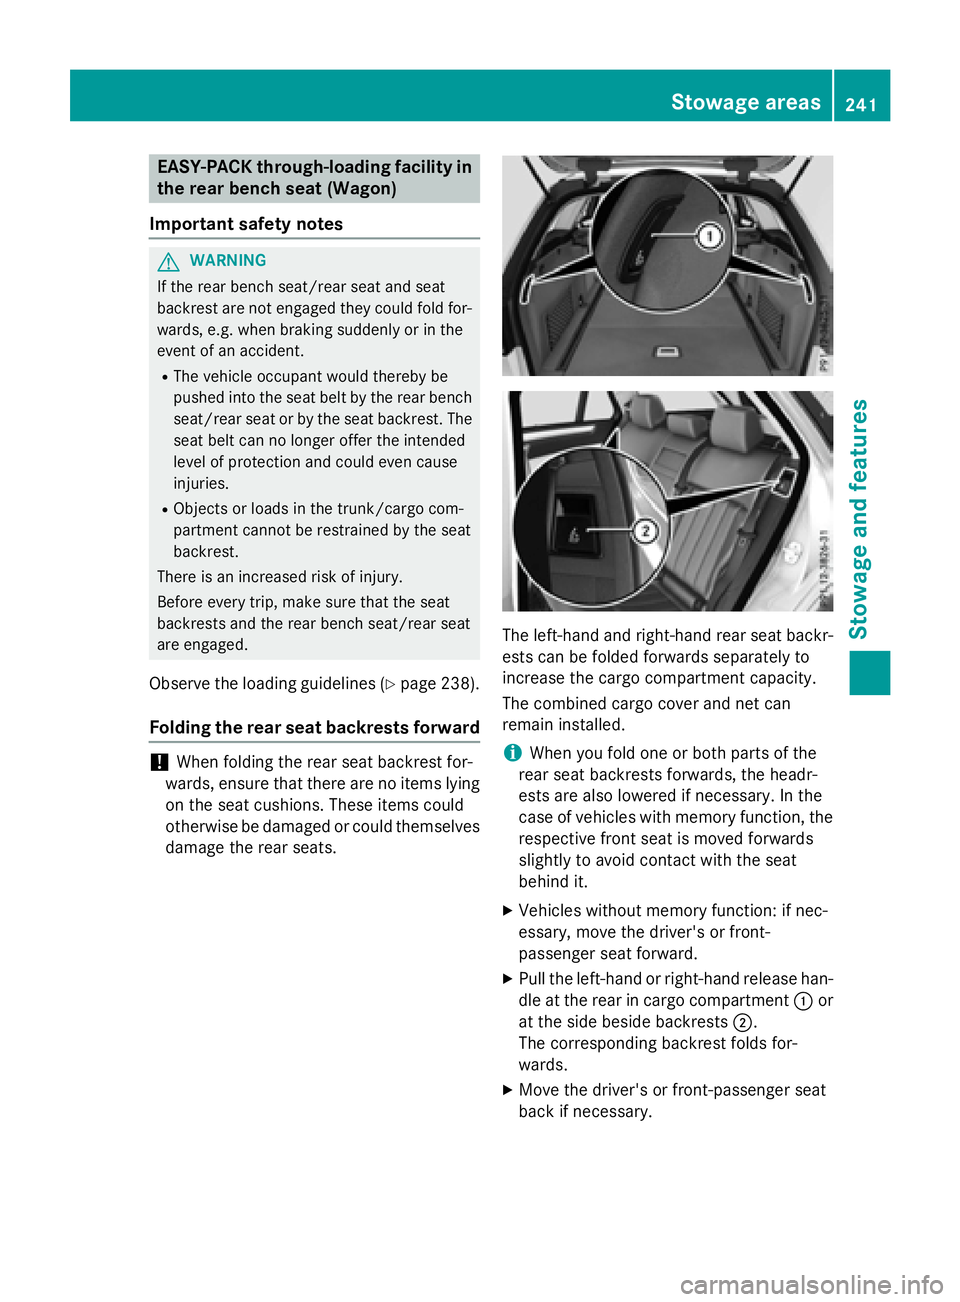
XPull the left-hand or right-hand release han-
dle at the rear in cargo compartment :or
at the side beside backrests ;.
The corresponding backrest folds for-
wards.
XMove the driver's or front-passenger seat
back if necessary.
Stowage areas241
Stowage and features
Z
Page 244 of 350
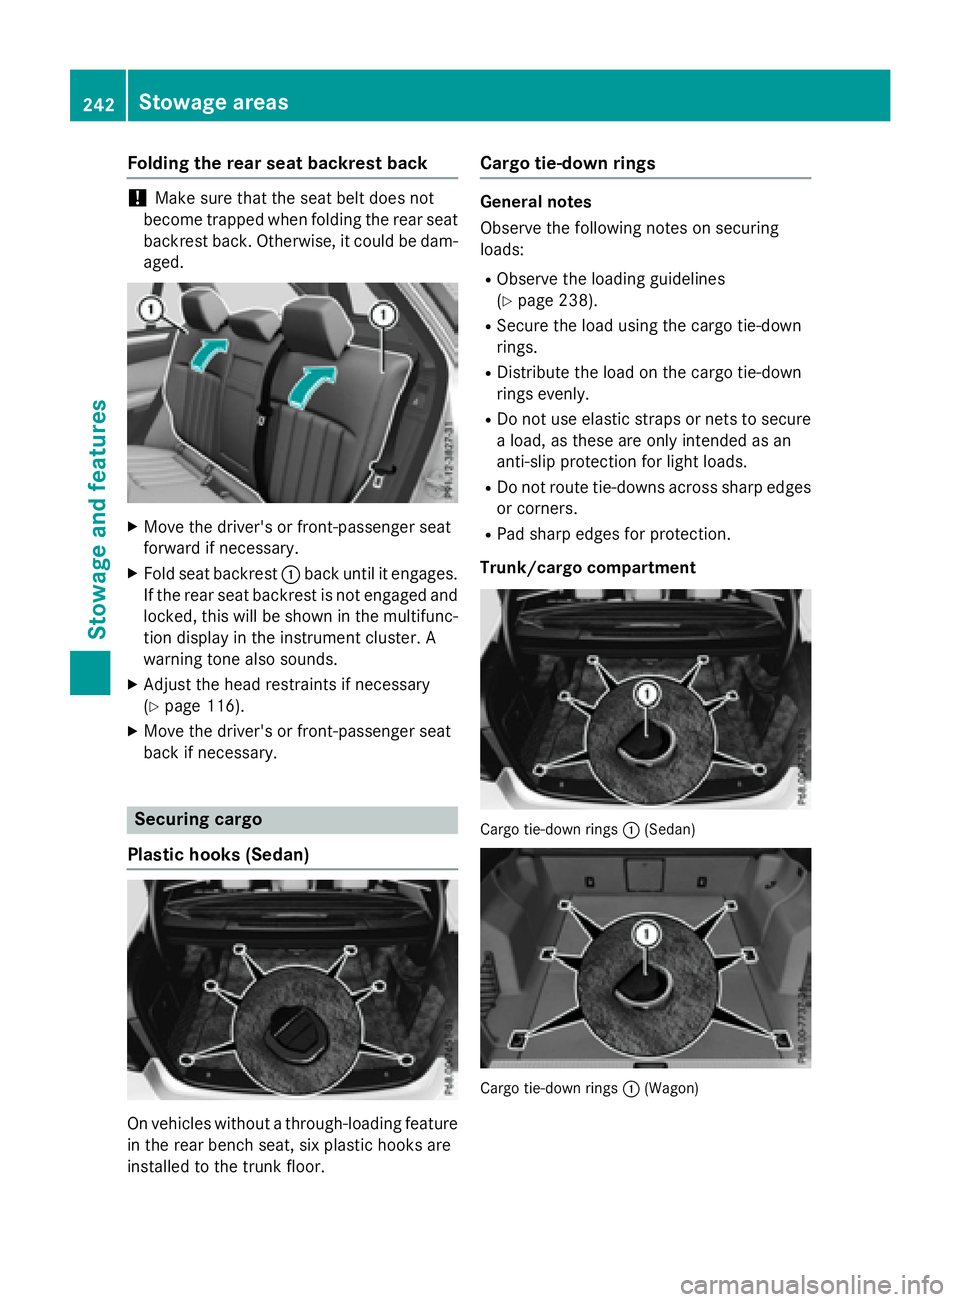
Folding the rear seat backrest back
!Make sure that the seat belt does not
become trapped when folding the rear seat
backrest back. Otherwise, itcould be dam-
aged.
XMove the driver's or front-passenger seat
forward ifnecessary.
XFo ldseat backrest :back until it engages.
If the rear seat backrest isnot engaged and
locke d,this will be shown in the multifunc-
tion displayinthe instrument cluster. A
warning tone also sounds.
XAdjust the head restraints ifnecessary
(
Ypage 116).
XMove the driver's or front-passenger seat
back ifnecessary.
Securing cargo
Plastic hooks (Sedan)
On vehicles without a through-loadin g feature
in the rear bench seat, six plastic hooks are
installed to the trunk floor.
Cargo tie-down rings
General notes
Observe the fol lowing notes on securing
loads:
RObserve the loading guidelines
(
Ypage 238).
RSe cure the load using the cargo tie-down
rings.
RDistribute the load on the cargo tie-down
rings evenly.
RDo not use elastic straps or nets to secure
a load, as these are only intended as an
anti-s lipprotection for light loads.
RDo not route tie-down s across sharp edges
or corners.
RPad sharp edges for protection.
Trunk/cargo compar tment
Carg otie-down rings :(Sedan )
Cargotie-down rings :(Wagon)
242Stowage areas
Stowage and features
Page 249 of 350
of purposes. The accessory parts are located
under the cargo compartment floor.
XOpen the EASY-PACK folding luggage-com-
partment floor (
Ypage 249).
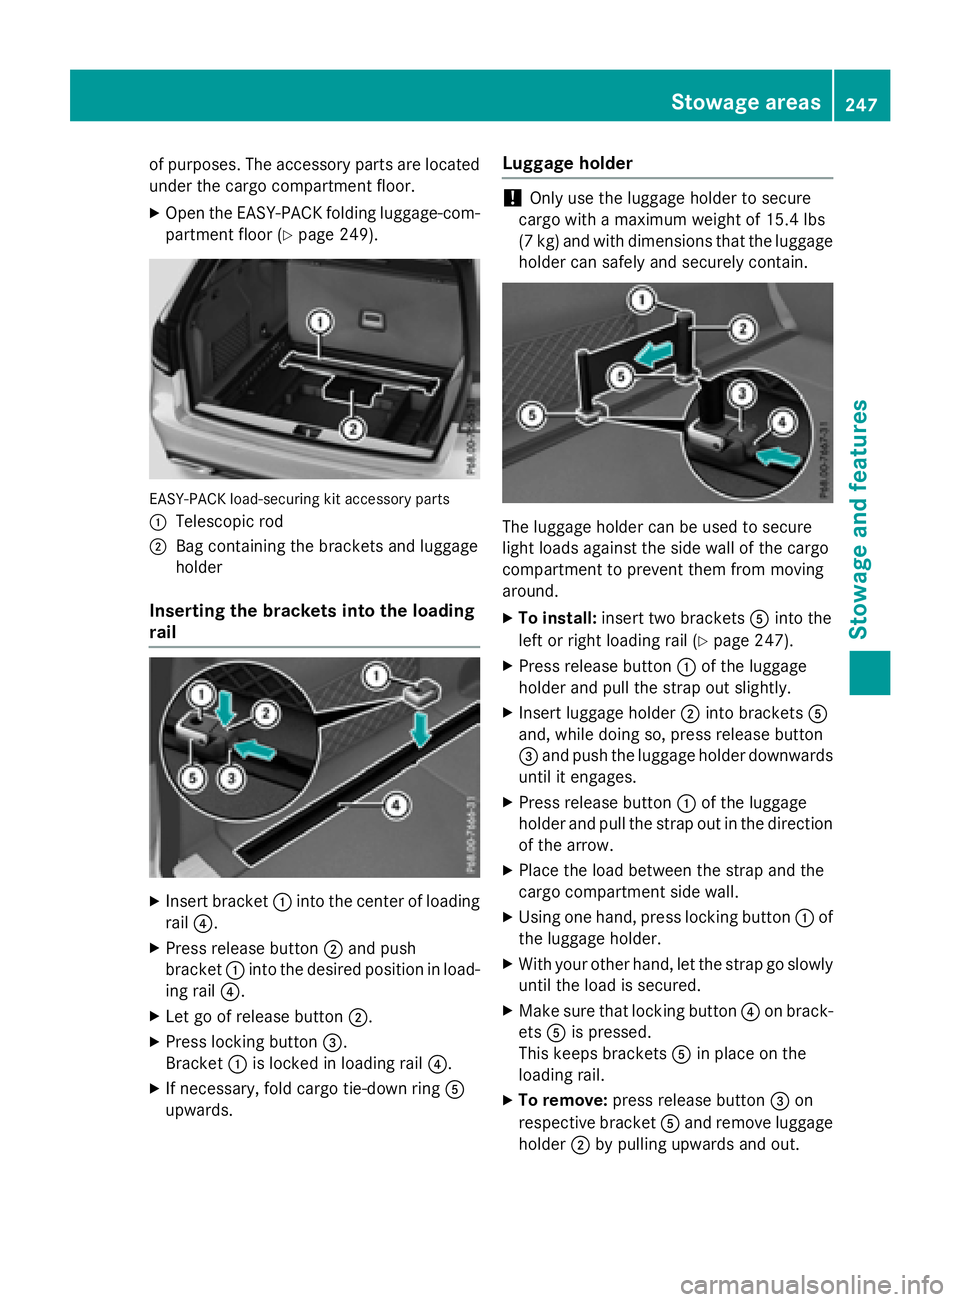
EASY-PACK load-securing kit accessory parts
:
Telescopic rod
;Bag containing the brackets and luggage
holder
Inserting the brackets into the loading
rail
XInsert bracket:into the center of loading
rail ?.
XPress release button ;and push
bracket :into the desired position in load-
ing rail ?.
XLet go of release button ;.
XPress locking button=.
Bracket :is locked in loading rail ?.
XIf necessary, fold cargo tie-down ring A
upwards.
Luggage holder
!Only use the luggage holder to secure
cargo with a maximum weight of 15.4 lbs
(7 kg) and with dimensions that the luggage
holder can safely and securely contain.
The luggage holder can be used to secure
light loads against the side wall of the cargo
compartment to prevent them from moving
around.
XTo install: insert two brackets Ainto the
left or right loading rail (
Ypage 247).
XPress release button :of the luggage
holder and pull the strap out slightly.
XInsert luggage holder ;into brackets A
and, while doing so, press release button
= and push the luggage holder downwards
until it engages.
XPress release button :of the luggage
holder and pull the strap out in the direction
of the arrow.
XPlace the load between the strap and the
cargo compartment side wall.
XUsing one hand, press locking button :of
the luggage holder.
XWith your other hand, let the strap go slowly
until the load is secured.
XMake sure that locking button ?on brack-
ets Ais pressed.
This keeps brackets Ain place on the
loading rail.
XTo remove: press release button =on
respective bracket Aand remove luggage
holder ;by pulling upwards and out.
Stowage areas247
Stowage and features
Z
Page 253 of 350
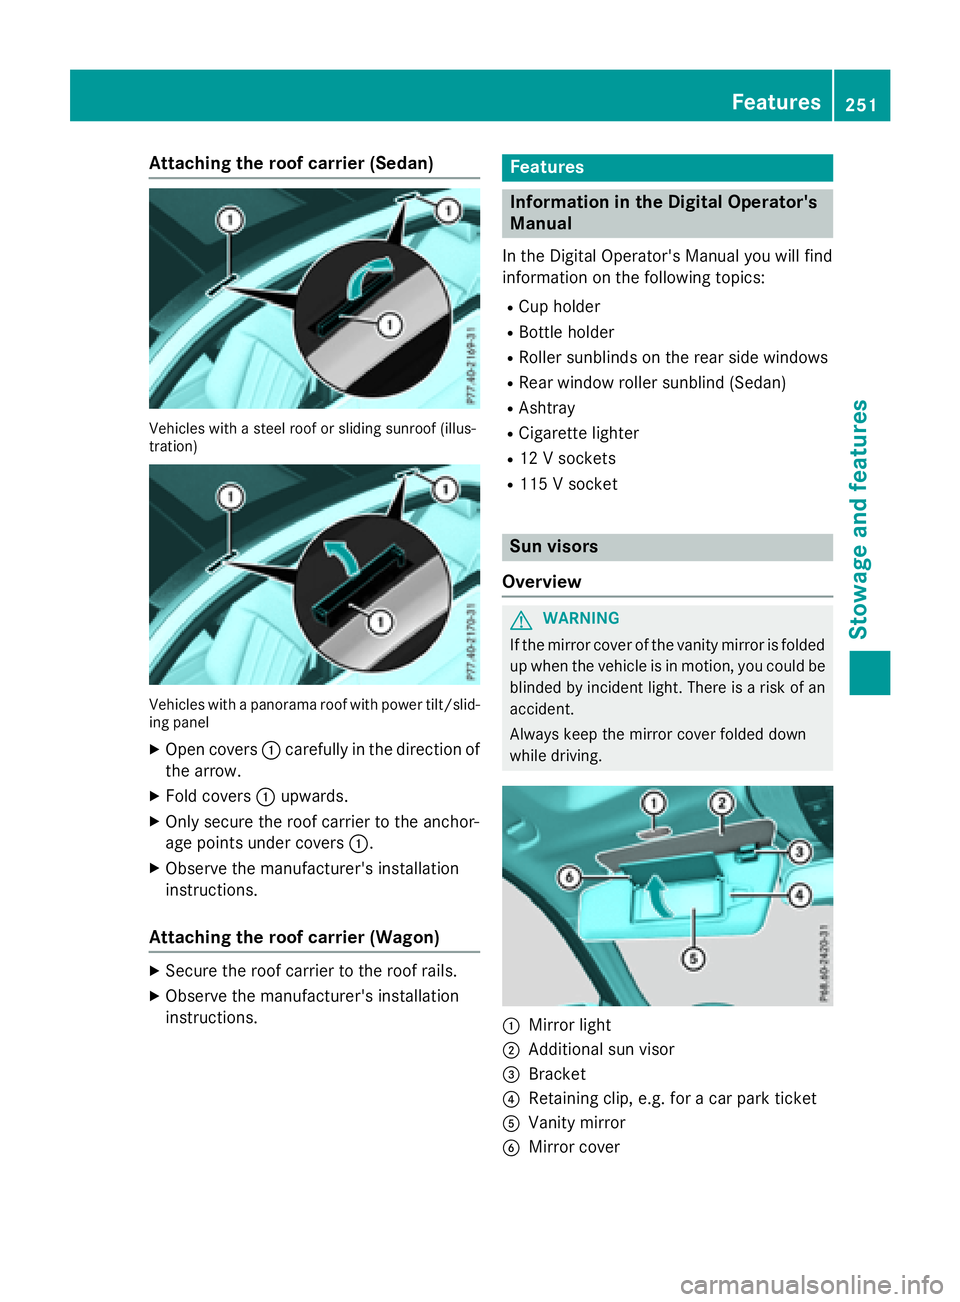
Attaching theroof car rier (Sedan)
Vehicles wit h asteel roo for sliding sunroo f(illus -
tration )
Vehicles wit h apanorama roo fwit hpowe rtilt/slid-
ing panel
XOpen cover s: carefully in th edirection of
th earrow.
XFold cover s: upwards.
XOnly secure th eroo fcarrie rto th eanchor -
age points under cover s:.
XObserv eth emanufacturer' sinstallation
instructions.
Attaching the roof car rier (Wagon)
XSecur eth eroo fcarrie rto th eroo frails .
XObserv eth emanufacturer' sinstallation
instructions.
Features
Infor mation in the Digital Operator's
Manual
In th eDigital Operator' sManual you will fin d
information on th efollowin gtopic s:
RCup holder
RBottle holder
RRoller sunblinds on th erear side windows
RRear window roller sunblin d(Sedan )
RAshtray
RCigarette lighte r
R12V sockets
R115 V socke t
Sun visors
Overview
GWARNIN G
If th emirror cover of th evanit ymirror is folded
up when th evehicl eis in motion ,you could be
blinded by inciden tlight. There is aris kof an
accident.
Always keep th emirror cover folded down
while driving.
:Mirror ligh t
;Additional sunvisor
=Bracket
?Retaining clip, e.g. for acar park ticket
AVanit ymirror
BMirror cover
Features251
Stowage and features
Z
Page 255 of 350
A malfunction in the system has been detec-
ted if one of the following occurs:
RThe indicator lamp in the SOS button doesnot come on during the system self-test.
RThe indicator lamp in the FRoadside
Assistance button does not light up during
self-diagnosis of the system.
RThe indicator lamp in the ïMB Info call
button does not light up during self-diag-
nosis of the system.
RThe indicator lamp in one or more of the
following buttons continues to light up red
after the system self-diagnosis:
-SOS button
-F Roadside Assistance call button
-ïMB Info call button
RTheInoperativeor the Service Not
Activatedmessage appears in the multi-
function display after the system self-diag-
nosis.
If a malfunction is indicated as outlined
above, the system may not operate as expec-
ted. In the event of an emergency, help will
have to be summoned by other means.
Have the system checked at the nearest
authorized Mercedes-Benz Center or contact the following service hotlines:
Mercedes-Benz Customer Assistance Center
at 1-800-FOR-MERCedes (1-800-367-6372)
or 1-866-990-9007
Emergency call
Important safety notes
GWARNING
It can be dangerous to remain in the vehicle,
even if you have pressed the SOS button in an emergency if:
Ryou see smoke inside or outside of the vehi-
cle, e.g. if there is a fire after an accident
Rthe vehicle is on a dangerous section of
road
Rthe vehicle is not visible or cannot easily beseen by other road users, particularly when
dark or in poor visibility conditions
There is a risk of an accident and injury.
Leave the vehicle immediately in this or simi-
lar situations as soon as it is safe to do so.
Move to a safe location along with other vehi-
cle occupants. In such situations, secure the
vehicle in accordance with national regula-
tions, e. g. with a warning triangle.
General notes
Observe the notes on system activation
(
Ypage 252).
An emergency call is dialed automatically if an
air bag or Emergency Tensioning Device is
triggered. You cannot end an automatically
triggered emergency call yourself.
An emergency call can also be initiated man-
ually.
As soon as the emergency call has been ini-
tiated, the indicator lamp in the SOS button
flashes. The Connecting Call
message
appears in the multifunction display.
The audio output is muted.
Once the connection has been made, the
Call Connected
message appears in the
multifunction display.
Features253
Stowag ean d features
Z