2016 MERCEDES-BENZ E-CLASS SALOON brake
[x] Cancel search: brakePage 243 of 557

The operation of
thefo llowing sy stems depends
on the trailer being connected cor rectly:
R ESP ®
R Parking Assist PARKTRONIC
R Parking Pilot
R Blind Spot Assist or Active Blind Spot Assi st
R Active Lane Keeping Assist
Coupling up a trailer
* NO
TEDama getothe battery due tofull
dischar ge Charging
the trailer battery using the po wer
supply of the trailer can damage the batter y. #
Do not use the po wer supp lyto charge
th e trailer batter y.#
Remo vethe pr otective co vering from the ball
head and store it in a safe place. #
Position the trailer on a le vel sur face behind
th eve hicle and couple it up totheve hicle. #
Open the soc ket co ver. #
Insert the plug connector with lug 1into
groo ve3 onthe soc ket. #
Turn bayonet coupling 2around clo ckwise
to thestop. #
Let the co ver engage. #
Secure the cable tothe trailer with cable ties
(if you are using an adap ter cable). #
Make sure that cable is alw ays slack for ease
of mo vement when cornering. #
Check the trailer lighting sy stem. Push the
combination switch up wards/down wards and
check whe ther the cor responding turn
signal light on the trailer is flashing.
A display message may appear in the multifunc‐
tion display even if the trailer has been connec‐
te d cor rectly:
R LEDs ha vebeen ins talled on the trailer light‐
ing sy stem
R the cur rent has fallen below the trailer light‐
ing sy stem's minimum cur rent (50 mA)
% Accessories can be connected tothe perma‐
nent po wer supp lyand the po wer supply that
is swit ched on via the ignition lock with max‐
imum po wer consum ptions of 180W.
Un coupling a trailer &
WARNING Risk of being crushed and
becoming trapped when uncoupling a
trailer
When uncoupling a trailer wi than engaged
ine rtia-activated brake, your hand may
become trapped between theve hicle and the
trailer dr awbar. 240
Driving and pa rking
Page 244 of 557
#
Do not uncouple traile rswith an
engaged overrun brake. &
WARNING Risk of becoming trapped
when disconnecting the trailer cable
Ve hicles with le vel control sy stem: the
ve hicle lo werswhen the trailer cable is dis‐
connected.
This could result in you or other people
becoming trapped if your or their limbs are
between theve hicle body and the tyres or
underneath theve hicle. #
Make sure nobody is underneath the
ve hicle or in the immediate vicinity of
th e wheel ar ches when you disconnect
th e trailer cable. *
NO
TEDama getothere ar bumper from
ins talling adap ter cables or adapte r plugs The
following parts could be damaged when
re tracting the ball neck fully electrically:
R bumper
R adap ter cable
R adapte r plug #
Alw aysre mo vethe adap ter cable or
adapte r plug before retracting the ball
neck fully electrically. #
Safeguard the trailer against rolling away. #
Disconnect the electrical connection
between theve hicle and the trailer. #
Uncouple the trailer. #
Place the pr otective co vering on the ball
head. Bicycle
rack &
WARNING Risk of an accident when
using the bicycle rack incor rectly
The bicycle rack may become de tach ed from
th eve hicle in thefo llowing cases:
R the permissible load capacity of the
trailer hitch is exceeded.
R the bicycle rack is used incor rectl y.
R the bicycle rack is secured tothe ball
neck beneath the ball head.
Obser vethefo llowing foryo ur ow n sa fety
and that of other road users:
R always adhere tothe permissible load
capacity of the trailer hitch.
R only use the bicycle rack totranspo rt
bicycles.
R always mount the bicycle rack properly by
attaching tothe ball head and the ball
neck guide pin, if possible. Driving and parking
241
Page 252 of 557

St
atus displa ysinthe Assis tance graphic:
R é: ATTENTION ASSIST deactivated
R æ: Active Brake Assi stdeactivated
R Light lane markings: Active Lane Keeping
Assist activated
R Green lane markings: Active Lane Keeping
Assist actived R
Grey radar waves next tovehicle: Blind Spot
Assist activated
R Green radar waves next tovehicle: Blind Spot
Assist actived
R Display of Dis tance Pilot DISTRONIC
(→ page 193) Calling up displa
ysintheTr ip menu On-board computer:
, Trip
% Ve
hicles with the instrument display in
th e widescreen cockpit: whenyou ha veset
th e progressive display setting, you can view
information on the journey in theContent
menu. #
Toselect a displa y:swipe upwards or down‐
wa rds on the left-hand Touch Control.
Displa ysintheTrip menu:
R Standard display
R Range and cur rent fuel consu mption
A recuperation displ ayis also available for
cer tain engines. If there is only a small amount of fuel left in
the fuel tank, the dis‐
play sho wsave hicle being refuelled ins tead
of thera nge.
R ECO displ ay (→page 159)
R Trip computer From startandFrom reset
R Digital speedom eter
% Ve
hicles with an instrument display in
th e widescreen cockpit: the digital speed‐
ome ter only appears in the Classic or Sport
display setting. Example:
standard display
1 Trip dis tance
2 Total dis tance recorder Instrument Display and on-board compu
ter249
Page 374 of 557
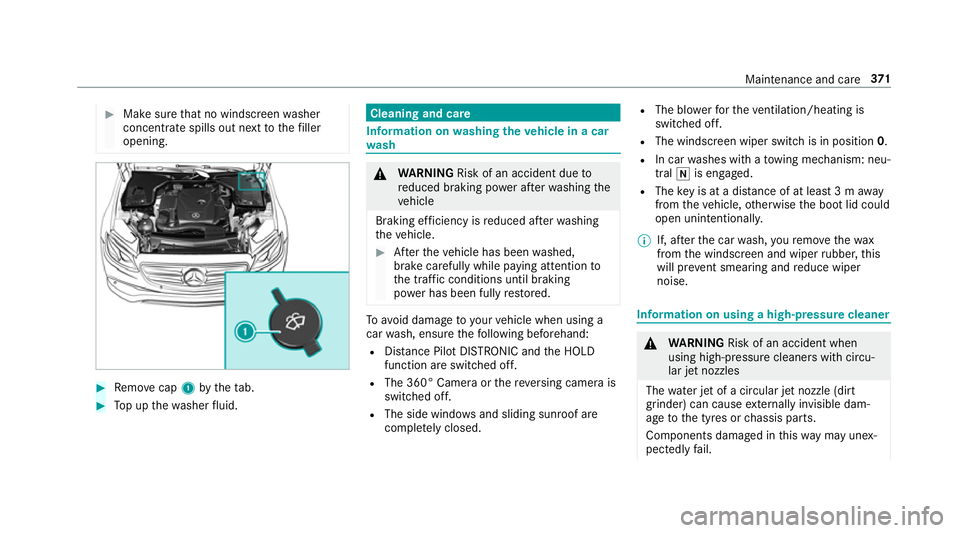
#
Make sure that no windsc reen washer
concentrate spills out next tothefiller
opening. #
Remo vecap 1bytheta b. #
Top up thewa sher fluid. Cleaning and care
Information on
washing theve hicle in a car
wa sh &
WARNING Risk of an accident due to
re duced braking po wer af terwa shing the
ve hicle
Braking ef ficiency is reduced af terwa shing
th eve hicle. #
Afterth eve hicle has been washed,
brake carefully while paying attention to
th e traf fic conditions until braking
po we r has been fully restored. To
avo id damage to yourvehicle when using a
car wash, ensure thefo llowing beforehand:
R Distance Pilot DISTRONIC and the HOLD
function are switched off.
R The 360° Camera or there ve rsing camera is
switched off.
R The side windo wsand sliding sun roof are
comple tely closed. R
The bl owerforth eve ntilation/heating is
switched off.
R The windsc reen wiper switch is in position 0.
R In car washes with a towing mechanism: neu‐
tral iis engaged.
R The key is at a dis tance of at least 3 m away
from theve hicle, otherwise the boot lid could
open unintentionall y.
% If, af terth e car wash, youre mo vethewax
from the windscreen and wiper rubber, this
will pr event smearing and reduce wiper
noise. Information on using a high-p
ressure cleaner &
WARNING Risk of an accident when
using high-pressure cleane rswith circu‐
lar jet nozzles
The wate r jet of a circular jet nozzle (dirt
grinder) can cause extern ally invisible dam‐
age tothe tyres or chassis parts.
Components damaged in this wa y may unex‐
pec tedly fail. Maintenance and care
371
Page 376 of 557
Note
s on paint work/matt finish paint workcare Obser
vethefo llowing information: Information on cleaning and car
eAvoiding damage tothe paintwork
Pa int R
Insect remains: soak with insect remo ver and rinse off the
trea ted areas af terw ards.
R Bird droppings: soak with water and rinse off af terw ards.
R Coolant, brake fluid, tree resins, oils, fuel and greases:
ge ntly rub with a clo thsoaked in petroleum ether or
lighter fluid.
R Tarst ains: use tarre mo ver.
R Wax: use silicone remo ver. R
Do not apply sticke rs,fi lms etc.
R Remo vedirt immediately, where possible.
Matt finish R
The vehicle should preferably be washed byhand using a
soft sponge, car shampoo and plenty of water.
R Only use care products recommended byMercedes-Benz. R
Do not polish theve hicle and light-alloy wheels.
R Do not ha veyour vehicle cleaned at an automatic car
wa sh too frequently and do not use wash programs which
fi nish wi tha hot waxve hicle treatment.
R Do not use paint cleaner, buf fing or polishing products
su ch as a gloss preser ver,e.g. wax.
R Alw ays ha vepaintwork repairs car ried out at a qualified
specialist workshop. Maintenance and care
373
Page 377 of 557
Note
s on care of vehicle parts &
WARNING Risk of entrapment if the
windscreen wipers are swit ched on while
th e windscreen is being cleaned
If th e windscreen wipers are set in motion
while you are cleaning the windscreen or
wiper blades, you can be trapped bythe
wiper arm. #
Alw ays switch off the windscreen wip‐
ers and the ignition before cleaning the
windscreen or wiper blades. &
WARNING Risk of bu rns from tailpipes
and tailpipe trim
The tailpipe and tailpipe trim can become
ve ry hot. If you come into contact with these
parts of theve hicle, you could burn yourself. #
Alw ays be particular lycareful around
th eta ilpipe and theta ilpipe trim. #
Allow theve hicle parts tocool down
before youto uch them. Obser
vethefo llowing information: Information on cleaning and car
eAvoiding vehicle damage
Wheels/rims Usewate r and acid-free wheel cleaners. R
Do not use acidic wheel cleaners toremo vebrake dust.
This could damage wheel bolts and brake components.
R Toavoid cor rosion of the brake discs and brake linings,
drive theve hicle for a few minutes af ter cleaning before
parking it. The brake discs and brake linings warm up and
dried out.
Wi ndo ws
Cleanthe windo wsonthe inside and outside using a damp
clo thand cleaning products recommended byMercedes-
Benz. Do not use dry clo
ths, abrasive products or cleaning agents
containing sol vents toclean the inside of the windo ws. 374
Maintenance and care
Page 394 of 557
R
Non- insulated parts of thete rm inal clamps
must not come into con tact wi thother me tal
parts while the jump lead/charging cable is
connected tothe battery/jump-s tart connec‐
tion point.
R The jump lead/charging cable must not
come into contact wi thany parts which may
mo vewhen the engine is running.
R Alw ays make sure that nei ther you nor the
battery is elect rostatically charge d.
R Keep away from fire and naked flames.
R Do not lean overth e batter y.
R When charging: only use battery charge rs
te sted and appr ovedby Mercedes-Benz and
re ad the battery charge r's operating instruc‐
tions before charging the batter y.
Obser vethe additional following points during
st arting assis tance:
R Starting assis tance may only be pr ovided
using batteries with a nominal voltage of 12
V.
R The vehicles must not touch. R
Petrol engine: Only acce ptstarting assis‐
ta nce if the engine and exhaust sy stem are
cold. #
Secure theve hicle byapplying the electric
parking brake. #
Automatic transmission: Shiftthe trans‐
mission toposition j. #
Manual transmission: Shift into neutral. #
Make sure that the ignition and all electrical
consumers are switched off. #
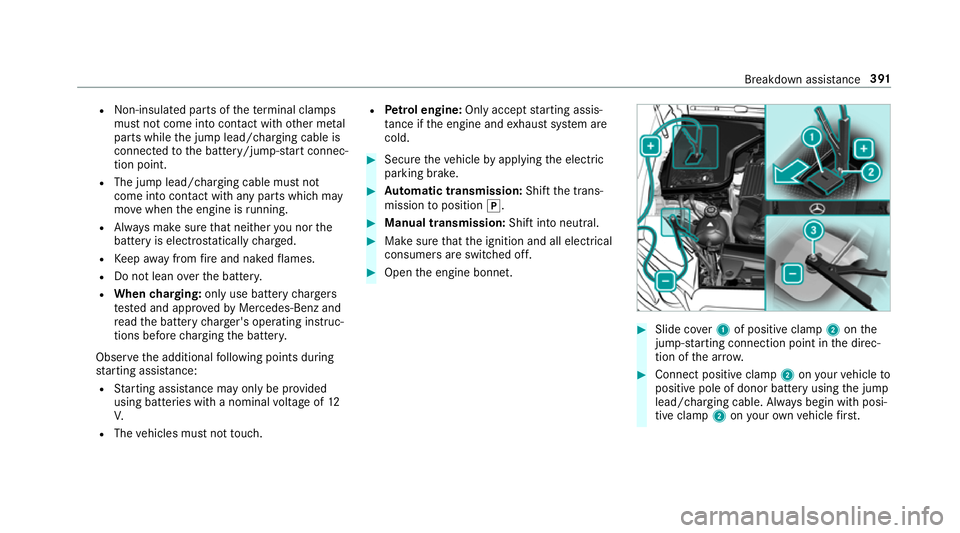
Open the engine bonn et. #
Slide co ver1 of positive clamp 2onthe
jump-s tarting connection point in the direc‐
tion of the ar row. #
Connect positive clamp 2onyour vehicle to
positive pole of donor battery using the jump
lead/charging cable. Alw ays begin with posi‐
tive clamp 2onyour ow nve hicle firs t. Breakdown assi
stance 391
Page 396 of 557
Pe
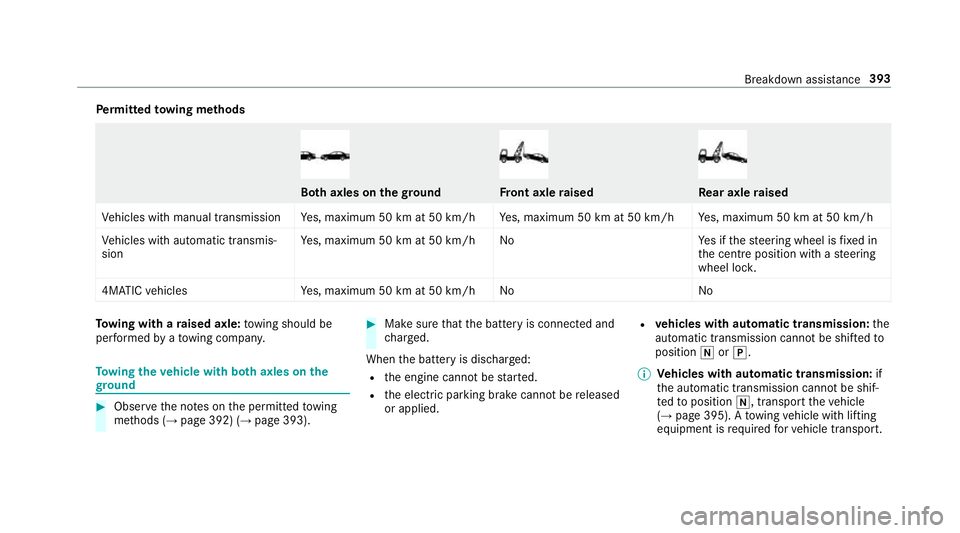
rm itted towing me thods Bo
th axles on thegr ound Fr
ont axle raised Re
ar axle raised
Ve hicles with manual transmission Yes, maximum 50 km at 50 km/h Yes, maximum 50 km at 50 km/h Yes, maximum 50 km at 50 km/h
Ve hicles with automatic transmis‐
sion Ye
s, maximum 50 km at 50 km/h No Yes if thesteering wheel is fixe d in
th e cent reposition with a steering
wheel loc k.
4MATIC vehicles Yes, maximum 50 km at 50 km/h No NoTo
wing with a raised axle: towing should be
per form ed byato wing compan y. To
wing theve hicle with bo thaxles on the
gr ound #
Obser vethe no tes on the permitted towing
me thods (→ page 392) (→ page 393). #
Make sure that the battery is connected and
ch arge d.
When the battery is dischar ged:
R the engine cann otbe star ted.
R the electric parking brake cann otbe released
or applied. R
vehicles with automatic transmission: the
automatic transmission cannot be shif tedto
position iorj.
% Vehicles with automatic transmission: if
th e automatic transmission cann otbe shif‐
te dto position i, transport theve hicle
(→ page 395). A towing vehicle with lifting
equipment is requiredforve hicle transport. Breakdown assis
tance 393