2016 MERCEDES-BENZ E-Class COUPE door lock
[x] Cancel search: door lockPage 84 of 318

XTurn the mechanical key from position1
counter-clockwise as far as it will go to posi-
tion 2. Simultaneously pull the trunk lid han-
dle.
The trunk is unlocked.
XTurn the mechanical key back to position 1
and remove it.
XInsert the mechanical key into the SmartKey
(Ypage 75).
Trunk emergency release
You can open the trunk lid from inside the vehi-
cle with the emergency release button.
XPress emergency release button :briefly.
The trunk lid unlocks and opens.
The trunk lid can be unlocked and opened with
the trunk lid emergency release when the vehi-
cle is stationary or while driving.
The trunk lid emergency release does not open
the trunk lid if the battery is disconnected or
discharged.
Trunk lid emergency release light:
REmergency release button :flashes for
30 minutes after the trunk lid is opened.
REmergency release button :flashes for
60 minutes after the trunk lid is closed.
Side windows
Important safety notes
GWARNING
While opening the side windows, body parts
could become trapped between the side win-
dow and the door frame as the side window
moves. There is a risk of injury.
Make sure that nobody touches the side win- dow during the opening procedure. If some-
body becomes trapped, release the switch or
pull the switch to close the side window again.
GWARNING
While closing the side windows, body parts in
the closing area could become trapped. There is a risk of injury.
When closing make sure that no parts of the
body are in the closing area. If somebody
becomes trapped, release the switch or press
the switch to open the side window again.
GWARNING
If children operate the side windows they
could become trapped, particularly if they are left unsupervised. There is a risk of injury.
Activate the override feature for the rear side
windows. When leaving the vehicle, always
take the SmartKey with you and lock the vehi-
cle. Never leave children unsupervised in the
vehicle.
Side window reversing feature
The side windows are equipped with an auto-
matic reversing feature. If a solid object blocks
or restricts a side window during the closing
process, the side window opens again automat-
ically. However, the automatic reversing feature
is only an aid and is not a substitute for your
attentiveness when closing a side window.
GWARNING
The reversing feature does not react:
Rto soft, light and thin objects, e.g. small fin-
gers
Rover the last 1/6 in(4 mm) of the closing
movement
Rduring resetting
Rwhen closing the side window again man-
ually immediately after automatic reversing
This means that the reversing feature cannot
prevent someone being trapped in these sit-
uations. There is a risk of injury.
82Side windows
Opening and closing
Page 85 of 318

Make sure that no body parts are in close
proximity during the closing procedure. If
someone becomes trapped, press the switch
to open the side window again.
Opening and closing the side win-
dows
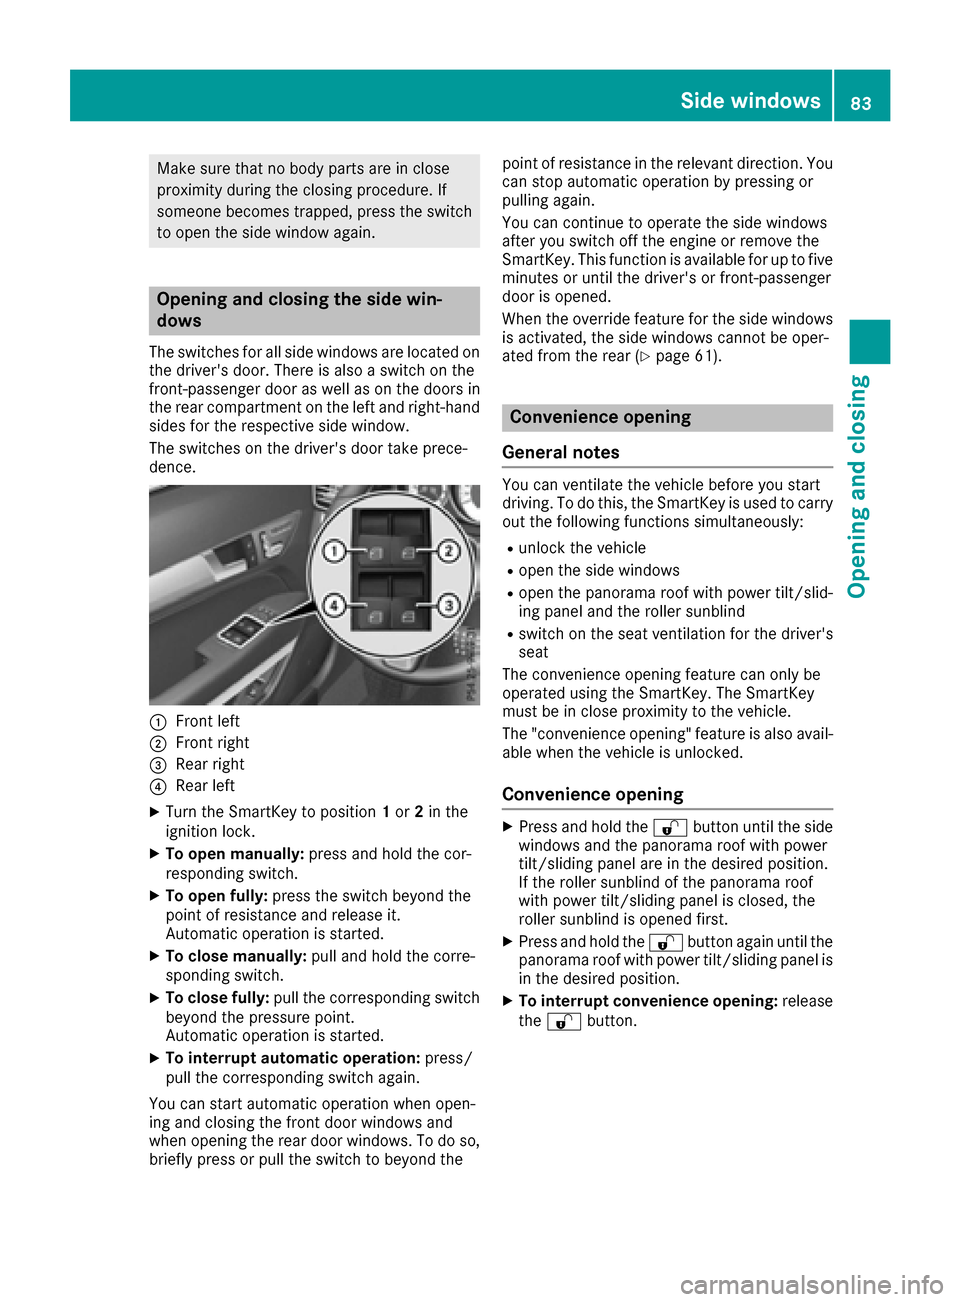
The switches for all side windows are located onthe driver's door. There is also a switch on the
front-passenger door as well as on the doors in
the rear compartment on the left and right-hand
sides for the respective side window.
The switches on the driver's door take prece-
dence.
:Front left
;Front right
=Rear right
?Rear left
XTurn the SmartKey to position 1or 2in the
ignition lock.
XTo open manually: press and hold the cor-
responding switch.
XTo open fully: press the switch beyond the
point of resistance and release it.
Automatic operation is started.
XTo close manually: pull and hold the corre-
sponding switch.
XTo close fully: pull the corresponding switch
beyond the pressure point.
Automatic operation is started.
XTo interrupt automatic operation: press/
pull the corresponding switch again.
You can start automatic operation when open-
ing and closing the front door windows and
when opening the rear door windows. To do so,
briefly press or pull the switch to beyond the point of resistance in the relevant direction. You
can stop automatic operation by pressing or
pulling again.
You can continue to operate the side windows
after you switch off the engine or remove the
SmartKey. This function is available for up to five
minutes or until the driver's or front-passenger
door is opened.
When the override feature for the side windows
is activated, the side windows cannot be oper-
ated from the rear (
Ypage 61).
Convenience opening
General notes
You can ventilate the vehicle before you start
driving. To do this, the SmartKey is used to carry out the following functions simultaneously:
Runlock the vehicle
Ropen the side windows
Ropen the panorama roof with power tilt/slid-
ing panel and the roller sunblind
Rswitch on the seat ventilation for the driver's
seat
The convenience opening feature can only be
operated using the SmartKey. The SmartKey
must be in close proximity to the vehicle.
The "convenience opening" feature is also avail-
able when the vehicle is unlocked.
Convenience opening
XPress and hold the %button until the side
windows and the panorama roof with power
tilt/sliding panel are in the desired position.
If the roller sunblind of the panorama roof
with power tilt/sliding panel is closed, the
roller sunblind is opened first.
XPress and hold the %button again until the
panorama roof with power tilt/sliding panel is
in the desired position.
XTo interrupt convenience opening: release
the % button.
Side windows83
Opening and closing
Z
Page 86 of 318

Convenience closing feature
Important safety notes
Information on the side window reversing fea-
ture (Ypage 82).
GWARNING
When the convenience closing feature is oper- ating, parts of the body could become trapped
in the closing area of the side window and the
sliding sunroof. There is a risk of injury.
Observe the complete closing procedure
when the convenience closing feature is oper-
ating. Make sure that no body parts are in
close proximity during the closing procedure.
Proceed as follows if someone is trapped:
With the SmartKey:
XRelease the &button.
XPress and hold the %button until the side
windows and the sliding sunroof or the pano-
rama roof with power tilt/sliding panel open
again.
With KEYLESS-GO:
XRelease the sensor surface on the door han-
dle.
XPull the door handle immediately and hold it.
The side windows and the sliding sunroof or
the panorama roof with power tilt/sliding
panel open.
General notes
When you lock the vehicle, you can simultane-
ously:
Rclose the side windows
Rclose the panorama roof with power tilt/slid-
ing panel
On vehicles with a panorama roof with power
tilt/sliding panel, you can then close the roller
sunblind.
Using the SmartKey
XVehicles without KEYLESS-GO: point the tip
of the SmartKey at the door handle on the
driver's door.
XVehicles with KEYLESS-GO: the SmartKey
must be in close proximity to the vehicle.
XPress and hold the &button until the side
windows and the panorama roof with power
tilt/sliding panel are fully closed.
XMake sure that all the side windows and the
panorama roof with power tilt/sliding panel
are closed.
On vehicles with a panorama roof with power
tilt/sliding panel:
XPress and hold the &button again until the
roller sunblind of the panorama roof with
power tilt/sliding panel closes.
XTo interrupt convenience closing: release
the & button.
Using KEYLESS-GO
The driver's door and the door at which the han-
dle is used, must both be closed. The SmartKey
must be outside the vehicle. The gap between
the SmartKey and the corresponding door han-
dle should not be greater than 3 ft (1 m).
XTouch recessed sensor surface :on the
door handle until the side windows and the
panorama roof with power tilt/sliding panel
are fully closed.
iMake sure you only touch recessed sensor
surface :.
XMake sure that all the side windows and the
panorama roof with power tilt/sliding panel
are closed.
On vehicles with a panorama roof with power
tilt/sliding panel:
XTouch recessed sensor surface :on the
door handle again until the roller sunblind of
the panorama roof with power tilt/sliding
panel closes.
84Side windows
Opening and closing
Page 87 of 318

XTo interrupt convenience closing:release
recessed sensor surface :on the door han-
dle.
Resetting the side windows
If a side window can no longer be closed fully,
you must reset it.
XClose all the doors.
XTurn the SmartKey to position 1or 2in the
ignition lock.
XPull the corresponding switch on the door
control panel until the side window is com-
pletely closed (
Ypage 83).
XHold the switch for an additional second.
If the side window opens again slightly:
XImmediately pull the corresponding switch on
the door control panel until the side window is
completely closed (
Ypage 83).
XHold the switch for an additional second.
XIf the respective side window remains closed
after the button is released, then it has been
set correctly. If this is not the case, repeat the
steps above again.
Side windows85
Opening and closing
Z
Page 99 of 318

XTurn the SmartKey to position2in the ignition
lock (Ypage 122).
XTo switch on/off: turn the lever in the direc-
tion of arrow :or;.
Indicator lamp =lights up or goes out.
Vehicles without KEYLESS-GO: when you
remove the SmartKey from the ignition lock, the
steering wheel heating is deactivated.
Vehicles with KEYLESS-GO: when you switch off
the ignition and open the driver's door, the
steering wheel heating is deactivated.
iThe steering wheel heating may switch off
temporarily if:
Rthe temperature in the vehicle interior is
above 86 ‡ (30 †)
Rthe temperature of the steering wheel is
above 95 ‡ (35 †).
Indicator lamp =remains on.
Steering wheel97
Seats, steering wheel and mirrors
Z
Page 100 of 318

Problems with the steering wheel heating
ProblemPossible causes/consequences andMSolutions
The steering wheel heat-
ing has switched off pre-
maturely or cannot be
switched on.The on-board voltage is too low because too many electrical consum-
ers are switched on.
XSwitch off electrical consumers that you do not need, such as the
rear window defroster or interior lighting.
Once the battery is sufficiently charged, the steering wheel heating
will switch back on automatically.
EASY-ENTRY/EXIT feature
Important safety notes
GWARNING
When the EASY-ENTRY/EXIT feature adjusts
the steering wheel, you and other vehicle
occupants – particularly children – could
become trapped. There is a risk of injury.
While the EASY-ENTRY/EXIT feature is mak-
ing adjustments, make sure that no one has
any body parts in the sweep of the steering
wheel.
Move the steering wheel adjustment lever if
there is a risk of entrapment by the steering
wheel. The adjustment process is stopped.
Vehicles with a memory function: if there is a
risk of becoming trapped by the steering wheel,
you can also one of the memory function posi-
tion buttons. The adjustment process is stop-
ped.
GWARNING
If children activate the EASY-ENTRY/EXIT fea-
ture, they can become trapped, particularly
when unattended. There is a risk of injury.
When leaving the vehicle, always take the
SmartKey with you and lock the vehicle. Never
leave children unsupervised in the vehicle.
GWARNING
If you drive off while the EASY-ENTRY/EXIT
feature is making adjustments, you could lose
control of the vehicle. There is a risk of an
accident.
Always wait until the adjustment process is
complete before driving off.
The EASY-ENTRY/EXIT feature makes getting in
and out of your vehicle easier.
You can activate and deactivate the EASY-
ENTRY/EXIT feature in the on-board computer
(
Ypage 195).
Position of the steering wheel when the
EASY-ENTRY/EXIT feature is active
The steering wheel swings upwards when you:
Rremove the SmartKey from the ignition lock
Rwith KEYLESS-GO: open the driver's door;
KEYLESS-GO must be in position 1
Rwith the SmartKey:open the driver's door;
the SmartKey is in position 0or 1must be in
the ignition lock (
Ypage 122).
iThe steering wheel only moves upwards if it
has not already reached the upper stop.
Position of the steering wheel for driv-
ing
The steering wheel is moved to the last selected position when:
Rthe driver's door is closed
Rwith KEYLESS-GO: you press the Start/Stop
button once
or
Rwith the SmartKey: you insert the SmartKey
into the ignition lock
When you close the driver's door with the igni-
tion switched on, the steering wheel is also
automatically moved to the previously set posi-
tion.
98Steering wheel
Seats, steering wheel and mirrors
Page 101 of 318

The last position of the steering wheel is stored
when you switch off the ignition or when you
store the setting with the memory function
(
Ypage 102).
Crash-responsive EASY-EXIT feature
If the crash-responsive EASY-EXIT feature is trig-
gered in an accident, the steering column will
move upwards when the driver's door is opened. This occurs irrespective of the position of the
SmartKey in the ignition lock. This makes it eas-
ier to exit the vehicle and rescue the occupants.
The crash-responsive EASY-EXIT feature is only
operational if the EASY-EXIT/ENTRY feature is
activated in the on-board computer
(
Ypage 195).
Mirrors
Rear-view mirror
XAnti-glare mode: flick anti-glare lever :for-
wards or back.
Exterior mirrors
Adjusting the exterior mirrors
GWARNING
You could lose control of your vehicle if you do the following while driving:
Radjust the driver's seat, head restraint,
steering wheel or mirrors
Rfasten the seat belt
There is a risk of an accident.
Adjust the driver's seat, head restraint, steer- ing wheel and mirror and fasten your seat belt
before starting the engine.
GWARNING
The exterior mirror on the front-passenger
side reduces the size of the image. Visible
objects are actually closer than they appear.
This means that you could misjudge the dis-
tance from road users traveling behind, e.g.
when changing lane. There is a risk of an acci-
dent.
For this reason, always make sure of the
actual distance from the road users traveling
behind by glancing over your shoulder.
XTurn the SmartKey to position 1or 2in the
ignition lock (Ypage 122).
XPress button :for the left-hand exterior mir-
ror or button ;for the right-hand exterior
mirror.
The indicator lamp in the corresponding but-
ton lights up in red.
The indicator lamp goes out again after some
time. You can adjust the selected mirror using
adjustment button =as long as the indicator
lamp is lit.
XPress adjustment button =up, down, or to
the left or right until you have adjusted the
exterior mirror to the correct position. You
should have a good overview of traffic condi-
tions.
The convex exterior mirrors provide a larger field
of vision.
After the engine has been started, the exterior
mirrors are automatically heated if the rear win-
dow defroster is switched on and the outside
Mirrors99
Seats, steering wheel and mirrors
Z
Page 102 of 318

temperature is low. Heating takes a maximum of
ten minutes.
iYou can also heat up the exterior mirrors
manually by switching on the rear window
defroster.
Folding the exterior mirrors in or out
electrically
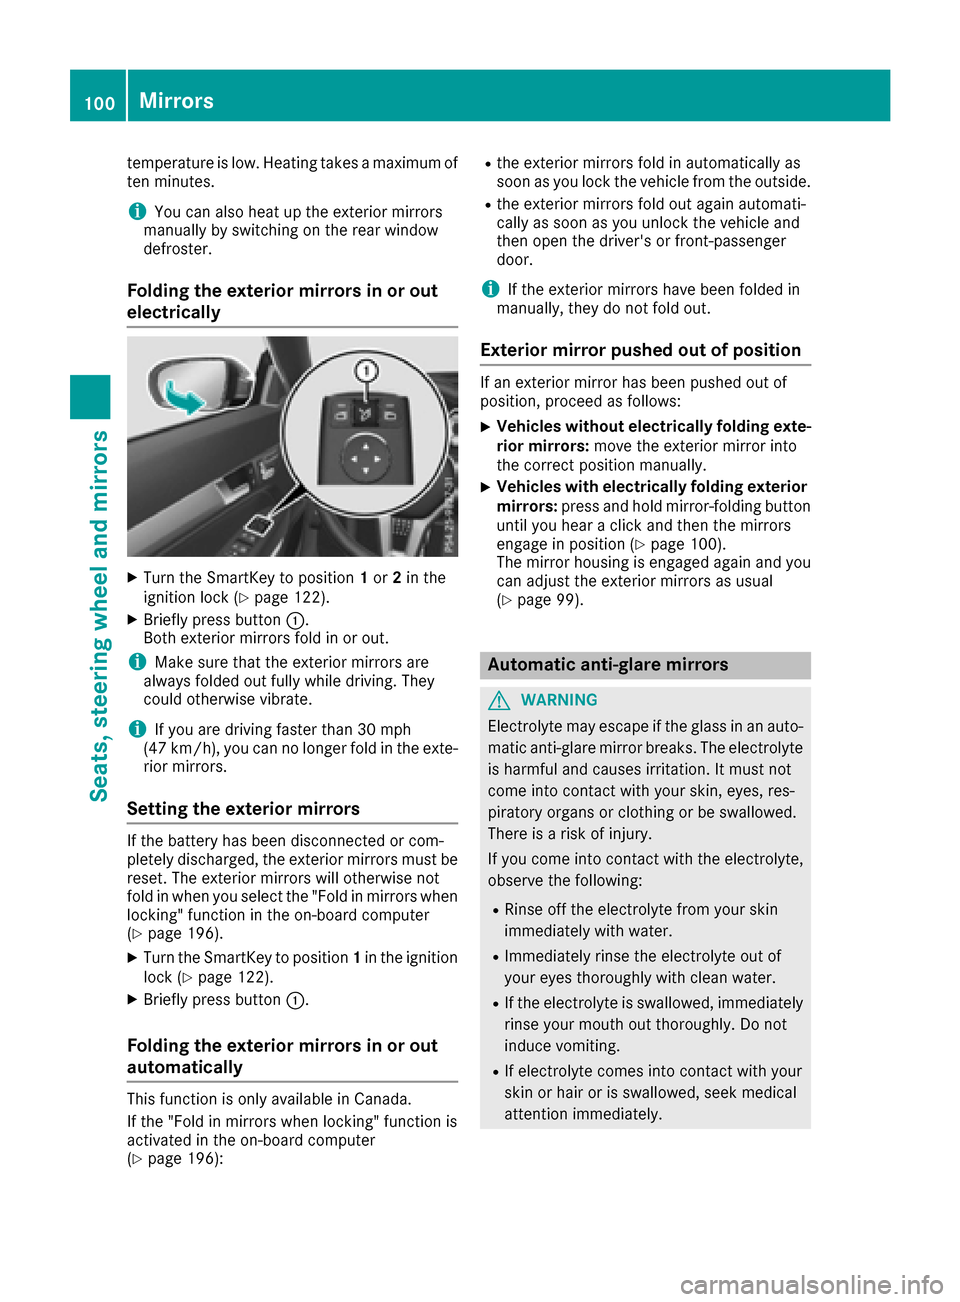
XTurn the SmartKey to position 1or 2in the
ignition lock (Ypage 122).
XBriefly press button :.
Both exterior mirrors fold in or out.
iMake sure that the exterior mirrors are
always folded out fully while driving. They
could otherwise vibrate.
iIf you are driving faster than 30 mph
(47 km/h), you can no longer fold in the exte-
rior mirrors.
Setting the exterior mirrors
If the battery has been disconnected or com-
pletely discharged, the exterior mirrors must be
reset. The exterior mirrors will otherwise not
fold in when you select the "Fold in mirrors when
locking" function in the on-board computer
(
Ypage 196).
XTurn the SmartKey to position 1in the ignition
lock (Ypage 122).
XBriefly press button :.
Folding the exterior mirrors in or out
automatically
This function is only available in Canada.
If the "Fold in mirrors when locking" function is
activated in the on-board computer
(
Ypage 196):
Rthe exterior mirrors fold in automatically as
soon as you lock the vehicle from the outside.
Rthe exterior mirrors fold out again automati-
cally as soon as you unlock the vehicle and
then open the driver's or front-passenger
door.
iIf the exterior mirrors have been folded in
manually, they do not fold out.
Exterior mirror pushed out of position
If an exterior mirror has been pushed out of
position, proceed as follows:
XVehicles without electrically folding exte-
rior mirrors: move the exterior mirror into
the correct position manually.
XVehicles with electrically folding exterior
mirrors: press and hold mirror-folding button
until you hear a click and then the mirrors
engage in position (
Ypage 100).
The mirror housing is engaged again and you
can adjust the exterior mirrors as usual
(
Ypage 99).
Automatic anti-glare mirrors
GWARNING
Electrolyte may escape if the glass in an auto-
matic anti-glare mirror breaks. The electrolyte
is harmful and causes irritation. It must not
come into contact with your skin, eyes, res-
piratory organs or clothing or be swallowed.
There is a risk of injury.
If you come into contact with the electrolyte,
observe the following:
RRinse off the electrolyte from your skin
immediately with water.
RImmediately rinse the electrolyte out of
your eyes thoroughly with clean water.
RIf the electrolyte is swallowed, immediately
rinse your mouth out thoroughly. Do not
induce vomiting.
RIf electrolyte comes into contact with your
skin or hair or is swallowed, seek medical
attention immediately.
100Mirrors
Seats, steering wheel and mirrors