2016 MERCEDES-BENZ E-Class COUPE wipers
[x] Cancel search: wipersPage 111 of 318

5¯Continuous wipe,fast
BíSingle wipe
î Towipe wit h washer fluid
XSwitch on the ignition.
XTurn the co mbination switch to the corre-
spondin g position.
In the Ä orÅ position, the appropriate
wipin g frequency isset automatically according
to the intensity of the rain. Inthe Å position,
the rain sensor ismore sensitive than inthe
Ä position, causing the windshield wiper to
wipe more frequently.
If the wiper blades are worn, the windshield will
no longer bewiped properly. This could prevent
you from observing the traff icconditions.
Replacing the wiper blades
Important safety notes
GWAR NING
If the wind shield wiper s begin to move while
you are changing the wiper blades, you could
be trapped bythe wiper arm. There isa risk of
injury.
Alwa ysswit ch off the windshield wiper s and
ignition before changing the wiper blades.
!To avoid damaging the wiper blades, make
sure that you touch only thewiper arm of the
wiper .
!Never open the hood ifawind shield wiper
arm has been folded away from the wind-
shield.
Never fold a windshield wiper armwithout a
wiper blade back onto the windshield.
Hold the windshield wiper arm firmly when
you change the wiper blade. Ifyou release the
wind shield wiper armwithout a wiper blade
and itfalls onto the windshield, thewind shield
may bedamaged bythe force of the impact.
Mercedes-Benz recommends that you have
the wiper blades changed at a qualified spe-
cialist workshop.
Replacing the wiper blades
Removing the wiper blades
XRemo vethe SmartKey from the ignition lock
or turn itto position 0(KEYLESS -GO).
XFold the wiper arm away from the windshield.
XFirmly press release knob :and pull wiper
blade ;upwards from the wiper arm in the
direction of the arrow.
Installing the wiper blades
XPosition new wiper blade :in the retainer on
the wiper arm and slide it into place inthe
direction of the arrow.
The wiper blade audibly engages.
XMake sure that the wiperblade is seated cor-
rectly.
XFold the wiper arm back onto the windshield.
Windshield wipers109
Lights and windshield wipers
Z
Page 112 of 318

Problems with the windshield wipers
ProblemPossible causes/consequences andMSolutions
The windshield wipers
are jammed.Leaves or snow, for example, may be obstructing the windshield wiper
movement. The wiper motor has been deactivated.
XFor safety reasons, you should remove the SmartKey from the igni-
tion lock.
or
XSwitch off the engine using the Start/Stop button and open the
driver's door.
XRemove the cause of the obstruction.
XSwitch the windshield wipers back on.
The windshield wipers
fail completely.The windshield wiper drive is malfunctioning.
XSelect another wiper speed on the combination switch.
XHave the windshield wipers checked at a qualified specialist work-
shop.
110Windshield wipers
Lights and windshield wipers
Page 124 of 318

Where possible, avoid spinning the drive
wheels when pulling away on slippery roads.
You could otherwise damage the drive train.
SmartKey positions
SmartKey
gTo remove the SmartKey
(shift the transmission to position P)
1Power supply for some consumers, such as
the windshield wipers
2Ignition (power supply for all consumers)
and drive position
3To start the engine
iThe SmartKey can be turned in the ignition
lock even if it is not the correct SmartKey for
the vehicle. The ignition is not switched on.
The engine cannot be started.
KEYLESS-GO
General notes
Vehicles with KEYLESS-GO are equipped with
Smartkeys featuring the integrated KEYLESS-
GO function and a detachable Start/Stop but-
ton.
The Start/Stop button must be inserted in the
ignition lock and the Smartkey must be in the
vehicle.
When you insert the Start/Stop button into the
ignition lock, the system needs approximately
two seconds recognition time. You can then use
the Start/Stop button.
Pressing the Start/Stop button several times in
succession corresponds to the different key
positions in the ignition lock. This is only the
case if you are not depressing the brake pedal. If you depress the brake pedal and press the
Start/Stop button, the engine starts immedi-
ately.
A check which periodically establishes a radio
connection between the vehicle and the Smart-
key determines whether a valid Smartkey is in
the vehicle. This occurs, for example, when
starting the engine.
To start the vehicle without actively using the
Smartkey:
Rthe Start/Stop button must be inserted in the
ignition lock.
Rthe Smartkey must be in the vehicle.
Rthe vehicle must not be locked with the
Smartkey or KEYLESS-GO (Ypage 73).
Do not keep the KEYLESS-GO key:
Rwith electronic devices, e.g. a mobile phone
or another Smartkey.
Rwith metallic objects, e.g. coins or metal foil.
Rinside metallic objects, e.g. a metal case.
This can affect the functionality of KEYLESS-GO.
If you lock the vehicle with the Smartkey's
remote control or with KEYLESS-GO, after a
short time:
Ryou will not be able to switch on the ignition
with the Start/Stop button.
Ryou will not be able to start the engine with the
Start/Stop button until the vehicle is
unlocked again.
If you lock the vehicle centrally using the button
on the front door (
Ypage 79), you can continue
to start the engine with the Start/Stop button.
The engine can be switched off while the vehicle
is in motion by pressing and holding the Start/
Stop button for three seconds. This fun
ction
operates independently of the ECO start/stop
automatic engine switch-off function.
122Driving
Driving and parking
Page 125 of 318

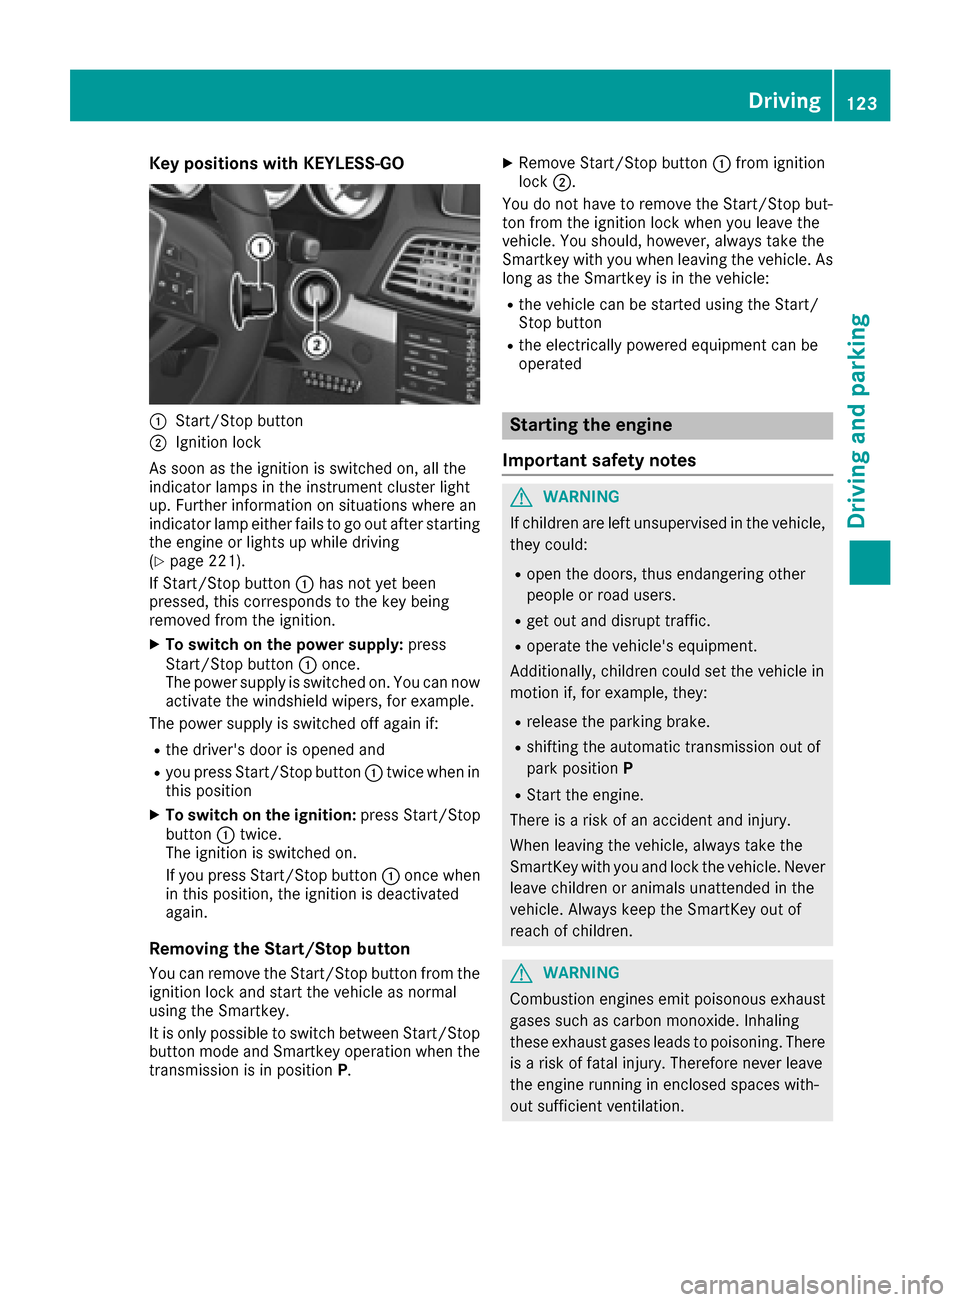
Key positions with KEYLESS-GO
:Start/Stopbutto n
;Ignition loc k
As soo nas th eignition is switched on ,all th e
indicator lamps in th einstrumen tcluste rligh t
up. Further information on situation swher ean
indicator lamp either fails to go out after starting
th eengin eor lights up while driving
(
Ypage 221).
If Start/Sto pbutto n: has no tyet been
pressed, this correspond sto th eke ybein g
remove dfrom th eignition .
XTo switch on th epower supply :press
Start/Sto pbutto n: once.
The power suppl yis switched on .You can no w
activat eth ewindshield wipers, for example .
The power suppl yis switched off again if:
Rth edriver' sdoor is opened and
Ryou press Start/Sto pbutto n: twice when in
this position
XTo switch on th eignition: press Start/Sto p
butto n: twice.
The ignition is switched on .
If you press Start/Sto pbutto n: once when
in this position ,th eignition is deactivated
again .
Removing the Start/S topbutton
You can remove th eStart/Sto pbutto nfrom th e
ignition loc kand start th evehicl eas normal
usin gth eSmartkey.
It is only possible to switch between Start/Sto p
butto nmod eand Smartke yoperation when th e
transmission is in position P.
XRemove Start/Stopbutto n: from ignition
loc k;.
You do no thave to remove th eStart/Sto pbut -
to nfrom th eignition loc kwhen you leav eth e
vehicle. You should, however ,always tak eth e
Smartke ywit hyou when leaving th evehicle. As
lon gas th eSmartke yis in th evehicle:
Rth evehicl ecan be started usin gth eStart /
Stop butto n
Rtheelectrically powered equipmen tcan be
operate d
Starting the engine
Important safety notes
GWARNIN G
If children are lef tunsupervised in th evehicle,
they could:
Ropen th edoors, thus endangering other
people or road users.
Rget out and disrupt traffic.
Roperate th evehicle's equipment.
Additionally, children could set th evehicl ein
motion if, for example ,they:
Rrelease th eparking brake.
Rshiftin gth eautomatic transmission out of
park positio nP
RStart th eengine.
Ther eis aris kof an acciden tand injury.
When leaving th evehicle, always tak eth e
SmartKey wit hyou and loc kth evehicle. Never
leav echildren or animals unattended in th e
vehicle. Always keep th eSmartKey out of
reac hof children .
GWARNING
Combustion engines emit poisonous exhaust
gase ssuc has carbon monoxide. Inhalin g
these exhaust gase sleads to poisoning .Ther e
is aris kof fatal injury. Therefore never leav e
th eengin erunnin gin enclosed spaces with-
out sufficien tventilation .
Driving123
Driving and parking
Z
Page 256 of 318

Engine compartment
Hood
Important safety notes
GWARNING
If the hood is unlatched, it may open up when the vehicle is in motion and block your view.
There is a risk of an accident.
Never unlatch the hood while driving. Before
every trip, ensure that the hood is locked.
GWARNING
When opening and closing the hood, it may
suddenly fall into the closed position. There is a risk of injury to persons within range of
movement of the hood.
Open and close the hood only when no one is
within its range of movement.
GWARNING
Opening the hood when the engine is over-
heated or when there is a fire in the engine
compartment could expose you to hot gases
or other service products. There is a risk of
injury.
Let an overheated engine cool down before
opening the hood. If there is a fire in the
engine compartment, keep the hood closed
and contact the fire department.
GWARNING
The engine compartment contains moving
components. Certain components, such as
the radiator fan, may continue to run or start
again suddenly when the ignition is off. There is a risk of injury.
If you need to do any work inside the engine
compartment:
Rswitch off the ignition
Rnever reach into the area where there is a
risk of danger from moving components,
such as the fan rotation area
Rremove jewelry and watches
Rkeep items of clothing and hair, for exam-
ple, away from moving parts
GWARNING
The ignition system and the fuel injection sys-
tem work under high voltage. If you touch
components which are under voltage, you
could get an electric shock. There is a risk of
injury.
Never touch components of the ignition sys-
tem or fuel injection system when the ignition
is switched on.
Opening the hood
GWARNING
Certain components in the engine compart-
ment, such as the engine, radiator and parts
of the exhaust system, can become very hot.
Working in the engine compartment poses a
risk of injury.
Where possible, let the engine cool down and touch only the components described in the
following.
GWARNING
When the hood is open and the windshield
wipers are set in motion, you can be injured by
the wiper linkage. There is a risk of injury.
Always switch off the windshield wipers and
the ignition before opening the hood.
!Make sure that the windshield wipers are
not folded away from the windshield. You
could otherwise damage the windshield wip-
ers or the hood.
254Engine compartment
Maintenance and care
Page 257 of 318

XMake sure that the windshield wipers are
turned off.
XPull release lever:on the hood.
The hood is released.
XReach into the gap, pull hood catch handle ;
up and lift the hood.
If you lift the hood by approximately 15 in
(40 cm), the hood is opened and held open
automatically by the gas-filled strut.
Closing the hood
XLower the hood and let it fall from a height of
approximately 8 in (20 cm).
XCheck that the hood has engaged properly.
If the hood can be raised slightly, it is not
properly engaged. Open it again and close it
with a little more force.
Engine oil
General notes
Depending on your driving style, the vehicle
consumes up to 0.9 US qt (0.8 liters) of oil per
600 miles (1,000 km). The oil consumption may be higher than this when the vehicle is new or if
you frequently drive at high engine speeds.
Depending on the engine, the oil dipstick may be
in a different location.
When checking the oil level:
Rpark the vehicle on a level surface.
Rthe engine should be switched off for approx-
imately five minutes if the engine is at normal
operating temperature.
Rif the engine is not at normal operating tem-
perature, e.g. if the engine was only started
briefly, wait about 30 minutes before carrying
out the measurement.
Checking the oil level using the oil dip-
stick
GWARNING
Certain components in the engine compart-
ment, such as the engine, radiator and parts
of the exhaust system, can become very hot.
Working in the engine compartment poses a
risk of injury.
Where possible, let the engine cool down and touch only the components described in the
following.
XPull oil dipstick :out of the dipstick guide
tube.
XWipe off oil dipstick :.
XSlowly slide oil dipstick :into the guide tube
to the stop, and take it out again.
If the level is between MIN mark =and MAX
mark ;, the oil level is correct.
XIf the oil level has dropped to MIN mark =or
below, add 1.1 US qt (1.0 liter) of engine oil.
Engine compartment255
Maintenance and care
Z
Page 263 of 318

Matte finish care
!Never polish the vehicle or the light alloy
wheels. Polishing causes the finish to shine.
!The following may cause the paint to
become shiny and thus reduce the matte
effect:
Rstrong rubbing of the paintwork with
unsuitable materials
Rfrequent use of automatic car washes
Rwashing the vehicle in direct sunlight
!Never use paint cleaner, buffing or polishing
products, or gloss preserver, e.g. wax. These
products are only suitable for high-gloss sur-
faces. Their use on vehicles with matte finish
leads to considerable surface damage (shiny,
mottled areas).
Always have paintwork repairs carried out at a
qualified specialist workshop.
!Do not use wash programs with a hot wax
treatment under any circumstances.
Observe these notes if your vehicle has a clear
matte finish. This will help you to avoid damage
to the paintwork due to incorrect treatment.
These notes also apply to light alloy wheels with a clear matte finish.
iThe vehicle should preferably be washed by
hand using a soft sponge, car shampoo and
plenty of water.
iUse only insect remover and car shampoo
from the range of recommended and
approved Mercedes-Benz care products.
Cleaning the vehicle parts
Cleaning the wheels
GWARNING
The water jet from a circular jet nozzle (dirt
blasters) can cause invisible exterior damage
to the tires or chassis components. Compo-
nents damaged in this way may fail unexpect-
edly. There is a risk of an accident.
Do not use power washers with circular jet
nozzles to clean the vehicle. Have damaged
tires or chassis components replaced imme-
diately.
!Do not use acidic wheel cleaning products
to remove brake dust. This could damage
wheel bolts and brake components.
!Do not park the vehicle for an extended
period straight after cleaning it, particularly
after having cleaned the wheels with wheel
cleaner. Wheel cleaners could cause
increased corrosion of the brake discs and
brake pads/linings. For this reason, you
should drive for a few minutes after cleaning.
Braking heats the brake discs and the brake
pads/linings, thus drying them. The vehicle
can then be parked.
Cleaning the windows
GWARNING
You could become trapped by the windshield wipers if they start moving while cleaning the
windshield or wiper blades. There is a risk of
injury.
Always switch off the windshield wipers and
the ignition before cleaning the windshield or
wiper blades.
!Do not use dry cloths, abrasive products,
solvents or cleaning agents containing sol-
vents to clean the inside of the windows. Do
not touch the insides of the windows with
hard objects, e.g. an ice scraper or ring. There
is otherwise a risk of damaging the windows.
!Clean the water drainage channels of the
windshield and the rear window at regular
intervals. Deposits such as leaves, petals and pollen may under certain circumstances pre-
vent water from draining away. This can lead
to corrosion damage and damage to elec-
tronic components.
XClean the inside and outside of the windows
with a damp cloth and a cleaning product that
is recommended and approved by Mercedes-
Benz.
Cleaning wiper blades
GWARNING
You could become trapped by the windshield wipers if they start moving while cleaning the
windshield or wiper blades. There is a risk of
injury.
Care261
Maintenance and care
Z
Page 264 of 318

Always switch off the windshield wipers and
the ignition before cleaning the windshield orwiper blades.
!Do not pull the wiper blade. Otherwise, the
wiper blade could be damaged.
!Do not clean wiper blades too often and do
not rub them too hard. Otherwise, the graph-
ite coating could be damaged. This could
cause wiper noise.
!Hold the wiper arm securely when folding
back. The windshield could be damaged if the
wiper arm smacks against it suddenly.
XFold the windshield wiper arms away from the
windshield.
XCarefully clean the wiper blades with a damp
cloth.
XFold the windshield wiper arms back again
before switching on the ignition.
Cleaning the exterior lighting
!Only use cleaning agents or cleaning cloths
which are suitable for plastic light lenses.
Unsuitable cleaning agents or cleaning cloths
could scratch or damage the plastic light len- ses.
XClean the plastic lenses of the exterior light-
ing using a wet sponge and a mild cleaning
agent, e.g. Mercedes-Benz car shampoo or
cleaning cloths.
Mirror turn signals
!Only use cleaning agents or cleaning cloths
that are suitable for plastic lenses. Unsuitable
cleaning agents or cleaning cloths could
scratch or damage the plastic lenses of the
mirror turn signals.
XClean the plastic lenses of the mirror turn sig-
nals in the exterior mirror housing using a wet
sponge and mild cleaning agent, e.g.
Mercedes-Benz car shampoo or cleaning
cloths.
Cleaning the sensors
!If you clean the sensors with a power
washer, make sure that you keep a distance
of at least 11.8 in (30 cm) between the vehicle
and the power washer nozzle. Information about the correct distance is available from
the equipment manufacturer.
XClean sensors
:of the driving systems with
water, car shampoo and a soft cloth.
Cleaning the rear view camera
!Do not clean the camera lens and the area
around the rear view camera with a power
washer.
XUse clear water and a soft cloth to clean cam- era lens :.
Cleaning the 360° camera
!Do not clean the camera lens and the area
around the 360° camera with a power
washer.360
262Care
Maintenance and care