2016 MERCEDES-BENZ CLS-Class audio
[x] Cancel search: audioPage 198 of 246

Media Interface basic display
:Main function bar
;Display for the active data medium
=Media menu bar
?Title display in the media list
ACurrent track and number in track list
BNumerical time display
CGraphic time display
DAdditional display area with cover view
Switching to Media Interface
XConnect a data medium to USB socket 1 or
USB socket 2 (
Ypage 184).
XSelect the basic menu for Media Interface 1
or Media Interface 2 (
Ypage 179).
If playable media files are found, they will
be played by COMAND.
If you remove a device, the No Device
Connectedmessage appears.
Supported devices
The following data media can be connected to
COMAND via the Media Interface:
RiPod®
RiPhone®
RiPad®
RMP3
RUSB devices
iIt is not possible to run two Apple®devi-
ces simultaneously.
iiPod®, iPhone®and iPad®are registered
trademarks of Apple Inc., Cupertino, Cali-
fornia, USA.
iAudio files, photos and video files can be
played back.
For details and a list of supported devices,
visit our website at http://www.mercedes-
benz-mobile.com/ . Then follow the instruc-
tions in the "Media Interface" section.
Or call the Mercedes-Benz Customer Assis-
tance Center at 1-800-FOR-MERCedes
(1-800-367-6372) (for the USA) or Customer
Relations at 1-800-387-0100 (for Canada).
Supported data formats
Musicmp3, wma, aac
Videompeg, wmv, mov,
avi, mp4
Imagesjpg, jpeg, bmp, png
Selecting a music file
Selecting with the controller
XTo display the current track list: press
the controller in the basic display.
The track list for the active data medium
appears.
XTo select a track: turn the controller and
press to confirm.
XTo skip forwards or backwards to a
track: turn the controller in the basic dis-
play.
The selected track is played.
Fast forward/rewind
XWith the media source active in the basic
display, slide 1the controller and hold
it until the desired position has been
reached.
196Operation with the Media Interface
Media
Page 199 of 246

Search function
Selecting Search using media menu bar
XSlide 6the controller.
The media menu bar appears.
XTo select Search: turn and press the con-
troller.
The category list appears.
Overview
The following categories are listed:
RCurrent Track List
RFolder
RSelect By Cover
RKeyword Search
RPlaylists
RArtists
RAlbums
RTracks
RGenres
RYear
RComposers
RVideos
RPhotos
RAudiobücher (Audio Books)
RPodcasts
RiTunes U
RGenius Mixes
iThe functions are available as soon as the
entire media content has been read and
analyzed.
If the same device is reconnected with
unchanged media content, these functions
are available more quickly.
The categories Audio Books, Podcasts,
iTunes U
®and Genius Mixes®are only
available for Apple®devices.
When connecting Apple
®devices, the cat-
egories “Folder”, “Year”, "Videos" and
“Photos” are not available.
XTo select a category, e.g. CurrentTrack
List: turn and press the controller.
The selection list appears.
XSelect the required track.
XKeyword search: using the controller,
enter the characters for the desired search
term and confirm (
Ypage 189).
Search results are sorted according to the
available categories, displayed and can
then be selected.
Playback options
Operation with the Media Interface197
Media
Z
Page 200 of 246

XSelect playback options (Ypage 184).
iThePlayMoreLikeThisoption is also
available for Apple®devices. This is only
possible if the Genius function is activated
in iTunes followed by a synchronization of
the Apple
®device with iTunes again.
Video function
If playable video files are found, they will be
played by COMAND.
XTo switch on full-screen mode: press the
controller in the basic display.
XTo show the video menu: slide 6the con-
troller in full-screen mode.
The Media Interface menu bar appears.
XTo select Options: turn and press the con-
troller.
XSelect Video Settings.
Operate Video Settings
(Ypage 200).
Video DVD mode
Important safety notes
GWARNING
The CD/DVD drive is a class 1 laser product.
If you open the housing of the CD/DVD drive,
there is a risk of exposure to invisible laser
radiation. This laser radiation could damage
your retina. There is a risk of injury.
Never open the housing. Always have main-
tenance and repair work carried out at a quali- fied specialist workshop.
GWARNING
Handling discs while driving may distract you from traffic conditions. You could also lose
control of the vehicle. There is a risk of an
accident.
Handle discs only when the vehicle is station-
ary.
Bear in mind that at a speed of only 30 mph
(approximately 50 km/h) your vehicle covers
a distance of 44 feet (approximately 14 m)
ever yse cond.
General notes
Notes on discs
!Do not affix stickers or labels to the discs.
They could peel off and damage COMAND.
Stickers can cause the disc to bend, which
can result in read errors and disc recogni-
tion problems.
!COMAND is designed to play discs that
comply with the EN 60908 standard. There-
fore, you can only use discs with a maxi-
mum thickness of 1.3 mm.
If you insert thicker discs, e.g. those that
contain data on both sides (DVD on one
side and audio data on the other), they can- not be ejected and can damage the device.
Only use round discs with a diameter of
12 cm. Do not use discs with a diameter of
8 cm, even with an adapter.
The variety of data media, burners and burn
software means there is no guarantee that
the system will be able to play discs that you
have copied yourself.
DVD playback conditions
If video DVDs do not conform to the NTSC or
PAL TV standards, they may create picture,
sound or other problems during playback.
198Video DVD mode
Media
Page 208 of 246

Your COMANDequipment
i
These operatin ginstruction sdescribe all
th estandar dan doptional equipmen tof
your COMAN Dsystem, as available at th e
time of going to print .Country-specifi cdif -
ference sare possible. Bear in min dthat
your vehicle may no tfeature all function s
described here. Thi salso applies to safety-
relevant systems an dfunctions.
iRead th einformation on qualified special-
ist workshop sin th evehicle Operator's
Manual.
Sound settings
Calling up th esound menu
You can mak evarious soun dsetting sfo rth e
differen taudio an dvideo sources. It is possi-
ble to set more bass fo rradio mode than fo r
audio CD mode, fo rexample. The respective
soun dmen ucan be called up from th emen u
of th edesire dmode.
XSwitch to radio mode (Ypage 166).
or
XSwitch to media mode (Ypage 178).
XTo display themen ubars: slid e6 the
controller .
XTo selectSoundin th emen ubar :turn an d
press th econtroller .
The men uappears wit hth elast setting
accessed, e.g. Balance/Fade r
.
Sound men uoverview
FunctionOptions
EqualizerSets treble ,mid -
range an dbase
Balance/faderAdjust sth evolume :
right/lef tan d
front/rea r
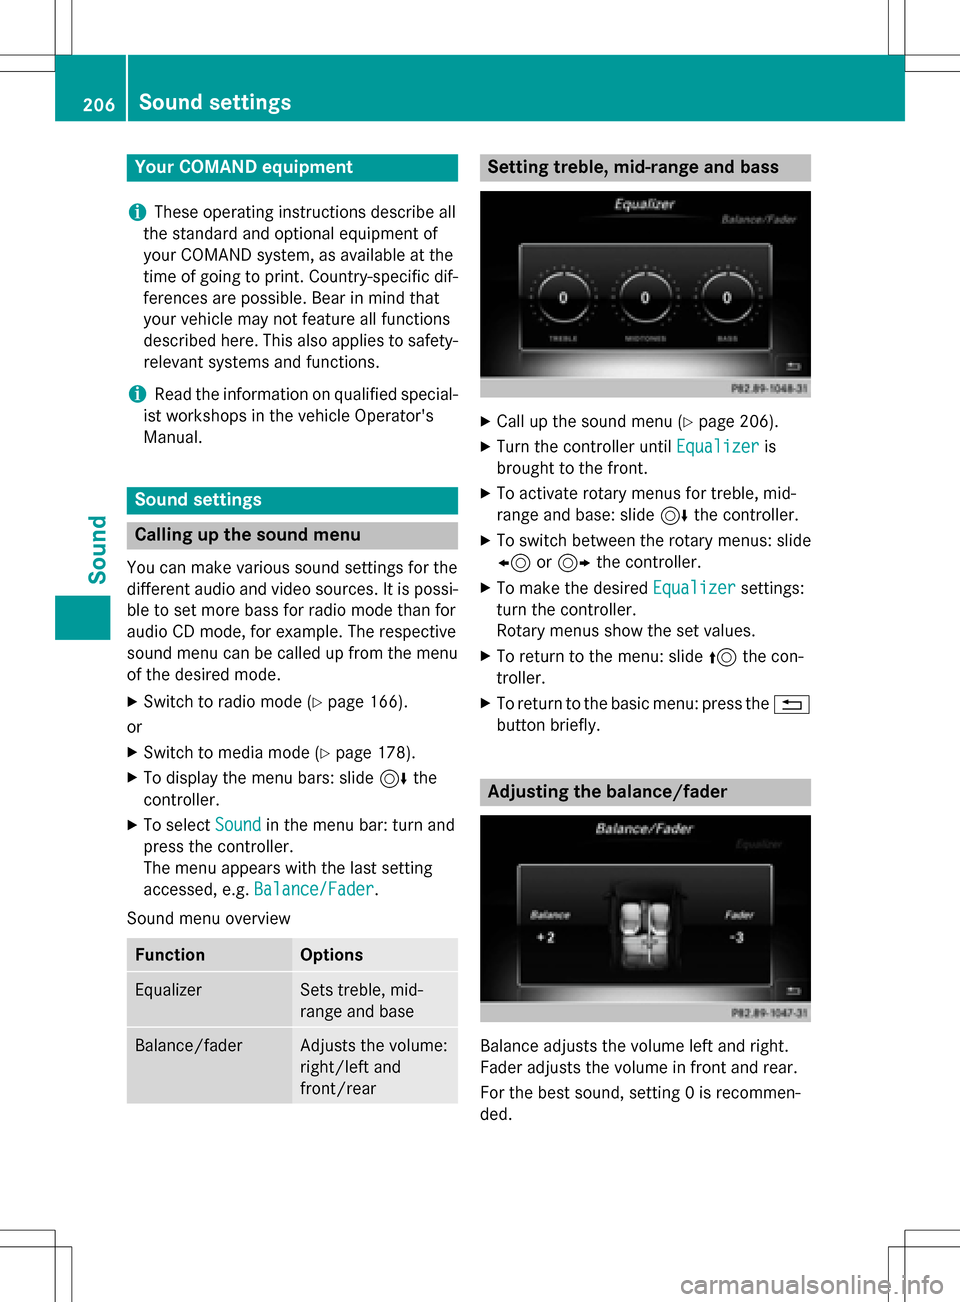
Setting treble, mid-range an dbass
XCall up th esoun dmen u (Ypage 206).
XTurnth econtroller until Equalizeris
brought to th efront.
XTo activat erotary menus fo rtreble ,mid -
range an dbase :slid e6 thecontroller .
XTo switch between th erotary menus: slid e
8 or9 thecontroller .
XTo maketh edesire dEqualize rsettings:
turn th econtroller .
Rotary menus sho wtheset values.
XTo return to th emenu: slid e5 thecon-
troller.
XTo return to th ebasi cmenu: press th e%
butto nbriefly.
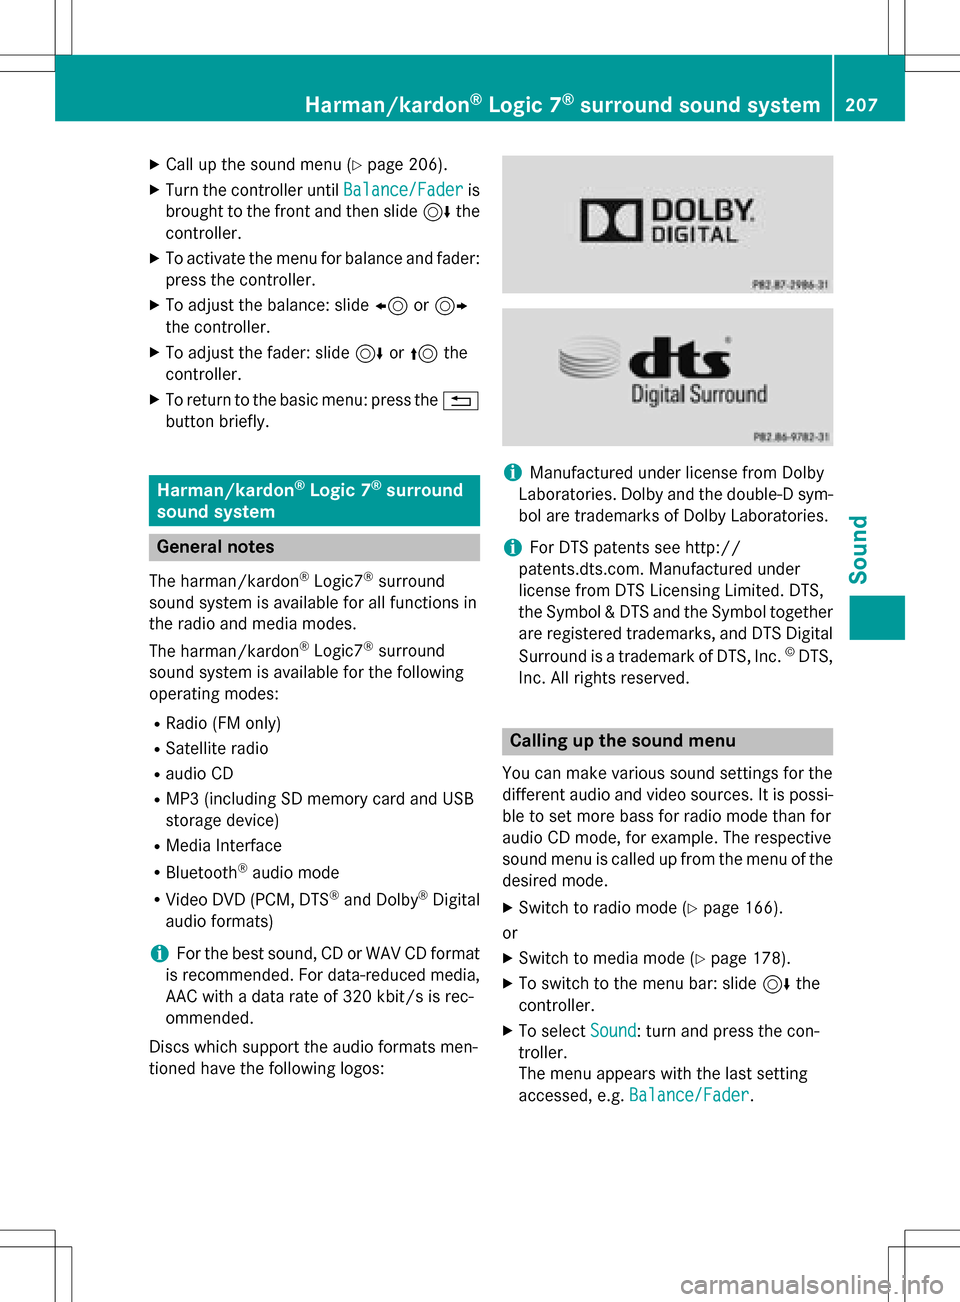
Adjusting th ebalance/fader
Balance adjust sth evolume lef tan dright .
Fader adjust sth evolume in fron tan drear.
Fo rth ebes tsound, setting 0is recommen -
ded.
206Sound settings
Sound
Page 209 of 246

XCallup the sound menu (Ypage 206).
XTurn the controller until Balance/Faderis
brought to the front and then slide 6the
controller.
XTo activate the menu for balance and fader:
press the controller.
XTo adjust the balance: slide 8or9
the controller.
XTo adjust the fader: slide 6or5 the
controller.
XTo return to the basic menu: press the %
button briefly.
Harman/kardon®Logic 7®surround
sound system
General notes
The harman/kardon®Logic7®surround
sound system isavailab lefor all functions in
the radio and media modes.
The harman/kardon
®Logic7®surround
sound system isavailab lefor the following
operating modes:
RRadio (FM only)
RSatellit e radio
Raudio CD
RMP3 (including SDmemory card and USB
storage device)
RMedia Interface
RBluetooth®audio mode
RVide o DVD (PCM, DTS®and Dolby®Digital
audio formats)
iFor the best sound, CD or WAV CD format
is recommended. For data-reduced media,
AAC with a data rate of 320 kbit/s isrec-
ommended.
Discs which support the audio formats men-
tioned have the following logos:
iManufactured under license from Dolby
Laboratories. Dolby and the double-D sym-
bol are trademarks of Do lbyLaboratories.
iFor DTS patents see http://
patents.dts.com. Manufactured under
license from DTS Licensing Limit ed. DTS,
the Symbol & DTS and the Symbol together
are registered trademarks, and DTS Dig ital
Surround isa trademark of DT S, Inc.
©DTS,
In c. All rights reserved.
Calling up the sound menu
You can make various sound settings for the
diff erent audio and video sources. It ispossi-
ble to set more bass for radio mode than for
audio CDmode, for example. The respecti ve
sound menu iscalled up from the menu of the
desired mode.
XSwit ch to radio mode (Ypage 166).
or
XSwit ch to med iamode (Ypage 178).
XTo switch to the menu bar: slide 6the
controller.
XTo select Sound: turn and press the con-
troller.
The menu appears with the last setting
accessed, e.g. Balance/Fader
.
Harman/kardon®Logic 7®surround sound system207
Sound
Page 211 of 246

XCallup the sound menu (Ypage 207).
XTurn the controller until Logic7is inthe
center.
XSlide 6the controller.
The left-hand rotary menu to switch sur-
round sound on and off isactivated.
XTo activate Logic7: turn the controller unt il
On
is active.
or
XTo deactivate Logic7: turn the controller,
unt ilOFF
is active.
XTo return to the menu: slide 5the con-
troller.
XTo return to the basic menu: press the %
button briefly.
For the optimum audio experience for all pas-
sengers when Logic7
®is switched on, the
balance settings should be set to the center
of the veh icleinterior.
MP3 tracks should have a bit rate of at least
128 kb it/s.
Surround sound playback does not function
for mono signal sources, such as for AM radio
mode.
If radio reception ispoor, e.g. ina tunne l,you
should switch off Logic7
®, since itmay oth-
erwise switch dynamically between stereo
and mono and cause temporary sound dis-
tortions.
Bang & Olufsen BeoSound
General notes
The Bang & Olufsen Beo Sound AMG sound
system isavailab lefor all functions inthe
radio and med iamodes.
The fol lowing modes are available for the
Bang & Olufsen Beo Sound AMG sound sys-
tem:
RRadio (FM only)
RSatellit e radio
Raudio CD
RMP3/A AC
RMediaInterface
RBluetooth®audio mode
RVideo DVD (PCM, DTS®and Do lby®Digital
audio formats)
iFor the best sound, CD or WAVCDformat
is recommended. For data-reduced media,
AAC with a data rate of 320 kb it/s isrec-
ommended.
iManufactured under license from Dolby
Laboratories. Dolby and the double-D sym-
bol are trademarks of Do lbyLaboratories.
iFor DTS patents see http://
patents.dts.com. Manufactured under
license from DTS Licensing Limit ed. DTS,
the Symbol & DTS and the Symbol together
are registered trademarks, and DTS Dig ital
Surround isa trademark of DT S, Inc.
©DTS,
In c. All rights reserved.
Calling up the sound menu
You can make various sound settings for the
diff erent audio and video sources. It ispossi-
ble to set more bass for radio mode than for
audio CDmode, for example. The respecti ve
sound menu iscalled up from the menu of the
desired mode.
XSwit ch to radio mode (Ypage 166).
or
XSwit ch to med iamode (Ypage 178).
Bang & Olufsen BeoSound209
Sound
Page 213 of 246

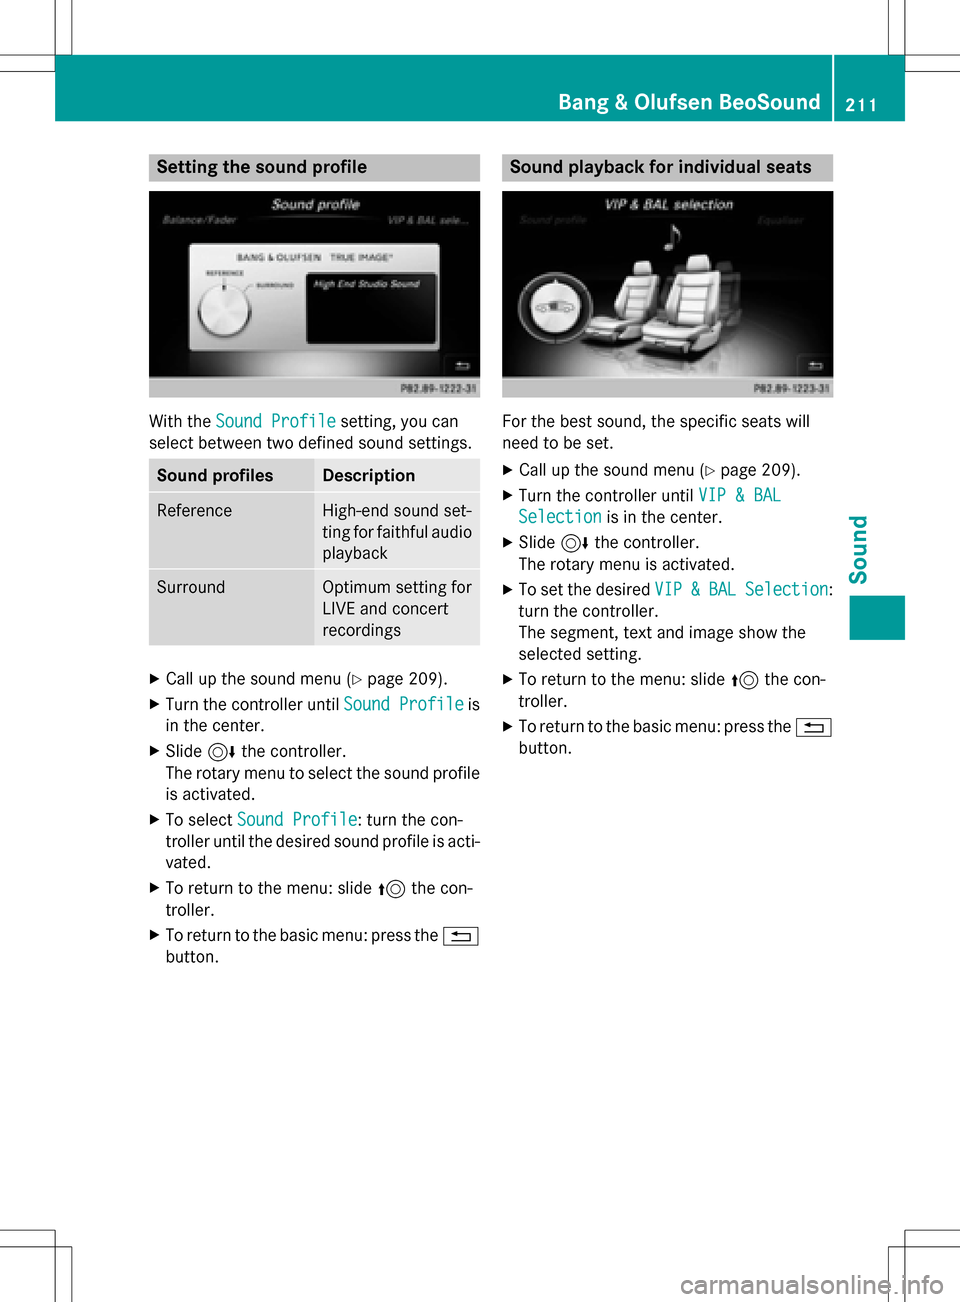
Setting the sound profile
With theSound Profilesetting, you can
select between two defined sound settings.
Sound profilesDescription
ReferenceHigh-end sound set-
ting for faithful audio
playback
SurroundOptimum setting for
LIVE and concert
recordings
XCall up the sound menu (Ypage 209).
XTurn the controller until Sound Profileis
in the center.
XSlide 6the controller.
The rotary menu to select the sound profile is activated.
XTo select Sound Profile: turn the con-
troller until the desired sound profile is acti-
vated.
XTo return to the menu: slide 5the con-
troller.
XTo return to the basic menu: press the %
button.
Sound playback for individual seats
For the best sound, the specific seats will
need to be set.
XCall up the sound menu (Ypage 209).
XTurn the controller until VIP & BAL
Selectionis in the center.
XSlide6the controller.
The rotary menu is activated.
XTo set the desired VIP&BALSelection:
turn the controller.
The segment, text and image show the
selected setting.
XTo return to the menu: slide 5the con-
troller.
XTo return to the basic menu: press the %
button.
Bang & Olufsen BeoSound211
Sound
Page 225 of 246

Your COMAND equipment................224
Overview ............................................ 224
Basic functions ................................ .229
Syste msettings ................................ 231
Audio CD/DV Dan dMP 3mode ........ 232
Video DVD mode .............................. .235
Active COMAND medi asource
mode .................................................. 239
AUX mode .......................................... 241
223
Rear Seat Entertainment System