2016 MERCEDES-BENZ CLA keyless
[x] Cancel search: keylessPage 13 of 374

Important safety notes .................. 290
Opening/closing the garage door .. 292
Programming (button in the rear-
view mirror) ................................... 290
Synchronizing the rolling code ....... 291
Gasoline ............................................ .3 66
Gear indicator (on-board com-
puter, Mercedes-AMG vehicles) ....... 223
Genuine parts ...................................... 21
Glove box .......................................... .2 73
H Handbrake
see Parking brake
Hazard warning lamps
Display message ............................ 256
Switching on/off ........................... 117
Head restraints
Adjusting ....................................... 103
Adjusting (manually) ..................... .1 03
Adjusting (rear) .............................. 104
Headlamps
Fogging up ..................................... 119
see Automatic headlamp mode
Heating
see Climate control
High beam flasher ............................ .1 17
High-beam headlamps
Adaptive Highbeam Assist ............. 118
Changing bulbs .............................. 122
Display message ............................ 241
Switching on/off ........................... 116
Hill start assist .................................. 151
HOLD function
Activating ....................................... 188
Deactivating ................................... 188
Display message ............................ 246
Function/notes ............................ .1 87
Hood
Closing .......................................... .2 97
Display message ............................ 255
Important safety notes .................. 296
Opening ......................................... 296
Horn ...................................................... 30
Hydroplaning ..................................... 177 I Ignition lock
see Key positions
Immobilizer .......................................... 73
Indicator and warning lamps
COLLISION PREVENTION ASSIST
PLUS .............................................. 269
Indicator lamps
see Warning and indicator lamps
Indicators
see Turn signals
Instrument cluster
Overview .......................................... 31
Settings ......................................... 221
Warning and indicator lamps ........... 32
Instrument cluster lighting .............. 210
Interior lighting
Control .......................................... .1 20
Emergency lighting ........................ 120
Overview ........................................ 119
Reading lamp ................................. 119
J Jack
Storage location ............................ 310
Using ............................................. 352
Jump starting (engine) ..................... .3 19
K
Key positions
Start/Stop button .......................... 147
KEYLESS-GO
Convenience closing feature ............ 90
Deactivation ..................................... 77
Locking ............................................ 77
Unlocking ......................................... 77
Kickdown
Driving tips ................................... .1 61
Manual gearshifting ....................... 166
Knee bag .............................................. 50
L
Lamps
see Warning and indicator lamps Index 11
Page 18 of 374

Seat heating problem .................... 106
Storing settings (memory func-
tion) ............................................... 110
Switching seat heating on/off ....... 105
Securing cargo .................................. 276
Selector lever
Cleaning ......................................... 307
Sensors (cleaning instructions) ....... 305
Service menu (on-board com-
puter) .................................................. 221
Service message
see ASSYST PLUS
Service products
Brake fluid ..................................... 369
Coolant (engine) ............................ 369
Engine oil ....................................... 368
Fuel ................................................ 365
Important safety notes .................. 365
Refrigerant (air-conditioning sys-
tem) ............................................... 371
Washer fluid ................................... 370
Setting the air distribution ............... 138
Setting the airflow ............................ 138
Settings
Factory (on-board computer) ......... 223
On-board computer ....................... 221
SETUP (on-board computer) ............. 224
Side impact air bag ............................. 50
Side marker lamp (display mes-
sage) ................................................... 242
Side windows
Cleaning ......................................... 304
Convenience closing feature ............ 90
Convenience opening feature .......... 89
Important safety information ........... 88
Opening/closing .............................. 89
Problem (malfunction) ..................... 92
Resetting ......................................... 91
Reversing feature ............................. 88
Sliding sunroof
see Panorama roof with power
tilt/sliding panel
SmartKey
Changing the battery ....................... 80
Changing the programming ............. 78
Checking the battery ....................... 79
Convenience closing feature ............ 90 Convenience opening feature .......... 89
Display message ............................ 257
Door central locking/unlocking ....... 76
Important safety notes .................... 76
KEYLESS-GO start function .............. 78
Loss ................................................. 81
Mechanical key ................................ 78
Positions (ignition lock) ................. 147
Problem (malfunction) ..................... 81
Sta rti
ng the engine ........................ 149
SmartKey positions (ignition lock) .. 147
Snow chains ...................................... 331
Sockets
Center console .............................. 281
General notes ................................ 281
Rear compartment ......................... 281
Trunk ............................................. 281
Special seat belt retractor .................. 59
Specialist workshop ............................ 25
Speed, controlling
see Cruise control
Speedometer
Activating/deactivating the addi-
tional speedometer ........................ 221
Digital ............................................ 215
In the Instrument cluster ................. 31
Segments ...................................... 210
Selecting the display unit ............... 221
SPORT handling mode
Deactivating/activating
(Mercedes-AMG vehicles) ................ 70
Warning lamp ................................. 264
Standing lamps
Display message ............................ 241
Switching on/off ........................... 116
Start-off assist
Activating ....................................... 189
Important safety notes .................. 189
Start/Stop button
Removing ....................................... 148
Starting the engine ........................ 150
Start/stop function
see ECO start/stop function
Starting (engine) ................................ 149
STEER CONTROL .................................. 72
Steering
Display message ............................ 25616
Index
Page 44 of 374

Useful information
i This Operator's Manual describes all
models and all standard and optional equip-
ment of your vehicle available at the time of
publication of the Operator's Manual.
Country-specific differences are possible.
Please note that your vehicle may not be
equipped with all features described. This
also applies to safety-related systems and
functions.
i Read the information on qualified special-
ist workshops ( Y
page 25).
Panic alarm
X
To activate: press and hold the
�3 button �C for approx. one second.
A visual and audible alarm is triggered if the
alarm system is armed. X
To deactivate: press �3 button �C
again.
or X
Insert the SmartKey into the ignition lock.
or, in vehicles with KEYLESS-GO start-func-
tion or KEYLESS ‑ GOX
Press the Start/Stop button.
The SmartKey must be in the vehicle. Occupant safety
Introduction to the restraint system The restraint system can reduce the risk of
vehicle occupants coming into contact with
parts of the vehicle's interior in the event of
an accident. The restraint system can also
reduce the forces to which vehicle occupants
are subjected during an accident.
The restraint system comprises: R
Seat belt system R
Air bags R
Child restraint system R
Child seat securing systems
The components of the restraint system work
in conjunction with each other. They can only
deploy their protective function if, at all times,
all vehicle occupants: R
have fastened their seat belts correctly
( Y
page 46) R
have adjusted their seat and head restraint
properly ( Y
page 101).
As the driver, you also have to make sure that
the steering wheel is adjusted correctly.
Observe the information relating to the cor-
rect driver's seat position ( Y
page 100).
You also have to make sure that an air bag can
inflate properly if deployed ( Y
page 48).
An air bag supplements a correctly worn seat
belt. As an additional safety device, the air
bag increases the level of protection for vehi-
cle occupants in the event of an accident. For
example, if, in the event of an accident, the
protection offered by the seat belt is suffi-
cient, the air bags are not deployed. When an
accident occurs, only the air bags that
increase protection in that particular accident
situation are deployed. However, seat belts
and air bags generally do not protect against
objects penetrating the vehicle from the out-
side.
Information on restraint system operation
can be found under "Triggering of the Emer-
gency Tensioning Devices and air bags"
( Y
page 56).42
Occupant safety
Safety
Page 75 of 374
No steering assistance is provided from
STEER CONTROL, if: R
ESP ®
is malfunctioning.R
the lighting is faulty.
If ESP ®
is malfunctioning, you will be assisted
further by the electrical power steering.
Protection against theft
Immobilizer The immobilizer prevents your vehicle from
being started without the correct SmartKey. X
To activate with the SmartKey: remove
the SmartKey from the ignition lock. X
To activate with KEYLESS-GO start-
function or KEYLESS-GO: switch the igni-
tion off and open the driver's door. X
To deactivate: switch on the ignition.
When leaving the vehicle, always take the
SmartKey with you and lock the vehicle. Any-
one can start the engine if a valid SmartKey
has been left inside the vehicle.
i The immobilizer is always deactivated
when you start the engine.
In the event that the engine cannot be star-
ted (yet the vehicle's battery is charged),
the system is not operational. Contact an
authorized Mercedes-Benz Center or call
1-800-FOR-MERCedes (in the USA) or
1-800-387-0100 (in Canada).
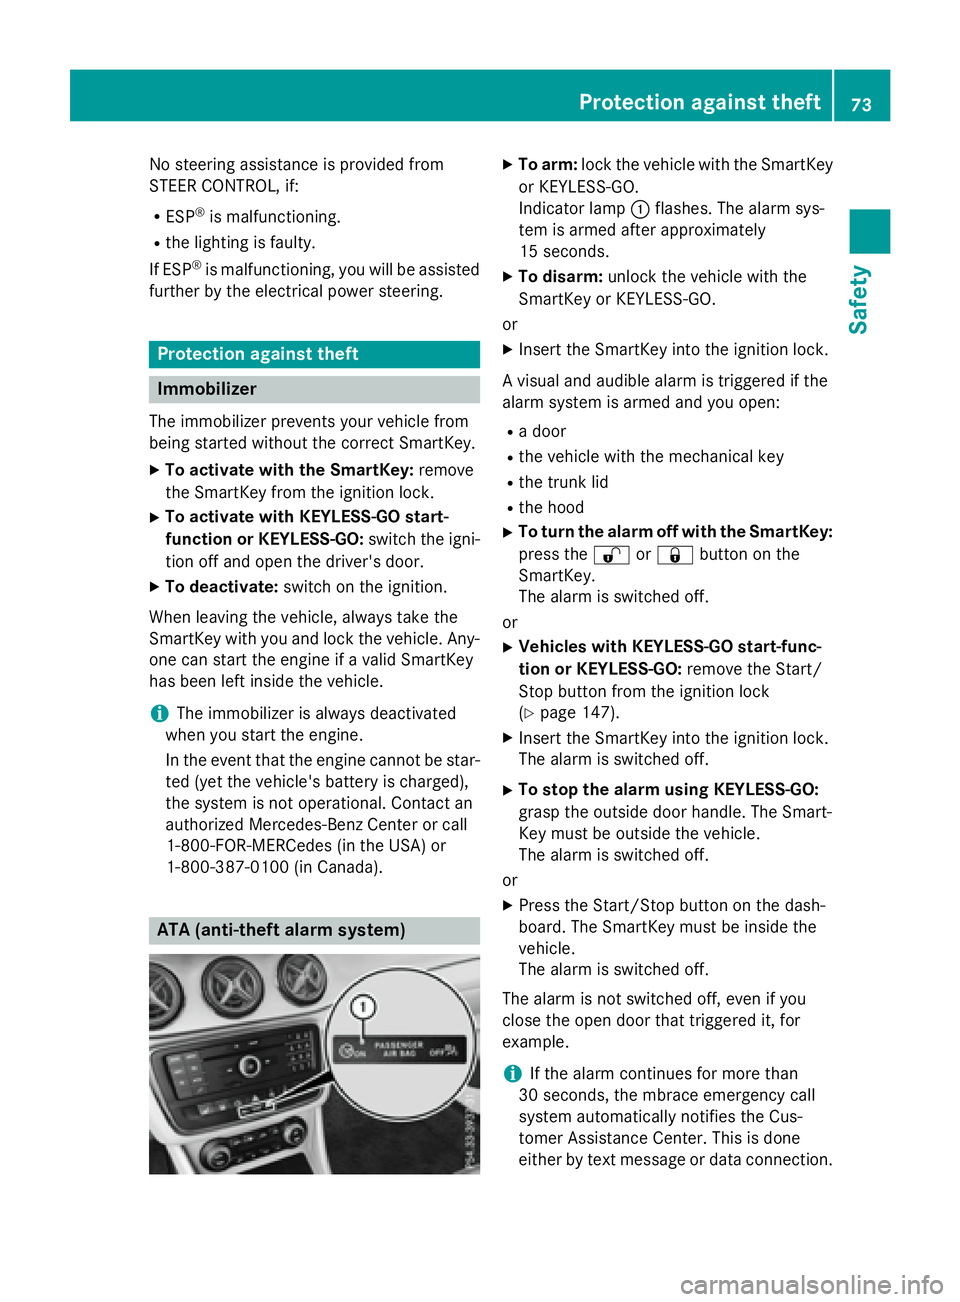
ATA (anti-theft alarm system) X
To arm: lock the vehicle with the SmartKey
or KEYLESS-GO.
Indicator lamp �C flashes. The alarm sys-
tem is armed after approximately
15 seconds. X
To disarm: unlock the vehicle with the
SmartKey or KEYLESS-GO.
or X
Insert the SmartKey into the ignition lock.
A visual and audible alarm is triggered if the
alarm system is armed and you open: R
a door R
the vehicle with the mechanical key R
the trunk lid R
the hood X
To turn the alarm off with the SmartKey:
press the �6 or �7 button on the
SmartKey.
The alarm is switched off.
or X
Vehicles with KEYLESS-GO start-func-
tion or KEYLESS-GO: remove the Start/
Stop button from the ignition lock
( Y
page 147). X
Insert the SmartKey into the ignition lock.
The alarm is switched off. X
To stop the alarm using KEYLESS-GO:
grasp the outside door handle. The Smart-
Key must be outside the vehicle.
The alarm is switched off.
or X
Press the Start/Stop button on the dash-
board. The SmartKey must be inside the
vehicle.
The alarm is switched off.
The alarm is not switched off, even if you
close the open door that triggered it, for
example.
i If the alarm continues for more than
30 seconds, the mbrace emergency call
system automatically notifies the Cus-
tomer Assistance Center. This is done
either by text message or data connection.Protection against theft 73
Safety Z
Page 78 of 374
Useful information
i This Operator's Manual describes all
models and all standard and optional equip-
ment of your vehicle available at the time of
publication of the Operator's Manual.
Country-specific differences are possible.
Please note that your vehicle may not be
equipped with all features described. This
also applies to safety-related systems and
functions.
i Read the information on qualified special-
ist workshops ( Y
page 25).
SmartKey
Important safety notes
G WARNING
If children are left unsupervised in the vehicle,
they could: R
open the doors, thus endangering other
people or road users. R
get out and disrupt traffic. R
operate the vehicle's equipment.
Additionally, children could set the vehicle in
motion if, for example, they: R
release the parking brake. R
shifting the automatic transmission out of
park position PR
Start the engine.
There is a risk of an accident and injury.
When leaving the vehicle, always take the
SmartKey with you and lock the vehicle. Never
leave children or animals unattended in the
vehicle. Always keep the SmartKey out of
reach of children.
G WARNING
If you attach heavy or large objects to the
SmartKey, the SmartKey could be uninten-
tionally turned in the ignition lock. This could
cause the engine to be switched off. There is a
risk of an accident. Do not attach any heavy or large objects to the
SmartKey. Remove any bulky key rings before
inserting the SmartKey into the ignition lock.
! Keep the SmartKey away from strong
magnetic fields. Otherwise, the remote
control function could be affected.
Strong magnetic fields can occur in the
vicinity of powerful electrical installations.
Do not keep the SmartKey: R
with electronic devices, e.g. a mobile
phone or another SmartKey. R
with metallic objects, e.g. coins or metal
foil. R
inside metallic objects, e.g. a metal case.
Vehicles with KEYLESS-GO start function:
do not keep the SmartKey in the cargo com-
partment. Otherwise, the SmartKey may not
be detected, e.g. when starting the engine
using the Start/Stop button.
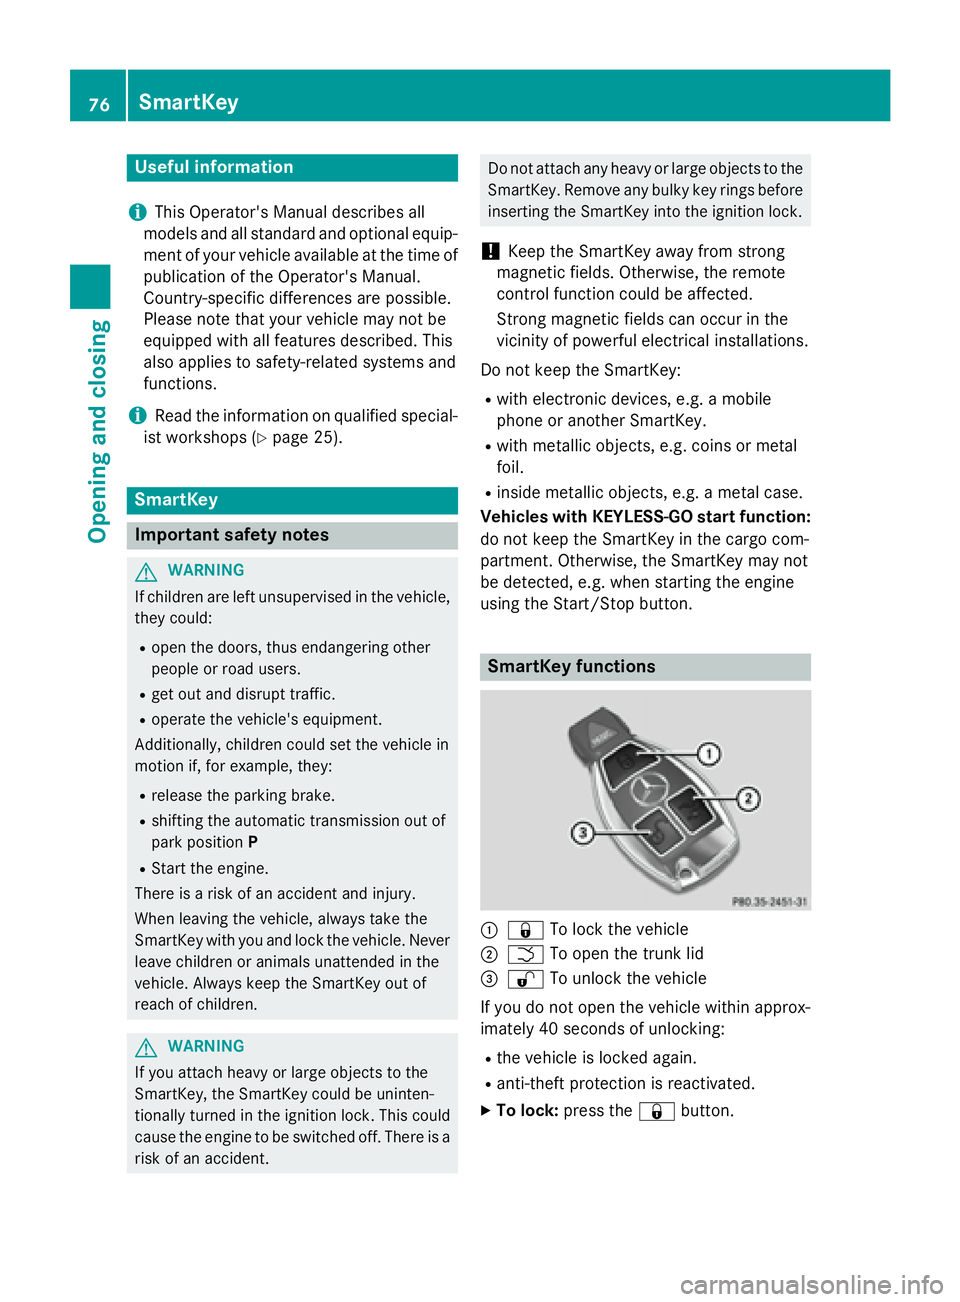
SmartKey functions
�C
�7 To lock the vehicle�D
�T To open the trunk lid�
Page 79 of 374
The SmartKey centrally locks/unlocks: R
the doors R
the trunk lid R
the fuel filler flap
The turn signals flash once when unlocking
and three times when locking.
When the locator lighting is activated in Audio
20/COMAND, it lights up when it is dark after
the vehicle is unlocked with the remote con-
trol (see separate operating instructions).
You can also set an audible signal to confirm
that the vehicle has been locked. The audible
signal can be activated and deactivated using
the on-board computer ( Y
page 222).X
To open the trunk lid automatically:
press and hold the �T button until the
trunk lid opens ( Y
page 86).
KEYLESS-GO
General notes
Bear in mind that the engine can be started by
any of the vehicle occupants if there is a
SmartKey in the vehicle.
Locking and unlocking
You can start, lock or unlock the vehicle using
KEYLESS-GO. To do this, you only need carry
the SmartKey with you. You can combine the
functions of KEYLESS-GO with those of a con-
ventional SmartKey. Unlock the vehicle by
using KEYLESS-GO, for instance, and lock it
using the �7 button on the SmartKey.
The driver's door and the door at which the
handle is used, must both be closed. The
SmartKey must be outside the vehicle. When
locking or unlocking with KEYLESS-GO, the
distance between the SmartKey and the cor-
responding door handle must not be greater
than 3 ft (1 m). A check which periodically establishes a radio
connection between the vehicle and the
SmartKey determines whether a valid Smart-
Key is in the vehicle. This occurs, for example: R
when starting the engine R
whilst driving R
when the external door handles are
touched R
during convenience closing
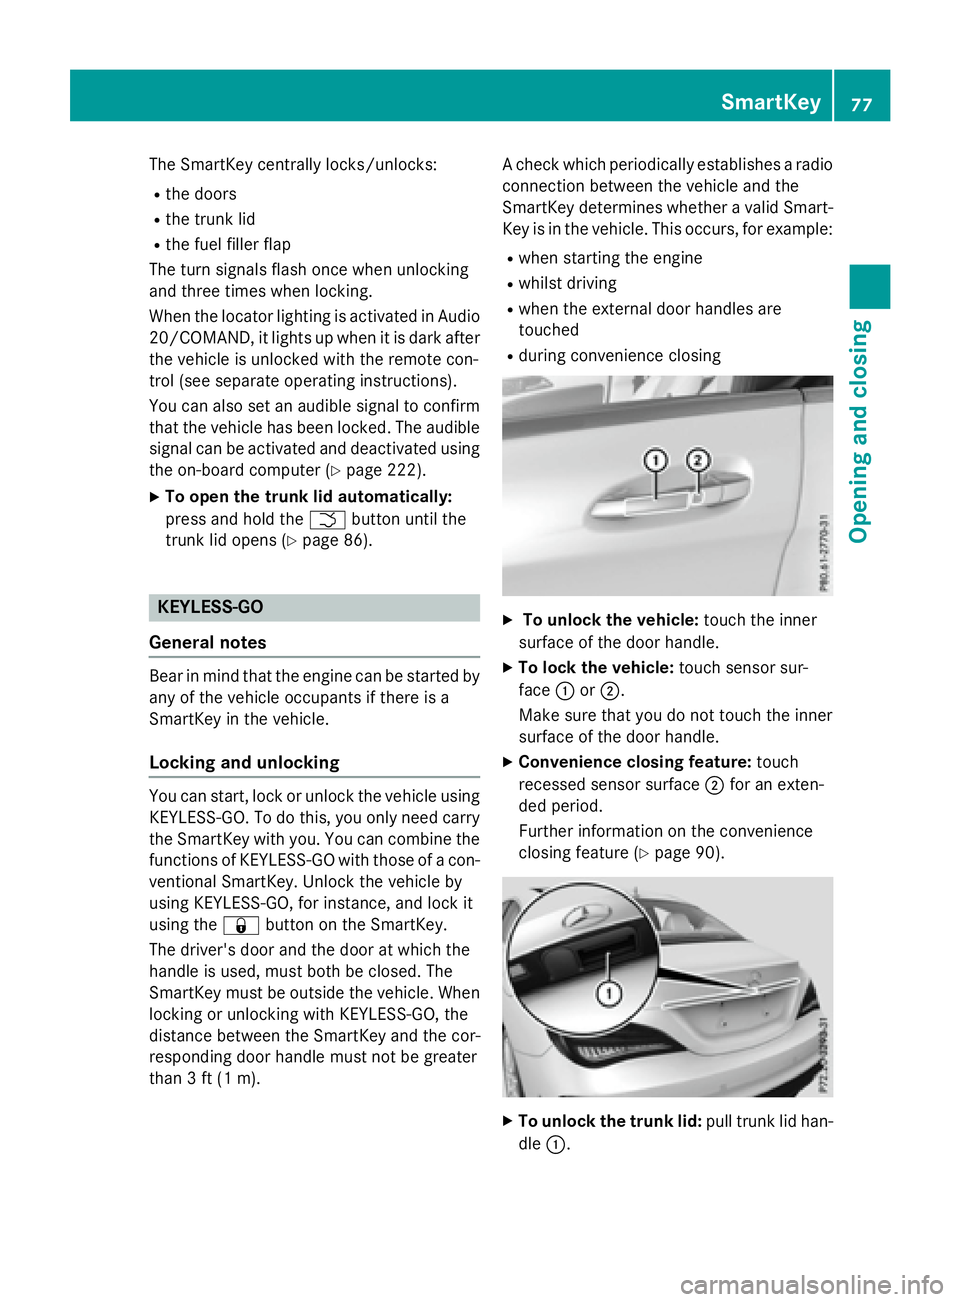
X
To unlock the vehicle: touch the inner
surface of the door handle. X
To lock the vehicle: touch sensor sur-
face �C or �D .
Make sure that you do not touch the inner
surface of the door handle. X
Convenience closing feature: touch
recessed sensor surface �D for an exten-
ded period.
Further information on the convenience
closing feature ( Y
page 90).
X
To unlock the trunk lid: pull trunk lid han-
dle �C . SmartKey 77
Opening and closing Z
Page 80 of 374
Deactivating an d activatingIf you do no t intend to use th e vehicle fo r a
longer period of time, you can deactivat e KEY-
LESS-GO . The SmartKey will then use ver y lit -
tl e power, thereby conservin g battery power.
Fo r th e purposes of activation/deactivation ,
th e vehicle mus t no t be nearby.X
To deactivate : press th e �7 butto n on
th e SmartKey twic e in rapid succession .
The battery chec k lamp of th e SmartKey
flashes twic e briefly and lights up once ,
then KEYLESS-GO is deactivated
( Y
page 79) .X
To activate : press any butto n on th e
SmartKey.
or X
Inser t th e SmartKey into th e ignition lock.
KEYLESS-GO and all of it s associated fea-
tures are available again .
KEYLESS-G O star t function
General notes
Bear in min d that th e engin e can be started by
any of th e vehicle occupant s if there is a
SmartKey in th e vehicle.
Changin g th e settings of th e locking
syste m
You can chang e th e setting s of th e locking
system. Thi s means that only th e driver's doo r
and th e fue l filler flap are unlocke d when th e
vehicle is unlocked. Thi s is useful if you fre-
quentl y trave l on your own .X
To change th e setting: press and hol d th e
�6 and �7 buttons simultaneousl y fo r approximately six seconds until th e battery
indicator lamp flashes twic e ( Y
page 79) .
If th e setting of th e locking system is changed
within th e signal range of th e vehicle, press-
in g th e �7 or �6 button: R
locks or R
unlocks th e vehicle
The SmartKey no w function s as follows :X
To unlock : press th e �6 butto n once .X
To unlock centrally : press th e �6 but -
to n twice. X
To lock centrally : press th e �7 button.
The KEYLESS-GO function is changed as fol-
lows : X
To unlock th e driver's door: touch th e
inne r surfac e of th e doo r handle on th e
driver's door. X
To unlock centrally : touch th e inne r sur -
fac e of th e doo r handle on th e front-
passenger doo r or th e rea r door.X
To lock centrally : touch th e outer sensor
surfac e on on e of th e doo r handles .X
To restor e th e factory settings: press
and hol d th e �6 and �7 buttons simul-
taneousl y fo r approximately six seconds
until th e battery chec k lamp flashes twic e
( Y
page 79).
Mechanica l key
General notes
If th e vehicle can no longer be locke d or
unlocke d wit h th e SmartKey or KEYLESS-GO ,
use th e mechanical key.
If you use th e mechanical ke y to unloc k and
ope n th e driver's doo r or th e trunk lid, th e
anti-thef t alar m system will be triggere d
( Y
page 73).
There are severa l ways to turn of f th e alarm:X
To deactivate th e alarm wit h th e key :
press th e �6 or �7 butto n on th e key.
or78
SmartKey
Opening and closing
Page 81 of 374
X
Insert the SmartKey into the ignition lock.
or X
To deactivate the alarm with KEYLESS-
GO: press the Start/Stop button in the igni-
tion lock. The SmartKey must be in the
vehicle.
or X
Lock or unlock the vehicle using KEYLESS-
GO. The SmartKey must be outside the
vehicle.
If you unlock the vehicle using the mechanical
key, the fuel filler flap will not be unlocked
automatically. X
To unlock the fuel filler flap: insert the
SmartKey into the ignition lock.
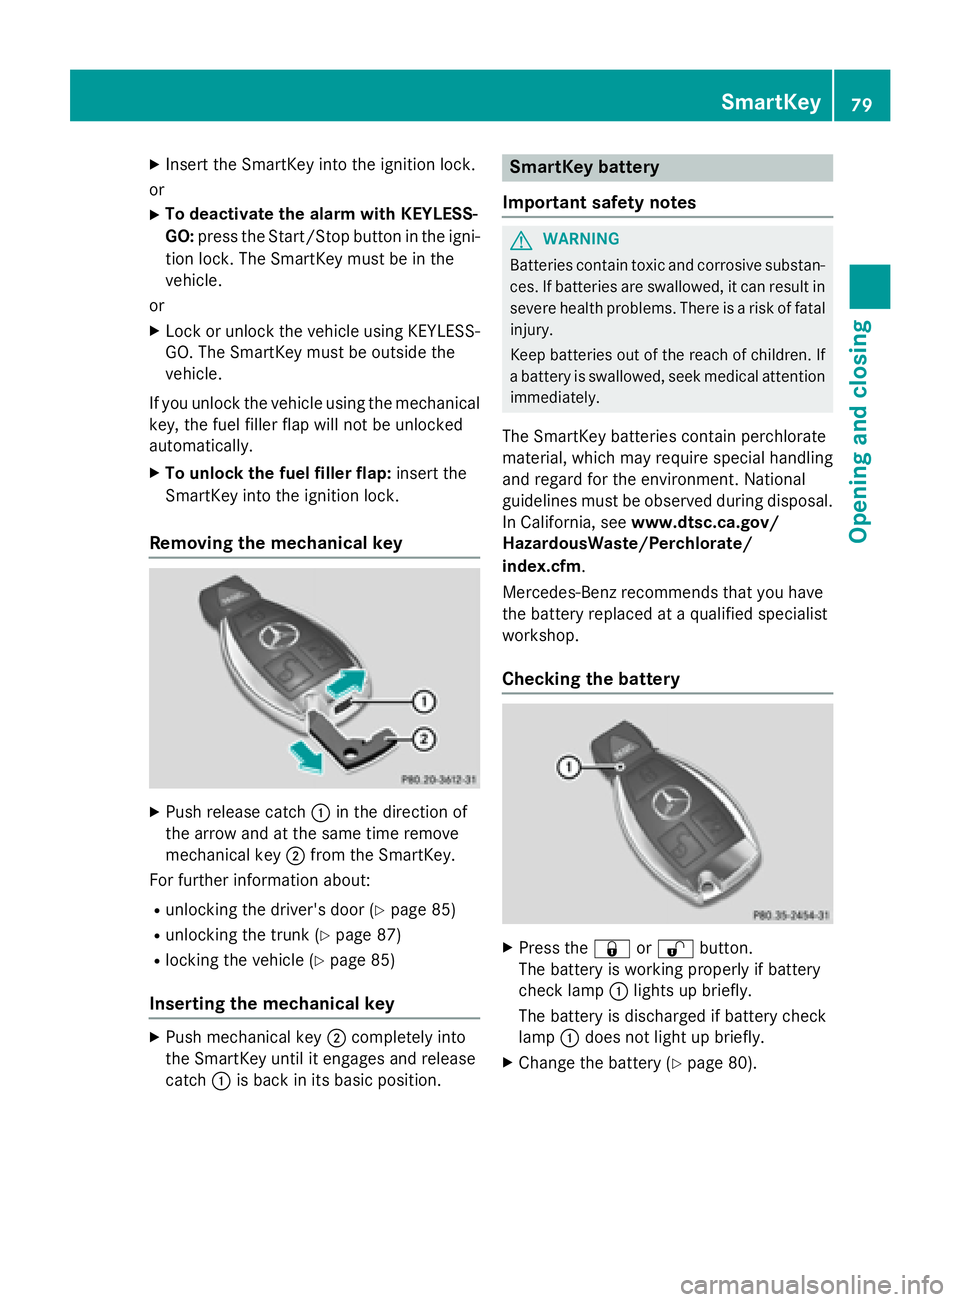
Removing the mechanical key
X
Push release catch �C in the direction of
the arrow and at the same time remove
mechanical key �D from the SmartKey.
For further information about: R
unlocking the driver's door ( Y
page 85)R
unlocking the trunk ( Y
page 87)R
locking the vehicle ( Y
page 85)
Inserting the mechanical key X
Push mechanical key �D completely into
the SmartKey until it engages and release
catch �C is back in its basic position. SmartKey battery
Important safety notes
G WARNING
Batteries contain toxic and corrosive substan-
ces. If batteries are swallowed, it can result in
severe health problems. There is a risk of fatal
injury.
Keep batteries out of the reach of children. If
a battery is swallowed, seek medical attention
immediately.
The SmartKey batteries contain perchlorate
material, which may require special handling
and regard for the environment. National
guidelines must be observed during disposal.
In California, see www.dtsc.ca.gov/
HazardousWaste/Perchlorate/
index.cfm .
Mercedes-Benz recommends that you have
the battery replaced at a qualified specialist
workshop.
Checking the battery
X
Press the �7 or �6 button.
The battery is working properly if battery
check lamp �C lights up briefly.
The battery is discharged if battery check
lamp �C does not light up briefly. X
Change the battery ( Y
page 80).SmartKey 79
Opening and closing Z