2016 MERCEDES-BENZ CLA trunk
[x] Cancel search: trunkPage 80 of 374
Deactivating an d activatingIf you do no t intend to use th e vehicle fo r a
longer period of time, you can deactivat e KEY-
LESS-GO . The SmartKey will then use ver y lit -
tl e power, thereby conservin g battery power.
Fo r th e purposes of activation/deactivation ,
th e vehicle mus t no t be nearby.X
To deactivate : press th e �7 butto n on
th e SmartKey twic e in rapid succession .
The battery chec k lamp of th e SmartKey
flashes twic e briefly and lights up once ,
then KEYLESS-GO is deactivated
( Y
page 79) .X
To activate : press any butto n on th e
SmartKey.
or X
Inser t th e SmartKey into th e ignition lock.
KEYLESS-GO and all of it s associated fea-
tures are available again .
KEYLESS-G O star t function
General notes
Bear in min d that th e engin e can be started by
any of th e vehicle occupant s if there is a
SmartKey in th e vehicle.
Changin g th e settings of th e locking
syste m
You can chang e th e setting s of th e locking
system. Thi s means that only th e driver's doo r
and th e fue l filler flap are unlocke d when th e
vehicle is unlocked. Thi s is useful if you fre-
quentl y trave l on your own .X
To change th e setting: press and hol d th e
�6 and �7 buttons simultaneousl y fo r approximately six seconds until th e battery
indicator lamp flashes twic e ( Y
page 79) .
If th e setting of th e locking system is changed
within th e signal range of th e vehicle, press-
in g th e �7 or �6 button: R
locks or R
unlocks th e vehicle
The SmartKey no w function s as follows :X
To unlock : press th e �6 butto n once .X
To unlock centrally : press th e �6 but -
to n twice. X
To lock centrally : press th e �7 button.
The KEYLESS-GO function is changed as fol-
lows : X
To unlock th e driver's door: touch th e
inne r surfac e of th e doo r handle on th e
driver's door. X
To unlock centrally : touch th e inne r sur -
fac e of th e doo r handle on th e front-
passenger doo r or th e rea r door.X
To lock centrally : touch th e outer sensor
surfac e on on e of th e doo r handles .X
To restor e th e factory settings: press
and hol d th e �6 and �7 buttons simul-
taneousl y fo r approximately six seconds
until th e battery chec k lamp flashes twic e
( Y
page 79).
Mechanica l key
General notes
If th e vehicle can no longer be locke d or
unlocke d wit h th e SmartKey or KEYLESS-GO ,
use th e mechanical key.
If you use th e mechanical ke y to unloc k and
ope n th e driver's doo r or th e trunk lid, th e
anti-thef t alar m system will be triggere d
( Y
page 73).
There are severa l ways to turn of f th e alarm:X
To deactivate th e alarm wit h th e key :
press th e �6 or �7 butto n on th e key.
or78
SmartKey
Opening and closing
Page 81 of 374
X
Insert the SmartKey into the ignition lock.
or X
To deactivate the alarm with KEYLESS-
GO: press the Start/Stop button in the igni-
tion lock. The SmartKey must be in the
vehicle.
or X
Lock or unlock the vehicle using KEYLESS-
GO. The SmartKey must be outside the
vehicle.
If you unlock the vehicle using the mechanical
key, the fuel filler flap will not be unlocked
automatically. X
To unlock the fuel filler flap: insert the
SmartKey into the ignition lock.
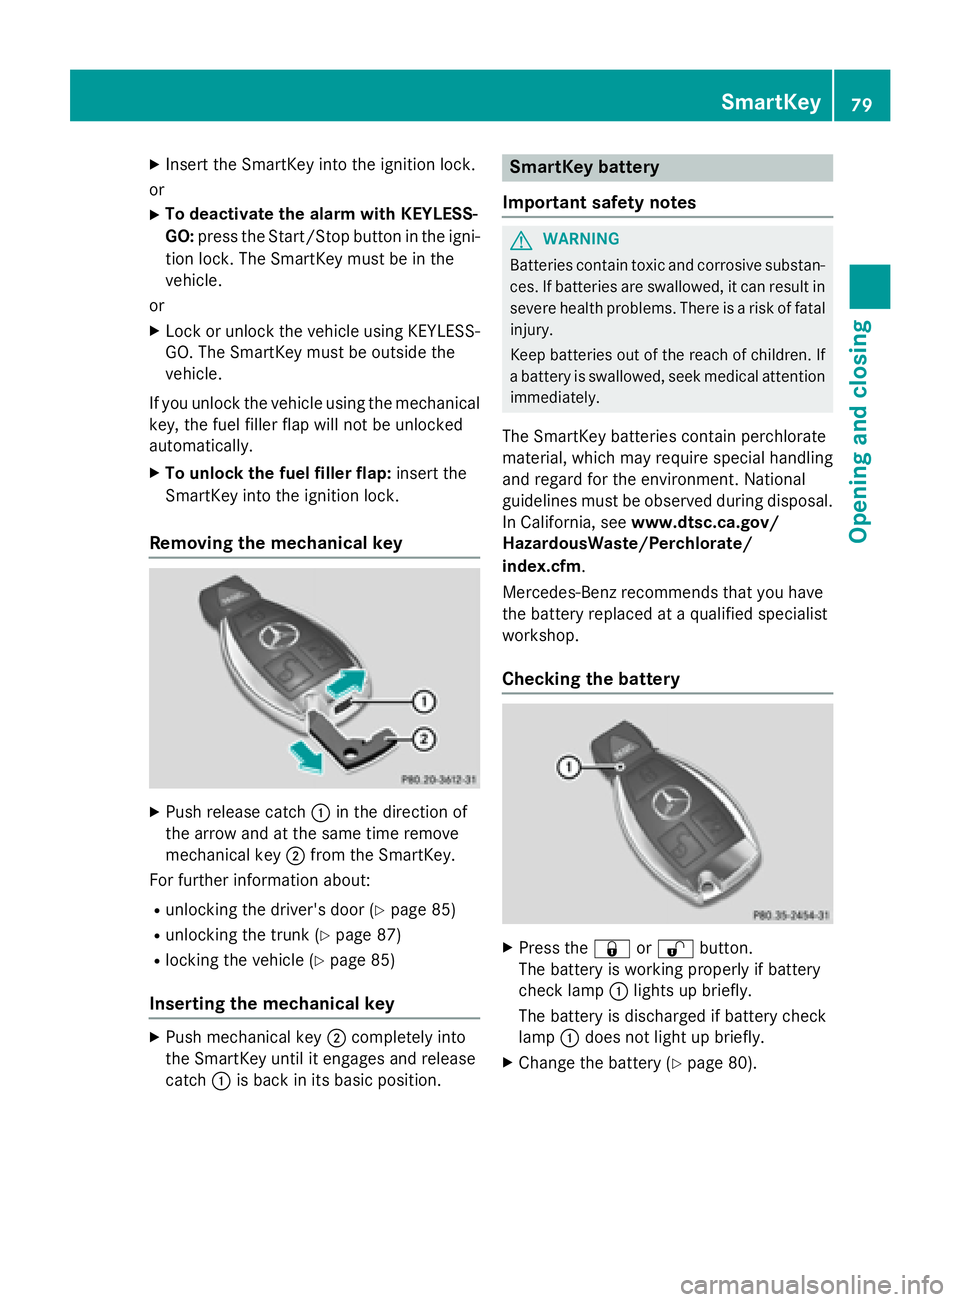
Removing the mechanical key
X
Push release catch �C in the direction of
the arrow and at the same time remove
mechanical key �D from the SmartKey.
For further information about: R
unlocking the driver's door ( Y
page 85)R
unlocking the trunk ( Y
page 87)R
locking the vehicle ( Y
page 85)
Inserting the mechanical key X
Push mechanical key �D completely into
the SmartKey until it engages and release
catch �C is back in its basic position. SmartKey battery
Important safety notes
G WARNING
Batteries contain toxic and corrosive substan-
ces. If batteries are swallowed, it can result in
severe health problems. There is a risk of fatal
injury.
Keep batteries out of the reach of children. If
a battery is swallowed, seek medical attention
immediately.
The SmartKey batteries contain perchlorate
material, which may require special handling
and regard for the environment. National
guidelines must be observed during disposal.
In California, see www.dtsc.ca.gov/
HazardousWaste/Perchlorate/
index.cfm .
Mercedes-Benz recommends that you have
the battery replaced at a qualified specialist
workshop.
Checking the battery
X
Press the �7 or �6 button.
The battery is working properly if battery
check lamp �C lights up briefly.
The battery is discharged if battery check
lamp �C does not light up briefly. X
Change the battery ( Y
page 80).SmartKey 79
Opening and closing Z
Page 86 of 374
alarm system. Switch off the alarm
( Y
page 73).
Centrally locking and unlocking the
vehicle from the insideYou can centrally lock or unlock the vehicle
from the inside. This can be useful if you wish
to lock the vehicle before pulling away, for
example.
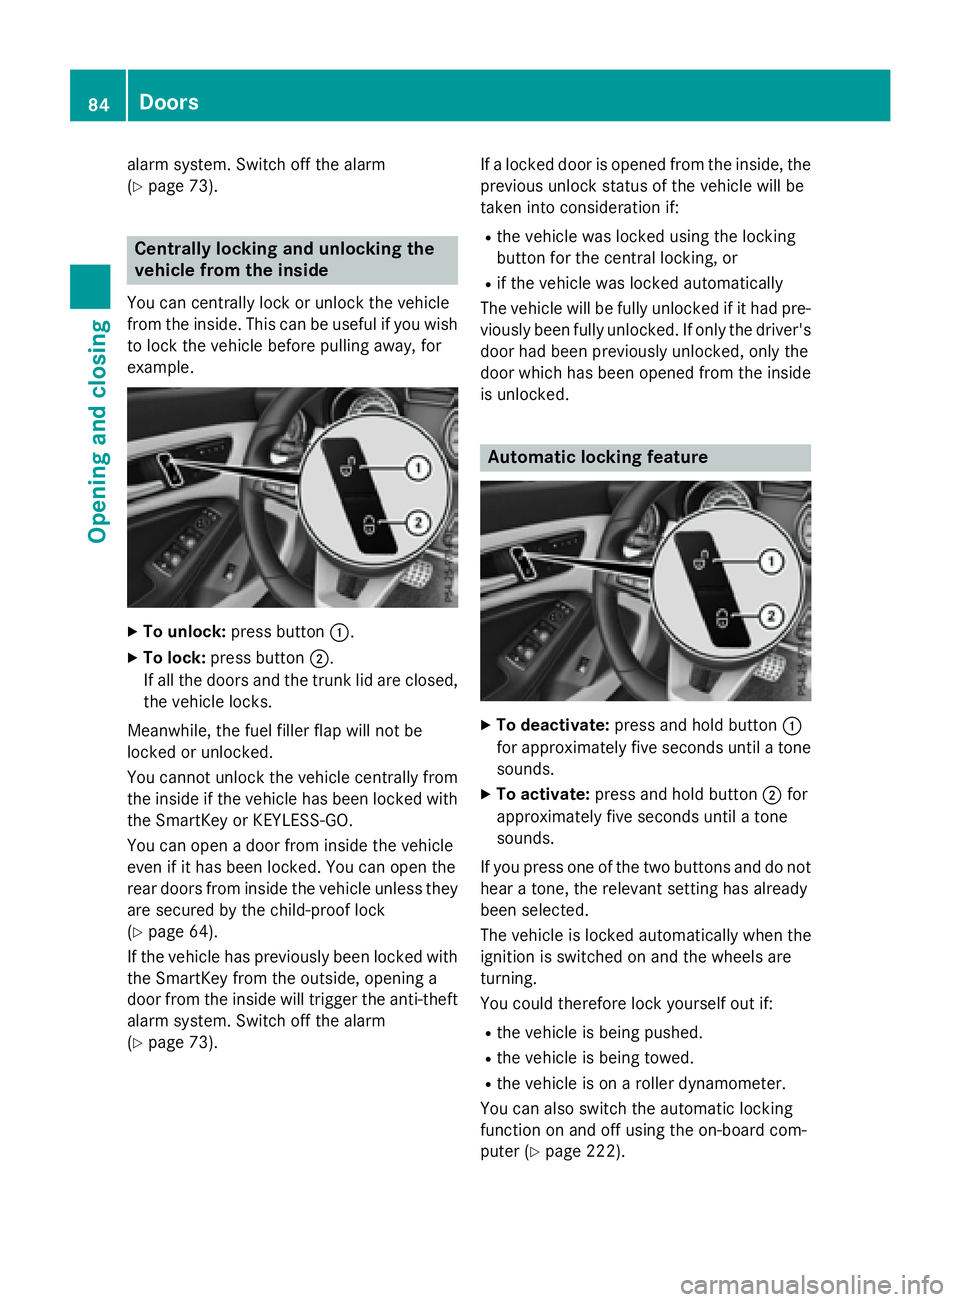
X
To unlock: press button �C .X
To lock: press button �D .
If all the doors and the trunk lid are closed,
the vehicle locks.
Meanwhile, the fuel filler flap will not be
locked or unlocked.
You cannot unlock the vehicle centrally from
the inside if the vehicle has been locked with
the SmartKey or KEYLESS-GO.
You can open a door from inside the vehicle
even if it has been locked. You can open the
rear doors from inside the vehicle unless they
are secured by the child-proof lock
( Y
page 64).
If the vehicle has previously been locked with
the SmartKey from the outside, opening a
door from the inside will trigger the anti-theft
alarm system. Switch off the alarm
( Y
page 73). If a locked door is opened from the inside, the
previous unlock status of the vehicle will be
taken into consideration if: R
the vehicle was locked using the locking
button for the central locking, or R
if the vehicle was locked automatically
The vehicle will be fully unlocked if it had pre-
viously been fully unlocked. If only the driver's
door had been previously unlocked, only the
door which has been opened from the inside
is unlocked.
Automatic locking feature
X
To deactivate: press and hold button �C
for approximately five seconds until a tone
sounds. X
To activate: press and hold button �D for
approximately five seconds until a tone
sounds.
If you press one of the two buttons and do not
hear a tone, the relevant setting has already
been selected.
The vehicle is locked automatically when the
ignition is switched on and the wheels are
turning.
You could therefore lock yourself out if: R
the vehicle is being pushed. R
the vehicle is being towed. R
the vehicle is on a roller dynamometer.
You can also switch the automatic locking
function on and off using the on-board com-
puter ( Y
page 222).84
Doors
Opening and closing
Page 87 of 374
Unlocking the driver's door (mechan-
ical key) If the vehicle can no longer be locked or
unlocked with the SmartKey or KEYLESS-GO,
use the mechanical key.
If you use the mechanical key to unlock and
open the driver's door, the anti-theft alarm
system will be triggered ( Y
page 73).X
Take the mechanical key out of the Smart-
Key ( Y
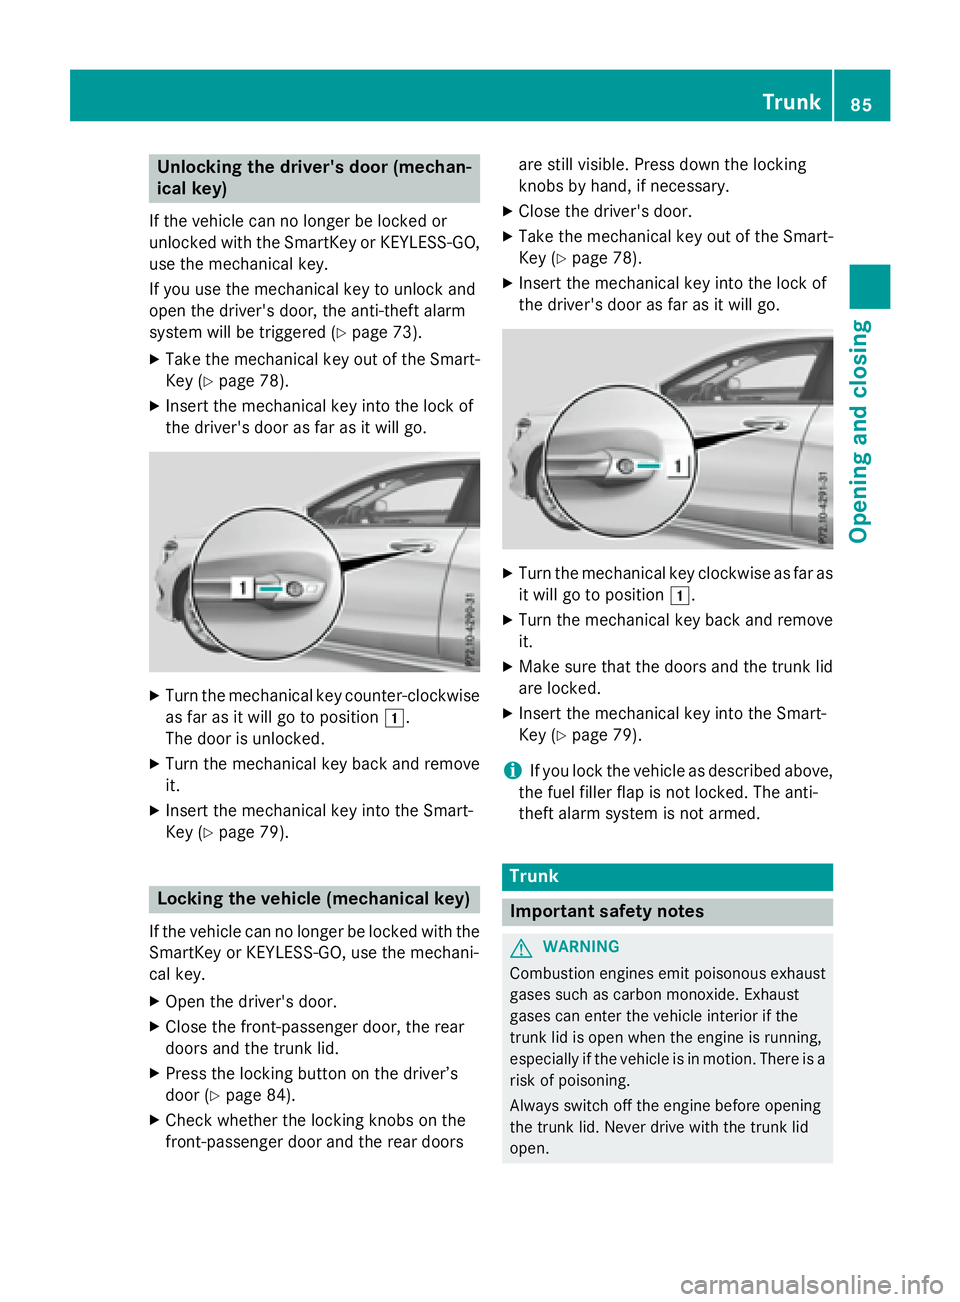
page 78).X
Insert the mechanical key into the lock of
the driver's door as far as it will go.
X
Turn the mechanical key counter-clockwise
as far as it will go to position �G .
The door is unlocked. X
Turn the mechanical key back and remove
it. X
Insert the mechanical key into the Smart-
Key ( Y
page 79).
Locking the vehicle (mechanical key)
If the vehicle can no longer be locked with the
SmartKey or KEYLESS-GO, use the mechani-
cal key. X
Open the driver's door. X
Close the front-passenger door, the rear
doors and the trunk lid. X
Press the locking button on the driver’s
door ( Y
page 84).X
Check whether the locking knobs on the
front-passenger door and the rear doors are still visible. Press down the locking
knobs by hand, if necessary. X
Close the driver's door. X
Take the mechanical key out of the Smart-
Key ( Y
page 78). X
Insert the mechanical key into the lock of
the driver's door as far as it will go.
X
Turn the mechanical key clockwise as far as
it will go to position �G .X
Turn the mechanical key back and remove
it. X
Make sure that the doors and the trunk lid
are locked. X
Insert the mechanical key into the Smart-
Key ( Y
page 79).
i If you lock the vehicle as described above,
the fuel filler flap is not locked. The anti-
theft alarm system is not armed.
Trunk
Important safety notes
G WARNING
Combustion engines emit poisonous exhaust
gases such as carbon monoxide. Exhaust
gases can enter the vehicle interior if the
trunk lid is open when the engine is running,
especially if the vehicle is in motion. There is a
risk of poisoning.
Always switch off the engine before opening
the trunk lid. Never drive with the trunk lid
open. Trunk 85
Opening and closing Z
Page 88 of 374
G WARNING
If objects, luggage or loads are not secured or
not secured sufficiently, they could slip, tip
over or be flung around and thereby hit vehicle
occupants. There is a risk of injury, particu-
larly in the event of sudden braking or a sud-
den change in direction.
Always store objects so that they cannot be
flung around. Secure objects, luggage or
loads against slipping or tipping before the
journey.
! The trunk lid swings upwards when
opened. Therefore, make sure that there is
sufficient clearance above the trunk lid.
The opening dimensions of the trunk lid can
be found in the "Vehicle data" section
( Y
page 371).
You should preferably place luggage or loads
in the trunk. Observe the loading guidelines
( Y
page 272).
Do not leave the SmartKey in the trunk. You
could otherwise lock yourself out.
The trunk lid can be: R
opened and closed manually from outside R
opened automatically from outside R
opened automatically from inside R
released with the emergency release from
the inside
Opening/closing from outside
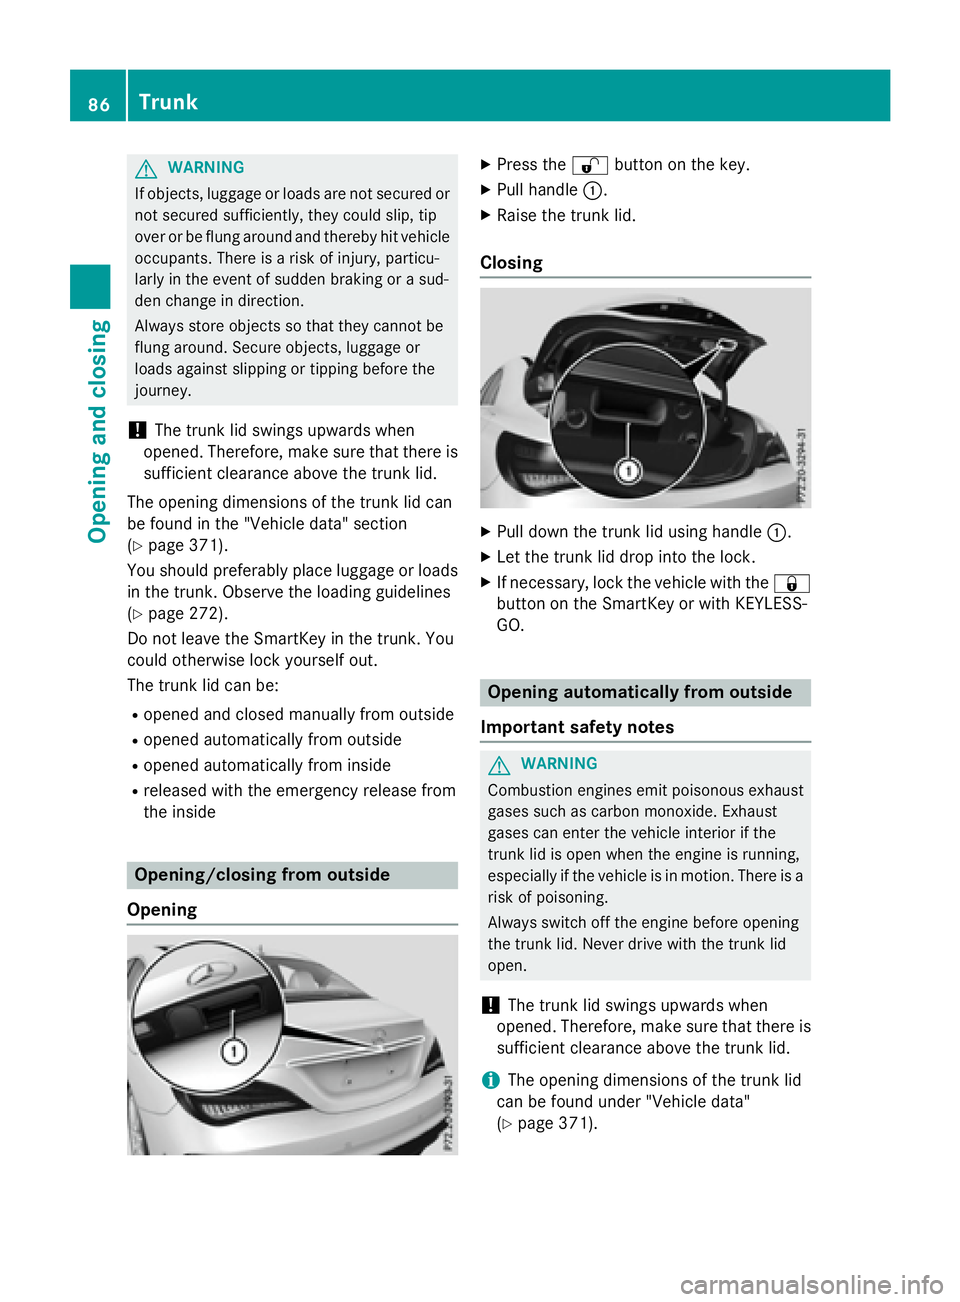
Opening X
Press the �6 button on the key. X
Pull handle �C . X
Raise the trunk lid.
Closing X
Pull down the trunk lid using handle �C .X
Let the trunk lid drop into the lock. X
If necessary, lock the vehicle with the �7
button on the SmartKey or with KEYLESS-
GO.
Opening automatically from outside
Important safety notes
G WARNING
Combustion engines emit poisonous exhaust
gases such as carbon monoxide. Exhaust
gases can enter the vehicle interior if the
trunk lid is open when the engine is running,
especially if the vehicle is in motion. There is a
risk of poisoning.
Always switch off the engine before opening
the trunk lid. Never drive with the trunk lid
open.
! The trunk lid swings upwards when
opened. Therefore, make sure that there is
sufficient clearance above the trunk lid.
i The opening dimensions of the trunk lid
can be found under "Vehicle data"
( Y
page 371).86
Trunk
Opening and closing
Page 89 of 374
Opening automatically You can open the trunk lid automatically
using the SmartKey or the handle in the trunk
lid. X
Press and hold the �T button on the
SmartKey until the trunk lid opens.
or X
If the trunk lid is unlocked, pull the trunk lid
handle and let it go again immediately.
Opening automatically from inside
Important safety notes
G WARNING
Combustion engines emit poisonous exhaust
gases such as carbon monoxide. Exhaust
gases can enter the vehicle interior if the
trunk lid is open when the engine is running,
especially if the vehicle is in motion. There is a
risk of poisoning.
Always switch off the engine before opening
the trunk lid. Never drive with the trunk lid
open.
! The trunk lid swings upwards when
opened. Therefore, make sure that there is
sufficient clearance above the trunk lid.
The opening dimensions of the trunk lid can
be found under "Vehicle data" ( Y
page 371).
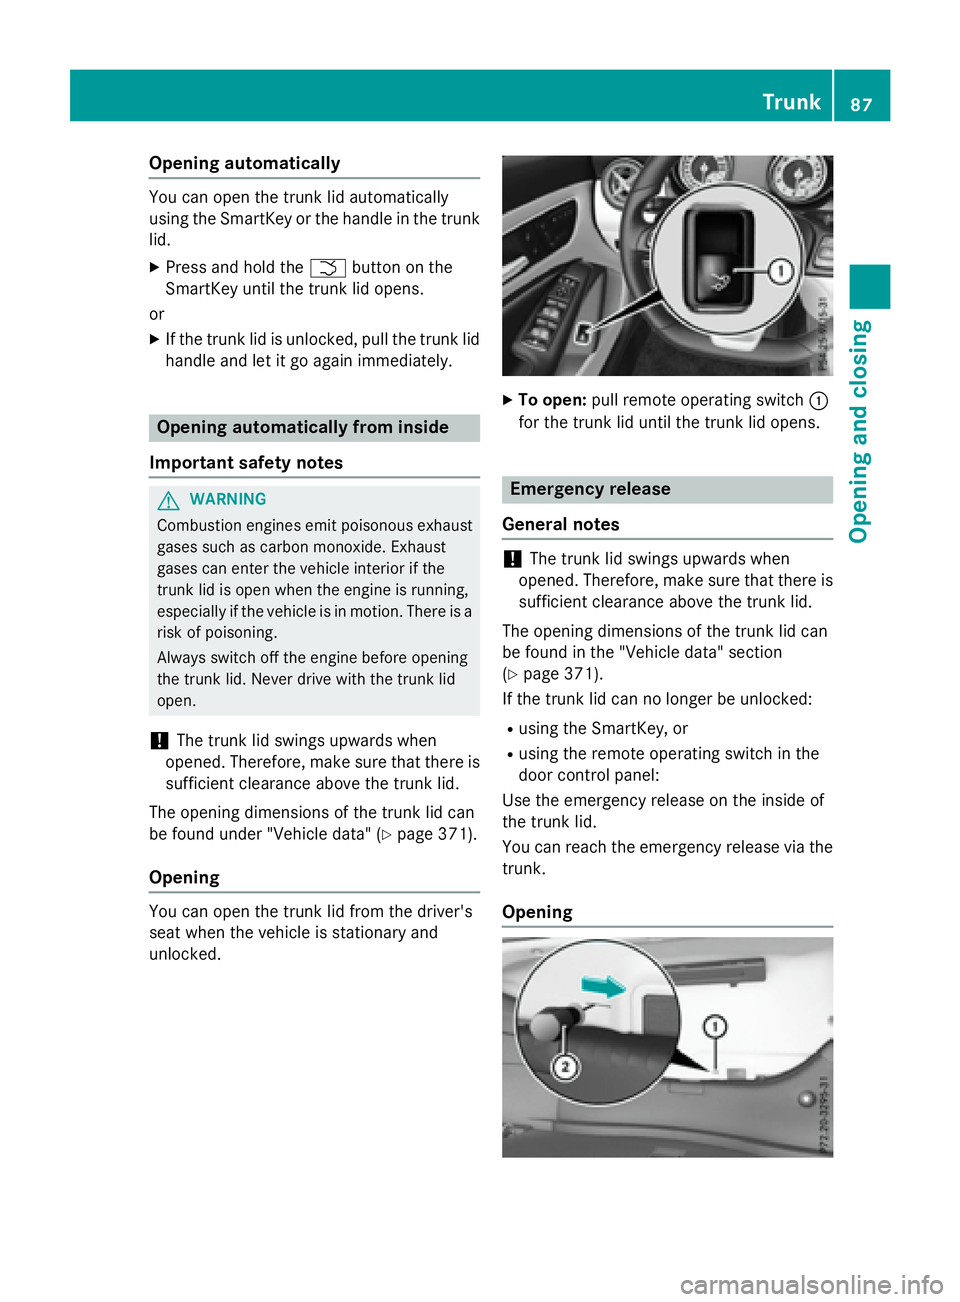
Opening
You can open the trunk lid from the driver's
seat when the vehicle is stationary and
unlocked. X
To open: pull remote operating switch �C
for the trunk lid until the trunk lid opens.
Emergency release
General notes
! The trunk lid swings upwards when
opened. Therefore, make sure that there is
sufficient clearance above the trunk lid.
The opening dimensions of the trunk lid can
be found in the "Vehicle data" section
( Y
page 371).
If the trunk lid can no longer be unlocked: R
using the SmartKey, or R
using the remote operating switch in the
door control panel:
Use the emergency release on the inside of
the trunk lid.
You can reach the emergency release via the
trunk.
Opening Trunk 87
Opening and closing Z
Page 90 of 374
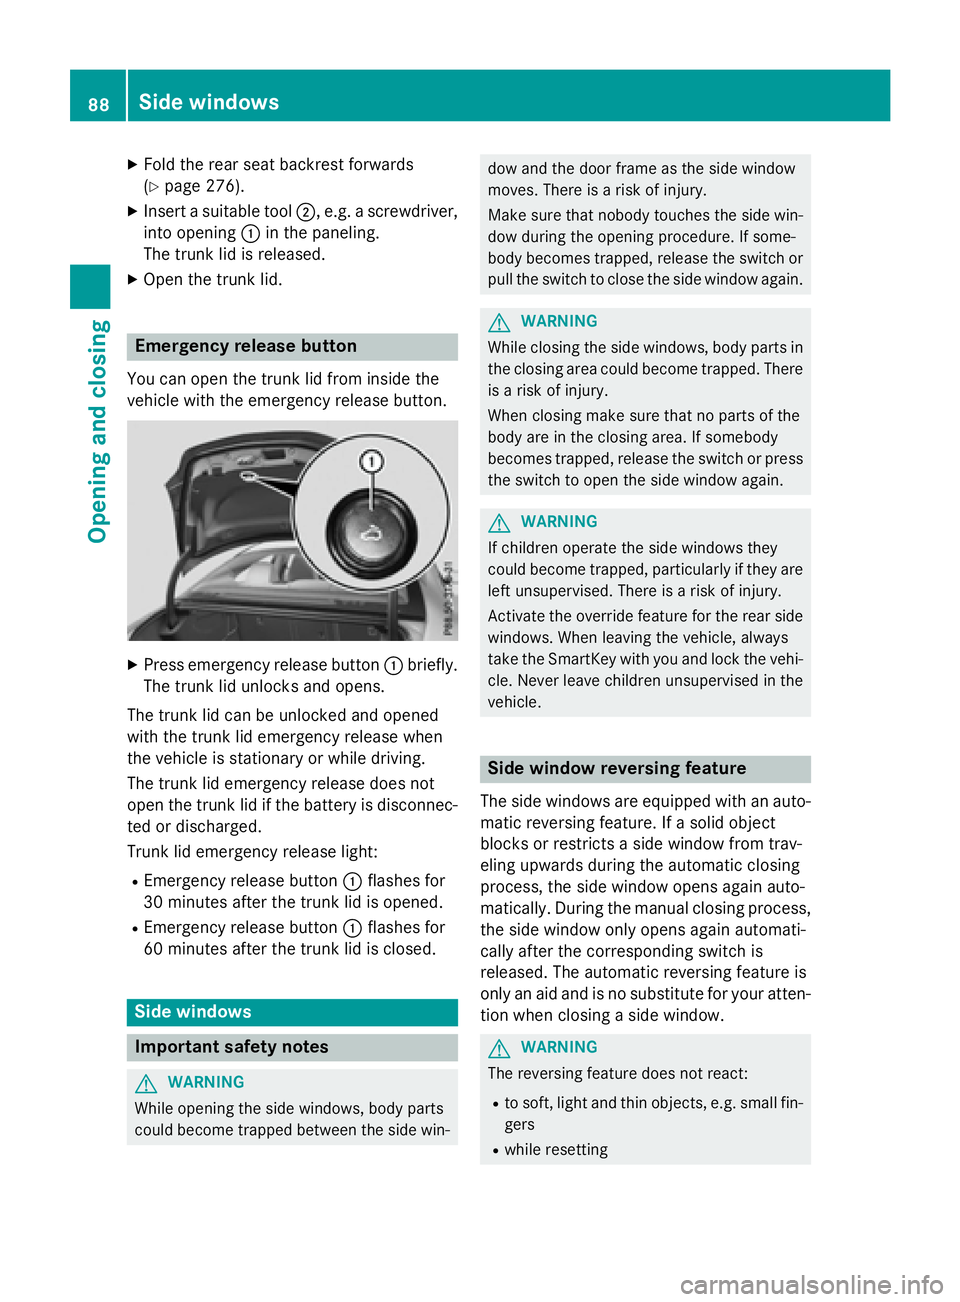
X
Fold the rear seat backrest forwards
( Y
page 276). X
Insert a suitable tool �D , e.g. a screwdriver,
into opening �C in the paneling.
The trunk lid is released. X
Open the trunk lid.
Emergency release buttonYou can open the trunk lid from inside the
vehicle with the emergency release button.
X
Press emergency release button �C briefly.
The trunk lid unlocks and opens.
The trunk lid can be unlocked and opened
with the trunk lid emergency release when
the vehicle is stationary or while driving.
The trunk lid emergency release does not
open the trunk lid if the battery is disconnec-
ted or discharged.
Trunk lid emergency release light: R
Emergency release button �C flashes for
30 minutes after the trunk lid is opened. R
Emergency release button �C flashes for
60 minutes after the trunk lid is closed.
Side windows
Important safety notes
G WARNING
While opening the side windows, body parts
could become trapped between the side win- dow and the door frame as the side window
moves. There is a risk of injury.
Make sure that nobody touches the side win-
dow during the opening procedure. If some-
body becomes trapped, release the switch or
pull the switch to close the side window again.
G WARNING
While closing the side windows, body parts in
the closing area could become trapped. There
is a risk of injury.
When closing make sure that no parts of the
body are in the closing area. If somebody
becomes trapped, release the switch or press
the switch to open the side window again.
G WARNING
If children operate the side windows they
could become trapped, particularly if they are
left unsupervised. There is a risk of injury.
Activate the override feature for the rear side
windows. When leaving the vehicle, always
take the SmartKey with you and lock the vehi-
cle. Never leave children unsupervised in the
vehicle.
Side window reversing feature
The side windows are equipped with an auto-
matic reversing feature. If a solid object
blocks or restricts a side window from trav-
eling upwards during the automatic closing
process, the side window opens again auto-
matically. During the manual closing process,
the side window only opens again automati-
cally after the corresponding switch is
released. The automatic reversing feature is
only an aid and is no substitute for your atten-
tion when closing a side window.
G WARNING
The reversing feature does not react: R
to soft, light and thin objects, e.g. small fin-
gers R
while resetting88
Side windows
Opening and closing
Page 125 of 374
Turn signals (halogen headlamps) X
Switch off the lights. X
Open the hood. X
Turn bulb holder �C counter-clockwise and
pull out. X
Pull the bulb out of bulb holder �C .X
Insert the new bulb into bulb holder �C .X
Insert bulb holder �C and turn it clockwise
until it engages.
Cornering light function (Xenon bulbs)
X
Switch off the lights. X
Open the hood. X
Turn housing cover �C counter-clockwise
and remove it. X
Turn bulb holder �D counter-clockwise and
pull out. X
Pull the bulb out of bulb holder �D .X
Insert the new bulb into bulb holder �D .X
Insert bulb holder �D and turn it clockwise.X
Press on housing cover �C and turn it to the
right. Changing the rear bulbs
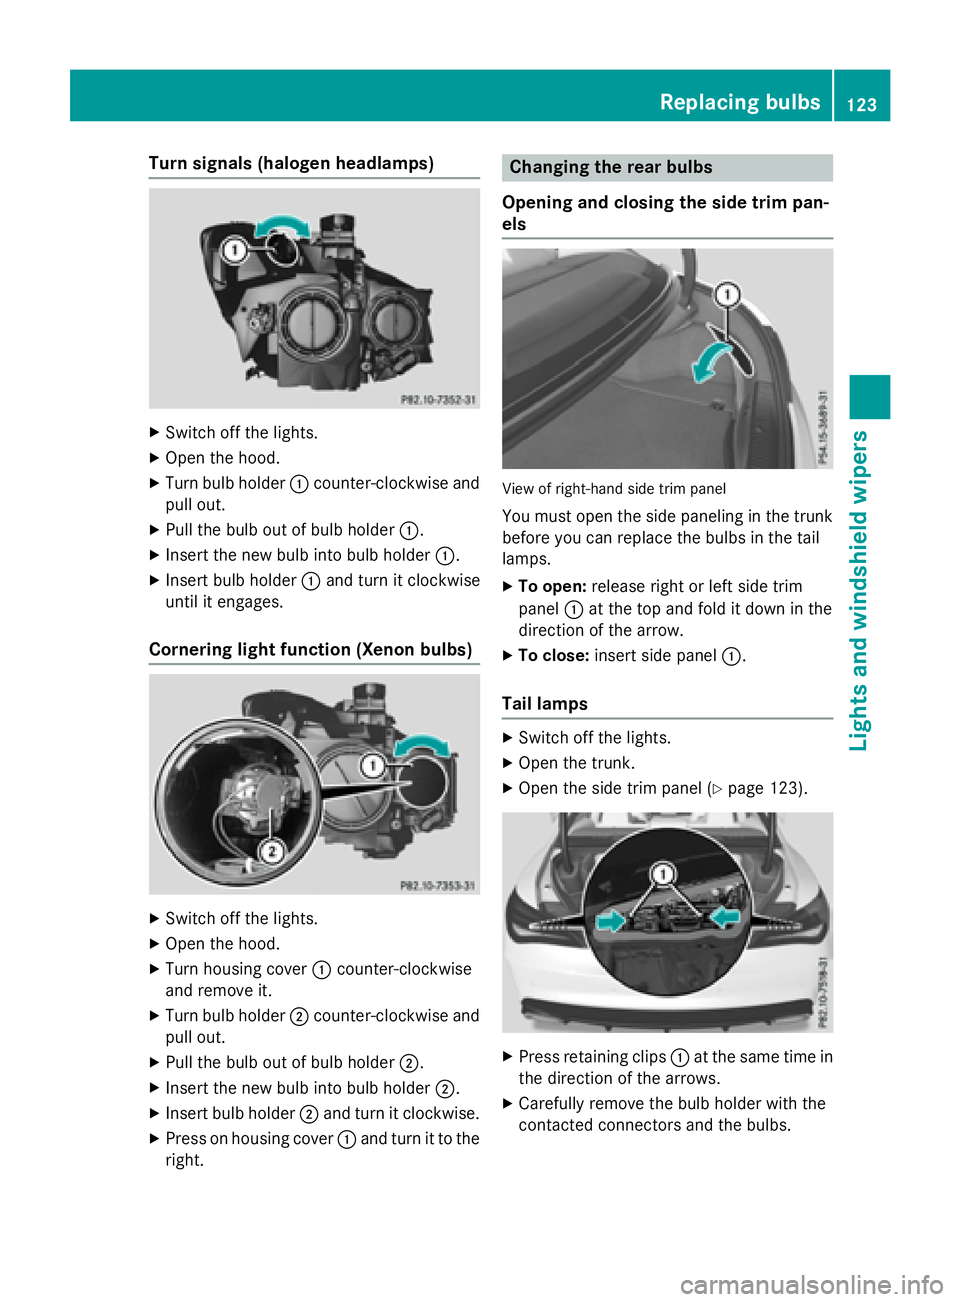
Opening and closing the side trim pan-
els
View of right-hand side trim panel
You must open the side paneling in the trunk
before you can replace the bulbs in the tail
lamps. X
To open: release right or left side trim
panel �C at the top and fold it down in the
direction of the arrow. X
To close: insert side panel �C .
Tail lamps X
Switch off the lights. X
Open the trunk. X
Open the side trim panel ( Y
page 123).
X
Press retaining clips �C at the same time in
the direction of the arrows. X
Carefully remove the bulb holder with the
contacted connectors and the bulbs. Replacing bulbs 123
Lights and windshield wiper s Z