2016 MERCEDES-BENZ CLA instrument cluster
[x] Cancel search: instrument clusterPage 50 of 374
passenger seat belts are not fastened, a
warning tone sounds. A warning tone also
sounds with increasing intensity for
60 seconds or until the driver or front
passenger have fastened their seat belts.
If the driver or front passenger unfasten their
seat belts during the journey, the seat belt
warning is activated again.
i For more information on the �v seat
belt warning lamp, see "Warning and indi-
cator lamps in the instrument cluster, seat
belts" ( Y
page 258).
Air bags
Introduction The installation point of an air bag can be rec-
ognized by the AIR BAG symbol.
An air bag complements the correctly fas-
tened seat belt. It is no substitute for the seat
belt. The air bag provides additional protec-
tion in applicable accident situations.
Not all air bags are deployed in an accident.
The different air bag systems function inde-
pendently from one another ( Y
page 56).
However, no system available today can com-
pletely eliminate injuries and fatalities.
It is also not possible to rule out a risk of injury
caused by an air bag due to the high speed at
which the air bag must be deployed.
Important safety notes
G WARNING
If you do not sit in the correct seat position,
the air bag cannot protect as intended and
could even cause additional injury when
deployed. This poses an increased risk of
injury or even fatal injury. To avoid hazardous situations, always make
sure that all of the vehicle's occupants: R
have fastened their seat belts correctly,
including pregnant women R
are sitting correctly and maintain the great-
est possible distance to the air bags R
follow the following instructions
Always make sure that there are no objects
between the air bag and the vehicle's occu-
pants. R
Adjust the seats properly before beginning
your journey. Always make sure that the
seat is in an almost upright position. The
center of the head restraint must support
the head at about eye level. R
Move the driver's and front-passenger
seats as far back as possible. The driver's
seat position must allow the vehicle to be
driven safely. R
Only hold the steering wheel on the out-
side. This allows the air bag to be fully
deployed. R
Always lean against the backrest while driv-
ing. Do not lean forwards or lean against
the door or side window. You may other-
wise be in the deployment area of the air
bags. R
Always keep your feet in the footwell in
front of the seat. Do not put your feet on the
dashboard, for example. Your feet may oth-
erwise be in the deployment area of the air
bag. R
For this reason, always secure persons less
than 5 ft (1.50 m) tall in suitable restraint
systems. Up to this height, the seat belt
cannot be worn correctly.
If a child is traveling in your vehicle, also
observe the following notes: R
Always secure children under twelve years
of age and less than 5 ft (1.50 m) tall in
suitable child restraint systems. R
Child restraint systems should be installed
on the rear seats.48
Occupant safety
Safety
Page 73 of 374
In the following situations, it may be better to
activate SPORT handling mode or deactivate
ESP ®
: R
when using snow chains R
in deep snow R
on sand or gravel R
on specially designated roads when the
vehicle's own oversteering and understeer-
ing characteristics are desired
Driving in SPORT handling mode or without
ESP ®
requires an extremely qualified and
experienced driver.
i Activate ESP ®
as soon as the situations
described above no longer apply. ESP ®
will
otherwise not be able to stabilize the vehi-
cle if the vehicle starts to skid or a wheel
starts to spin.
! Avoid spinning the driven wheels for an
extended period with ESP ®
deactivated.
You could otherwise damage the drivetrain.
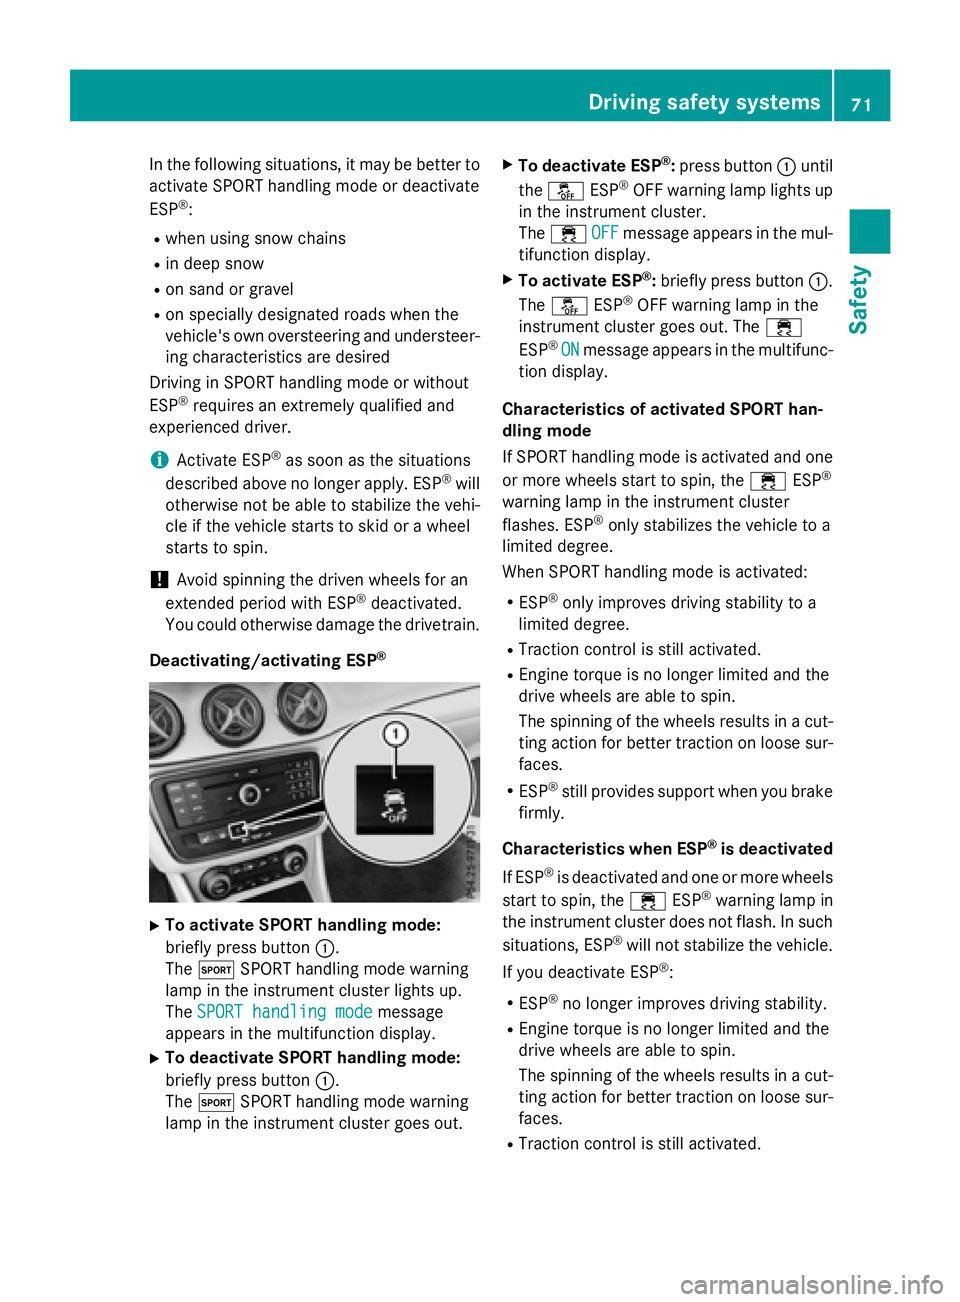
Deactivating/activating ESP ®
X
To activate SPORT handling mode:
briefly press button �C .
The �t SPORT handling mode warning
lamp in the instrument cluster lights up.
The SPORT handling mode message
appears in the multifunction display. X
To deactivate SPORT handling mode:
briefly press button �C .
The �t SPORT handling mode warning
lamp in the instrument cluster goes out. X
To deactivate ESP ®
: press button �C until
the �
Page 116 of 374
Useful information
i This Operator's Manual describes all
models and all standard and optional equip-
ment of your vehicle available at the time of
publication of the Operator's Manual.
Country-specific differences are possible.
Please note that your vehicle may not be
equipped with all features described. This
also applies to safety-related systems and
functions.
i Read the information on qualified special-
ist workshops ( Y
page 25).
Exterior lighting
General notesFor reasons of safety, Mercedes-Benz recom-
mends that you drive with the lights switched
on even during the daytime. In some coun-
tries, operation of the headlamps varies due
to legal requirements and self-imposed obli-
gations.
Setting the exterior lighting
Setting options
Exterior lighting can be set using the: R
light switch R
combination switch ( Y
page 116)R
on-board computer ( Y
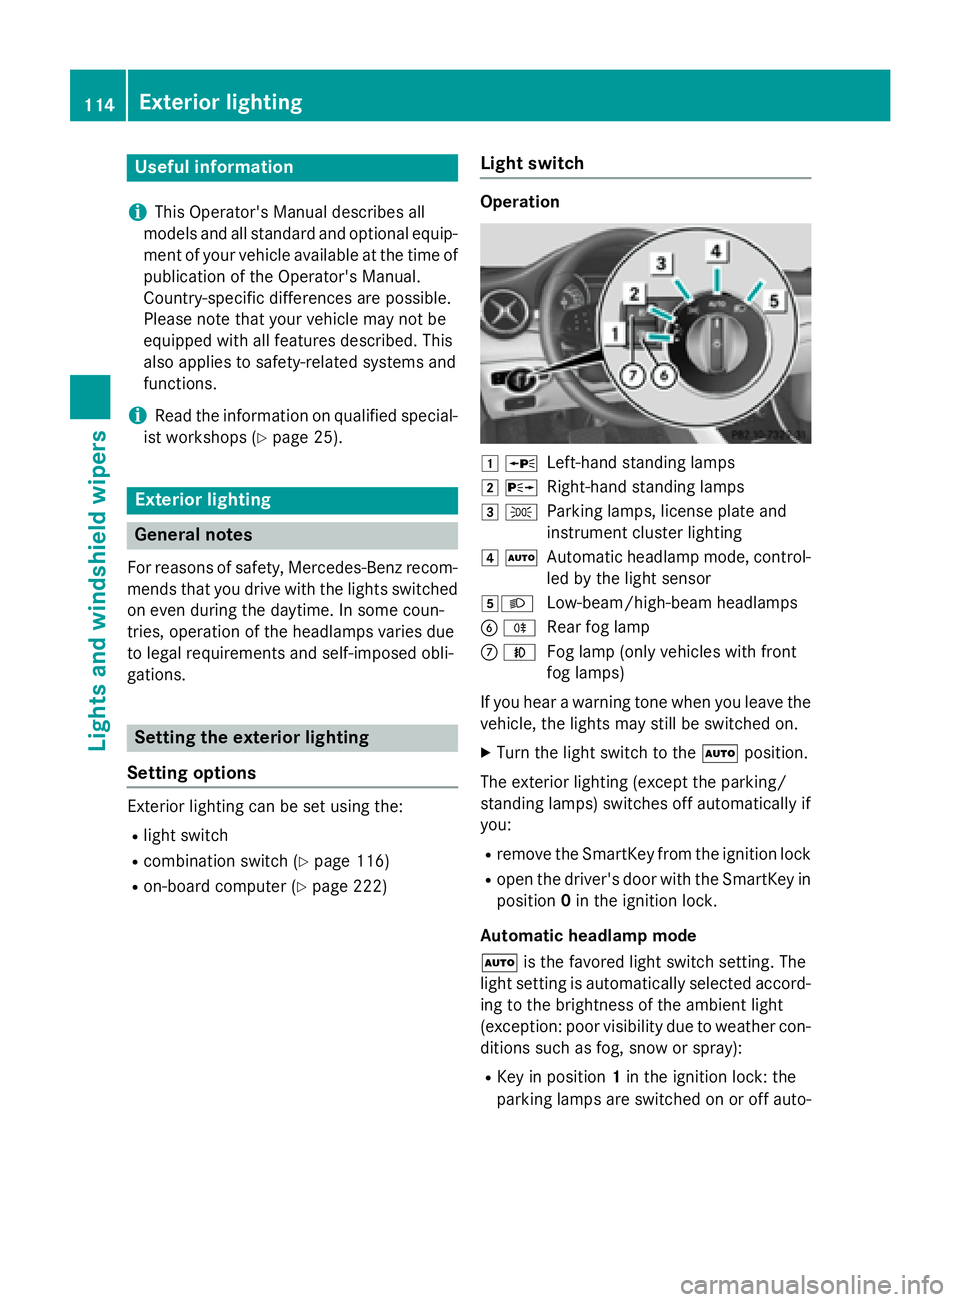
page 222) Light switch Operation
�G �c
Left-hand standing lamps�H �d
Right-hand standing lamps�I �`
Parking lamps, license plate and
instrument cluster lighting�J �X
Automatic headlamp mode, control-
led by the light sensor�K �X
Low-beam/high-beam headlamps�
Page 118 of 374
Rear fog lamp
The rear fog lamp improves visibility of your
vehicle for the traffic behind in the event of
thick fog. Please take note of the country-
specific regulations for the use of rear fog
lamps. X
To switch on the rear fog lamp: turn the
SmartKey in the ignition lock to position 2
or start the engine. X
Turn the light switch to �X or �X .X
Press the �^ button.
The yellow �^ indicator lamp in the
instrument cluster lights up. X
To switch off the rear fog lamp: press the
�^ button.
The yellow �^ indicator lamp in the
instrument cluster goes out.
i When the rear fog lamp is switched on,
the center brake lamp in the tail lamp
switches off due to a legal requirement.
Parking lamps
! If the battery has been excessively dis-
charged, the parking lamps or standing
lamps are automatically switched off to
enable the next engine start. Always park
your vehicle safely and sufficiently lit
according to legal standards. Avoid the
continuous use of the �` parking lamps
for several hours. If possible, switch on the
�d right or the �c left standing lamp.X
To switch on: turn the light switch to �` .
The green �` indicator lamp in the instru-
ment cluster lights up.
Standing lamps
Switching on the standing lamps ensures the
corresponding side of the vehicle is illumina-
ted. X
To switch on the standing lamps: the
Sma rtKey should not be in the ignition lock
or it should be in position 0 .X
Turn the light switch to �c (left-hand side
of the vehicle) or �d (right-hand side of
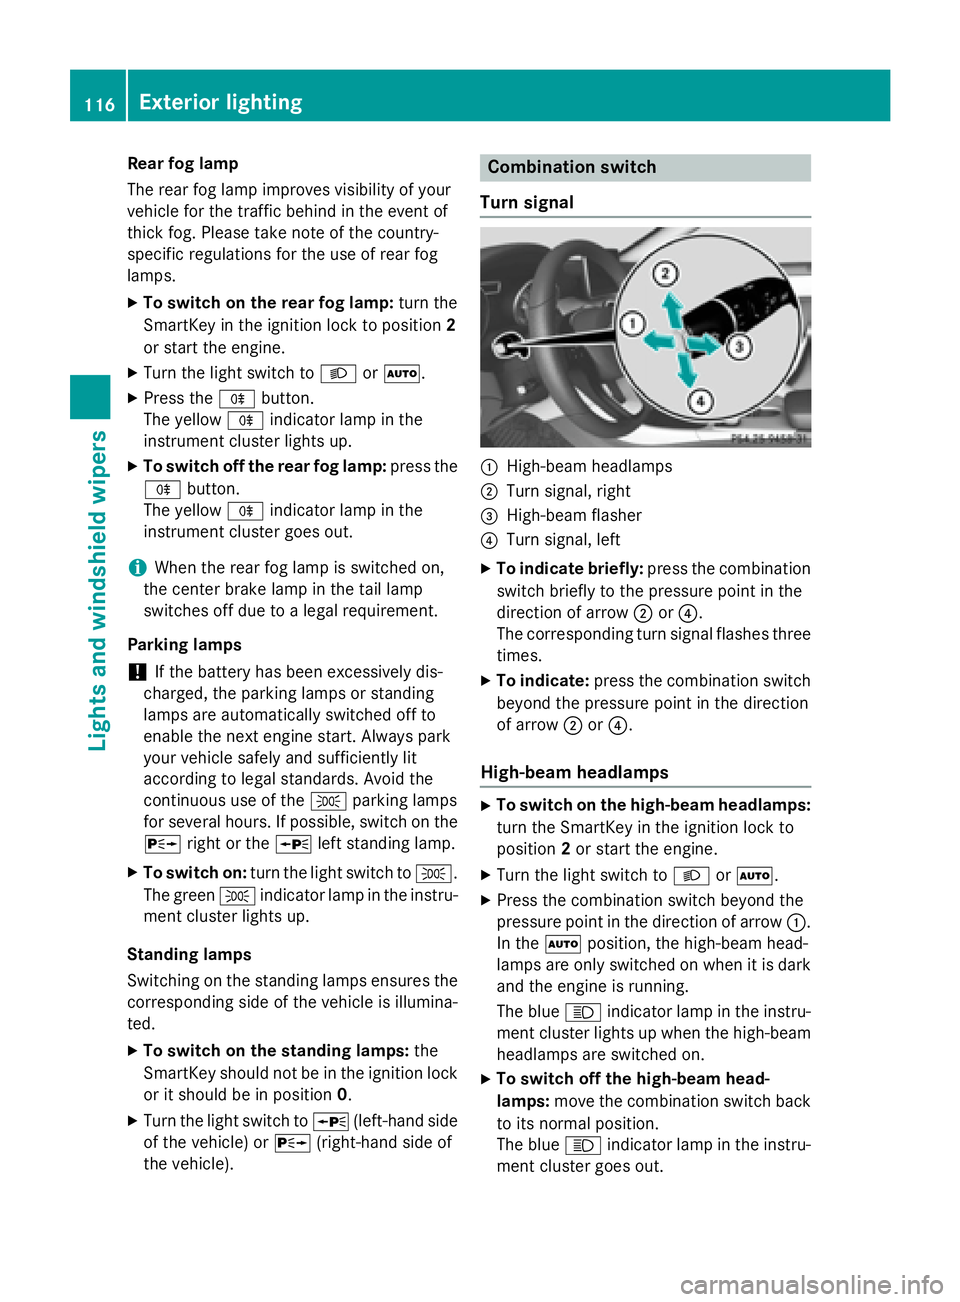
the vehicle). Combination switch
Turn signal
�C
High-beam headlamps �D
Turn signal, right �
Page 121 of 374
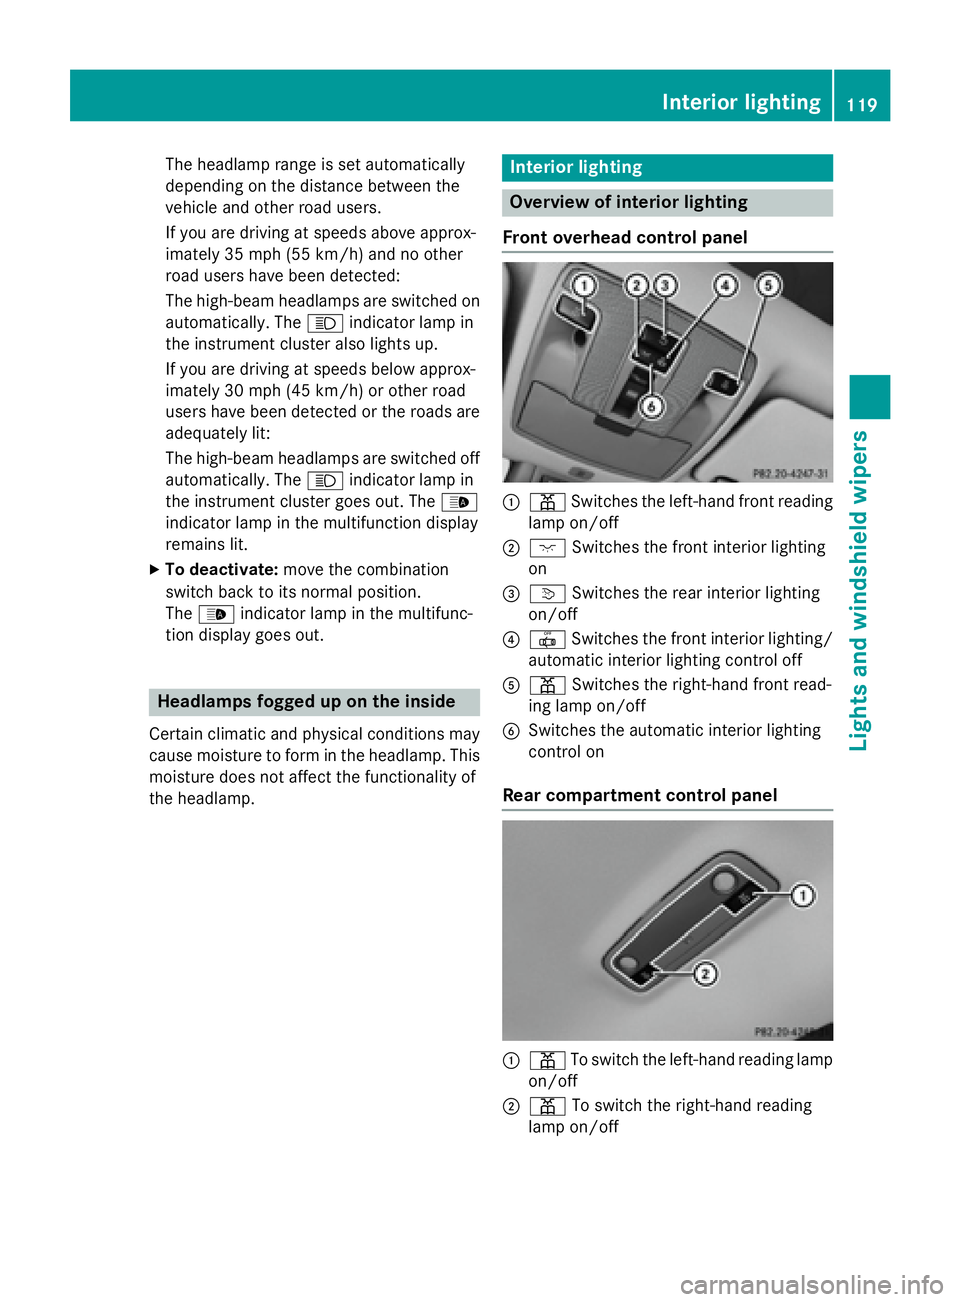
The headlamp range is set automatically
depending on the distance between the
vehicle and other road users.
If you are driving at speeds above approx-
imately 35 mph (55 km/h) and no other
road users have been detected:
The high-beam headlamps are switched on
automatically. The �W indicator lamp in
the instrument cluster also lights up.
If you are driving at speeds below approx-
imately 30 mph (45 km/h) or other road
users have been detected or the roads are
adequately lit:
The high-beam headlamps are switched off
automatically. The �W indicator lamp in
the instrument cluster goes out. The �
Page 150 of 374
Pressing the Start/Stop button several times
in succession corresponds to the different
key positions in the ignition lock. This is only
the case if you are not depressing the brake
pedal.
If you depress the brake pedal and press the
Start/Stop button, the engine starts immedi-
ately.
To start the vehicle without actively using the
SmartKey: R
the Start/Stop button must be inserted in
the ignition lock. R
the SmartKey must be in the vehicle. R
the vehicle must not be locked with the
SmartKey or KEYLESS-GO ( Y
page 77).
Do not keep the KEYLESS-GO key: R
with electronic devices, e.g. a mobile
phone or another SmartKey. R
with metallic objects, e.g. coins or metal
foil. R
inside metallic objects, e.g. a metal case.
This can affect the functionality of KEYLESS-
GO.
If you lock the vehicle with the SmartKey's
remote control or with KEYLESS-GO, after a
short time: R
you will not be able to switch on the ignition
with the Start/Stop button. R
you will not be able to start the engine with
the Start/Stop button until the vehicle is
unlocked again.
If you lock the vehicle centrally using the but-
ton on the front door ( Y
page 84), you can
continue to start the engine with the Start/
Stop button.
The engine can be switched off while the vehi-
cle is in motion by pressing and holding the
Start/Stop button for three seconds. This
function operates independently of the ECO
start/stop automatic engine switch-off func-
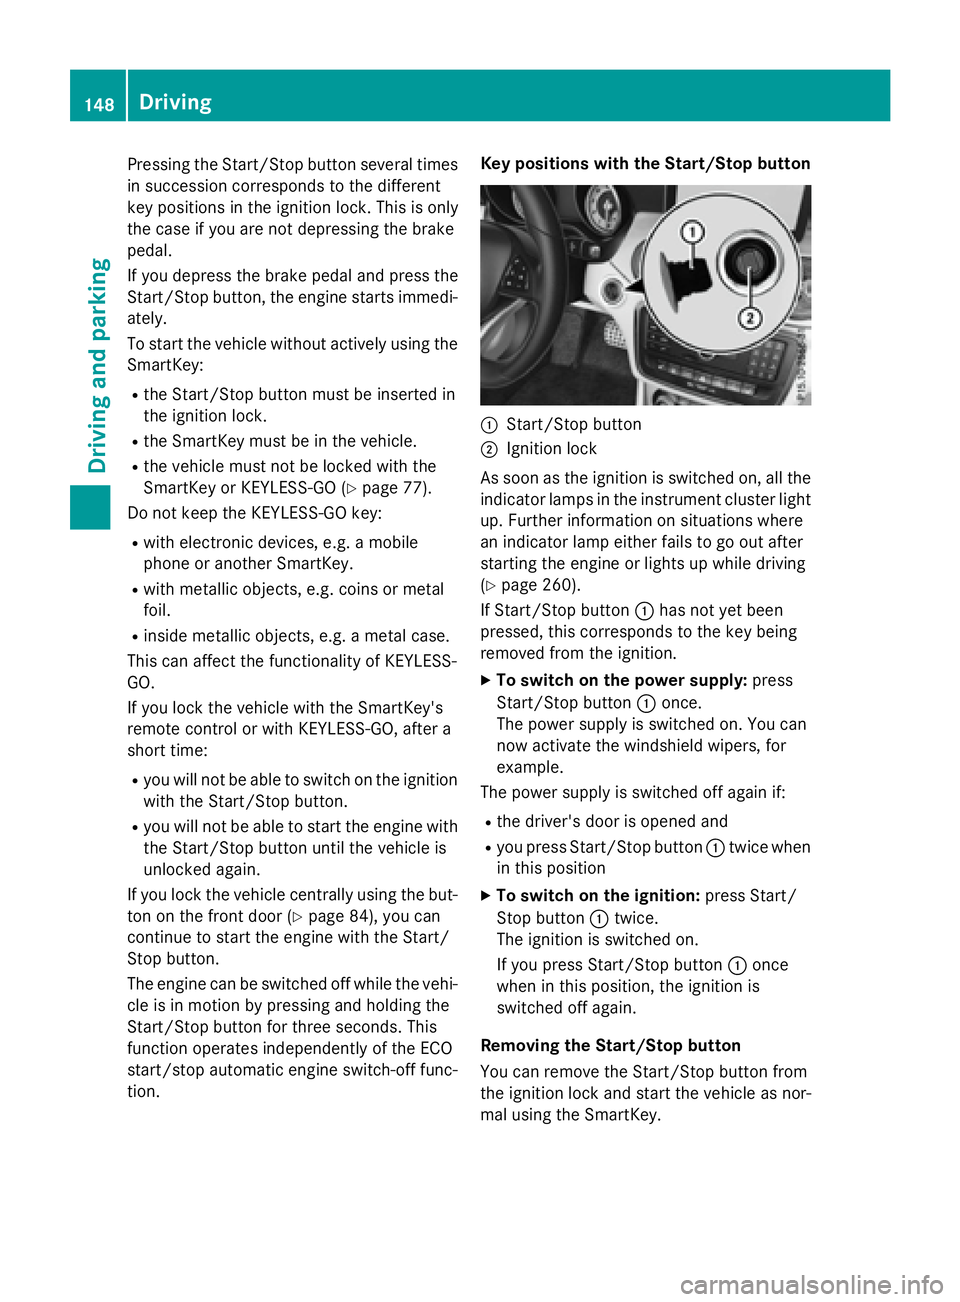
tion. Key positions with the Start/Stop button
�C
Start/Stop button �D
Ignition lock
As soon as the ignition is switched on, all the
indicator lamps in the instrument cluster light
up. Further information on situations where
an indicator lamp either fails to go out after
starting the engine or lights up while driving
( Y
page 260).
If Start/Stop button �C has not yet been
pressed, this corresponds to the key being
removed from the ignition. X
To switch on the power supply: press
Start/Stop button �C once.
The power supply is switched on. You can
now activate the windshield wipers, for
example.
The power supply is switched off again if: R
the driver's door is opened and R
you press Start/Stop button �C twice when
in this position X
To switch on the ignition: press Start/
Stop button �C twice.
The ignition is switched on.
If you press Start/Stop button �C once
when in this position, the ignition is
switched off again.
Removing the Start/Stop button
You can remove the Start/Stop button from
the ignition lock and start the vehicle as nor-
mal using the SmartKey.148
Driving
Driving and parking
Page 156 of 374
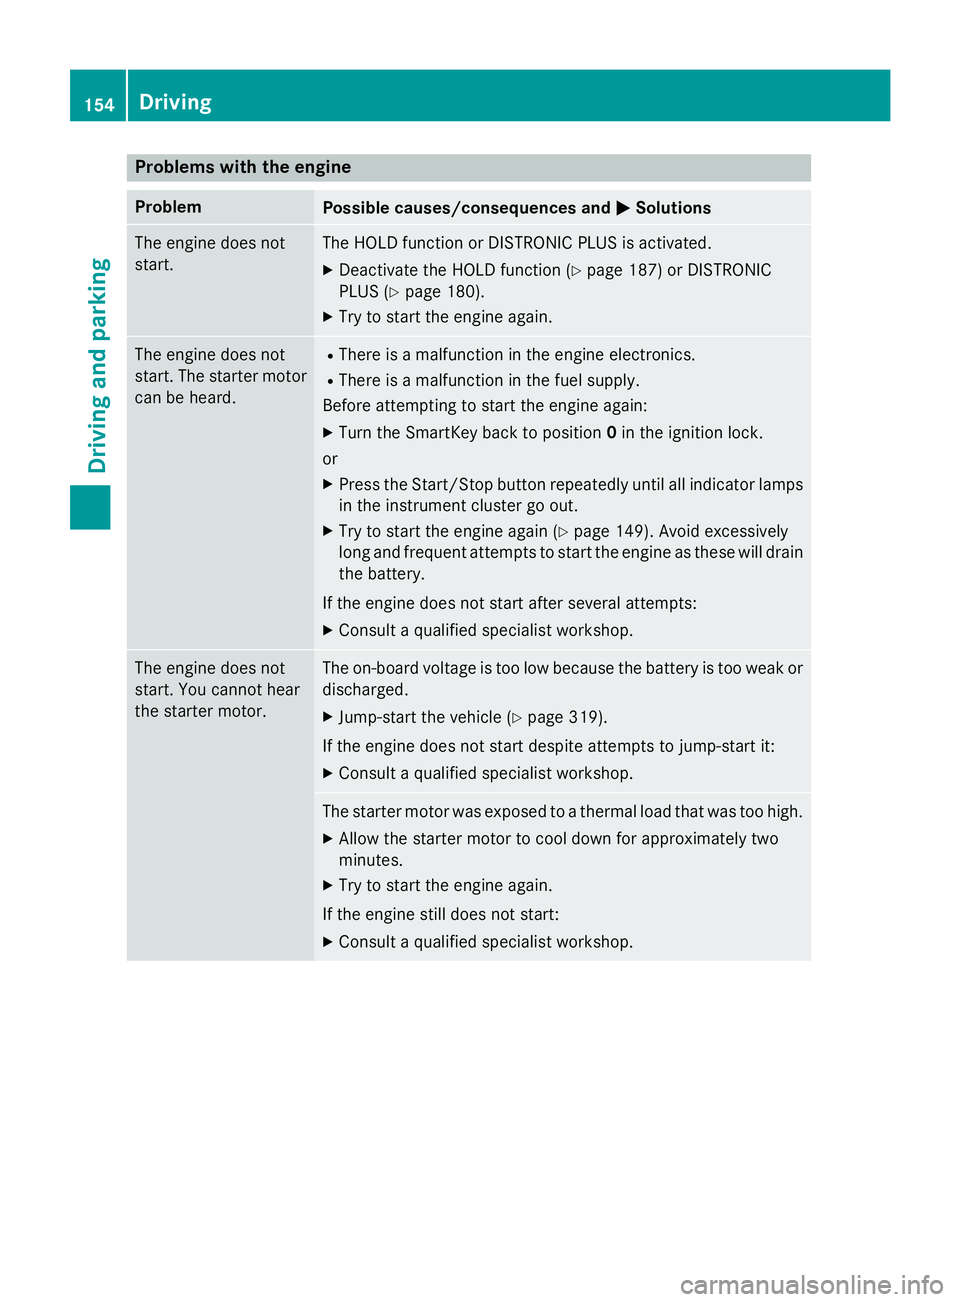
Problems with the engine Problem
Possible causes/consequences and �P Solutions
The engine does not
start. The HOLD function or DISTRONIC PLUS is activated. X
Deactivate the HOLD function ( Y
page 187) or DISTRONIC
PLUS ( Y
page 180). X
Try to start the engine again.
The engine does not
start. The starter motor
can be heard. R
There is a malfunction in the engine electronics. R
There is a malfunction in the fuel supply.
Before attempting to start the engine again: X
Turn the SmartKey back to position 0 in the ignition lock.
or X
Press the Start/Stop button repeatedly until all indicator lamps
in the instrument cluster go out. X
Try to start the engine again ( Y
page 149). Avoid excessively
long and frequent attempts to start the engine as these will drain
the battery.
If the engine does not start after several attempts: X
Consult a qualified specialist workshop.
The engine does not
start. You cannot hear
the starter motor. The on-board voltage is too low because the battery is too weak or
discharged. X
Jump-start the vehicle ( Y
page 319).
If the engine does not start despite attempts to jump-start it: X
Consult a qualified specialist workshop.
The starter motor was exposed to a thermal load that was too high. X
Allow the starter motor to cool down for approximately two
minutes. X
Try to start the engine again.
If the engine still does not start: X
Consult a qualified specialist workshop.154
Driving
Driving and parking
Page 172 of 374
Switching off the engine
Important safety notes
G WARNING
The automatic transmission switches to neu-
tral position N when you switch off the engine.
The vehicle may roll away. There is a risk of an
accident.
After switching off the engine, always switch
to parking position P . Prevent the parked vehi-
cle from rolling away by applying the parking
brake.
Vehicles with automatic transmission X
Apply the electric parking brake. X
All vehicles (except Mercedes-AMG
vehicles): shift the transmission to posi-
tion P .
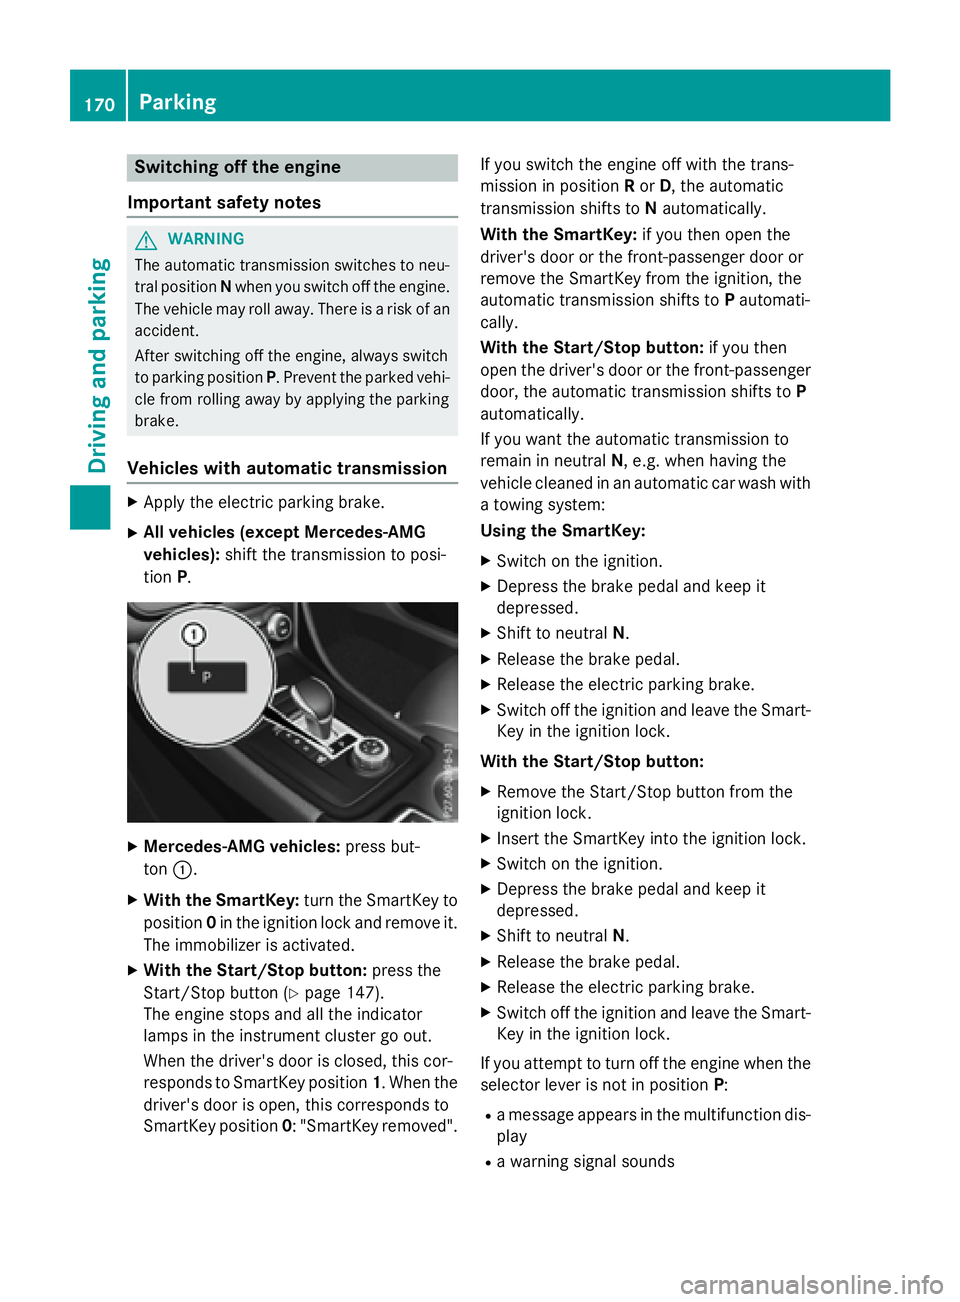
X
Mercedes-AMG vehicles: press but-
ton �C .X
With the SmartKey: turn the SmartKey to
position 0 in the ignition lock and remove it.
The immobilizer is activated. X
With the Start/Stop button: press the
Start/Stop button ( Y
page 147).
The engine stops and all the indicator
lamps in the instrument cluster go out.
When the driver's door is closed, this cor-
responds to SmartKey position 1 . When the
driver's door is open, this corresponds to
SmartKey position 0 : "SmartKey removed". If you switch the engine off with the trans-
mission in position R or D , the automatic
transmission shifts to N automatically.
With the SmartKey: if you then open the
driver's door or the front-passenger door or
remove the SmartKey from the ignition, the
automatic transmission shifts to P automati-
cally.
With the Start/Stop button: if you then
open the driver's door or the front-passenger
door, the automatic transmission shifts to P
automatically.
If you want the automatic transmission to
remain in neutral N , e.g. when having the
vehicle cleaned in an automatic car wash with
a towing system:
Using the SmartKey: X
Switch on the ignition. X
Depress the brake pedal and keep it
depressed. X
Shift to neutral N . X
Release the brake pedal. X
Release the electric parking brake. X
Switch off the ignition and leave the Smart-
Key in the ignition lock.
With the Start/Stop button: X
Remove the Start/Stop button from the
ignition lock. X
Insert the SmartKey into the ignition lock. X
Switch on the ignition. X
Depress the brake pedal and keep it
depressed. X
Shift to neutral N . X
Release the brake pedal. X
Release the electric parking brake. X
Switch off the ignition and leave the Smart-
Key in the ignition lock.
If you attempt to turn off the engine when the
selector lever is not in position P :R
a message appears in the multifunction dis-
play R
a warning signal sounds170
Parking
Driving and parking