2016 MERCEDES-BENZ CLA COUPE change time
[x] Cancel search: change timePage 195 of 345
Blind Spot Assist
General notes
Blind Spot Assist monitors the areas on either
side of the vehicle that are not visible to the
driver with two lateral, rear-facing radar sen-
sors. A warning display in the exterior mirrors
draws your attention to vehicles detected in the
monitored area. If you then switch on the cor-
responding turn signal to change lanes, you will also receive a visual and audible warning.
Blind Spot Assist supports you from a speed of
approximately 30 km/h.
Important safety notes G
WARNING
Blind Spot Assist does not react to vehicles:
R overtaken too closely on the side, placing
them in the blind spot area
R when the difference in the speed of
approach and overtaking is too great
As a result, Blind Spot Assist cannot warn
drivers in these situations. There is a risk of an accident.
Always pay careful attention to the traffic sit- uation and maintain a safe distance at the side
of the vehicle.
Blind Spot Assist is only an aid. It may fail to
detect some vehicles and is not a substitute for
attentive driving. Always ensure that there is
sufficient distance to the side for other road
users and obstacles.
Radar sensors The radar sensors for Blind Spot Assist are inte-
grated into the rear bumper. Make sure that the
bumpers are free from dirt, ice or slush. The
sensors must not be covered, e.g. by cycle racks
or overhanging loads. Following a severe impact or in the event of damage to the bumpers, havethe function of the radar sensors checked at a
qualified specialist workshop. Blind Spot Assist
may no longer work properly in such cases. Monitoring range of the sensors
In particular, the detection of obstacles can be
impaired in the following situations:
R dirt on the sensors or obscured sensors
R poor visibility, e.g. due to fog, heavy rain or
snow
R a narrow vehicle travelling in front, e.g. a
motorcycle or a bicycle
R very wide lanes
R narrow lanes
R vehicles not driving in the middle of their lane
R barriers or other road boundaries
Vehicles in the monitoring range are then not
indicated.
Blind Spot Assist monitors an area up to 3.0 m
behind your vehicle and directly next to your
vehicle.
If the lanes are narrow, vehicles driving in the
lane beyond the lane next to your vehicle may be
indicated, especially if the vehicles are not driv-
ing in the middle of their lane. This may be the
case if the vehicles are driving on the inner side of their lane.
Due to the nature of the system:
R warnings may be issued in error when driving
close to crash barriers or similar solid boun-
daries
R warnings may be interrupted when you are
driving alongside particularly long vehicles,
for example lorries, for a prolonged time
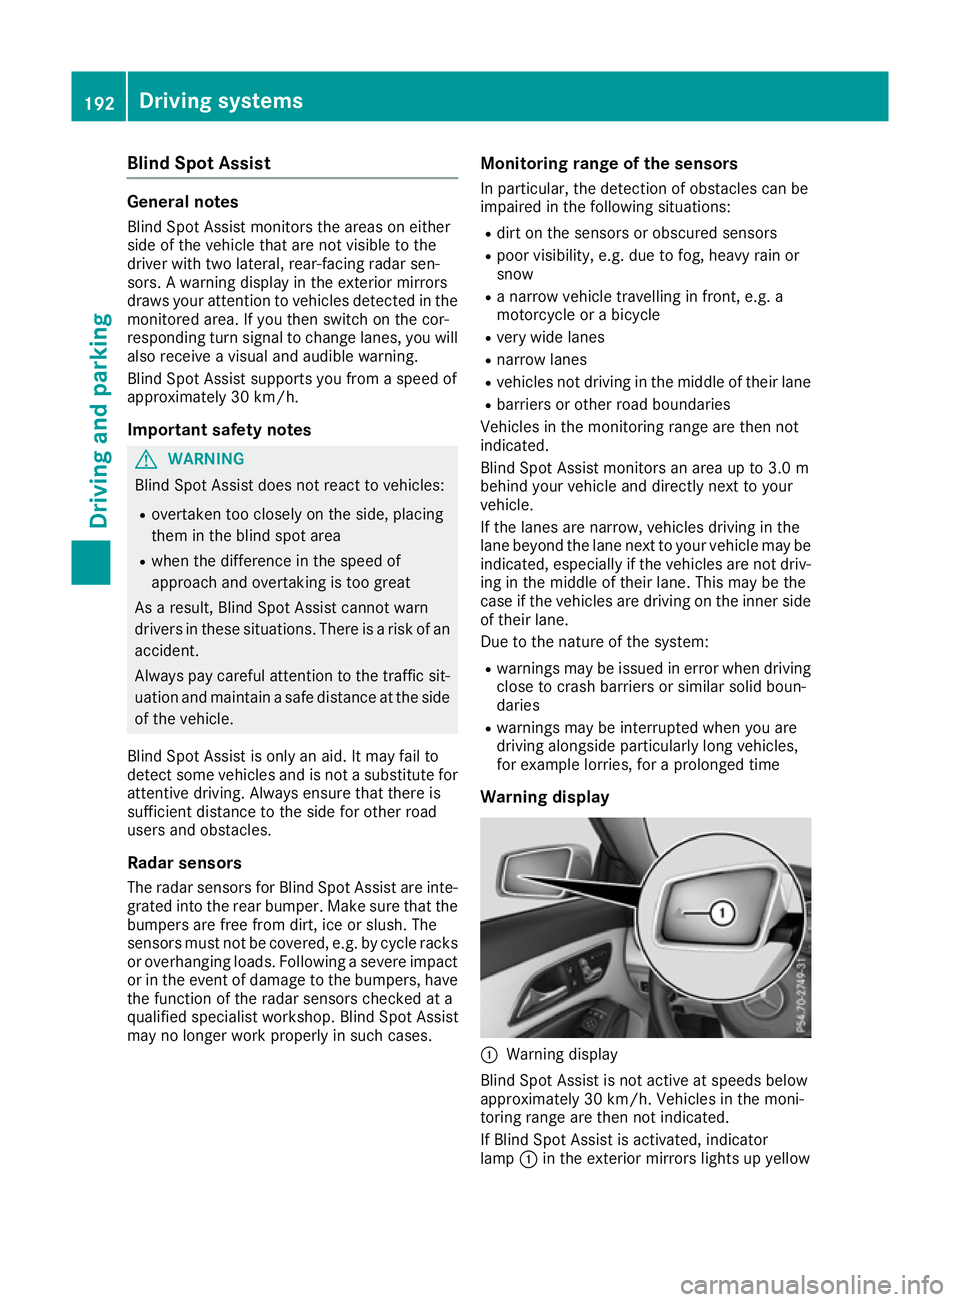
Warning display :
Warning display
Blind Spot Assist is not active at speeds below
approximately 30 km/h. Vehicles in the moni-
toring range are then not indicated.
If Blind Spot Assist is activated, indicator
lamp :in the exterior mirrors lights up yellow 192
Driving systemsDriving an
d parking
Page 197 of 345
G
WARNING
The Lane Keeping Assist warning does not
return the vehicle to the original lane. There is a risk of an accident.
Always steer, apply the brakes or accelerate
the vehicle yourself, especially if Lane Keep-
ing Assist alerts you.
If you fail to adapt your driving style, Lane Keep-
ing Assist can neither reduce the risk of an acci-
dent nor override the laws of physics. Lane
Keeping Assist cannot take into account road,
weather or traffic conditions. Lane Keeping
Assist is only an aid. You are responsible for the distance to the vehicle in front, for vehicle
speed, for braking in good time and for staying in
lane.
Lane Keeping Assist does not keep your vehicle
in its lane.
The system may be impaired or may not function in the following situations:
R Poor visibility, e.g. due to insufficient illumi-
nation of the road, or due to snow, rain, fog or
spray
R Glare, e.g. from oncoming traffic, the sun or
reflection from other vehicles (e.g. if the road surface is wet)
R The windscreen is dirty, misted up, damaged
or covered, for instance by a sticker, in the
vicinity of the camera
R No or several, unclear lane markings are pres-
ent for one lane, e.g. in a construction area
R The lane markings are worn away, dark or
covered up, e.g. by dirt or snow
R The distance to the vehicle in front is so small
that the lane markings cannot be detected
R The lane markings change quickly, e.g. lanes
branch off, cross one another or merge
R The road is narrow and winding
R There are highly variable shade conditions on
the roadway
Activating Lane Keeping Assist
X Activate Lane Keeping Assist using the on-
board computer; to do so, select Standard
Standard or
Adaptive
Adaptive (Ypage 209).
If you drive at speeds above 60 km/h and lane markings are detected, the lane markings in
the assistance graphics display (Y page 208)
are shown in green. If
Standard
Standard is selected, no warning vibration
occurs if:
R You have switched on the turn signal. In this
event, the warnings are suppressed for a cer-
tain period of time.
R A driving safety system such as ABS, BAS or
ESP ®
engages.
When Adaptive
Adaptive is selected, no warning vibra-
tion occurs if:
R You have switched on the turn signal. In this
case, the warnings are suppressed for a cer-
tain period of time
R A driving safety system such as ABS, BAS or
ESP ®
engages
R You accelerate hard, e.g. kickdown
R You brake hard
R You steer actively, e.g. swerve to avoid an
obstacle or change lane quickly
R You cut the corner on a sharp bend
To ensure that you are warned only when nec-
essary and in good time if you cross the lane
marking, the system detects certain conditions
and warns you accordingly.
The warning vibration occurs earlier in the fol-
lowing situations:
R You approach the outer lane marking on a
bend
R The road has very wide lanes, e.g. a motorway
R The system detects solid lane markings
The warning vibration occurs later in the follow- ing situations:
R The road has narrow lanes
R You cut the corner on a bend Towing a trailer
Important safety notes
G
WARNING
You could lose control of the vehicle/trailer
combination if it begins to swerve. The vehi-
cle/trailer combination could even overturn.
There is a risk of an accident.
On no account should you attempt to
straighten out the vehicle/trailer combina-
tion by increasing speed. Decrease your
speed and do not countersteer. Brake if nec-
essary. 194
Towing a trailerDriving and parking
Page 199 of 345

not exceed the maximum permissible speed for
your vehicle/trailer combination. Notes on towing a trailer
General notes Trailer towing is not possible on the following
models:
R CLA 180 d BlueEFFICIENCY Edition
R CLA 250 Sport
R CLA 250 Sport 4MATIC
R Mercedes‑AMG CLA 45 4MATIC
When towing a trailer, set the tyre pressure on
the rear axle of the towing vehicle for the max-
imum load. Further information on the tyre pres-
sure table in the fuel filler flap (Y page 313).
Please note that when towing a trailer, the fol-
lowing driving systems have limited availability
or are not available at all.
R Parking Assist PARKTRONIC (Y page 177)
R Blind Spot Assist (Y page 192)
The height of the ball coupling changes with the
load of the vehicle. If necessary, use a trailer
with a height-adjustable drawbar.
You will find fitting dimensions and loads under "Technical data" (Y page 334).
Driving tips Observe the notes on ESP
®
trailer stabilisation
(Y page 72).
The maximum permissible speed for vehicle/
trailer combinations depends on the type of
trailer. Before beginning the journey, check the
trailer's documents to see what the maximum
permitted speed is. Observe the legally prescri-
bed maximum speed in the relevant country.
For certain Mercedes-Benz vehicles, the maxi-
mum permissible rear axle load is increased
when towing a trailer. See the "Technical data"
section to find out whether this applies to your
vehicle. If you utilise any of the added maximum rear axle load when towing a trailer, the vehicle/
trailer combination may not exceed a maximum speed of 100 km/h for reasons concerning the
operating permit. This also applies in countries
in which the permissible maximum speed for
vehicle/trailer combinations is above
100 km/h. When towing a trailer, your vehicle's handling
characteristics will be different to when driving
without a trailer and the vehicle will consume
more fuel.
Shift into a lower gear in good time on long and steep downhill gradients. For vehicles with auto-
matic transmission, you need to have selected
manual drive program M(Y page 150).
This also applies if you have activated cruise
control, SPEEDTRONIC or Distance Pilot
DISTRONIC.
This will use the braking effect of the engine, so
less braking will be required to maintain the
vehicle speed. This relieves the load on the
brake system and prevents the brakes from
overheating and wearing too quickly. If you need additional braking, depress the brake pedal
repeatedly rather than continuously.
Briefly depressing the accelerator pedal on
downhill gradients while the manual drive pro-
gram Mis temporarily activated (vehicles with
automatic transmission): the automatic trans-
mission may switch back to the last active auto-
matic drive program Eor S. The automatic trans-
mission may shift to a higher gear. This can
reduce the engine's braking effect.
Driving tips R
Maintain a greater distance to the vehicle in
front than when driving without a trailer.
R Avoid braking abruptly. If possible, brake gen-
tly at first to allow the trailer to run on. Then,
increase the braking force rapidly.
R The values given for gradient-climbing capa-
bilities from a standstill refer to sea level.
When driving in mountainous areas, note that
the power output of the engine, and conse-
quently the vehicle's gradient-climbing capa-
bility from a standstill, decrease with increas-
ing altitude.
If the trailer swings from side to side:
X Do not accelerate under any circumstances
X Do not countersteer
X Brake, if necessary 196
Towing a trailerDriving an
d parking
Page 208 of 345
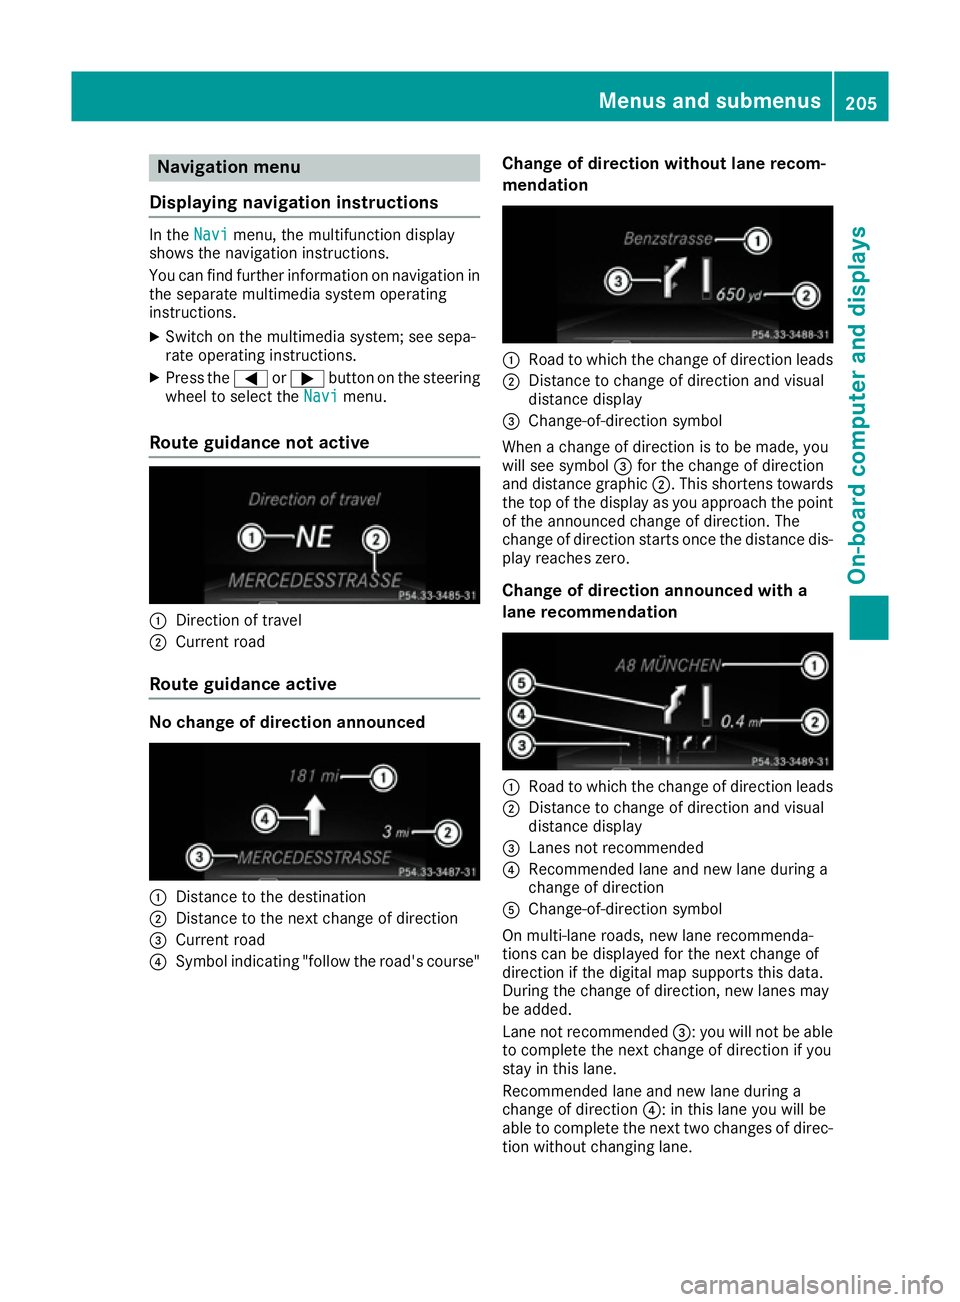
Navigation menu
Displaying navigation instructions In the
Navi
Navimenu, the multifunction display
shows the navigation instructions.
You can find further information on navigation in the separate multimedia system operating
instructions.
X Switch on the multimedia system; see sepa-
rate operating instructions.
X Press the =or; button on the steering
wheel to select the Navi
Navi menu.
Route guidance not active :
Direction of travel
; Current road
Route guidance active No change of direction announced
:
Distance to the destination
; Distance to the next change of direction
= Current road
? Symbol indicating "follow the road's course" Change of direction without lane recom-
mendation :
Road to which the change of direction leads
; Distance to change of direction and visual
distance display
= Change-of-direction symbol
When a change of direction is to be made, you
will see symbol =for the change of direction
and distance graphic ;. This shortens towards
the top of the display as you approach the point of the announced change of direction. The
change of direction starts once the distance dis-
play reaches zero.
Change of direction announced with a
lane recommendation :
Road to which the change of direction leads
; Distance to change of direction and visual
distance display
= Lanes not recommended
? Recommended lane and new lane during a
change of direction
A Change-of-direction symbol
On multi-lane roads, new lane recommenda-
tions can be displayed for the next change of
direction if the digital map supports this data.
During the change of direction, new lanes may
be added.
Lane not recommended =: you will not be able
to complete the next change of direction if you
stay in this lane.
Recommended lane and new lane during a
change of direction ?: in this lane you will be
able to complete the next two changes of direc-
tion without changing lane. Menus and submenus
205On-board computer and displays Z
Page 215 of 345
tion system, e.g. a garage. If the vehicle is
stuck in snow and you must leave the auxiliary heating running, keep the exhaust pipe and
the area around the vehicle clear of snow. To guarantee a sufficient supply of fresh air, open
a window on the side of the vehicle away from
the wind. G
WARNING
When the auxiliary heating is switched on,
parts of the vehicle can become very hot.
Flammable materials such as leaves, grass or twigs may ignite if they come into contact
with:
R hot parts of the exhaust system
R the exhaust gas itself
There is a risk of fire.
When the auxiliary heating is switched on,
make sure that:
R no flammable materials come into contact
with hot vehicle components
R the exhaust gas can escape from the
exhaust pipe unhindered
R the exhaust gas does not come into contact
with flammable materials.
! Operating the auxiliary heating/ventilation
draws on the vehicle battery. After you have
heated or ventilated the vehicle a maximum of two times, drive for a longer distance.
Only vehicles with auxiliary heating have this
function.
In the Heating
Heating submenu, you can select a
stored departure time or change a departure
time.
The auxiliary heating timer function calculates
the switch-on time according to the outside
temperature so that the vehicle is preheated by the departure time. When the departure time isreached, the auxiliary heating continues to heat
for a further five minutes and then switches off. The auxiliary heating adopts the set air condi-
tioning or THERMOTRONIC temperature set-
ting.
You can switch off the auxiliary heating by using
the remote control or the auxiliary heating but-
ton on the centre console. i
Switch the auxiliary heating on regularly
once a month for about ten minutes.
Further information on auxiliary heating
(Y page 126).
Selecting the departure time or deactivat- ing a selected departure time
X Press the =or; button on the steering
wheel to select the Settings
Settings menu.
X Press the :or9 button to select the
Heating Heating submenu.
X Press ato confirm.
The current setting appears.
X Press aagain.
X Press the :or9 button to select one
of the three departure times or Timer
Timeroff
off(no
timer active).
X Press ato confirm.
If a departure time is selected, the yellow
indicator lamp lights up on the auxiliary heat-
ing button.
Changing the departure time
X Press the =or; button on the steering
wheel to select the Settings
Settingsmenu.
X Press the :or9 button to select the
Heating
Heating submenu.
X Press ato confirm.
The current setting appears.
X Press the :or9 button to select
Change A
Change A, Change B
Change BorChange C
Change C.
X Press ato confirm.
You can now change the departure time.
X Press the =or; button to select the
display to be changed: hours, minutes.
X Press the :or9 button to set the
selected display.
X Press the abutton to store the entry.
The yellow indicator lamp on the auxiliary
heating button lights up.
Comfort Switching belt adjustment on/off
X Press the =or; button on the steering
wheel to select the Settings Settingsmenu.
X Press the :or9 button to select the
Convenience
Convenience submenu.
X Press ato confirm. 212
Menus and submenusOn-board computer and displays
Page 262 of 345
General notes
The section on the multimedia system in this
manual describes the basic principles for oper-
ation. More information can be found in the Dig-
ital Owner's Manual. Important safety notes
G
WARNING
Operating the integrated information systems and communications equipment in the vehicle
while driving will distract you from traffic con-
ditions. You could then lose control of the
vehicle. There is a risk of an accident.
Only operate these devices if road traffic con-
ditions permit. If you are unsure about the
surrounding conditions, pull over to a safe
location and make entries only while the vehi-
cle is stationary.
You must observe the legal requirements for the country in which you are currently driving whenoperating the multimedia system.
The multimedia system calculates the route to
the destination without taking the following into
account, for example:
R traffic lights
R stop and give way signs
R parking or stopping restrictions
R road narrowing
R other road and traffic rules and regulations
The multimedia system may give incorrect driv-
ing recommendations if the actual road/traffic
situation does not correspond with the digital
map data.
For example:
R a diverted route
R the road layout or the direction of a one-way
street has been changed
For this reason, you must always observe road
and traffic rules and regulations during your
journey. Road and traffic rules and regulations
always have priority over multimedia system
driving recommendations. Function restrictions
For safety reasons, some functions are restric-
ted or unavailable while the vehicle is in motion.
You will notice this, for example, because either
you will not be able to select certain menu items or a message will appear to this effect. Operating system
Overview
General notes !
Do not use the space in front of the display
for storage. Objects placed here could dam-
age the display or impair its function. Avoid
any direct contact with the display surface.
Pressure on the display surface may result in
impairments to the display, which could be
irreversible.
Wearing polarised sunglasses may impair your
ability to read the display.
The display has an automatic temperature-con- trolled switch-off feature. The brightness is
automatically reduced if the temperature is too
high. If necessary, the display may temporarily
switch off completely.
Cleaning instructions !
Do not touch the display. The display has a
very sensitive high-gloss surface; there is a
risk of scratching. If you have to clean the
screen, however, use a mild cleaning agent
and a soft, lint-free cloth.
The display must be switched off and have
cooled down before you start cleaning. Do not
apply pressure to the display surface when
cleaning it, as this could cause irreversible dam- age to the display.
Switching the multimedia system
on/off X
Press the qcontrol knob. Operating system
259Multimedia system Z
Page 263 of 345
Adjusting the volume
X
Turn the qcontrol knob.
The volume changes:
R for the currently set media source
R during a traffic announcement or navigation
message
R in hands-free mode during an active call
Switching the sound on/off X
Press the 8button on the control panel.
If the audio output is switched off, the status
line will show the 8symbol. If you switch
the media source or change the volume, the
sound is automatically switched on.
i You will hear navigation messages even
when the sound is muted.
Functions The multimedia system has the following func-
tions:
R Radio mode
R Media mode with media search
R Sound systems
R Navigation system
COMAND Online: navigation using hard drive
Audio 20: navigation using SD memory card
R Communication functions
R Vehicle functions with system settings
R Favourites functions
Controller The controller in the centre console lets you:
R select menu items on the display
R enter characters
R select a destination on the map
R save entries
The controller can be:
R turned 3
R slid left or right 1
R slid forwards or back 4
R slid diagonally 2
R pressed briefly or pressed and held 7Back button You can use the
%button to exit a menu or to
call up the basic display of the current operating mode.
X To exit the menu: briefly press the%
button.
The multimedia system changes to the next
higher menu level in the current operating
mode.
X To call up the basic display: press the%
button for longer than two seconds.
The multimedia system changes to the basic
display of the current operating mode. Favourites
Calling up and exiting favourites X
To call up: press thegbutton on the con-
troller.
X Select a favourite, e. g. Vehicle Vehicle.
The favourites are displayed.
X To exit: press the gbutton again.
Adding favourites Adding a predefined favourite
:
To add a new favourite
; To rename a selected favourite
= To move a selected favourite
? To delete a selected favourite
X Press the gbutton.
X Slide 6the controller.
The menu bar is shown.
X Select Reassign
Reassign.
The categories are displayed.
X Select a category.
The favourites are displayed. 260
Operating systemMultimedia system
Page 265 of 345

X
Select Town
Town .
The town in which the vehicle is currently
located (current vehicle position) is at the top.
Below this, you will see locations for which
route guidance has already been carried out.
X Enter the town.
The Gsymbol: the location is contained on
the digital map multiple times.
X To switch to the list: slide5the control-
ler.
X Select the location.
If available, the postcode is shown. If there
are different postcodes available for the loca-
tion, the corresponding digits are displayed
with an X
X.
X Enter the street and house number.
The address is in the menu.
Further options for destination entry:
R search for a keyword
The keyword search finds destinations using
fragments of words.
R select the last destination
R select a contact
R select a POI
You can search for a POI by location, name or
telephone number.
R select destination on the map
R enter intermediate destination
You can map the route to the destination
yourself with up to four intermediate destina-
tions.
R select travel guide destination (only available
for selected European countries)
R select destinations from Mercedes-Benz
Apps
R select geo-coordinates
Calculating the route Prerequisite: the address has been entered and
is in the menu.
X Select Start StartorContinue
Continue .
The route is calculated with the selected route
type and the selected route options. If route guidance has already been activated,
a prompt will appear asking whether you wish to end the current route guidance.
X Select Cancel
Cancel current
current route
routeguidance
guidance or
Set as intermediate destination
Set as intermediate destination.
Cancel current route guidance Cancel current route guidance cancels
the current route guidance and starts route
calculation to the new destination.
Set as intermediate destination
Set as intermediate destination adds
the new destination in addition to the existing destination and opens the intermediate des-
tinations list. Connecting the mobile phone
Requirements For telephony via the Bluetooth
®
interface, you
require a Bluetooth ®
-capable mobile phone. The
mobile phone must support Hands-Free Profile
1.0 or above.
Multimedia system:
X Select Vehicle VehicleQ System set‐
System set‐
tings
tingsQActivate Bluetooth Activate Bluetooth.
X Activate Bluetooth ®
O.
Mobile phone:
X Activate Bluetooth ®
and, if necessary, Blue-
tooth ®
visibility for other devices (see the
manufacturer's operating instructions).
The Bluetooth ®
device names for all of one man-
ufacturer's products might be identical. To
make it possible to clearly identify your mobile
phone, change the device name (see the man-
ufacturer's operating instructions).
If the mobile phone supports the PBAP (Phone
Book Access Profile) and MAP (Message
Access Profile) Bluetooth ®
profiles, the follow-
ing information will be transmitted after you
connect:
R Phone book
R Call lists
R Text messages and e-mails
i Further information on suitable mobile
phones can be found at: http://
www.mercedes-benz.com/connect 262
Operating systemMultimedia system