2016 MERCEDES-BENZ CLA COUPE trailer
[x] Cancel search: trailerPage 20 of 345
Rear-compartment seat belt sta-
tus indicator
........................................ 44
Rear-view mirror
Anti-dazzle mode (automatic) ........ 104
Dipping (manual) ........................... 103
Refuelling
Fuel gaug e....................................... 32
Important safety notes .................. 152
Notes for Mercedes‑ AMG vehi-
cles ................................................ 329
Refuelling process ......................... 153
see Fuel
Remote control
Auxiliary heating/ventilation .......... 127
Changing the batteries (auxiliary
heating) ......................................... 129
Replacing bulbs
Brake lamp .................................... 113
Dipped-beam headlamp s............... 112
Fitting/removing the cover (front
wheel arch) .................................... 112
Important safety notes .................. 111
Main-beam headlamp s................... 113
Overview of bulb types .................. 112
Rear fog lamp ................................ 113
Turn signals (front) ......................... 113
Turn signals (rear) .......................... 113
Replacing the battery (auxiliary
heating remote control) .................... 129
Rescue card ......................................... 28
Reserve (fuel tank)
see Fuel
Reserve fuel
Display message ............................ 234
Warning lamp ................................. 255
Residual heat (climate control) ........ 126
Restraint system
Display message ............................ 225
Introduction ..................................... 39
Warning lamp ................................. 254
Warning lamp (function) ................... 40
Rev counter ........................................ 200
Reverse gear
Engaging (manual transmission) .... 142
Reverse gear (selector lever) ........... 146
Reversing camera
"Reverse parking" function ............ 186 Cleaning instructions ..................... 289
Coupling up a trailer function ........ 188
Display in the multimedia system .. 185
Function/note s............................. 184
General notes ................................ 184
Switching on/of f........................... 185
Reversing feature
Panorama sliding sunroo f................ 93
Side windows ................................... 89
Reversing function
Roller sunblind ................................. 94
Reversing lamps
Display message ............................ 230
Roller sunblind
Panorama sliding sunroo f................ 94
Roof carrier ........................................ 273
Roof lining and carpets (cleaning
instructions) ...................................... 292
Roof load (maximum) ........................ 333
Route guidance
See also Digital Owner's Manua l... 259 S
Safety Children in the vehicle ..................... 54
see Occupant safety
Safety system
see Driving safety systems
SD card
Inserting ........................................ 267
Inserting/removing ........................ 267
Removing ....................................... 267
SD memory card
See also Digital Owner's Manua l... 259
Seat
Adjusting (Performance Seat) ........ 101
Folding the backrest (rear com-
partment) forwards/back .............. 271
Seat belt
Correct usage .................................. 42
Switching belt adjustment on/off
(on-board computer) ...................... 212
Seat belts
Adjusting the driver's and front-
passenger seat belt ......................... 43
Adjusting the height ......................... 43
Cleaning ......................................... 291 Index
17
Page 22 of 345

SPORT handling mode
Deactivating/activating
(Mercedes-AMG vehicles) ................71
Warning lamp ................................. 253
Start-off assist
Activating ....................................... 174
Important safety notes .................. 174
Start/Stop button
Removing ....................................... 134
Starting the engine ........................ 135
Start/stop function
see ECO start/stop function
Starting (engine) ................................ 134
STEER CONTROL ..................................73
Steering
Display message ............................2 45
Steering assistant STEER CON-
TROL
see STEER CONTROL
Steering wheel
Adjusting (manually) ...................... 102
Button overview ............................... 33
Buttons (on-board computer) ......... 201
Cleaning ......................................... 291
Gearshift paddle s........................... 150
Important safety notes .................. 102
Steering wheel gearshift paddles .... 150
Stopwatch (RACETIMER) ................... 214
Stowage compartment
Map pockets .................................. 270
Stowage compartments
Armrest (front) ............................... 269
Armrest (under) ............................. 270
Centre console .............................. 269
Centre console (rear) ..................... 270
Cup holde r..................................... 273
Glove compartment ....................... 269
Important safety information ......... 268
Spectacles compartment ............... 269
Under driver's seat/front-
passenger sea t.............................. 270
Stowage net ....................................... 270
Stowage space
Stowage net ................................... 270
Stowage well beneath the boot
floor .................................................... 272
Summer tyres .................................... 312 Sun visor
............................................ 275
Suspension
Adaptive Damping System ............. 176
Suspension settings
AMG RIDE CONTROL sports sus-
pension .......................................... 175
Switching on media mode
Via the device list .......................... 266 T
Tail lamps Display message ............................ 229
see Lights
Tank
see Fuel tank
Technical data
Capacities ...................................... 327
Information .................................... 325
Trailer load s................................... 334
Tyres/wheels ................................. 323
Vehicle data ................................... 333
Telephone
Accepting a call (multifunction
steering wheel) .............................. 207
Authorising a mobile phone (con-
necting) ......................................... 263
Connecting a Mobile phone (gen-
eral information) ............................ 262
Display message ............................ 246
Introduction ................................... 207
Menu (on-board computer) ............ 207
Number from the phone book ........ 207
Redialling ....................................... 208
Rejecting/ending a call ................. 207
See also Digital Owner's Manua l... 259
Switching between mobile
phones ........................................... 263
Telephone compartment ................ 270
Telephone module with Bluetooth ®
(SAP profile) Activating and connecting the
module ........................................... 264
Charging a mobile phone ............... 266
Connecting the mobile phone ........ 265
Connecting the module via a USB
cable .............................................. 264
Data modem mode ........................ 265 Index
19
Page 23 of 345
Installing the module .....................2
64
Introduction ................................... 263
Saving/deleting the PIN for the
SIM card ........................................ 266
Settings ......................................... 266
SIM card mode .............................. 265
Text messages ............................... 266
Transferring the phone book .......... 266
Temperature
Coolant .......................................... 201
Coolant (on-board computer,
Mercedes-AMG vehicles) .............. .213
Engine oil (on-board computer,
Mercedes-AMG vehicles) .............. .213
Outside temperature ..................... .200
Setting (climate control) ................ 122
Transmission oil (on-board com-
puter, Mercedes-AMG vehicles) ..... 213
TEMPOMAT
Function/notes ............................ .162
Text messages
Telephone module with Blue-
tooth ®
(SAP profile) ....................... 266
Through-loading ................................ 271
Timing (RACETIMER) ......................... 214
TIREFIT kit .......................................... 296
Declaration of conformity ................ 27
Important safety notes .................. 296
Storage location ............................ 294
Tyre pressure not reached ............. 297
Tyre pressure reached ................... 298
Top Tether ............................................ 56
Total distance recorder .................... 203
Tow-away protection
Activating ......................................... 74
Deactivating ..................................... 74
Function .......................................... .74
Tow-starting
Emergency engine starting ............ 307
Fitting the towing ey e.................... 305
Important safety notes .................. 304
Removing the towing eye ............... 305
Towing
Important safety notes .................. 304
Notes for 4MATIC vehicles ............ 307
Transporting the vehicle ................ 307 Towing a trailer
Axle load, permissibl e.................... 334
ESP ®
(Electronic Stability Pro-
gram) ............................................... 72
Failure check for LEDs ................... 199
General notes ................................ 196
Parking Pilot .................................. 180
Pulling away with a traile r.............. 136
Trailer tow hitch display message .. 245
Towing away
Fitting the towing ey e.................... 305
Removing the towing eye ............... 305
With both axles on the ground ....... 306
With front axle raised ..................... 306
Towing eye ......................................... 294
Traffic Sign Assist
Activating ....................................... 191
Activating/deactivating the warn- ing function .................................... 208
Display message ............................ 236
Function/note s............................. 190
Important safety notes .................. 191
Instrument cluster display ............. 191
Trailer
Folding the ball coupling in/out ..... 197
Trailer coupling
see Towing a trailer
Trailer towing
7-pin connecto r............................. 199
Blind Spot Assist ............................ 193
Cleaning the trailer tow hitch ......... 290
Coupling up a traile r...................... 198
Decoupling a trailer ....................... 198
Driving tip s.................................... 196
Folding in the ball coupling ............ 197
Folding out the ball coupling .......... 197
Important safety notes .................. 194
Lights display message .................. 228
Power supply ................................. 198
Trailer load s................................... 334
Transmission
see Automatic transmission
see Manual transmission
Transmission position display
(DIRECT SELECT lever) ...................... 144
Transporting the vehicle .................. 30720
Index
Page 75 of 345
SPORT handling mode
SPORT handling mode
message appears in
the multifunction display.
X To deactivate SPORT handling mode:
briefly press button :.
The M SPORT handling mode warning
lamp on the instrument cluster goes out.
X To deactivate ESP ®
:press button :until
the å ESP®
OFF warning lamp lights up in
the instrument cluster.
The ÷ OFF
OFF message appears in the multi-
function display.
X To activate ESP ®
:briefly press button :.
The å ESP®
OFF warning lamp on the
instrument cluster goes out. The ÷ESP®
ON
ON message appears in the multifunction dis-
play.
Characteristics when SPORT handling
mode is activated
If SPORT handling mode is activated and one or
more wheels start to spin, the ÷ESP®
warn-
ing lamp on the instrument cluster flashes. In
such situations, ESP ®
will stabilise the vehicle
only to a limited degree.
When SPORT handling mode is activated:
R ESP ®
improves driving stability only to a limi-
ted degree
R traction control is still activated
R the engine's torque is only restricted to a limi-
ted degree and the drive wheels may start to spin
The spinning of the wheels results in a cut for better traction on loose surfaces.
R ESP ®
still provides support when you brake
firmly.
Characteristics when ESP ®
is deactivated
If ESP ®
is deactivated and one or more wheels
start to spin, the ÷ESP®
warning lamp in the
instrument cluster does not flash. In such situa-
tions, ESP ®
will not stabilise the vehicle.
If you deactivate ESP ®
:
R ESP ®
no longer improves driving stability
R engine torque is no longer limited and the
drive wheels may start to spin
The spinning of the wheels results in a cut for
better traction on loose surfaces.
R traction control is still activated R
Active Brake Assist is no longer available; it is
not activated even if you brake firmly with
assistance from ESP ®
R PRE-SAFE ®
is no longer available; it is not
activated even if you brake firmly with assis-
tance from ESP ®
R ESP ®
still provides support when you brake
firmly.
ESP ®
trailer stabilisation General notes
If your vehicle/trailer combination begins to
lurch, ESP ®
assists you in this situation. ESP ®
slows the vehicle down by braking and limiting
the engine output until the vehicle/trailer com- bination has stabilised.
Important safety notes G
WARNING
If road and weather conditions are poor,
trailer stabilisation will not be able to prevent the vehicle/trailer combination from swerv-
ing. Trailers with a high centre of gravity can
tip over before ESP ®
can detect this. There is
a risk of an accident.
Always adapt your driving style to the prevail-
ing road and weather conditions.
If your vehicle/trailer combination begins to
lurch, you can only stabilise the vehicle/trailer
combination by depressing the brake firmly.
ESP ®
trailer stabilisation is active above speeds
of approximately 65 km/h.
ESP ®
trailer stabilisation does not work if ESP ®
is deactivated or disabled because of a malfunc- tion. EBD (electronic brake force distribu-
tion)
General notes EBD monitors and controls the brake pressure
on the rear wheels to improve driving stability
while braking. 72
Driving safety systemsSafety
Page 91 of 345
R
HANDS-FREE ACCESS does not function dur-
ing engine start.
R Dirt caused by road salt around sensors :
may restrict functionality.
Using HANDS-FREE ACCESS with a pros-
thetic leg may restrict functionality.
R If a KEYLESS-GO key is in the KEYLESS-GO
detection range to the rear of the vehicle,
HANDS-FREE ACCESS could be triggered.
The boot lid could thus be opened uninten-
tionally, for example, when you:
- fold the ball coupling in or out
- couple or uncouple a trailer
- fit or remove a rear-mounted bicycle rack
- load/unload bicycles on/from a rear-
mounted bicycle rack
- set down or lift up an object behind the
vehicle
- polish the rear of the vehicle
Do not carry the KEYLESS-GO key with you in
such situations. This will prevent the uninten- tional opening of the boot lid.
Operation X
To open: kick into sensor detection range :
below the bumper with your foot.
X If the boot lid does not open after several
attempts: wait at least ten seconds then kick
under the bumper once again.
If you hold your foot under the bumper for too
long, the boot lid does not open. Repeat the
kicking movement more quickly if this occurs. Opening automatically from inside
General notes !
The boot lid swings upwards when opened.
Therefore, make sure that there is sufficient
clearance above the boot lid.
The opening dimensions of the boot lid can be
found under "Vehicle data" (Y page 333).
Opening You can open the boot lid from the driver's seat
when the vehicle is stationary and unlocked. X
To open: pull remote operating switch :for
the boot lid until the boot lid opens. Boot emergency release
General notes !
The boot lid swings upwards when opened.
Therefore, make sure that there is sufficient
clearance above the boot lid.
The opening dimensions of the boot lid can be
found in the "Vehicle data" section
(Y page 333).
If the boot lid can no longer be unlocked:
R using the key, or
R using the remote operating switch in the door
control panel:
Use the emergency release on the inside of the boot lid.
You can reach the emergency release via the
boot. 88
BootOpening and closing
Page 111 of 345
(side lamps) and
L(dipped-beam head-
lamps) in the instrument cluster light up.
Dipped-beam headlamps When the ignition is switched on and the light
switch is in the Lposition, the side lamps
and dipped-beam headlamps are switched on
even if the light sensor does not sense dark
ambient light conditions. This is advantageous
when there is fog or rain.
X To switch on the dipped-beam headlamps:
turn the key in the ignition lock to position 2
or start the engine.
X Turn the light switch to L.
The green Lindicator lamp on the instru-
ment cluster lights up.
Rear foglamp The rear foglamp improves the visibility of your
vehicle in heavy fog for the following traffic.
Please observe the country-specific laws on the
use of rear foglamps.
X To switch on the rear foglamp: turn the key
in the ignition lock to position 2or start the
engine.
X Turn the light switch to LorÃ.
X Press the Rbutton.
The yellow Rindicator lamp in the instru-
ment cluster lights up.
X To switch off the rear foglamp:press the
R button.
The yellow Rindicator lamp in the instru-
ment cluster goes out.
i When the rear foglamp is switched on, the
centre brake lamp in the tail lamp switches off
due to a legal requirement.
Side lamps ! When the battery is discharged heavily, the
side lamps or parking lamps are automatically
switched off to facilitate an engine start.
Always park your vehicle safely and in a well lit area, in accordance with the relevant legal
stipulations. Avoid using the Tside lamps
for periods lasting several hours. Where pos-
sible, switch on the right Xor left W
parking lamp.
X To switch on: turn the light switch to T.
The green Tindicator lamp in the instru-
ment cluster lights up. Parking lamps
Switching on the parking lamps ensures that the
corresponding side of the vehicle is illuminated.
X To switch on the parking lamps: the key
should not be in the ignition lock or it should
be in position 0.
X Turn the light switch to W(left-hand side of
the vehicle) or X(right-hand side of the
vehicle).
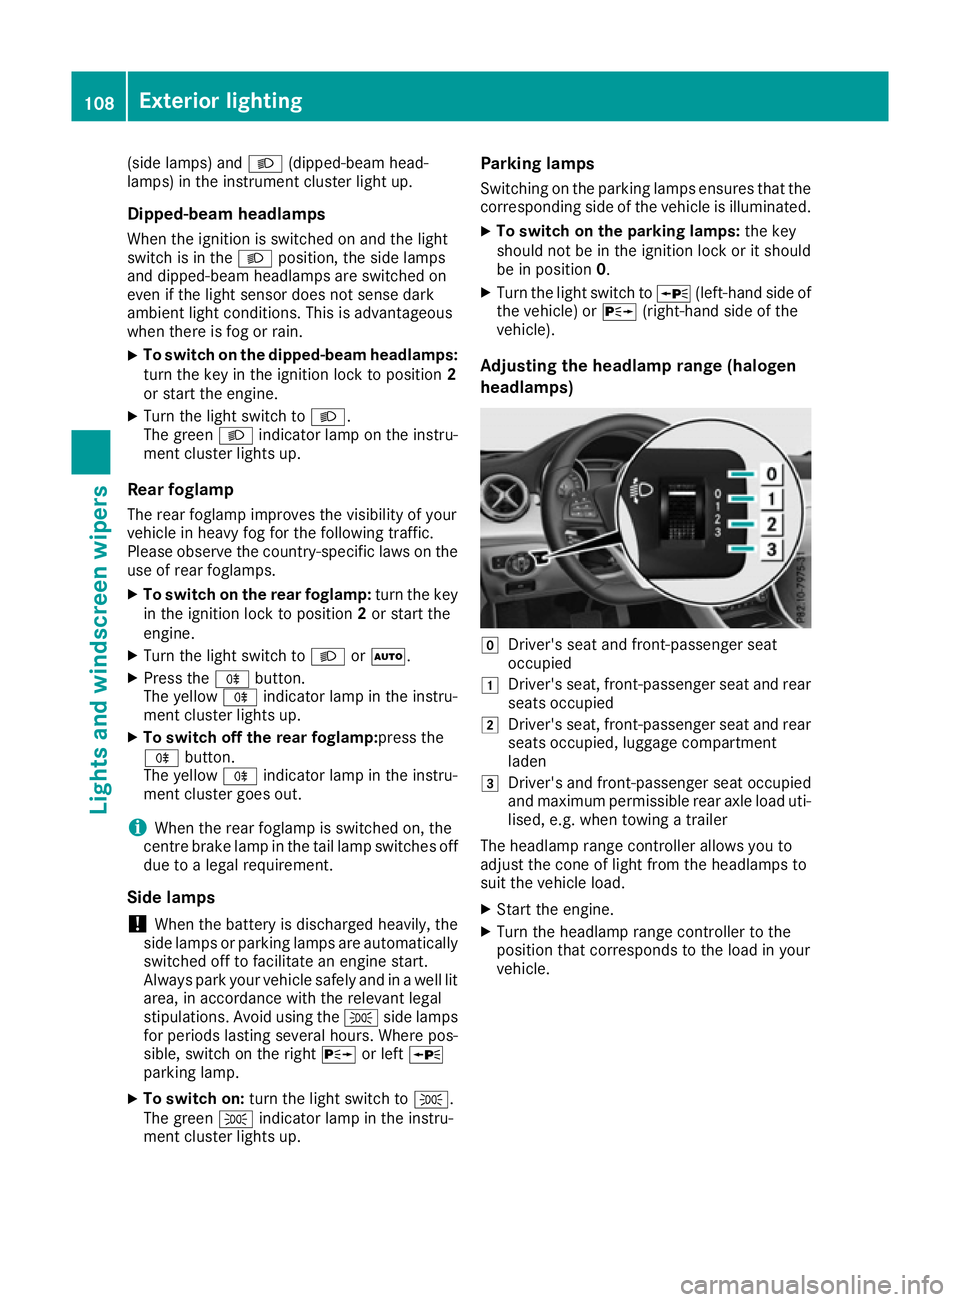
Adjusting the headlamp range (halogen
headlamps) g
Driver's seat and front-passenger seat
occupied
1 Driver's seat, front-passenger seat and rear
seats occupied
2 Driver's seat, front-passenger seat and rear
seats occupied, luggage compartment
laden
3 Driver's and front-passenger seat occupied
and maximum permissible rear axle load uti-
lised, e.g. when towing a trailer
The headlamp range controller allows you to
adjust the cone of light from the headlamps to
suit the vehicle load.
X Start the engine.
X Turn the headlamp range controller to the
position that corresponds to the load in your
vehicle. 108
Exterior lightingLights and windscreen wipers
Page 139 of 345
position
Dor R, the vehicle may accelerate
suddenly. There is a risk of an accident.
When engaging transmission position Dor R,
always keep the brake pedal firmly depressed
and do not depress the accelerator pedal at
the same time.
! Vehicles with manual transmission:
change gear in good time and avoid spinning
the wheels. You could otherwise damage the
vehicle.
Depress the accelerator carefully when pulling
away.
The vehicle automatically locks centrally once
you have pulled away. The locking knobs in the
doors drop down.
You can open the doors from the inside at any
time.
You can also deactivate the automatic door
locking system (Y page 211).
Vehicles with automatic transmission: it is
only possible to shift the transmission from posi-
tion Pto the desired position if you depress the
brake pedal. Only then can the parking lock be
deactivated.
All vehicles (except Mercedes-AMG vehi-
cles): if you do not depress the brake pedal, the
DIRECT SELECT lever can still be moved but the
parking lock remains engaged.
Mercedes-AMG vehicles: if you do not depress
the brake pedal, the selector lever can still be
moved but the parking lock remains engaged.
Vehicles with automatic transmission: at
transmission fluid temperatures below Ò20 †,
you can only shift out of position Pinto another
transmission position when the engine is run-
ning.
i Vehicles with automatic transmission:
upshifts take place at higher engine speeds
after a cold start. This helps the catalytic con- verter to reach its operating temperature
more quickly.
Vehicles with automatic transmission: infor-
mation on automatically releasing the electric
parking brake (Y page 158). Pulling away with a trailer
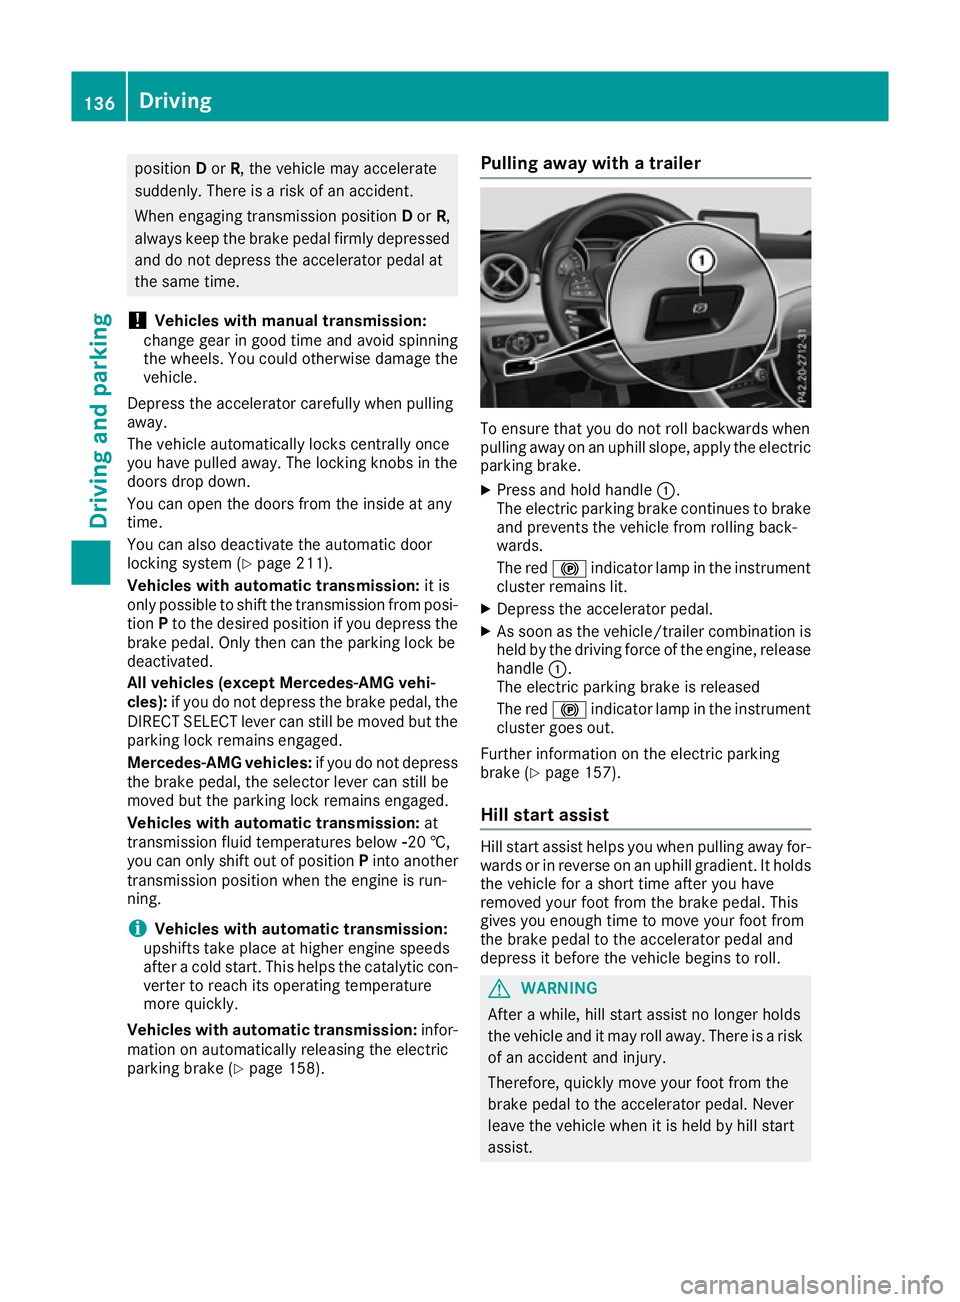
To ensure that you do not roll backwards when
pulling away on an uphill slope, apply the electric
parking brake.
X Press and hold handle :.
The electric parking brake continues to brake
and prevents the vehicle from rolling back-
wards.
The red !indicator lamp in the instrument
cluster remains lit.
X Depress the accelerator pedal.
X As soon as the vehicle/trailer combination is
held by the driving force of the engine, release
handle :.
The electric parking brake is released
The red !indicator lamp in the instrument
cluster goes out.
Further information on the electric parking
brake (Y page 157).
Hill start assist Hill start assist helps you when pulling away for-
wards or in reverse on an uphill gradient. It holds the vehicle for a short time after you have
removed your foot from the brake pedal. This
gives you enough time to move your foot from
the brake pedal to the accelerator pedal and
depress it before the vehicle begins to roll. G
WARNING
After a while, hill start assist no longer holds
the vehicle and it may roll away. There is a risk of an accident and injury.
Therefore, quickly move your foot from the
brake pedal to the accelerator pedal. Never
leave the vehicle when it is held by hill start
assist. 136
DrivingDriving and parking
Page 145 of 345

X
Turn DYNAMIC SELECT controller :as many
times as necessary until the desired drive
program is selected.
The selected drive program appears in the
multifunction display. After five seconds the
display goes out and the status icon of the
selected drive program appears.
The drive program indicator on DYNAMIC
SELECT controller :lights up in red.
Available drive programs: I
Individual Individual settings
C
Comfort Comfort-orientated, engine
and transmission settings
optimised for economy
S
Sport Sporty engine and trans-
mission settings
S+
Sport Plus Particularly sporty trans-
mission settings
RACE
Maximum sportiness and
engine and transmission
settings suitable for the
racetrack
Additional information on drive programs
(Y page 148).
You can also change gear yourself using the
steering wheel gearshift paddles. Further infor-
mation on manual gearshifting (Y page 150).Manual transmission
Gear lever
! Only engage gear when the clutch pedal is
depressed.
! When shifting to
5thand 6thgear, you must
press the shift lever to the right. Otherwise,
you could shift unintentionally into 3rdor4th
gear and damage the engine or transmission.
If you shift down at too high a speed (trans-
mission braking), this can cause the engine to
overrev, leading to engine damage.
Do not use the clutch bite point to keep the
vehicle stationary on uphill gradients. There is otherwise a risk of damaging the clutch.
! On long and steep downhill gradients, espe-
cially if the vehicle is laden or towing a trailer, you must shift into gear
1, 2or3in good time.
This uses the engine's braking effect. This
relieves the load on the brake system and
prevents the brakes from overheating and
wearing too quickly. k
Reverse gear
1 -6
Forward gears Shifting to neutral N
X
Depress the clutch pedal fully.
X Shift the gear lever to position N:. Engaging reverse gear
! Only shift into reverse gear
Rwhen the vehi-
cle is stationary. Otherwise, you could dam-
age the transmission.
X Pull the gear lever up, push it to the left and
then pull it back.
The ECO start/stop function is not available
when reverse gear is engaged. For further infor- mation on the ECO start/stop function, see
(Y page 137). 142
Manual transmissionDriving and parking