2016 MERCEDES-BENZ CLA COUPE bulb
[x] Cancel search: bulbPage 115 of 345
Overview of bulb types
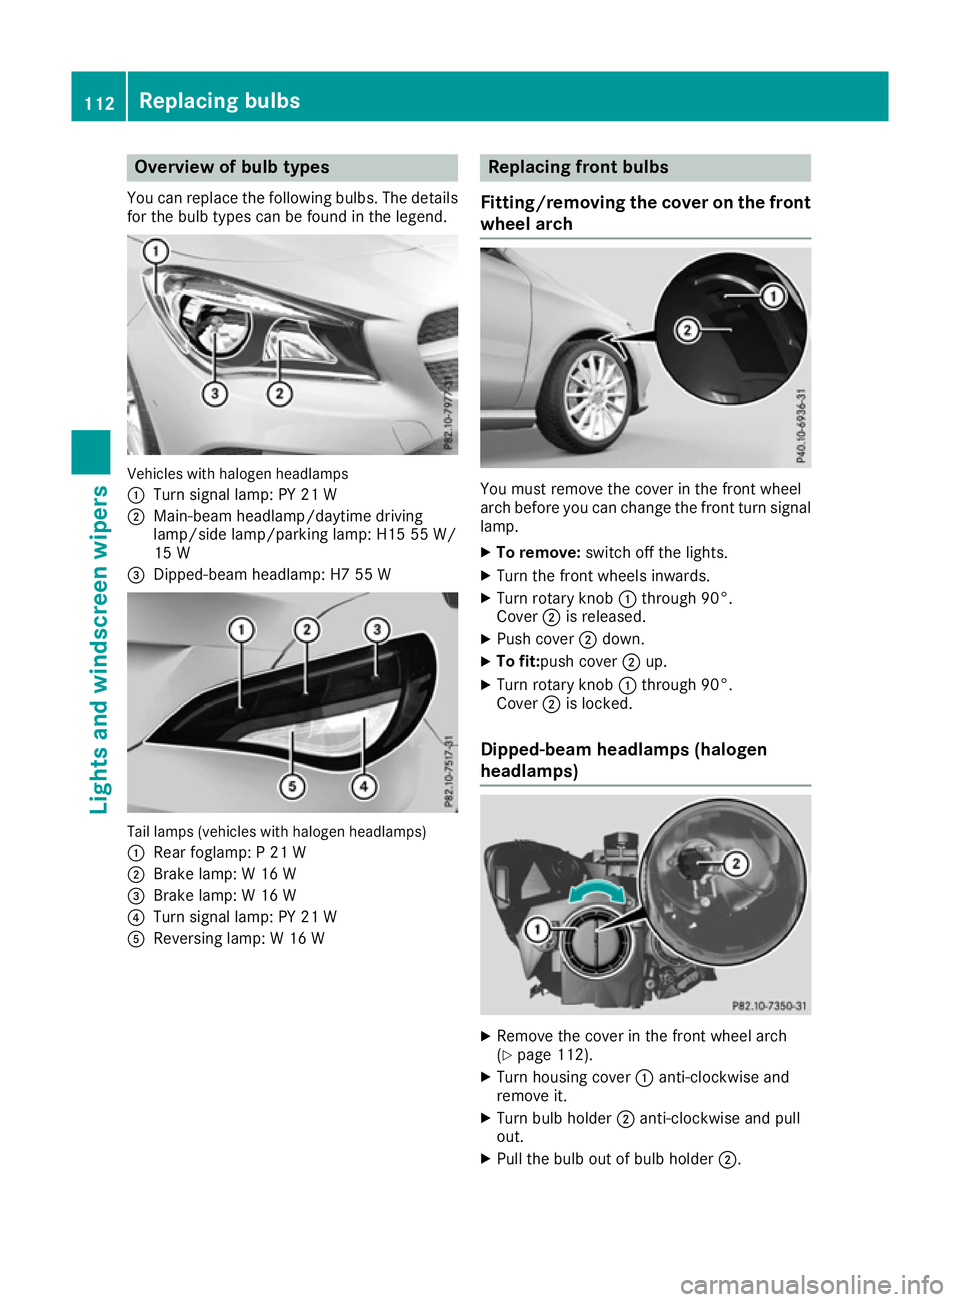
You can replace the following bulbs. The details
for the bulb types can be found in the legend. Vehicles with halogen headlamps
:
Turn signal lamp: PY 21 W
; Main-beam headlamp/daytime driving
lamp/side lamp/parking lamp: H15 55 W/
15 W
= Dipped-beam headlamp: H7 55 W Tail lamps (vehicles with halogen headlamps)
: Rear foglamp: P 21 W
; Brake lamp: W 16 W
= Brake lamp: W 16 W
? Turn signal lamp: PY 21 W
A Reversing lamp: W 16 W Replacing front bulbs
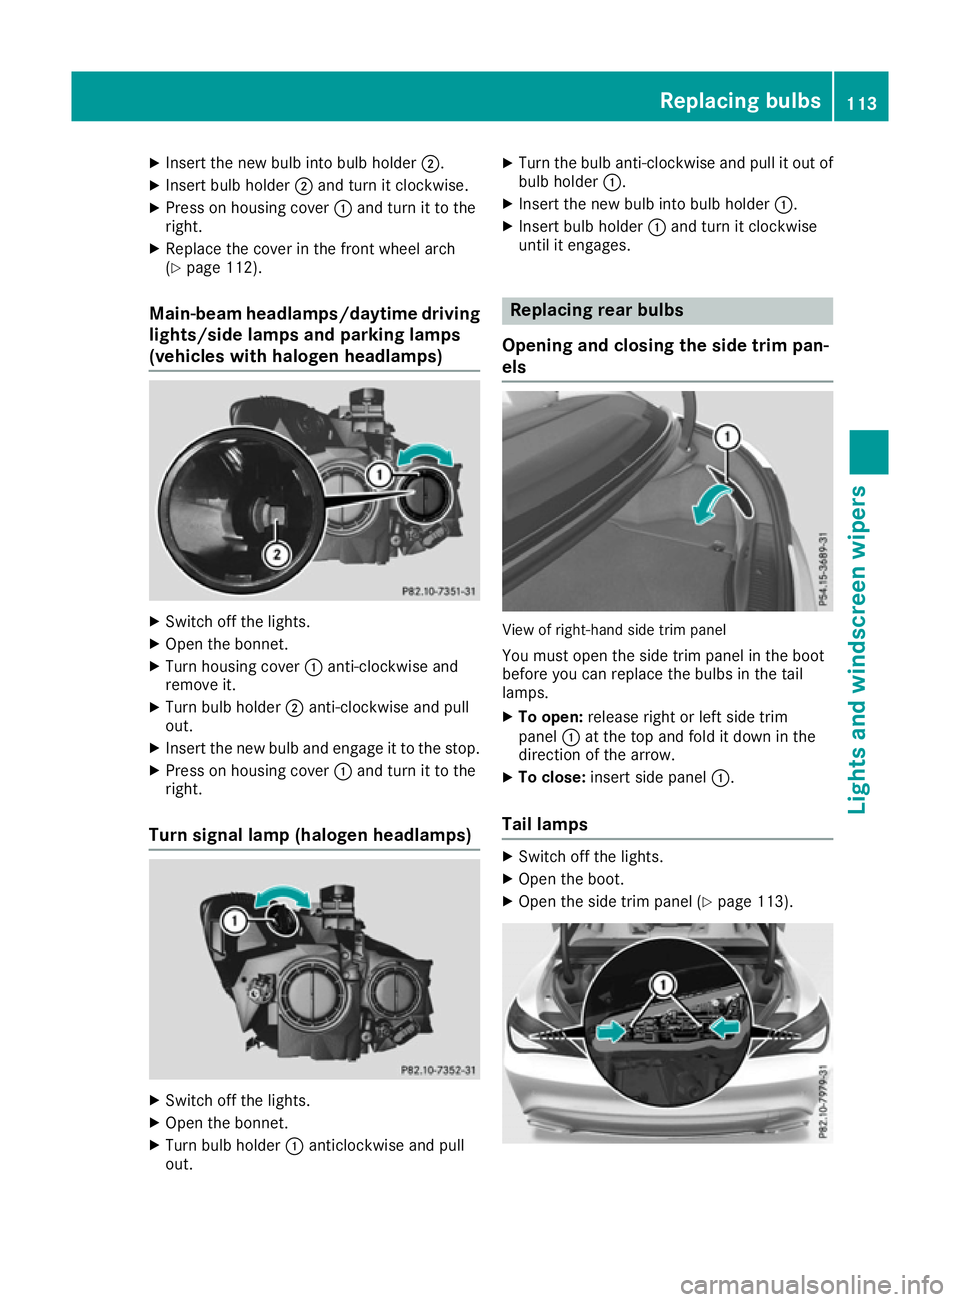
Fitting/removing the cover on the front wheel arch You must remove the cover in the front wheel
arch before you can change the front turn signal
lamp.
X To remove: switch off the lights.
X Turn the front wheels inwards.
X Turn rotary knob :through 90°.
Cover ;is released.
X Push cover ;down.
X To fit:push cover ;up.
X Turn rotary knob :through 90°.
Cover ;is locked.
Dipped-beam headlamps (halogen
headlamps) X
Remove the cover in the front wheel arch
(Y page 112).
X Turn housing cover :anti-clockwise and
remove it.
X Turn bulb holder ;anti-clockwise and pull
out.
X Pull the bulb out of bulb holder ;.112
Replacing bulbsLights and windscreen wipers
Page 116 of 345
X
Insert the new bulb into bulb holder ;.
X Insert bulb holder ;and turn it clockwise.
X Press on housing cover :and turn it to the
right.
X Replace the cover in the front wheel arch
(Y page 112).
Main-beam headlamps/daytime driving
lights/side lamps and parking lamps
(vehicles with halogen headlamps) X
Switch off the lights.
X Open the bonnet.
X Turn housing cover :anti-clockwise and
remove it.
X Turn bulb holder ;anti-clockwise and pull
out.
X Insert the new bulb and engage it to the stop.
X Press on housing cover :and turn it to the
right.
Turn signal lamp (halogen headlamps) X
Switch off the lights.
X Open the bonnet.
X Turn bulb holder :anticlockwise and pull
out. X
Turn the bulb anti-clockwise and pull it out of
bulb holder :.
X Insert the new bulb into bulb holder :.
X Insert bulb holder :and turn it clockwise
until it engages. Replacing rear bulbs
Opening and closing the side trim pan-
els View of right-hand side trim panel
You must open the side trim panel in the boot
before you can replace the bulbs in the tail
lamps.
X To open: release right or left side trim
panel :at the top and fold it down in the
direction of the arrow.
X To close: insert side panel :.
Tail lamps X
Switch off the lights.
X Open the boot.
X Open the side trim panel (Y page 113). Replacing bulbs
113Lights and windscreen wipers Z
Page 117 of 345
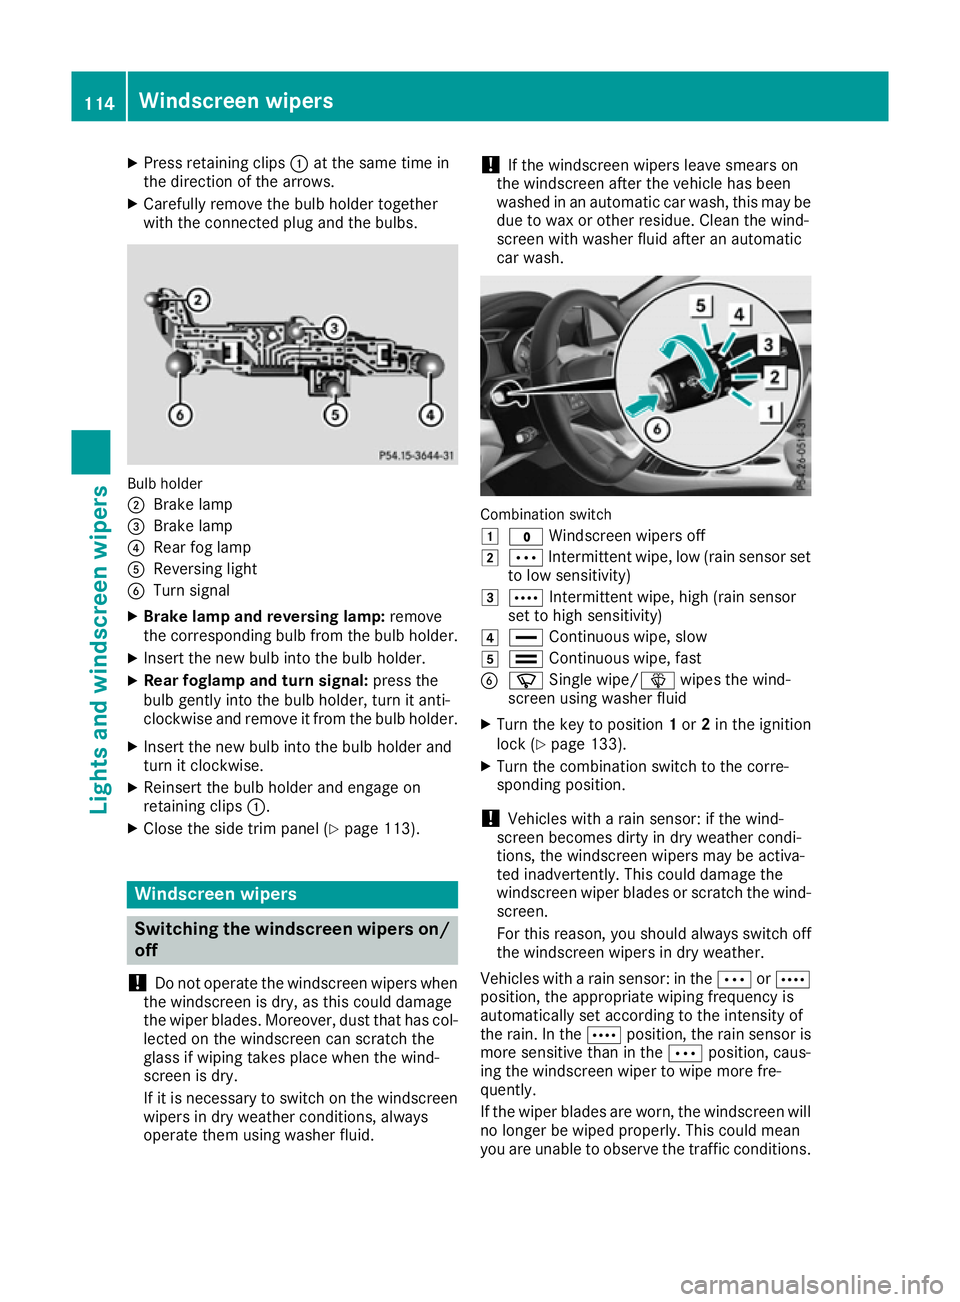
X
Press retaining clips :at the same time in
the direction of the arrows.
X Carefully remove the bulb holder together
with the connected plug and the bulbs. Bulb holder
;
Brake lamp
= Brake lamp
? Rear fog lamp
A Reversing light
B Turn signal
X Brake lamp and reversing lamp: remove
the corresponding bulb from the bulb holder.
X Insert the new bulb into the bulb holder.
X Rear foglamp and turn signal: press the
bulb gently into the bulb holder, turn it anti-
clockwise and remove it from the bulb holder.
X Insert the new bulb into the bulb holder and
turn it clockwise.
X Reinsert the bulb holder and engage on
retaining clips :.
X Close the side trim panel (Y page 113).Windscreen wipers
Switching the windscreen wipers on/
off
! Do not operate the windscreen wipers when
the windscreen is dry, as this could damage
the wiper blades. Moreover, dust that has col-
lected on the windscreen can scratch the
glass if wiping takes place when the wind-
screen is dry.
If it is necessary to switch on the windscreen wipers in dry weather conditions, always
operate them using washer fluid. !
If the windscreen wipers leave smears on
the windscreen after the vehicle has been
washed in an automatic car wash, this may be
due to wax or other residue. Clean the wind-
screen with washer fluid after an automatic
car wash. Combination switch
1
$ Windscreen wipers off
2 Ä Intermittent wipe, low (rain sensor set
to low sensitivity)
3 Å Intermittent wipe, high (rain sensor
set to high sensitivity)
4 ° Continuous wipe, slow
5 ¯ Continuous wipe, fast
B í Single wipe/î wipes the wind-
screen using washer fluid
X Turn the key to position 1or 2in the ignition
lock (Y page 133).
X Turn the combination switch to the corre-
sponding position.
! Vehicles with a rain sensor: if the wind-
screen becomes dirty in dry weather condi-
tions, the windscreen wipers may be activa-
ted inadvertently. This could damage the
windscreen wiper blades or scratch the wind- screen.
For this reason, you should always switch off
the windscreen wipers in dry weather.
Vehicles with a rain sensor: in the ÄorÅ
position, the appropriate wiping frequency is
automatically set according to the intensity of
the rain. In the Åposition, the rain sensor is
more sensitive than in the Äposition, caus-
ing the windscreen wiper to wipe more fre-
quently.
If the wiper blades are worn, the windscreen will
no longer be wiped properly. This could mean
you are unable to observe the traffic conditions. 114
Windscreen wipersLights and windscreen wipers
Page 231 of 345
Display messages
Possible causes/consequences and
M
MSolutions X
Consult a qualified specialist workshop immediately.
Further information on the automatic front-passenger front airbag
deactivation feature (Y page 47).Lights
i Vehicles with LED light bulbs in the light clusters:
The display message for the corresponding lamp only appears when all the LEDs in the lamp have
failed. Display messages
Possible causes/consequences and
M
MSolutions b
Left cornering Left cornering
light light
orRight cor‐
Right cor‐
nering light
nering light The left or right-hand cornering light is faulty.
X Check whether you are permitted to replace the bulb yourself
(Y page 111).
or
X Consult a qualified specialist workshop. b
Left dipped beam Left dipped beam
or
Right dipped beam
Right dipped beam The left or right-hand dipped-beam headlamp is faulty.
X Check whether you are permitted to replace the bulb yourself
(Y page 111).
or
X Consult a qualified specialist workshop. b
Trailer left tail Trailer left tail
lamp lampor
Trailer right
Trailer right
tail lamp
tail lamp The left or right-hand trailer tail lamp is faulty.
X Consult the manufacturer's operating instructions. b
Trailer left turn Trailer left turn
signal signal
orTrailerTrailer
right turn signal
right turn signal The left or right-hand trailer turn signal lamp is faulty.
X
Consult the manufacturer's operating instructions. b
Trailer brake lamp Trailer brake lamp The trailer brake lamp is faulty.
X Consult the manufacturer's operating instructions. b
Rear Rear
left
leftindicator
indicator
or Rear right indi‐
Rear right indi‐
cator
cator The rear left-hand or rear right-hand turn signal is faulty.
X Check whether you are permitted to replace the bulb yourself
(Y page 111).
or
X Consult a qualified specialist workshop. 228
Display
messagesOn-board computer and displays
Page 232 of 345
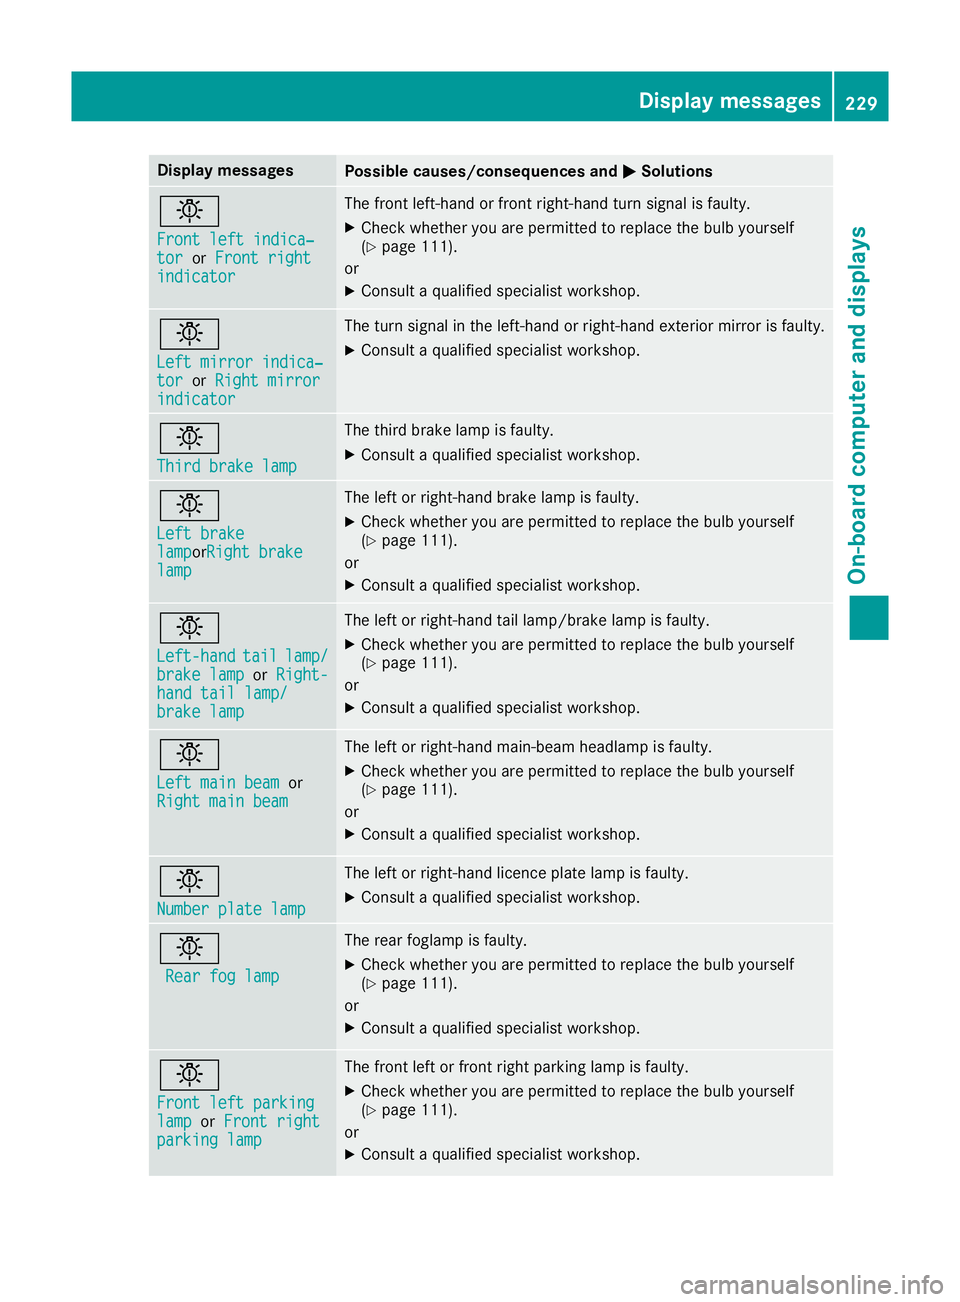
Display messages
Possible causes/consequences and
M
MSolutions b
Front left indica‐ Front left indica‐
tor tor
orFront right
Front right
indicator
indicator The front left-hand or front right-hand turn signal is faulty.
X Check whether you are permitted to replace the bulb yourself
(Y page 111).
or
X Consult a qualified specialist workshop. b
Left mirror indica‐ Left mirror indica‐
tor tor
orRight mirror
Right mirror
indicator
indicator The turn signal in the left-hand or right-hand exterior mirror is faulty.
X Consult a qualified specialist workshop. b
Third brake lamp Third brake lamp The third brake lamp is faulty.
X Consult a qualified specialist workshop. b
Left brake Left brake
lamp lampor
Right brake
Right brake
lamp
lamp The left or right-hand brake lamp is faulty.
X Check whether you are permitted to replace the bulb yourself
(Y page 111).
or
X Consult a qualified specialist workshop. b
Left-hand Left-hand
tail
taillamp/
lamp/
brake lamp
brake lamp orRight-
Right-
hand tail lamp/
hand tail lamp/
brake lamp brake lamp The left or right-hand tail lamp/brake lamp is faulty.
X Check whether you are permitted to replace the bulb yourself
(Y page 111).
or X Consult a qualified specialist workshop. b
Left main beam Left main beam
or
Right main beam
Right main beam The left or right-hand main-beam headlamp is faulty.
X Check whether you are permitted to replace the bulb yourself
(Y page 111).
or X Consult a qualified specialist workshop. b
Number plate lamp Number plate lamp The left or right-hand licence plate lamp is faulty.
X Consult a qualified specialist workshop. b
Rear fog lamp
Rear fog lamp The rear foglamp is faulty.
X Check whether you are permitted to replace the bulb yourself
(Y page 111).
or X Consult a qualified specialist workshop. b
Front left parking Front left parking
lamp lamp
orFront right
Front right
parking lamp
parking lamp The front left or front right parking lamp is faulty.
X Check whether you are permitted to replace the bulb yourself
(Y page 111).
or X Consult a qualified specialist workshop. Display
messages
229On-board computer and displays Z
Page 233 of 345
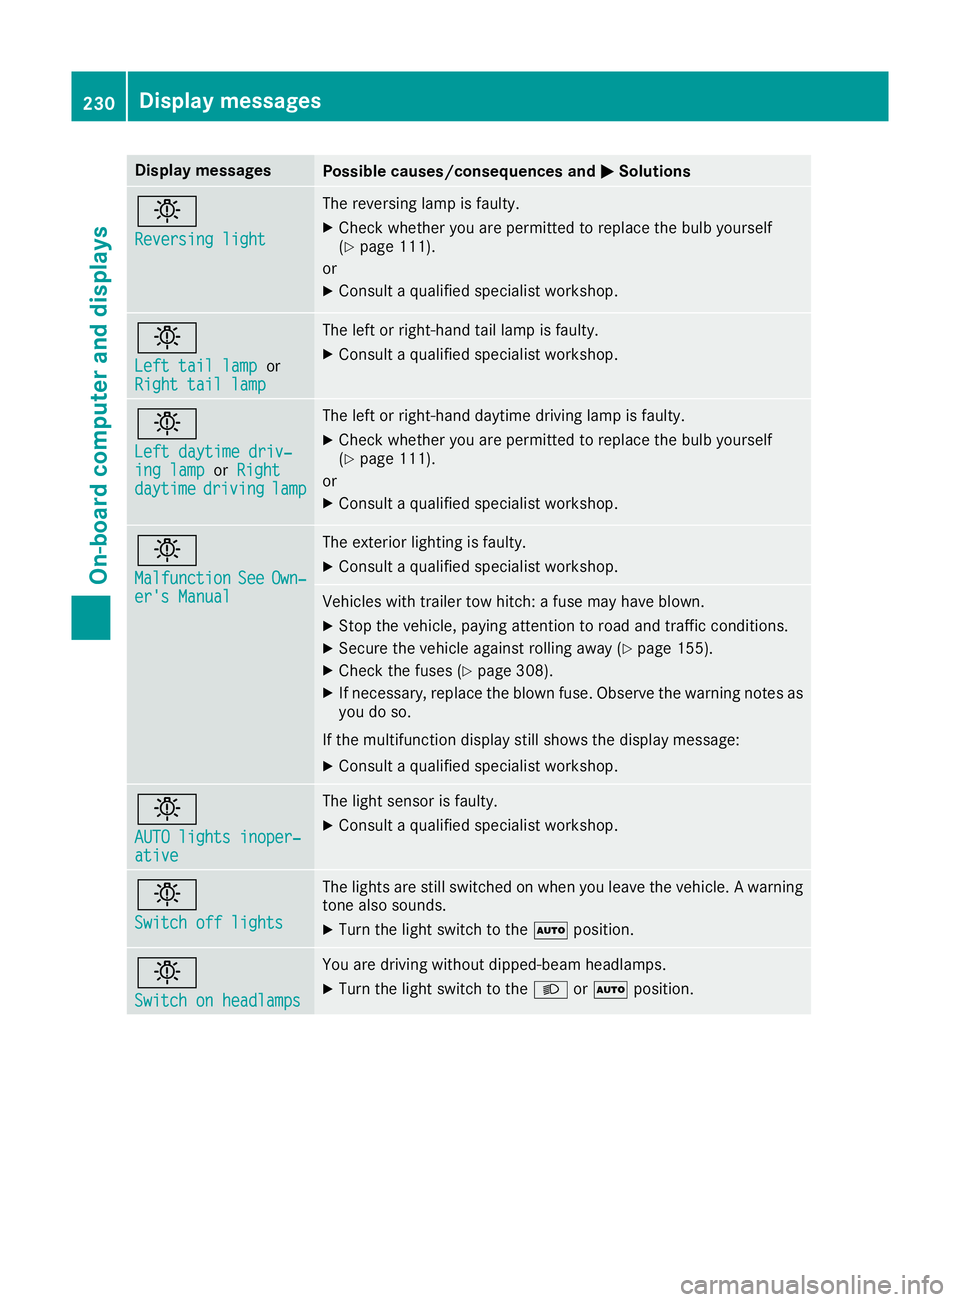
Display messages
Possible causes/consequences and
M
MSolutions b
Reversing light Reversing light The reversing lamp is faulty.
X Check whether you are permitted to replace the bulb yourself
(Y page 111).
or
X Consult a qualified specialist workshop. b
Left tail lamp Left tail lamp
or
Right tail lamp
Right tail lamp The left or right-hand tail lamp is faulty.
X Consult a qualified specialist workshop. b
Left daytime driv‐ Left daytime driv‐
ing lamp ing lamp
orRight
Right
daytime
daytime driving
drivinglamp
lamp The left or right-hand daytime driving lamp is faulty.
X Check whether you are permitted to replace the bulb yourself
(Y page 111).
or
X Consult a qualified specialist workshop. b
Malfunction Malfunction
See
SeeOwn‐
Own‐
er's Manual
er's Manual The exterior lighting is faulty.
X Consult a qualified specialist workshop. Vehicles with trailer tow hitch: a fuse may have blown.
X Stop the vehicle, paying attention to road and traffic conditions.
X Secure the vehicle against rolling away (Y page 155).
X Check the fuses (Y page 308).
X If necessary, replace the blown fuse. Observe the warning notes as
you do so.
If the multifunction display still shows the display message: X Consult a qualified specialist workshop. b
AUTO lights inoper‐ AUTO lights inoper‐
ative ative The light sensor is faulty.
X
Consult a qualified specialist workshop. b
Switch off lights Switch off lights The lights are still switched on when you leave the vehicle. A warning
tone also sounds.
X Turn the light switch to the Ãposition. b
Switch on headlamps Switch on headlamps You are driving without dipped-beam headlamps.
X
Turn the light switch to the Lorà position. 230
Display
messagesOn-board computer and displays