2016 MERCEDES-BENZ C-CLASS CABRIOLET lock
[x] Cancel search: lockPage 123 of 377
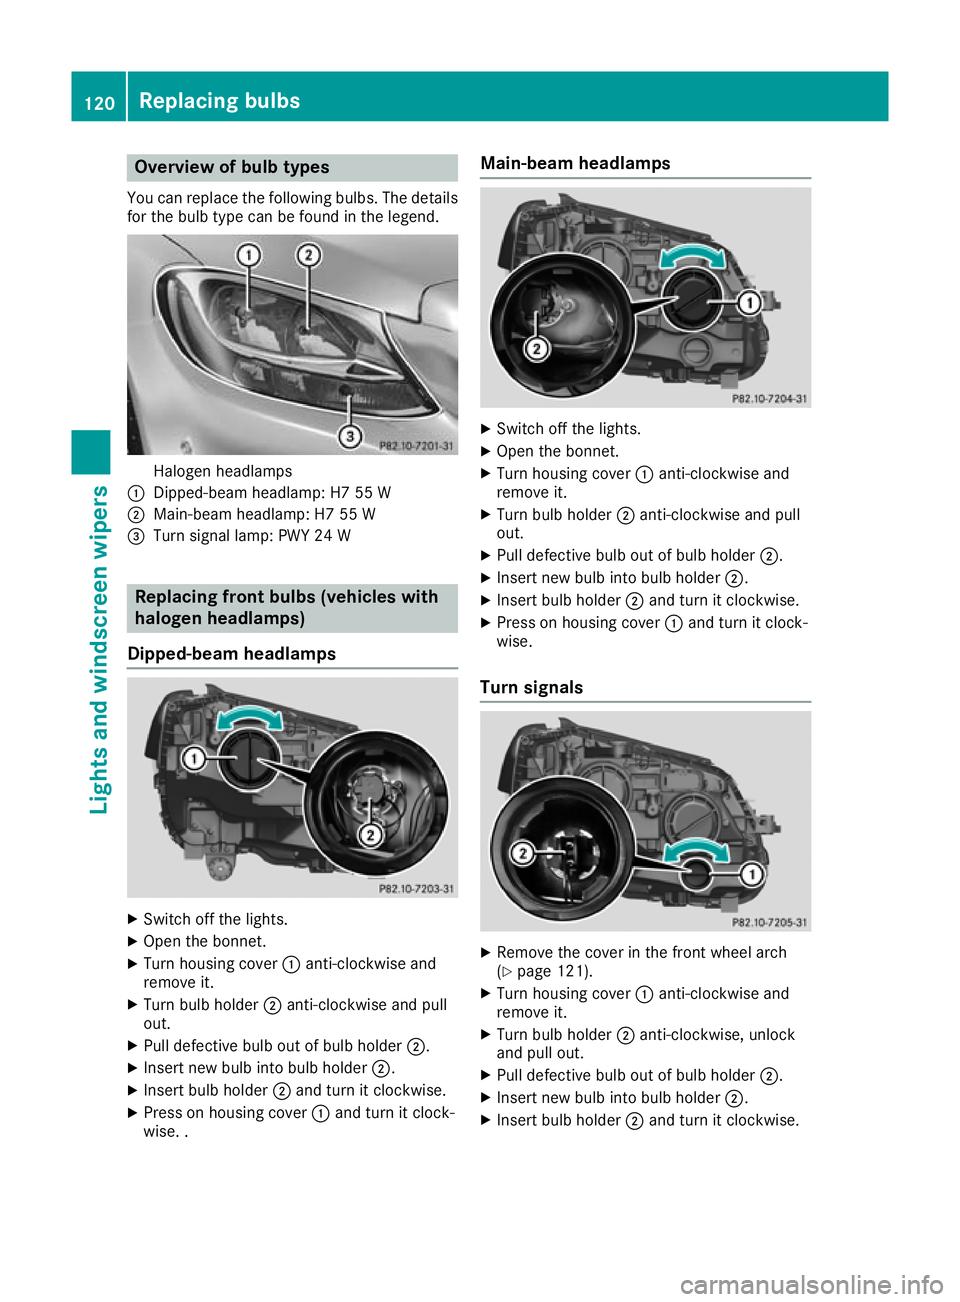
Overview of bulb types
You can replace the following bulbs. The details
for the bulb type can be found in the legend. Halogen headlamps
: Dipped-beam headlamp: H7 55 W
; Main-beam headlamp: H7 55 W
= Turn signal lamp: PWY 24 W Replacing front bulbs (vehicles with
halogen headlamps)
Dipped-beam headlamps X
Switch off the lights.
X Open the bonnet.
X Turn housing cover :anti-clockwise and
remove it.
X Turn bulb holder ;anti-clockwise and pull
out.
X Pull defective bulb out of bulb holder ;.
X Insert new bulb into bulb holder ;.
X Insert bulb holder ;and turn it clockwise.
X Press on housing cover :and turn it clock-
wise. . Main-beam headlamps
X
Switch off the lights.
X Open the bonnet.
X Turn housing cover :anti-clockwise and
remove it.
X Turn bulb holder ;anti-clockwise and pull
out.
X Pull defective bulb out of bulb holder ;.
X Insert new bulb into bulb holder ;.
X Insert bulb holder ;and turn it clockwise.
X Press on housing cover :and turn it clock-
wise.
Turn signals X
Remove the cover in the front wheel arch
(Y page 121).
X Turn housing cover :anti-clockwise and
remove it.
X Turn bulb holder ;anti-clockwise, unlock
and pull out.
X Pull defective bulb out of bulb holder ;.
X Insert new bulb into bulb holder ;.
X Insert bulb holder ;and turn it clockwise. 120
Replacing bulbsLights and windscreen wipers
Page 124 of 377

X
Press on housing cover :, turn it to the right
and lock it.
X Replace the cover in the front wheel arch
(Y page 121).
Fitting/removing the cover on the front wheel arch You must remove the cover in the front wheel
arch before you can change the front turn signal
lamp. X
To remove: switch off the lights.
X Turn the front wheels inwards.
X Use a suitable object to turn rotary knob :
180° outwards until it stops.
Cover ;is released.
X Lift cover ;off.
X To fit:insert cover ;into the left, right and
two lower catches.
X Use a suitable object to turn rotary knob :
180° inwards until it stops.
Cover ;is locked. Windscreen wipers
Switching the windscreen wipers on/
off
! Do not operate the windscreen wipers when
the windscreen is dry, as this could damage
the wiper blades. Moreover, dust that has col-
lected on the windscreen can scratch the
glass if wiping takes place when the wind-
screen is dry.
If it is necessary to switch on the windscreen wipers in dry weather conditions, always
operate them using washer fluid. !
If the windscreen wipers leave smears on
the windscreen after the vehicle has been
washed in an automatic car wash, this may be
due to wax or other residue. Clean the wind-
screen with washer fluid after an automatic
car wash.
! Intermittent wiping with rain sensor: due to
optical influences and the windscreen becom-
ing dirty in dry weather conditions, the wind-
screen wipers may be activated inadvertently. This could damage the windscreen wiper
blades or scratch the windscreen.
For this reason, you should always switch off
the windscreen wipers in dry weather. 1
$ Windscreen wipers off
2 Ä Intermittent wiping, normal
3 Å Intermittent wiping, frequent
4 ° Continuous wipe, slow
5 ¯ Continuous wipe, fast
B í Single wipe
î Wipe with washer fluid
X Turn the key to position 1or 2in the ignition
lock (Y page 133).
X Turn the combination switch to the corre-
sponding position.
Vehicles with a rain sensor: in theÅor
Ä position, the appropriate wiping frequency
is automatically set according to the intensity of
the rain. In the Åposition, the rain sensor is
more sensitive than in the Äposition, caus-
ing the windscreen wiper to wipe more fre-
quently.
If the wiper blades are worn, the windscreen will no longer be wiped properly. This could mean
you are unable to observe the traffic conditions. Windscreen wipers
121Lights and windscreen wipers Z
Page 125 of 377

Replacing the wiper blades
Important safety notes G
WARNING
If the windscreen wipers begin to move while
you are changing the wiper blades, you can be trapped by the wiper arm. There is a risk of
injury.
Always switch off the windscreen wipers and
ignition before changing the wiper blades.
! Never open the bonnet if a windscreen
wiper arm has been folded away from the
windscreen.
Never fold a windscreen wiper arm without a
wiper blade back onto the windscreen.
Hold the windscreen wiper arm firmly when
you change the wiper blade. If you release the
windscreen wiper arm without a wiper blade
and it falls onto the windscreen, the wind-
screen may be damaged by the force of the
impact.
Mercedes-Benz recommends that you have
the wiper blades changed at a qualified spe-
cialist workshop.
! To avoid damaging the windscreen wiper
blades, make sure that you touch only the
wiper arm of the windscreen wiper.
Replacing the windscreen wiper blades Moving the wiper blades to the vertical
position
On vehicles without KEYLESS-GO or KEY-
LESS‑GO start function:
X Turn the key to position 1or 2in the ignition
lock (Y page 133).
X Set the windscreen wipers to the °posi-
tion on the combination switch.
X When the wiper arms have reached the verti-
cal position, turn the key to position 0in the
ignition lock and remove it.
X Fold the wiper arm away from the windscreen.
On vehicles with KEYLESS-GO or KEY-
LESS‑GO start function:
X Switch off the engine.
X Remove your foot from the brake pedal. X
Set the windscreen wipers to the °posi-
tion on the combination switch.
X Press the Start/Stop button repeatedly until
the windscreen wipers start.
X When the wiper arms have reached the verti-
cal position, press the Start/Stop button.
X Fold the wiper arm away from the windscreen.
Removing the wiper blades X
Hold on to the wiper arm with one hand. With
the other hand, turn the wiper blade in the
direction of arrow :away from the wiper arm
as far as it will go.
X Slide the catch ;in the direction of arrow =
until it engages in the removal position with a noticeable click. X
Remove the wiper blade in the direction of
arrow ?away from the wiper arm. 122
Windscreen wipersLights and windscreen wipers
Page 126 of 377

Fitting the wiper blades
X
Insert the new wiper blade into the wiper arm
in the direction of arrow :. X
Slide the catch ;in the direction of arrow =
until it engages in the locking position with a
noticeable click.
X Make sure that the wiper blade sits correctly.
X Fold the wiper arm back onto the windscreen. X
Remove the protective film :from the ser-
vice indicator on the tip of the wiper blade.
If the colour of the service indicator changes
from black to yellow, the wiper blades should be replaced.
i The duration of the colour change varies
depending on the usage conditions. Windscreen wipers
123Lights and windscreen wipers Z
Page 127 of 377

Problems with the windscreen wipers
Problem
Possible causes/consequences and
M
MSolutions The windscreen wipers
are jammed. Leaves or snow, for example, are obstructing windscreen wiper move-
ment. The wiper motor has been deactivated.
X Switch off the engine.
X Remove the key from the ignition lock.
or, on vehicles with KEYLESS-GO or KEYLESS ‑GO start function:
X Open the driver's door.
The vehicle electronics now have status 0. This is the same as the
key having been removed.
X Remove the cause of the obstruction.
X Switch the windscreen wipers back on. The windscreen wipers
fail completely. The windscreen wiper drive is malfunctioning.
X Select another wiper speed on the combination switch.
X Have the windscreen wipers checked at a qualified specialist work-
shop. The windscreen washer
fluid from the spray noz-
zles no longer hits the
centre of the wind-
screen. The spray nozzles are misaligned.
X Have the spray nozzles adjusted at a qualified specialist workshop. 124
Windscreen wipersLights and windscreen wipers
Page 129 of 377
A
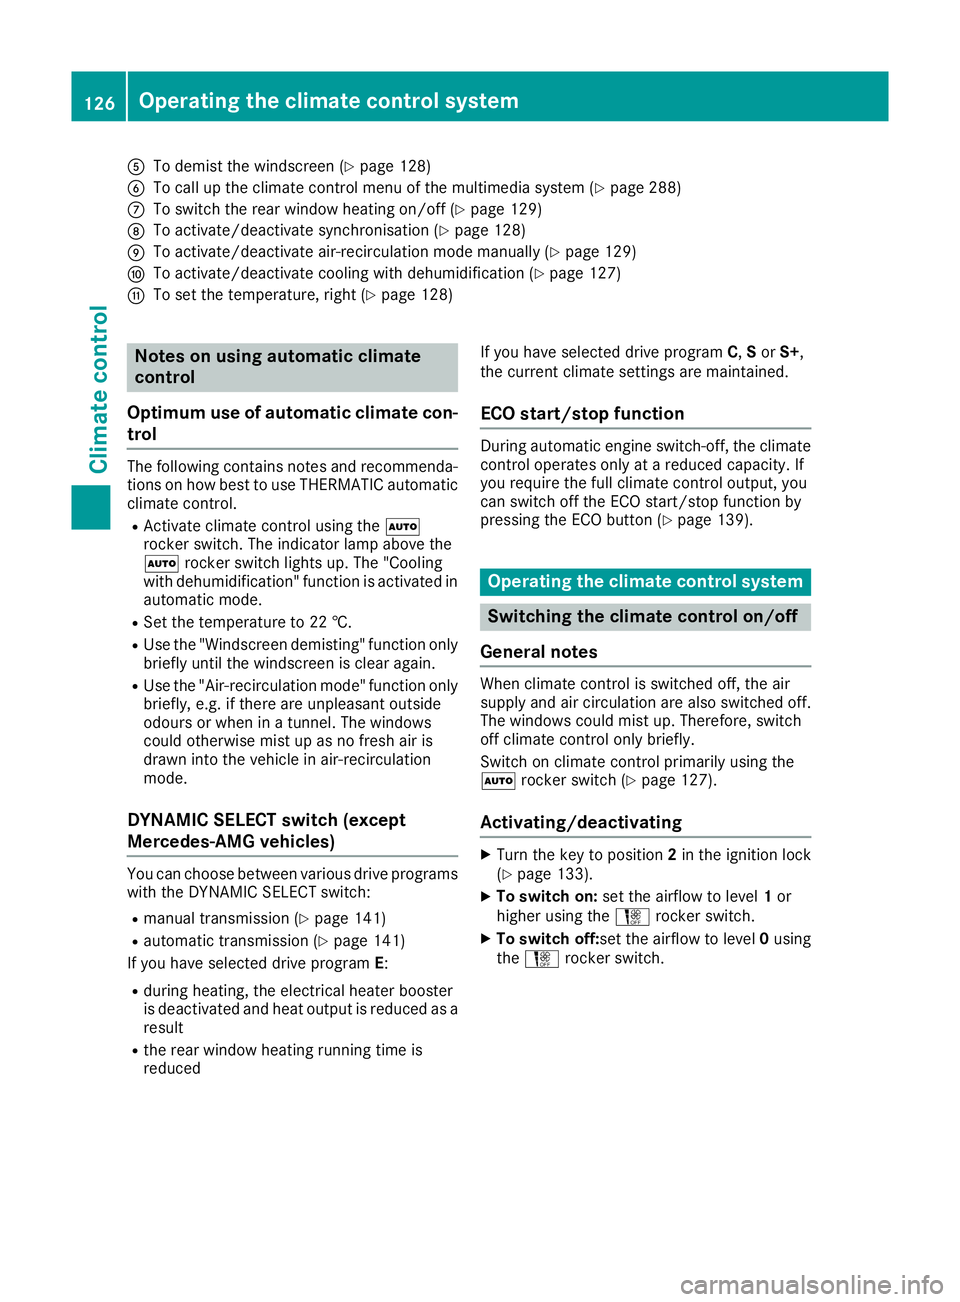
To demist the windscreen (Y page 128)
B To call up the climate control menu of the multimedia system (Y page 288)
C To switch the rear window heating on/off (Y page 129)
D To activate/deactivate synchronisation (Y page 128)
E To activate/deactivate air-recirculation mode manually (Y page 129)
F To activate/deactivate cooling with dehumidification (Y page 127)
G To set the temperature, right (Y page 128)Notes on using automatic climate
control
Optimum use of automatic climate con-
trol The following contains notes and recommenda-
tions on how best to use THERMATIC automatic
climate control.
R Activate climate control using the Ã
rocker switch. The indicator lamp above the
à rocker switch lights up. The "Cooling
with dehumidification" function is activated in
automatic mode.
R Set the temperature to 22 †.
R Use the "Windscreen demisting" function only
briefly until the windscreen is clear again.
R Use the "Air-recirculation mode" function only
briefly, e.g. if there are unpleasant outside
odours or when in a tunnel. The windows
could otherwise mist up as no fresh air is
drawn into the vehicle in air-recirculation
mode.
DYNAMIC SELECT switch (except
Mercedes-AMG vehicles) You can choose between various drive programs
with the DYNAMIC SELECT switch:
R manual transmission (Y page 141)
R automatic transmission (Y page 141)
If you have selected drive program E:
R during heating, the electrical heater booster
is deactivated and heat output is reduced as a
result
R the rear window heating running time is
reduced If you have selected drive program
C,Sor S+,
the current climate settings are maintained.
ECO start/stop function During automatic engine switch-off, the climate
control operates only at a reduced capacity. If
you require the full climate control output, you
can switch off the ECO start/stop function by
pressing the ECO button (Y page 139). Operating the climate control system
Switching the climate control on/off
General notes When climate control is switched off, the air
supply and air circulation are also switched off.
The windows could mist up. Therefore, switch
off climate control only briefly.
Switch on climate control primarily using the
à rocker switch (Y page 127).
Activating/deactivating X
Turn the key to position 2in the ignition lock
(Y page 133).
X To switch on: set the airflow to level 1or
higher using the Hrocker switch.
X To switch off: set the airflow to level 0using
the H rocker switch. 126
Operating the climate control systemClimate control
Page 130 of 377

Activating/deactivating cooling with air dehumidification
General notes If you deactivate the "Cooling with dehumidification" function, the air inside the vehicle will not be
cooled during warm weather. The air inside the vehicle will also not be dehumidified. The windows
can mist up more quickly. Therefore, deactivate the "Cooling with dehumidification" function only
briefly.
The "Cooling with dehumidification" function is available only when the engine is running. The air
inside the vehicle is cooled and dehumidified according to the temperature selected.
Condensation may drip from the underside of the vehicle when cooling mode is active. This is normal
and not a sign that there is a malfunction.
Activating/deactivating X
Press rocker switch ¿up or down.
The indicator lamp above the rocker switch lights up or goes out.
Problems with the "Cooling with dehumidification" function Problem
Possible causes/consequences and
M MSolutions The indicator lamp above
rocker switch
¿ remains off. The
"Cooling with dehumidi-
fication" function can no
longer be activated via
the multimedia system
(Y page 289). The cooling with dehumidification function has been deactivated due
to a malfunction.
X Consult a qualified specialist workshop. Setting climate control to automatic
mode
General notes In automatic mode, the set temperature is main-
tained automatically at a constant level. The
system automatically regulates the temperature of the dispensed air, the airflow and the air dis- tribution.
During automatic controlling, the "Cooling with
air dehumidification" function is activated.
The system automatically detects whether the
soft top is open or closed and automatically
adjusts the air settings depending on the soft
top status. Automatic control X
Turn the key to position 2in the ignition lock
(Y page 133).
X To activate: press theÃrocker switch up
or down.
The indicator lamp above the Ãrocker
switch lights up.
X Set the desired temperature using the w
rocker switch on the front control unit.
X To switch to manual operation: press the
H rocker switch up or down.
or
X Press the _rocker switch up or down.
The indicator lamp above the Ãrocker
switch goes out.
In automatic mode, if you adjust the airflow or
air distribution manually, the indicator lamp
above the Ãrocker switch goes out. The
function that has not been changed manually,
however, continues to be controlled automati- Operating the climate control system
127Climate control
Page 131 of 377

cally. When the manually set function switches
back to automatic mode, the indicator lamp
above the
Ãrocker switch lights up again. Setting the temperature
Different temperatures can be set for the driv-
er's and front-passenger sides.
X Turn the key to position 2in the ignition lock
(Y page 133).
X To increase or reduce: press thew
rocker switch up or down.
Only change the temperature setting in small increments. Start at 22 †. Setting the air distribution
Air distribution settings ¯
Directs the airflow through the demister
vents
P Directs the airflow through the centre
and side air vents
O Directs the airflow through the footwell
air vents
S Directs the airflow through the centre
and side air vents as well as the footwell
air vents
a Directs the airflow through the footwell
and demister vents
_ Directs the airflow through the demister
vents, the centre and side air vents as
well as the footwell air vents
b Directs the airflow through the centre
and side air vents as well as the demister
vents
W Sets the air distribution to automatic
Setting X
Turn the key to position 2(Y page 133).
X Press the _rocker switch up or down.
The various air distribution settings appear in the multimedia system. Setting the airflow
X Turn the key to position 2in the ignition lock
(Y page 133).
X To increase or reduce: press theH
rocker switch up or down. Activating/deactivating the synchro-
nisation function
General notes The
0 rocker switch is available only with
THERMATIC (2-zone) automatic climate control.
Climate control can be set centrally using the
synchronisation function. The temperature set-
ting is adopted for the front-passenger side.
Activating/deactivating X
Press the 0rocker switch up or down.
The indicator lamp above the 0rocker
switch lights up or goes out.
or X Activate or deactivate the "Synchronisation"
function using the multimedia system
(Y page 128).
The synchronisation function is deactivated if
the settings for the front-passenger side are
changed. Demisting the windscreen
General notes You can use this function to defrost the wind-
screen or to demist the inside of the windscreen
and the front side windows.
Switch off the "Windscreen demisting" functionas soon as the windscreen is clear again.
Switching the "Windscreen demisting"
function on or off X
Turn the key to position 2in the ignition lock
(Y page 133).
X To switch on: press rocker switch ¬on
the front control unit up or down.
The indicator lamp above rocker switch ¬
lights up. The current climate control settings are deactivated. 128
Operating the climate control systemClimate control