2016 MERCEDES-BENZ B-Class ELECTRIC buttons
[x] Cancel search: buttonsPage 119 of 342
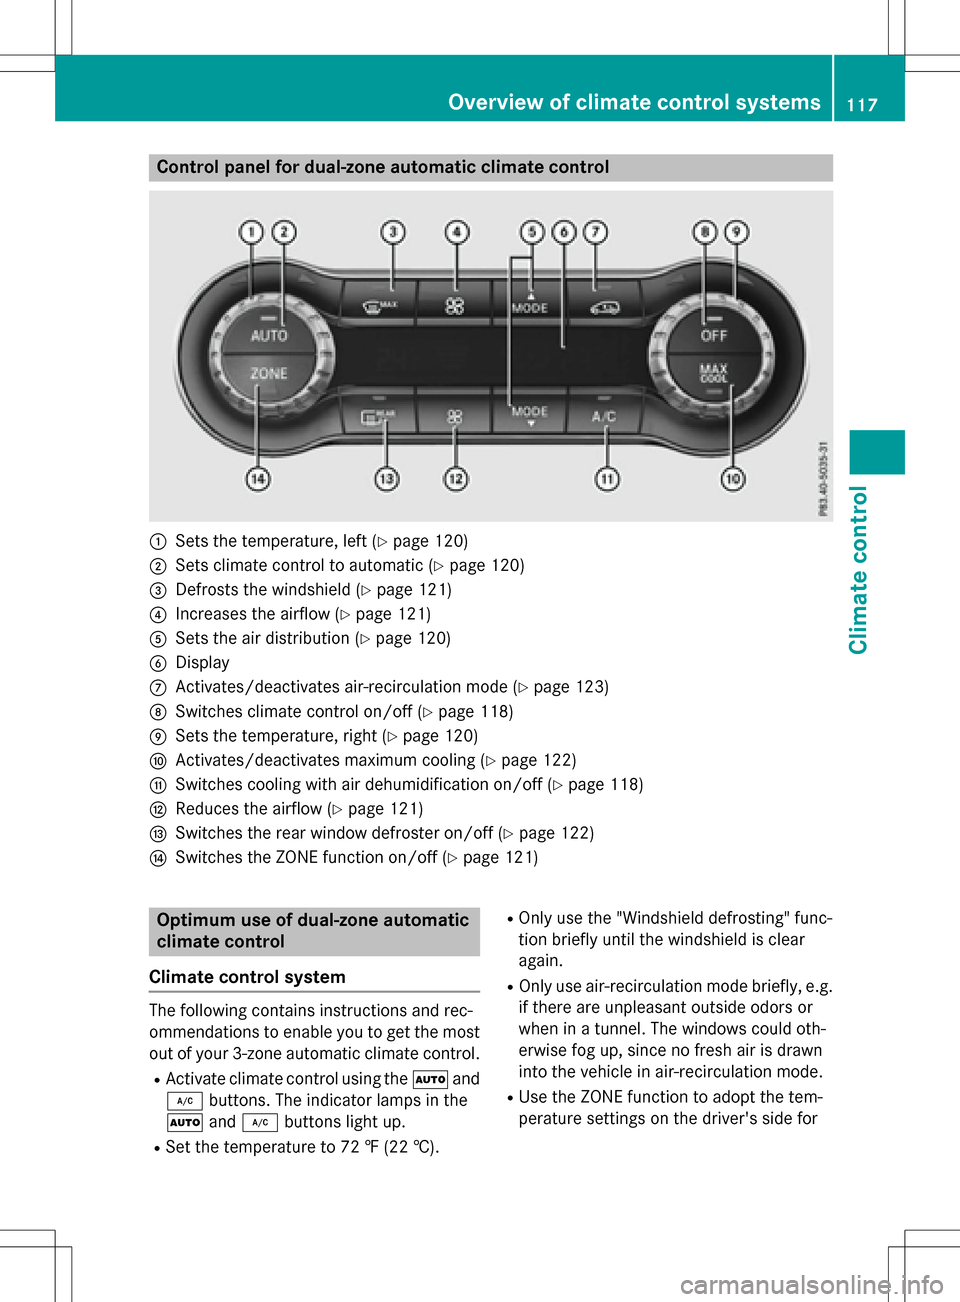
Control panel for dual-zone automatic climate control
:Sets the temperature, left (Ypage 120)
;Sets climate control to automatic (Ypage 120)
=Defrosts the windshield (Ypage 121)
?Increases the airflow (Ypage 121)
ASets the air distribution (Ypage 120)
BDisplay
CActivates/deactivates air-recirculation mode (Ypage 123)
DSwitches climate control on/off (Ypage 118)
ESets the temperature, right (Ypage 120)
FActivates/deactivates maximum cooling (Ypage 122)
GSwitches cooling with air dehumidification on/off (Ypage 118)
HReduces the airflow (Ypage 121)
ISwitches the rear window defroster on/off (Ypage 122)
JSwitches the ZONE function on/off (Ypage 121)
Optimum use of dual-zone automatic
climate control
Climate control system
The following contains instructions and rec-
ommendations to enable you to get the most
out of your 3-zone automatic climate control.
RActivate climate control using the Ãand
¿ buttons. The indicator lamps in the
à and¿ buttons light up.
RSet the temperature to 72 ‡ (22 †).
ROnly use the "Windshield defrosting" func-
tion briefly until the windshield is clear
again.
ROnly use air-recirculation mode briefly, e.g.
if there are unpleasant outside odors or
when in a tunnel. The windows could oth-
erwise fog up, since no fresh air is drawn
into the vehicle in air-recirculation mode.
RUse the ZONE function to adopt the tem-
perature settings on the driver's side for
Overview of climate control systems117
Climate control
Page 187 of 342

Vehicles with COMAND: switches on the
Voice Control System (see the separate
operating instructions)
=Right control panel
?Left control panel
ABack button
XTo activate the on-board computer:turn
the SmartKey to position 1in the ignition
lock.
You can control the multifunction display and
the settings in the on-board computer using
the buttons on the multifunction steering
wheel.
Left control panel
=
;RCalls up the menu and menu bar
9
:Press briefly:
RScrolls in lists
RSelects a submenu or function
RIn the Audiomenu: selects the
previous or next station, when
the preset list or station list is
active, or an audio track or video
scene
RIn the Tel(Telephone) menu:
switches to the phone book and
selects a name or telephone
number
9
:Press and hold:
RIn the Audiomenu: selects a pre-
set list or a station list in the
desired frequency range or an
audio track or video scene using
rapid scrolling
RIn the Tel(Telephone) menu:
starts rapid scrolling if the phone
book is open
aRConfirms the selection or display
message
RIn the Tel(Telephone) menu:
switches to the telephone book
and starts dialing the selected
number
Right control panel
8RMute
W
XRAdjusts the volume
~RRejects or ends a call
RExits the telephone book/redial
memory
6RMakes or accepts a call
RSwitches to the redial memory
Displays and operation185
On-board computer and displays
Z
Page 188 of 342
Back button
%Press briefly:
RBack
RVehicles with Audio 20:
Switches off voice-operated con-
trol for navigation (see manufac-
turer's operating instructions)
RVehicles with COMAND:
Switches off the Voice Control
System (see the separate oper-
ating instructions)
RHides display messages or calls
up the lastTrip
menu function
used
RExits the telephone book/redial
memory
%Press and hold:
RCalls up the standard display in
the Trip
menu
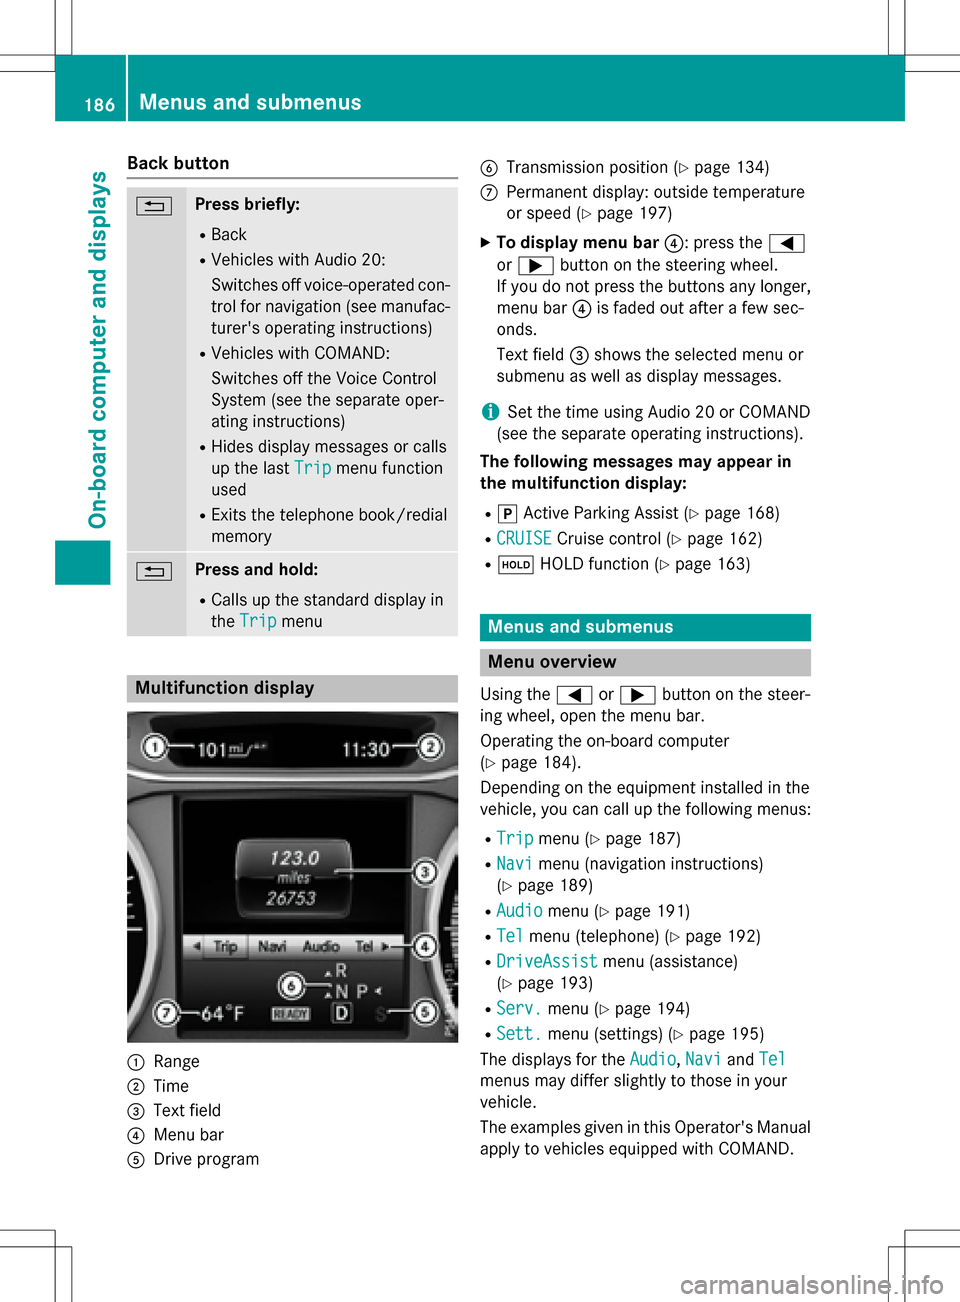
Multifunction display
:Range
;Time
=Text field
?Menu bar
ADrive program
BTransmission position (Ypage 134)
CPermanent display: outside temperature
or speed (
Ypage 197)
XTo display menu bar ?: press the=
or ; button on the steering wheel.
If you do not press the buttons any longer,
menu bar ?is faded out after a few sec-
onds.
Text field =shows the selected menu or
submenu as well as display messages.
iSet the time using Audio 20 or COMAND
(see the separate operating instructions).
The following messages may appear in
the multifunction display:
Rj Active Parking Assist (Ypage 168)
RCRUISECruise control (Ypage 162)
Rë HOLD function (Ypage 163)
Menus and submenus
Menu overview
Using the =or; button on the steer-
ing wheel, open the menu bar.
Operating the on-board computer
(
Ypage 184).
Depending on the equipment installed in the
vehicle, you can call up the following menus:
RTripmenu (Ypage 187)
RNavimenu (navigation instructions)
(
Ypage 189)
RAudiomenu (Ypage 191)
RTelmenu (telephone) (Ypage 192)
RDriveAssistmenu (assistance)
(
Ypage 193)
RServ.menu (Ypage 194)
RSett.menu (settings) (Ypage 195)
The displays for the Audio
,Naviand Tel
menus may differ slightly to those in your
vehicle.
The examples given in this Operator's Manual
apply to vehicles equipped with COMAND.
186Menus and submenus
On-board computer and displays
Page 258 of 342

A malfunction in the system has been detec-
ted if one of the following occurs:
RThe indicator lamp in the SOS button doesnot come on during the system self-test.
RThe indicator lamp in the FRoadside
Assistance button does not light up during
self-diagnosis of the system.
RThe indicator lamp in the ïMB Info call
button does not light up during self-diag-
nosis of the system.
RThe indicator lamp in one or more of the
following buttons continues to light up red
after the system self-diagnosis:
-SOS button
-F Roadside Assistance call button
-ïMB Info call button
RTheInoperativeor the Service Not
Activatedmessage appears in the multi-
function display after the system self-diag-
nosis.
If a malfunction is indicated as outlined
above, the system may not operate as expec-
ted. In the event of an emergency, help will
have to be summoned by other means.
Have the system checked at the nearest
authorized Mercedes-Benz Center or contact the following service hotlines:
Mercedes-Benz Customer Assistance Center
at 1-800-FOR-MERCedes (1-800-367-6372)
or 1-866-990-9007
Emergency call
Important safety notes
GWARNING
It can be dangerous to remain in the vehicle,
even if you have pressed the SOS button in an emergency if:
Ryou see smoke inside or outside of the vehi-
cle, e.g. if there is a fire after an accident
Rthe vehicle is on a dangerous section of
road
Rthe vehicle is not visible or cannot easily beseen by other road users, particularly when
dark or in poor visibility conditions
There is a risk of an accident and injury.
Leave the vehicle immediately in this or simi-
lar situations as soon as it is safe to do so.
Move to a safe location along with other vehi-
cle occupants. In such situations, secure the
vehicle in accordance with national regula-
tions, e. g. with a warning triangle.
General notes
Observe the notes on system activation
(
Ypage 255).
An emergency call is dialed automatically if an
air bag or Emergency Tensioning Device is
triggered. You cannot end an automatically
triggered emergency call yourself.
An emergency call can also be initiated man-
ually.
As soon as the emergency call has been ini-
tiated, the indicator lamp in the SOS button
flashes. The Connecting Call
message
appears in the multifunction display.
The audio output is muted.
Once the connection has been made, the
Call Connected
message appears in the
multifunction display.
256Features
Stowage and features
Page 266 of 342
When using the integrated garage door
opener, always make sure that nobody is
within the range of movement of the garage
door.
Programming
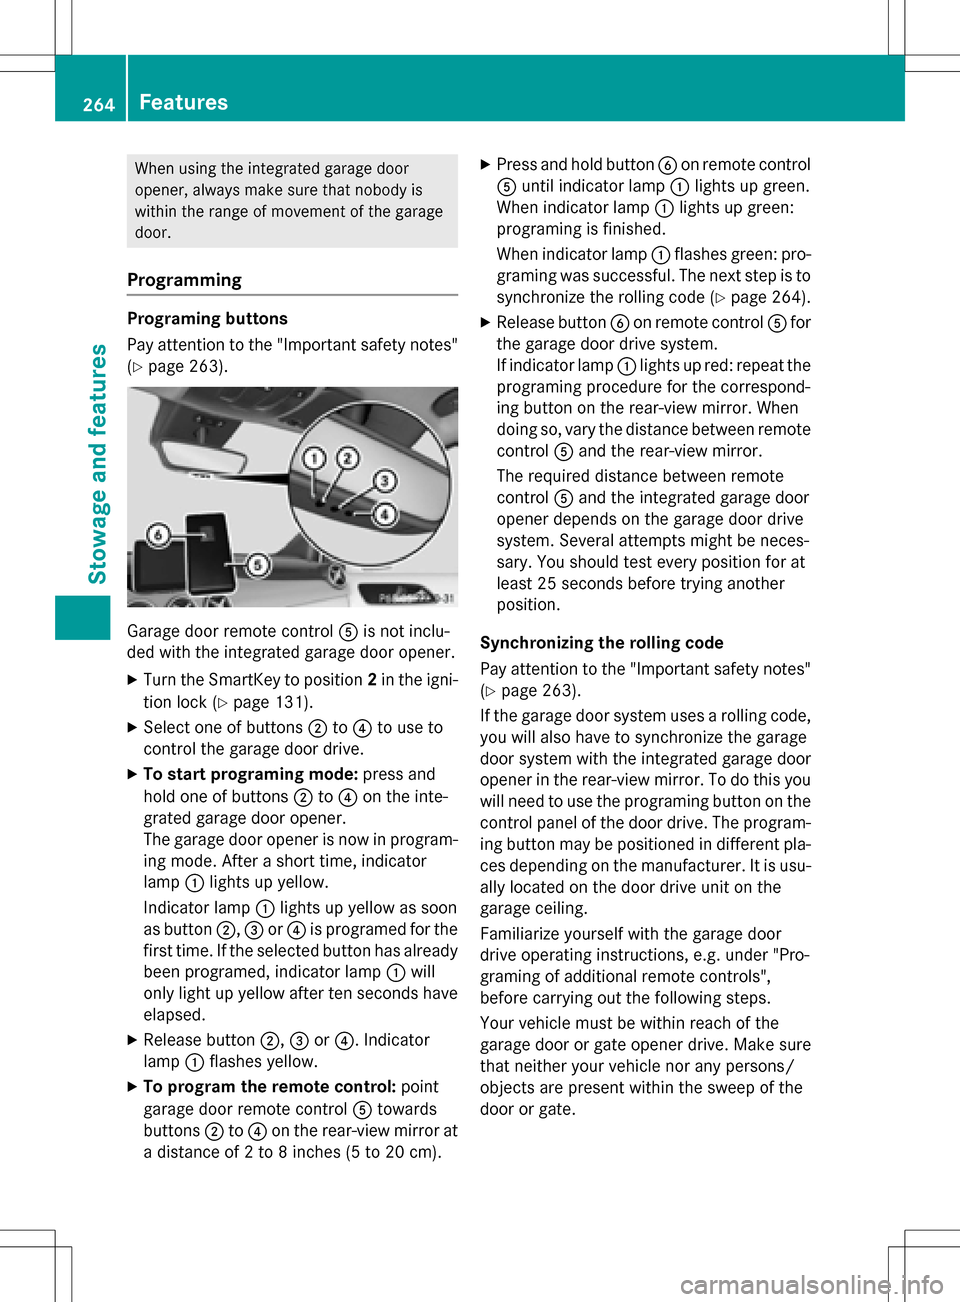
Programing buttons
Pay attention to the "Important safety notes"
(
Ypage 263).
Garage door remote controlAis not inclu-
ded with the integrated garage door opener.
XTurn the SmartKey to position 2in the igni-
tion lock (
Ypage 131).
XSelect one of buttons ;to? to use to
control the garage door drive.
XTo start programing mode: press and
hold one of buttons ;to? on the inte-
grated garage door opener.
The garage door opener is now in program-
ing mode. After a short time, indicator
lamp :lights up yellow.
Indicator lamp :lights up yellow as soon
as button ;,=or? is programed for the
first time. If the selected button has already
been programed, indicator lamp :will
only light up yellow after ten seconds have
elapsed.
XRelease button ;,=or?. Indicator
lamp :flashes yellow.
XTo program the remote control: point
garage door remote control Atowards
buttons ;to? on the rear-view mirror at
a distance of 2 to 8 inches (5 to 20 cm).
XPress and hold button Bon remote control
A until indicator lamp :lights up green.
When indicator lamp :lights up green:
programing is finished.
When indicator lamp :flashes green: pro-
graming was successful. The next step is to
synchronize the rolling code (
Ypage 264).
XRelease button Bon remote control Afor
the garage door drive system.
If indicator lamp :lights up red: repeat the
programing procedure for the correspond-
ing button on the rear-view mirror. When
doing so, vary the distance between remote
control Aand the rear-view mirror.
The required distance between remote
control Aand the integrated garage door
opener depends on the garage door drive
system. Several attempts might be neces-
sary. You should test every position for at
least 25 seconds before trying another
position.
Synchronizing the rolling code
Pay attention to the "Important safety notes"
(
Ypage 263).
If the garage door system uses a rolling code,
you will also have to synchronize the garage
door system with the integrated garage door
opener in the rear-view mirror. To do this you
will need to use the programing button on the
control panel of the door drive. The program- ing button may be positioned in different pla-
ces depending on the manufacturer. It is usu-
ally located on the door drive unit on the
garage ceiling.
Familiarize yourself with the garage door
drive operating instructions, e.g. under "Pro-
graming of additional remote controls",
before carrying out the following steps.
Your vehicle must be within reach of the
garage door or gate opener drive. Make sure
that neither your vehicle nor any persons/
objects are present within the sweep of the
door or gate.
264Features
Stowage and features
Page 267 of 342
XTurn the SmartKey to position2in the igni-
tion lock (
Ypage 131).
XGet out of the vehicle.
XPress the programing button on the door
drive unit.
Usually, you now have 30 seconds to ini-
tiate the next step.
XGet into the vehicle.
XPress previously programed button ;,=
or ? on the integrated garage door opener
repeatedly until the door closes.
The rolling code synchronization is then
complete.
Notes on programing the remote control
Canadian radio frequency laws require a
"break" (or interruption) of the transmission
signals after broadcasting for a few seconds.
Therefore, these signals may not last long
enough for the integrated garage door
opener. The signal is not recognized during
programing. Comparable with Canadian law,
some U.S. garage door openers also feature a
"break".
Proceed as follows:
Rif you live in Canada
Rif you have difficulties programing the
garage door opener (regardless of where
you live) when using the programing steps.
XPress and hold one of buttons ;to? on
the integrated garage door opener.
After a short time, indicator lamp :lights
up yellow.
XRelease the button.
Indicator lamp :flashes yellow.
XPress button Bof garage door remote
control Afor two seconds, then release it
for two seconds.
XPress button Bagain for two seconds.
XRepeat this sequence on button Bof
remote control Auntil indicator lamp :
lights up green.
When indicator lamp :lights up green:
programing is finished. When indicator lamp
:flashes green: pro-
graming was successful. The next step is to
synchronize the rolling code.
XRelease button Bof remote control Aof
the garage door drive.
If indicator lamp :lights up red: repeat the
programing process for the corresponding
button on the rear-view mirror. When doing
so, vary the distance between remote con-
trol Aand the rear-view mirror.
The required distance between remote
control Aand the integrated garage door
opener depends on the garage door drive
system. Several attempts might be neces-
sary. You should test every position for at
least 25 seconds before trying another
position.
Problems when programing
If you experience problems programing the
integrated garage door opener on the rear-
view mirror, take note of the following instruc-
tions:
RCheck the transmitter frequency used by
garage door drive remote control Aand
whether it is supported. The transmitter
frequency can usually be found on the back
of the garage door drive remote control.
The integrated garage door opener is com- patible with devices that have units which
operate in the frequency range of 280 to
433 MHz.
RReplace the batteries in garage door
remote control A. This increases the like-
lihood that garage door remote control A
will transmit a strong and precise signal to
the integrated garage door opener.
RWhen programing, hold remote control A
at varying distances and angles from the
button which you are programing. Try vari-
ous angles at a distance between 2and
12 inches (5to 30 cm) or at the same angle
but at varying distances.
RIf another remote control is available for the
same garage door drive, repeat the same
programing steps with this remote control.
Features265
Stowage and features
Z
Page 268 of 342
Before performing these steps, make sure
that new batteries have been installed in
garage door drive remote controlA.
RNote that some remote controls only trans-
mit for a limited amount of time (the indi-
cator lamp on the remote control goes out).
Press buttonBon remote control Aagain
before transmission ends.
RAlign the antenna cable of the garage door
opener unit. This can improve signal recep-
tion/transmission.
Opening/closing the garage door
After it has been programmed, the integrated
garage door opener assumes the function of
the garage door system's remote control.
Please also read the operating instructions
for the garage door system.
XTurn the SmartKey to position 2in the igni-
tion lock (
Ypage 131).
XPress button ;,=or? that has been
programmed to operate the garage door.
Garage door system with a fixed code: indi-
cator lamp :lights up green.
Garage door system with a rolling code:
indicator lamp :flashes green.
The transmitter will transmit a signal as
long as the button is pressed. The trans-
mission is halted after a maximum of ten
seconds and indicator lamp :lights up
yellow.
XPress button ;,=or? again if neces-
sary.
Clearing the memory
Make sure that you clear the memory of the
integrated garage door opener before selling
the vehicle.
XTurn the SmartKey to position 2in the igni-
tion lock (
Ypage 131).
XPress and hold buttons ;and ?.
The indicator lamp initially lights up yellow
and then green.
XRelease buttons ;and ?.
The memory of the integrated garage door
opener in the rear-view mirror is cleared.
Compass
Calling up the compass
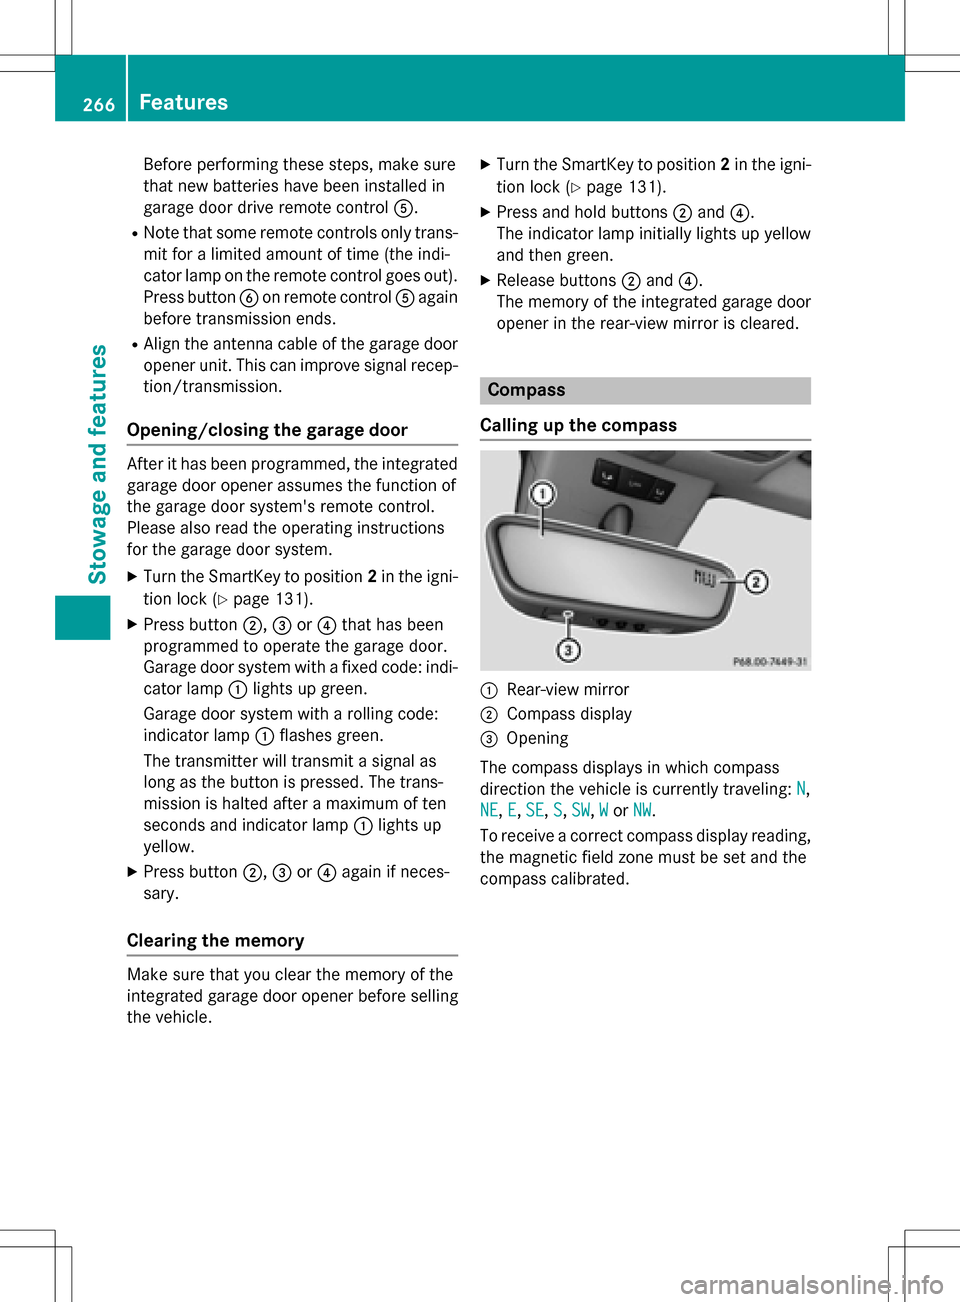
:Rear-view mirror
;Compass display
=Opening
The compass displays in which compass
direction the vehicle is currently traveling: N
,
NE
, E,SE, S,SW,Wor NW.
To receive a correct compass display reading, the magnetic field zone must be set and the
compass calibrated.
266Features
Stowage and features