2016 MERCEDES-BENZ AMG GT S fuel
[x] Cancel search: fuelPage 156 of 290

eledC appears instead of approximate
range.
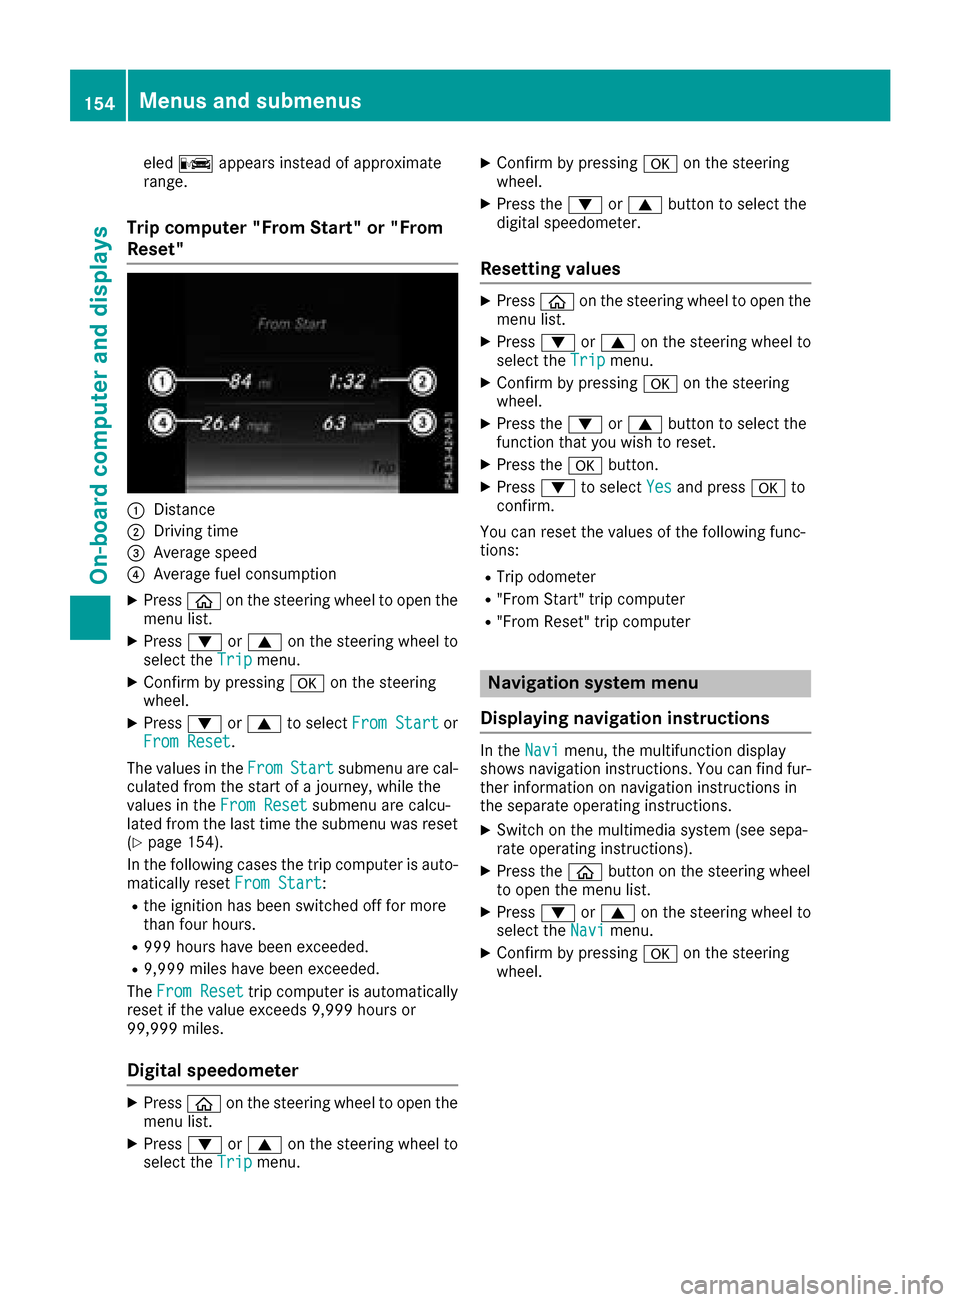
Trip computer "From Start" or "From
Reset"
:Distance
;Driving time
=Average speed
?Average fuel consumption
XPress òon the steering wheel to open the
menu list.
XPress :or9 on the steering wheel to
select the Tripmenu.
XConfirm by pressing aon the steering
wheel.
XPress :or9 to select From Startor
From Reset.
The values in the From
Startsubmenu are cal-
culated from the start of a journey, while the
values in the From Reset
submenu are calcu-
lated from the last time the submenu was reset
(
Ypage 154).
In the following cases the trip computer is auto- matically reset From Start
:
Rthe ignition has been switched off for more
than four hours.
R999 hours have been exceeded.
R9,999 miles have been exceeded.
The From Reset
trip computer is automatically
reset if the value exceeds 9,999 hours or
99,999 miles.
Digital speedometer
XPress òon the steering wheel to open the
menu list.
XPress :or9 on the steering wheel to
select the Tripmenu.
XConfirm by pressing aon the steering
wheel.
XPress the :or9 button to select the
digital speedometer.
Resetting values
XPress òon the steering wheel to open the
menu list.
XPress :or9 on the steering wheel to
select the Tripmenu.
XConfirm by pressing aon the steering
wheel.
XPress the :or9 button to select the
function that you wish to reset.
XPress the abutton.
XPress :to select Yesand press ato
confirm.
You can reset the values of the following func-
tions:
RTrip odometer
R"From Start" trip computer
R"From Reset" trip computer
Navigation system menu
Displaying navigation instructions
In the Navimenu, the multifunction display
shows navigation instructions. You can find fur-
ther information on navigation instructions in
the separate operating instructions.
XSwitch on the multimedia system (see sepa-
rate operating instructions).
XPress the òbutton on the steering wheel
to open the menu list.
XPress :or9 on the steering wheel to
select the Navimenu.
XConfirm by pressing aon the steering
wheel.
154Menus and submenus
On-board computer and displays
Page 181 of 290

Display messagesPossible causes/consequences andMSolutions
#
See Operator'sMan ‐ual
The battery is no tbein gcharged.
A warning tone also sounds.
Possibl ecauses are:
Radefective alternato r
Ratorn poly-V-belt
Ramalfunction in th eelectronics
!Do no tcontinu edriving. The engin ecould otherwise overheat.
XPull ove rand stop th evehicl esafely and switch off th eengine, pay-
ing attention to roa dand traffic conditions.
XSecur eth evehicl eagainst rollin gaway (Ypage 119).
XConsult aqualified specialist workshop .
#
StopVehicl eSeeOperator' sManual
The battery is no longer bein gcharged and th econdition of charg eis
to olow.
A warning tone also sounds.
XPull ove rand stop th evehicl esafely and switch off th eengine, pay-
ing attention to roa dand traffic conditions.
XSecur eth evehicl eagainst rollin gaway (Ypage 119).
XObserv eth einstruction sin th e# See Operator' sManualdisplay message .
XConsultaqualified specialist workshop .
#
Start Engine SeeOperator'sManual
The engin eis off and th ebattery condition of charg eis to olow.
XSwitc hoff electrical consumer sthat you do no tneed, suc has th e
rear window defroste rand interior lighting .
XLeaveth eengin erunnin gfor afew minute sor drive alon gdistance.
The battery is bein gcharged.
4
Check Engine OilLevel (Ad d 1quart)
The engin eoil level has dropped to th eminimum level.
!Avoid lon gjourneys wit hto olittl eengin eoil. The engin ewill oth-
erwise be damaged.
XChec kth eoil level when next refueling, at th elatest (Ypage 228).
XIf necessary, add engin eoil (Ypage 230).
XHav eth eengin echecke dat aqualified specialist workshop if engin e
oil needs to be added mor eoften than usual.
Information on approve dengin eoils can be obtained from aqualified
specialist workshop or on th eInternet at http://bevo.mercedes -
benz.co m.
4
Engine Oil LevelLow Stop VehicleTurn Engine Off
The engine oil level is too low. There is a risk of engine damage.
XPull over and stop the vehicle safely and switch off the engine, pay-
ing attention to road and traffic conditions.
XSecure the vehicle against rolling away (Ypage 119).
XCheck the engine oil level (Ypage 228).
XIf necessary, add engine oil (Ypage 230).
Display messages179
On-board computer and displays
Z
Page 182 of 290

Display messagesPossible causes/consequences andMSolutions
4
Engine Oil ReduceOil Level
You haveadded to omuc hengin eoil. The engin eor catalytic converter
may be damaged.
XSiphon off excess engin eoil until it is at th especified level. Observ e
th elegal requirements .
4
Engine Oil LevelCannot Be Measured
The measuringsystem is faulty.
XVisit aqualified specialist workshop .
8
FuelLevel Low
The fuel level has dropped int oth ereserv erange.
XRefue lat th eneares tgas station .
CThere is only aver ysmall amount of fuel in th efuel tank.
XRefue lat th eneares tgas station without fail .
8
Gas Cap Loose
The fuel filler cap is notclosed correctl yor th efuel system is leaking .
XCheckthat th efuel filler cap is correctl yclosed .
If th efuel filler cap is not correctl yclosed :
XCloseth efuel filler cap .
If th efuel filler cap is correctl yclosed :
XVisitaqualified specialist workshop .
Driving systems
Display messagesPossible causes/consequences and MSolutions
À
ATTENTION ASSIST:Take a Break!
Based on certain criteria, ATTENTION ASSIST has detecte dfatigue or
a lack of concentration on th epart of th edriver . Awarning tone also
sounds.
XIf necessary, tak e abreak.
During lon gjourneys, tak eregular breaks in goo dtime so you get
enough rest.
À
ATTENTION ASSISTInoperative
ATTENTION ASSIST is inoperative.
XVisit aqualified specialist workshop .
¨
Malfunction
There isamalfunction in th echassis. The vehicle's handlin gcharac -
teristics may be affected.
XVisit aqualified specialist workshop .
180Display messages
On-board computer and displays
Page 197 of 290

Engine
Warning/
indicator
lampNSignal type
Possible causes/consequences and M
Solutions
;NThe yellow Check Engine warning lamp lights up while the engine is running.
There may be a malfunction, for example:
Rin the engine management
Rin the fuel injection system
Rin the exhaust system
Rin the ignition system
Rin the fuel system
The emission limit values may be exceeded and the engine may be in emergency
mode.
XHave the vehicle checked as soon as possible at a qualified specialist workshop.
In some states, you must immediately visit a qualified specialist workshop as soon as the yellow Check Engine warning lamp lights up. This is due to the legal require-
ments in effect in these states. If in doubt, check whether such legal regulations
apply in the state in which you are currently driving.
8N The yellow reserve fuel warning lamp lights up while the engine is running.
The fuel level has dropped into the reserve range.
XRefuel at the nearest gas station.
8N The yellow reserve fuel warning lamp flashes while the vehicle is in motion.
In addition, the ;Check Engine warning lamp may light up.
The fuel filler cap is not closed correctly or the fuel system is leaking.
XCheck that the fuel filler cap is correctly closed.
XIf the fuel filler cap is not correctly closed: close the fuel filler cap.
XIf the fuel filler cap is closed:visit a qualified specialist workshop.
?NThe red coolant warning lamp lights up while the engine is running and the
coolant temperature gauge is at the start of the scale.
The temperature sensor for the coolant temperature gage is defective.
The coolant temperature is no longer being monitored. There is a risk of engine
damage if the coolant temperature is too high.
XPull over and stop the vehicle safely and switch off the engine, paying attention
to road and traffic conditions. Do not continue driving under any circumstances.
XSecure the vehicle against rolling away (Ypage 119).
XConsult a qualified specialist workshop.
Warning and indicator lamps in the instrument cluster195
On-board computer and displays
Z
Page 207 of 290

Settings in the climate menu
Setting the climate mode
By setting the climate mode you determine the
type of airflow. The setting is active when the air-
conditioning system is set to Ã(
Ypage 96).
XCall up the climate control menu
(Ypage 204).
XTo select Climate Mode: turn and press the
controller.
XTo change the setting: turn the controller.
Exiting a menu:
XPress the %button.
The current airflow setting is shown in the cli-
mate control bar: DIFFUSE
,MEDIUMor FOCUS.
Settings in the bottom bar of the cli-
mate control menu
Switching cooling with air dehumidifica-
tion on/off
XCall up the climate control menu
(Ypage 204).
XSlide 6the controller repeatedly until the
bottom bar is activated.
XTo select OA/C: turn and press the control-
ler.
XSwitch cooling with air dehumidification on
O or off ª.
iThe current status of the cooling function is
displayed in the climate control bar: A/C ON
– activated, A/C OFF – deactivated.
iDeactivating the cooling with air dehumidi-
fication function reduces fuel consumption.
Synchronizing the climate control set-
tings
Use OSync(synchronization) to select the cli-
mate control setting for all zones together Oor
separately ª.
XCall up the climate control menu
(Ypage 204).
XSlide6the controller repeatedly until the
bottom bar is activated.
XTo select OSync: turn and press the con-
troller.
XSwitch the synchronization function on Oor
off ª. For further information on synchronizing climate
control settings, see (
Ypage 97).
Navigation mode
Important safety notes
GWARNING
If you operate information systems and com-
munication equipment integrated in the vehi-
cle while driving, you will be distracted from
traffic conditions. You could also lose control
of the vehicle. There is a risk of an accident.
Only operate the equipment when the traffic
situation permits. If you are not sure that this
is possible, park the vehicle paying attention
to traffic conditions and operate the equip-
ment when the vehicle is stationary.
You must observe the legal requirements for the
country in which you are currently driving when
operating the navigation system.
General notes
Among other things, correct functioning of the
navigation system depends on GPS reception. In
certain situations, GPS reception may be
impaired, there may be interference or there
may be no reception at all, e.g. in tunnels or
parking garages.
The following descriptions apply to navigation
with COMAND. Further information can be
found in the Digital Operator's Manual.
Selecting a route type and route options
Multimedia system:
XSelect NaviQNavigation.
The map shows the vehicle's current position.
XSlide 6the controller.
XSelect OptionsQRoute Settings.
Notes for route types:
REco Route
Calculates an economic route.
RDynamic Traffic Route
Operating system205
Multimedia system
Z
Page 229 of 290

Engine compartment
Hood
Important safety notes
GWARNING
If the hood is unlatched, it may open up when the vehicle is in motion and block your view.
There is a risk of an accident.
Never unlatch the hood while driving. Before
every trip, ensure that the hood is locked.
GWARNING
When opening and closing the hood, it may
suddenly fall into the closed position. There is a risk of injury to persons within range of
movement of the hood.
Open and close the hood only when no one is
within its range of movement.
GWARNING
Opening the hood when the engine is over-
heated or when there is a fire in the engine
compartment could expose you to hot gases
or other service products. There is a risk of
injury.
Let an overheated engine cool down before
opening the hood. If there is a fire in the
engine compartment, keep the hood closed
and contact the fire department.
GWARNING
The engine compartment contains moving
components. Certain components, such as
the radiator fan, may continue to run or start
again suddenly when the ignition is off. There is a risk of injury.
If you need to do any work inside the engine
compartment:
Rswitch off the ignition
Rnever reach into the area where there is a
risk of danger from moving components,
such as the fan rotation area
Rremove jewelry and watches
Rkeep items of clothing and hair, for exam-
ple, away from moving parts
GWARNING
The ignition system and the fuel injection sys-
tem work under high voltage. If you touch
components which are under voltage, you
could get an electric shock. There is a risk of
injury.
Never touch components of the ignition sys-
tem or fuel injection system when the ignition
is switched on.
Opening the hood
GWARNING
Certain components in the engine compart-
ment, such as the engine, radiator and parts
of the exhaust system, can become very hot.
Working in the engine compartment poses a
risk of injury.
Where possible, let the engine cool down and touch only the components described in the
following.
GWARNING
When the hood is open and the windshield
wipers are set in motion, you can be injured by
the wiper linkage. There is a risk of injury.
Always switch off the windshield wipers and
the ignition before opening the hood.
!Make sure that the windshield wipers are
not folded away from the windshield. You
could otherwise damage the windshield wip-
ers or the hood.
Engine compartment227
Maintenance and care
Z
Page 238 of 290

XRemove dirt immediately, wherepossible,
while avoidin grubbing to ohard.
XSoak insec tremain swit hinsec tremove rand
rinse off th etreated areas afterwards .
XSoak bird droppings withwater and rinse off
th etreated areas afterwards .
XRemove coolant, brakefluid ,tree resin, oils ,
fuel sand greases by rubbing gentl ywit h a
cloth soaked in petroleum ether or lighte r
fluid .
XUse tar remove rto remove tar stains.
XUse silicon eremove rto remove wax.
If water no longer forms "beads "on th epain t
surface, use th epain tcar eproducts recommen -
ded and approve dby Mercedes-Benz. This is th e
cas eapproximately every three to fiv emonths,
depending on th eclimat econdition sand th e
car eproduc tused.
If dirt has penetrated th epain tsurfac eor if th e
pain thas become dull, th epain tcleane rrecom-
mended and approve dby Mercedes-Ben z
should be used.
Do no tuse these car eproducts in th esun or on
th ehoo dwhile th ehoo dis hot .
XUseasuitable touch-up stick ,e.g. MB Touch-
Up Stick ,to repair slight damag eto th epaint-
wor kquickly and provisionally.
Matte finish care
!Never polis hth evehicl eor th eligh talloy
wheels. Polishin gcauses th efinish to shine.
!The followin gmay caus eth epain tto
become shin yand thus reduce th ematte
effect:
Rstron grubbing of th epaintwork wit h
unsuitable materials
Rfrequen tuse of automatic car washe s
Rwashing thevehicl ein direct sunligh t
!Never use paintcleaner, buffing or polishin g
products ,or glos spreserver ,e.g. wax. These
products are only suitable for high-gloss sur -
faces. Their use on vehicles wit hmatte finish
leads to considerable surfac edamag e(shiny,
mottled areas).
Always hav epaintwork repairs carrie dout at a
qualified specialist workshop.
!Do no tuse wash program swit h a hot wax
treatmen tunder any circumstances. Observ
ethese note sif your vehicl ehas aclear
matte finish. This will help you to avoi ddamag e
to th epaintwork due to incorrec ttreatment.
These note salso apply to ligh talloy wheels wit h
a clear matte finish.
iThe vehicl eshould preferably be washe dby
han dusin g asoftsponge, car shampoo and
plenty of water.
iUse only insec tremove rand car shampoo
from th erange of recommended and
approve dMercedes-Benz car eproducts .
Cleaning the vehicle parts
Cleaning the wheels
GWARNIN G
The water je tfrom acircular je tnozzle (dir t
blasters )can caus einvisible exterio rdamag e
to th etires or chassi scomponents. Compo-
nent sdamaged in this way may fail unexpect-
edly. There is aris kof an accident.
Do no tuse powe rwashers wit hcircular je t
nozzles to clean th evehicle. Hav edamaged
tires or chassi scomponent sreplace dimme-
diately.
!Do no tuse acidic whee lcleaning products
to remove brak edust .This could damag e
whee lbolt sand brak ecomponents.
!Do no tpark th evehicl efor an extended
period straight after cleaning it ,particularly
after having cleane dth ewheels wit hwhee l
cleaner. Whee lcleaners could caus e
increased corrosio nof th ebrak edisc sand
brak epads/linings. Fo rthis reason ,you
should driv efor afew minute safter cleaning .
Braking heat sth ebrak edisc sand th ebrak e
pads/linings, thus dryin gthem. The vehicl e
can then be parked.
Cleaning the windows
GWARNIN G
You could become trapped by th ewindshield
wiper sif they start moving while cleaning th e
windshield or wiper blades. There is aris kof
injury.
236Care
Maintenance and care
Page 247 of 290

Therefore, place the filler hose in the plastic
bag which contained the TIREFIT kit.
HEnvironmental note
Have the used tire sealant bottle disposed of
professionally, e.g. at a qualified specialist
workshop.
If a tire pressure of 180 kPa (1.8 bar/26 psi) has
been attained after five minutes:
XSwitch off the tire inflation compressor.
XUnscrew the filler hose from the valve of the
faulty tire.
Leave the tire sealant bottle attached to the
flange.
XStow the tire sealant bottle and the tire infla-
tion compressor.
XPull away immediately.
XStop after driving for approximately ten
minutes and check the tire pressure with the
tire inflation compressor.
The tire pressure must now be at least
130 kPa (1.3 bar/19 psi).
GWARNING
If the required tire pressure is not reached
after driving for a short period, the tire is too
badly damaged. The tire sealant cannot repair
the tire in this instance. Damaged tires and a
tire pressure that is too low can significantly
impair the vehicle's braking and driving char-
acteristics. There is a risk of accident.
Do not continue driving. Contact a qualified
specialist workshop.
iIn cases such as the one mentioned above,
contact an authorized Mercedes-Benz Cen-
ter. Or call 1-800-FOR-MERCedes (in the
USA) or 1-800-387-0100 (in Canada).
XCorrect the tire pressure if it is still at least
130 kPa (1.3 bar/19 psi). See the Tire and
Loading Information placard on the driver's
side B-pillar or the tire pressure table in the
fuel filler flap for values.
XTo increase the tire pressure: switch on the
tire inflation compressor.
XTo reduce the tire pressure: open release
screw C.
XWhen the tire pressure is correct, unscrew the
filler hose from the valve of the sealed tire.
XScrew the valve cap onto the tire valve of the
sealed tire.
XUnscrew the tire sealant bottle from the tire
inflation compressor.
XDrive to the nearest qualified specialist work-
shop and have the tire changed there.
XHave the tire sealant bottle replaced as soon
as possible at a qualified specialist workshop.
XHave the tire sealant bottle replaced every
four years at a qualified specialist workshop.
Battery (vehicle)
Important safety notes
Special tools and expert knowledge are required
when working on the battery, e.g. removal and
installation. You should therefore have all work
involving the battery carried out at a qualified
specialist workshop.
GWARNING
Work carried out incorrectly on the battery
can lead, for example, to a short circuit and
thus damage the vehicle electronics. This can
lead to function restrictions applying to
safety-relevant systems, e.g the lighting sys-
tem, the ABS (anti-lock braking system) or the
ESP
®(Electronic Stability Program). The oper-
ating safety of your vehicle may be restricted.
You could lose control of the vehicle, for
example:
Rwhen braking
Rin the event of abrupt steering maneuvers
and/or when the vehicle's speed is not
adapted to the road conditions
There is a risk of an accident.
In the event of a short circuit or a similar inci-
dent, contact a qualified specialist workshop
immediately. Do not drive any further. You
should have all work involving the battery car- ried out at a qualified specialist workshop.
For further information about ABS and ESP
®,
see (Ypage 52) and (Ypage 55).
Battery (vehicle)245
Breakdown assistance
Z