2016 MERCEDES-BENZ AMG GT S reset
[x] Cancel search: resetPage 86 of 290

XPress memory buttonM: and one of the
arrows on button ?within three seconds.
The parking position is stored if the exterior
mirror does not move.
XIf the mirror moves out of position, repeat the
steps.
Calling up a stored parking position set-
ting
XSelect key position 2with the Start/Stop but-
ton.
XAdjust the exterior mirror on the front-
passenger side using button =.
XStart the engine.
XEngage reverse gear.
The exterior mirror on the front-passenger
side moves to the stored parking position.
The exterior mirror on the front-passenger side
moves back to its original position:
Ras soon as you exceed a speed of 9 mph
(15 km/h)
Rabout ten seconds after you have disengaged
reverse gear
Rif you press button ;for the exterior mirror
on the driver's side
Memory function
Important safety notes
GWARNING
If you use the memory function on the driver's side while driving, you could lose control of
the vehicle as a result of the adjustments
being made. There is a risk of an accident.
Only use the memory function on the driver's
side when the vehicle is stationary.
GWARNING
When the memory function adjusts the seat or steering wheel, you and other vehicle occu-
pants – particularly children – could become
trapped. There is a risk of injury.
While the memory function is making adjust-
ments, make sure that no one has any body
parts in the sweep of the seat or steering
wheel. If somebody becomes trapped, imme-
diately release the memory function position
button. The adjustment process is stopped.
GWARNING
Children could become trapped if they acti-
vate the memory function, particularly when
unattended. There is a risk of injury.
When leaving the vehicle, always take the
SmartKey with you and lock the vehicle. Never
leave children unsupervised in the vehicle.
Storing settings
The memory function can be used at any time,
e.g. even when the SmartKey isn't in the ignition
lock.
With the memory function, you can store up to
three different settings, e.g. for three different
people.
The following settings are stored as a single
memory preset:
Rseat and backrest position
Rdriver's side: position of the exterior mirrors
on the driver's and front-passenger sides
XSelect key position 2with the Start/Stop but-
ton.
XAdjust the seat accordingly (Ypage 77).
XOn the driver's side, adjust the steering wheel (Ypage 80) and the exterior mirrors
(Ypage 82).
XPress memory button Mand one of the stor-
age position buttons 1,2or 3within three
seconds.
The settings are stored in the selected preset
position. A tone sounds when the settings
have been completed.
84Memory function
Seats, steering wheel and mirrors
Page 156 of 290

eledC appears instead of approximate
range.
Trip computer "From Start" or "From
Reset"
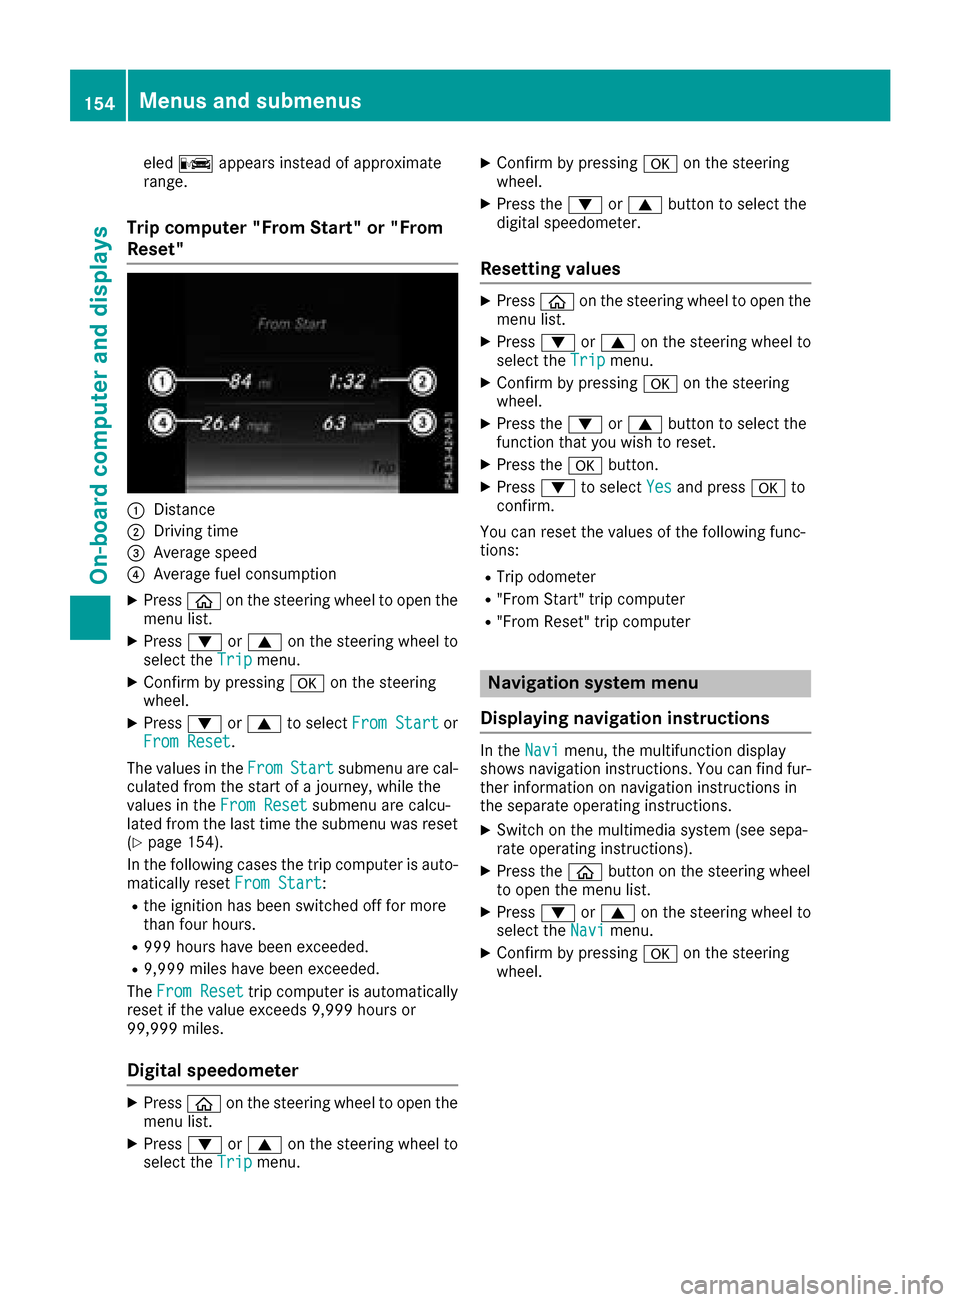
:Distance
;Driving time
=Average speed
?Average fuel consumption
XPress òon the steering wheel to open the
menu list.
XPress :or9 on the steering wheel to
select the Tripmenu.
XConfirm by pressing aon the steering
wheel.
XPress :or9 to select From Startor
From Reset.
The values in the From
Startsubmenu are cal-
culated from the start of a journey, while the
values in the From Reset
submenu are calcu-
lated from the last time the submenu was reset
(
Ypage 154).
In the following cases the trip computer is auto- matically reset From Start
:
Rthe ignition has been switched off for more
than four hours.
R999 hours have been exceeded.
R9,999 miles have been exceeded.
The From Reset
trip computer is automatically
reset if the value exceeds 9,999 hours or
99,999 miles.
Digital speedometer
XPress òon the steering wheel to open the
menu list.
XPress :or9 on the steering wheel to
select the Tripmenu.
XConfirm by pressing aon the steering
wheel.
XPress the :or9 button to select the
digital speedometer.
Resetting values
XPress òon the steering wheel to open the
menu list.
XPress :or9 on the steering wheel to
select the Tripmenu.
XConfirm by pressing aon the steering
wheel.
XPress the :or9 button to select the
function that you wish to reset.
XPress the abutton.
XPress :to select Yesand press ato
confirm.
You can reset the values of the following func-
tions:
RTrip odometer
R"From Start" trip computer
R"From Reset" trip computer
Navigation system menu
Displaying navigation instructions
In the Navimenu, the multifunction display
shows navigation instructions. You can find fur-
ther information on navigation instructions in
the separate operating instructions.
XSwitch on the multimedia system (see sepa-
rate operating instructions).
XPress the òbutton on the steering wheel
to open the menu list.
XPress :or9 on the steering wheel to
select the Navimenu.
XConfirm by pressing aon the steering
wheel.
154Menus and submenus
On-board computer and displays
Page 158 of 290

Change of direction without lane recom-
mendation
:Road into which the change of direction
leads
;Distance to change of direction and visual
distance display
=Change-of-direction symbol
When a change of direction is to be made, you
will see symbol =for the change of direction
and distance graphic ;. The distance indicator
shortens towards the top of the display as you
approach the point of the announced change of
direction. The change of direction starts once
the distance display reaches zero.
Change of direction with lane recommen-
dation
:Road into which the change of direction
leads
;Distance to change of direction and visual
distance display
=Change-of-direction symbol
?Lane recommendation
Other status indicators of the naviga-
tion system
:Additional information
Other possible additional information:
RNew Route...or Calculating Route...
A new route is calculated.
RRoad Not Mapped
The vehicle position is inside the area of the
digital map but the road is not recognized, e.g.
newly built streets, car parks or private land.
RNo Route
No route could be calculated to the selected
destination.
RO
You have reached the destination or an inter-
mediate destination.
Radio menu
:Frequency range
;Station frequency with memory position
=Name of artist
?Name of track
The multifunction display shows station ;with
station frequency or station name. The preset
156Menus and submenus
On-board computer and displays
Page 164 of 290

The selected unit of measurement for distance
applies to:
RDigital speedometer in theTripmenu
ROdometer and the trip odometer
RTrip computer
RRange
RNavigation instructions in the Navimenu
RCruise control
RDISTRONIC PLUS
RASSYST PLUS service interval display
Switching the additional speedometer
on/off
If the additional speedometer is switched on,
the speed is shown in the status bar in the mul-
tifunction display instead of the outside tem-
perature.
The speed display is inverse to the speedome-
ter.
XPress theòbutton on the steering wheel
to open the menu list.
XPress :or9 on the steering wheel to
select the Settingsmenu.
XConfirm by pressing aon the steering
wheel.
XPress :or9 to select the Instru‐ment Clustersubmenu.
XPressato confirm.
XUsing :or9, select the AdditionalSpeedometer [km/h]function.
The current selection appears.
XTo activate/deactivate: press theabut-
ton again.
Restoring the factory settings
XPress òon the steering wheel to open the
menu list.
XPress :or9 on the steering wheel to
select the Settingsmenu.
XConfirm by pressing aon the steering
wheel.
XPress :or9 to select the FactorySettingssubmenu.
XPressato confirm.
The Reset All Settings?function
appears.
XPress :or9 to select NoorYes.
XPress ato confirm the selection.
If you have selected Yes, the multifunction
display shows a confirmation message.
For safety reasons, the Daytime Running
Lightsfunction in theLightssubmenu is only
reset when the vehicle is stationary.
AMG menu
WARMUP
:Digital speedometer
;Gear indicator
=Charge-air pressure
?Engine oil temperature
ATransmission fluid temperature
XUse ò on the steering wheel to call up the
list of menus.
XPress the :or9 button on the steering
wheel to select the AMGmenu.
XConfirm by pressing aon the steering
wheel.
Engine and transmission oil tempera-
tures: when the engine and transmission are
at normal operating temperature, oil temper-
atures ?and Aare displayed in white in the
multifunction display.
If the multifunction display shows oil temper-
ature ?orA in blue, the engine or the
transmission are not yet at normal operating
temperature. Avoid driving at full engine out-
put during this time.
162Menus and submenus
On-board computer and displays
Page 165 of 290

G-Meter
The G-Meter shows you the forces that are exer-
ted on the driver during the journey, both later-
ally and in the direction of travel.
The maximum values are indicated in red in theguideline system.
XPress òon the steering wheel to open the
menu list.
XPress the :or9 button on the steering
wheel to select the AMGmenu.
XConfirm by pressing aon the steering
wheel.
XPress the 9button repeatedly until the G-
Meter appears.
The maximum values of the G-Meter are
saved.
XTo reset the G-Meter: pressaagain.
XUsing :or9 select Yeson the steer-
ing wheel.
XPress ato confirm.
The maximum values of the G-Meter are
deleted.
If the ignition remains switched off for longer
than four hours, the G-Meter will be automati-
cally reset.
SETUP
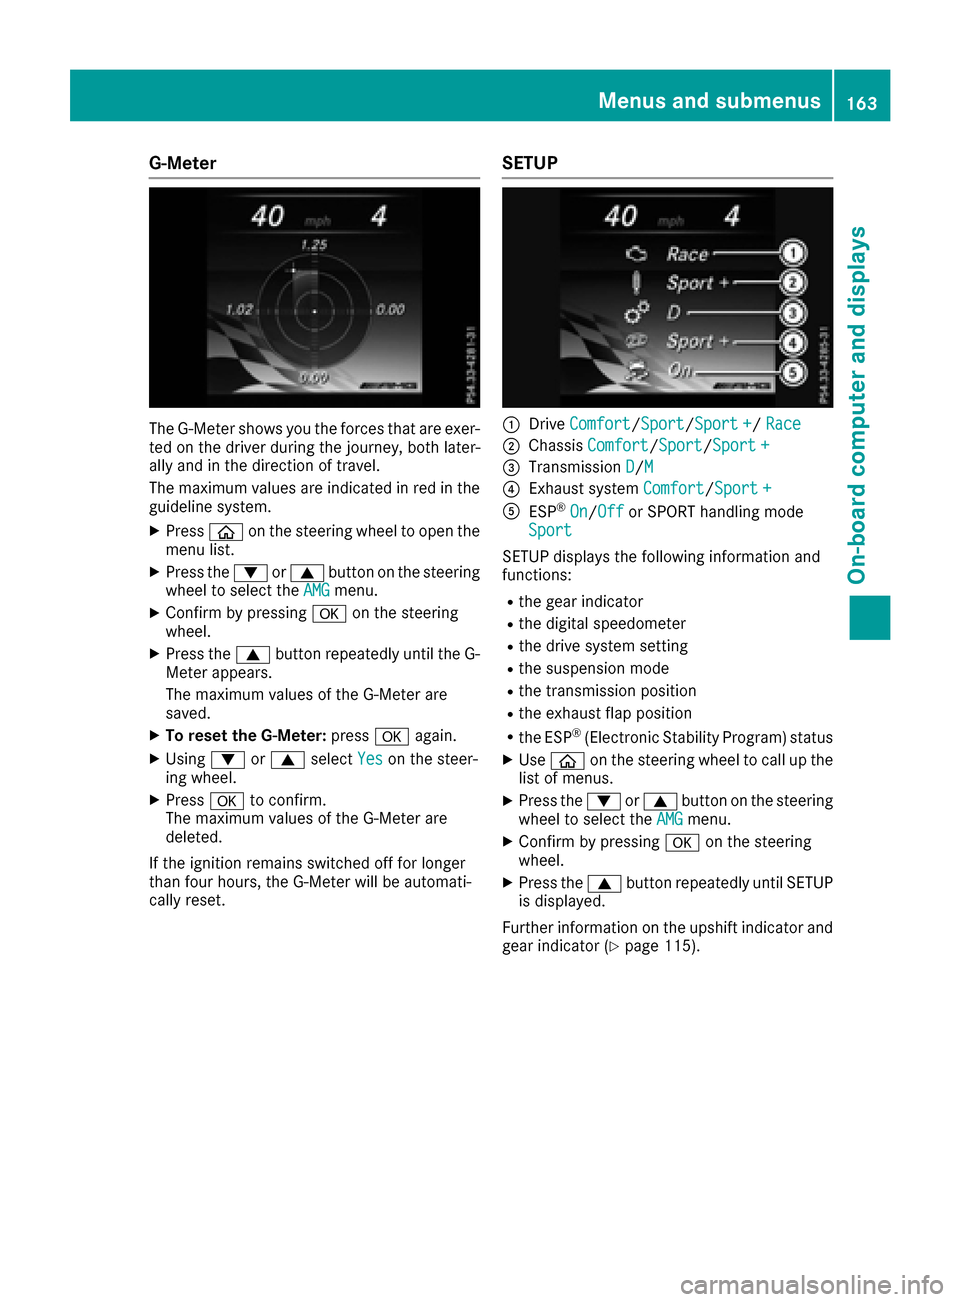
:Drive Comfort/Sport/Sport +/ Race
;Chassis Comfort/Sport/Sport +
=Transmission D/M
?Exhaust system Comfort/Sport +
AESP®On/Offor SPORT handling mode
Sport
SETUP displays the following information and
functions:
Rthe gear indicator
Rthe digital speedometer
Rthe drive system setting
Rthe suspension mode
Rthe transmission position
Rthe exhaust flap position
Rthe ESP®(Electronic Stability Program) status
XUse ò on the steering wheel to call up the
list of menus.
XPress the :or9 button on the steering
wheel to select the AMGmenu.
XConfirm by pressing aon the steering
wheel.
XPress the 9button repeatedly until SETUP
is displayed.
Further information on the upshift indicator and
gear indicator (
Ypage 115).
Menus and submenus163
On-board computer and displays
Z
Page 167 of 290

Resetting the RACETIMER
XPress the:or9 button to select Stop.
The RACETIMER is stopped.
XPress the :or9 button to select
Reset.
XPress ato confirm.
All laps are deleted.
Lap statistics
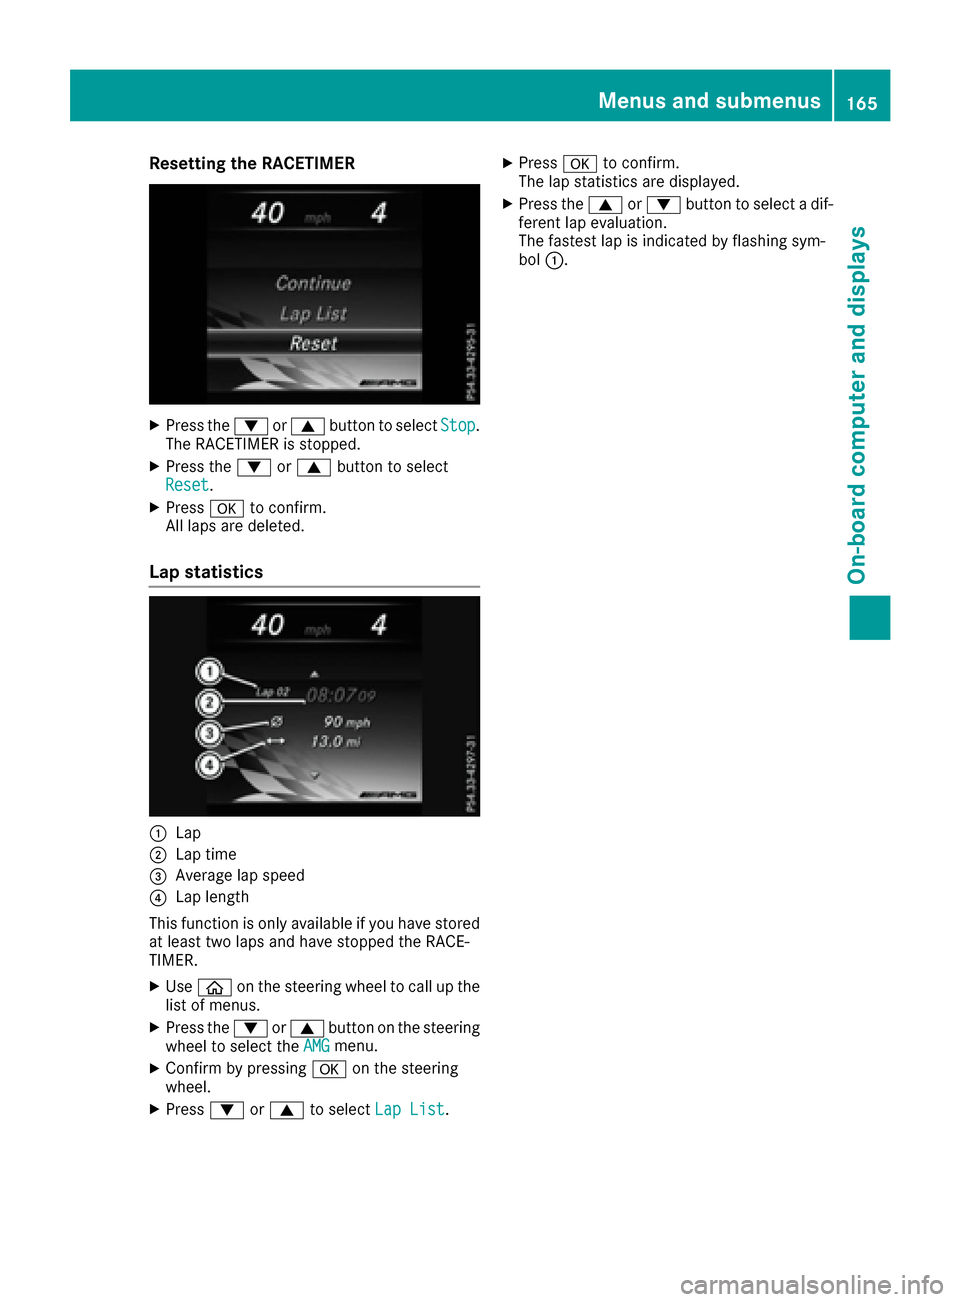
:Lap
;Lap time
=Average lap speed
?Lap length
This function is only available if you have stored
at least two laps and have stopped the RACE-
TIMER.
XUse ò on the steering wheel to call up the
list of menus.
XPress the :or9 button on the steering
wheel to select the AMGmenu.
XConfirm by pressing aon the steering
wheel.
XPress :or9 to select Lap List.
XPressato confirm.
The lap statistics are displayed.
XPress the 9or: button to select a dif-
ferent lap evaluation.
The fastest lap is indicated by flashing sym-
bol :.
Menus and submenus165
On-board computer and displays
Z
Page 235 of 290

You can obtain further information from an
authorized Mercedes-Benz Center or at
http://www.mbusa.com (USA only).
iThe ASSYST PLUS service interval display
does not show any information on the engine
oil level. Observe the notes on the engine oil
level (
Ypage 228).
The multifunction display shows a service mes-
sage for several seconds, e.g.:
RService A in XX Days
RService A Due
RService A Overdue by XX Days
Depending on the operating conditions of the
vehicle, the remaining time or distance until the
next service due date is displayed.
The letter A
orB, possibly in connection with a
number or another letter, indicates the type of
service. A
stands for a minor service and Bfor a
major service.
You can obtain further information from an
authorized Mercedes-Benz Center.
The ASSYST PLUS service interval display does
not take into account any periods of time during
which the battery is disconnected.
Maintaining the time-dependent service sched-
ule:
XNote down the service due date displayed in
the multifunction display before disconnect-
ing the battery.
or
XAfter reconnecting the battery, subtract the
battery disconnection periods from the ser-
vice date shown on the display.
Hiding a service message
XPress the aor% button on the steering
wheel.
Displaying service messages
XSwitch on the ignition.
XUse ò on the steering wheel to call up the
list of menus.
XPress 9or: on the steering wheel to
select the Servicemenu and confirm with
a.
XPress 9or: on the steering wheel to
select the ASSYST PLUSsubmenu and con-
firm with a.
The service due date appears in the multi-
function display.
Information about Service
Resetting the ASSYST PLUS service
interval display
!If the ASSYST PLUS service interval display
has been inadvertently reset, this setting can
be corrected at a qualified specialist work-
shop.
Have service work carried out as described in
the Maintenance Booklet. This may otherwise
lead to increased wear and damage to the
major assemblies or the vehicle.
A qualified specialist workshop, e.g. an author-
ized Mercedes-Benz Center, will reset the
ASSYST PLUS service interval display after the
service work has been carried out. You can also
obtain further information on maintenance
work, for example.
Special service requirements
The specified maintenance interval takes only
the normal operation of the vehicle into
account. Under arduous operating conditions or
increased load on the vehicle, maintenance
work must be carried out more frequently, for
example:
Rregular city driving with frequent intermediate
stops
Rif the vehicle is primarily used to travel short
distances
Ruse in mountainous terrain or on poor road
surfaces
Rif the engine is often left idling for long periods
Under these or similar conditions, have, for
example, the air filter, engine oil and oil filter
replaced or changed more frequently. Under
arduous operating conditions, the tires must be
checked more often. Further information can be obtained at a qualified specialist workshop, e.g.
an authorized Mercedes-Benz Center.
ASSYST PLUS233
Maintenance and care
Z
Page 249 of 290

If the power supply has been interrupted, e.g. if
you reconnect the battery, you will have to:
Rreset the function for automatically folding
the exterior mirrors in/out by folding the mir-
rors out once (
Ypage 82)
Rreset the side windows, see (Ypage 73)
Charging the battery
!
Only use battery chargers with a maximum
charging voltage of 14.4 V.
!Only charge the battery using the jump-
starting connection point.
The jump-starting connection point is in the
engine compartment (
Ypage 248).
XOpen the hood.
XConnect the battery charger to the positive
terminal and ground point in the same order
as when connecting the donor battery in the
jump-starting procedure (
Ypage 248).
Keep away from fire and open flames. Do not
lean over a battery. Never charge the battery if it
is still installed in the vehicle, unless you use a
battery charger which has been tested and
approved by Mercedes-Benz. A battery charger
unit specially adapted for Mercedes-Benz vehi-
cles and tested and approved by Mercedes-
Benz is available as an accessory. It permits the
charging of the battery in its installed position.
Contact an authorized Mercedes-Benz Center
for further information and availability. Read the
battery charger's operating instructions before
charging the battery.
Do not charge a battery which has been
removed at low temperatures with a battery
charger. Allow the battery to warm up gently
first, if necessary. Otherwise, the service life can
be shortened and the starting characteristics
impaired, especially at low temperatures.
Battery (vehicle)247
Breakdown assistance
Z