2016 MERCEDES-BENZ AMG GT ROADSTER sensor
[x] Cancel search: sensorPage 72 of 289
Doors
Important safety notes
United Kingdom only: G
WARNING
When the double locks are activated, the
doors can no longer be opened from the
inside. People in the vehicle can no longer get out, e.g. in hazardous situations. There is a
risk of injury.
Therefore, do not leave any people unsuper-
vised in the vehicle, particularly children, eld-
erly people or people in need of special assis-
tance. Do not activate the double lock when
people are in the vehicle.
If the vehicle has been locked from the outside, the double lock function is activated as stand-
ard. It is then not possible to open the doors
from inside the vehicle. You can deactivate the
double lock function by deactivating the interior
motion sensor (Y page 62). The doors can then
be opened from the inside after the vehicle has
been locked from the outside. The anti-theft
alarm system is triggered if the door is opened
from the inside. Switch off the alarm
(Y page 60).
All countries: G
WARNING
If children are left unsupervised in the vehicle, they can:
R open doors and endanger other persons or
road users
R climb out and be injured by the traffic
R operate vehicle equipment and, for exam-
ple, trap themselves.
Children could also set the vehicle in motion, for example by:
R releasing the parking brake
R shifting the automatic transmission out of
park position P
R starting the engine.
There is a risk of an accident and injury.
When leaving the vehicle, always take the key
with you and lock the vehicle. Never leave children unattended in the vehicle. Always
keep the key out of reach of children.
When a door is opened, the side window on that
side opens slightly. When the door is closed, the side window is raised again.
! The side windows will not open/close if the
battery is discharged or if the side windows
have iced up. It will then not be possible to
close the door. Do not attempt to force the
door to close. You could otherwise damage
the door or the side window. Unlocking and opening the doors
from the inside
United Kingdom only: if the vehicle has been
locked with the key or with KEYLESS-GO, the
double lock function is activated as standard. It
is then not possible to open the doors from
inside the vehicle. You can deactivate the dou-
ble lock function by deactivating the interior
motion sensor (Y page 62). The doors can then
be opened from the inside after the vehicle has been locked from the outside. The anti-theft
alarm system is triggered if the door is opened
from the inside. Switch off the alarm
(Y page 60).
For all countries except the United Kingdom:
You can open a door from inside the vehicle
even if it has been locked. If the vehicle has pre- viously been locked with the key or with KEY-
LESS-GO, opening a door from the inside will
trigger the anti-theft alarm system. Switch off
the alarm (Y page 60). X
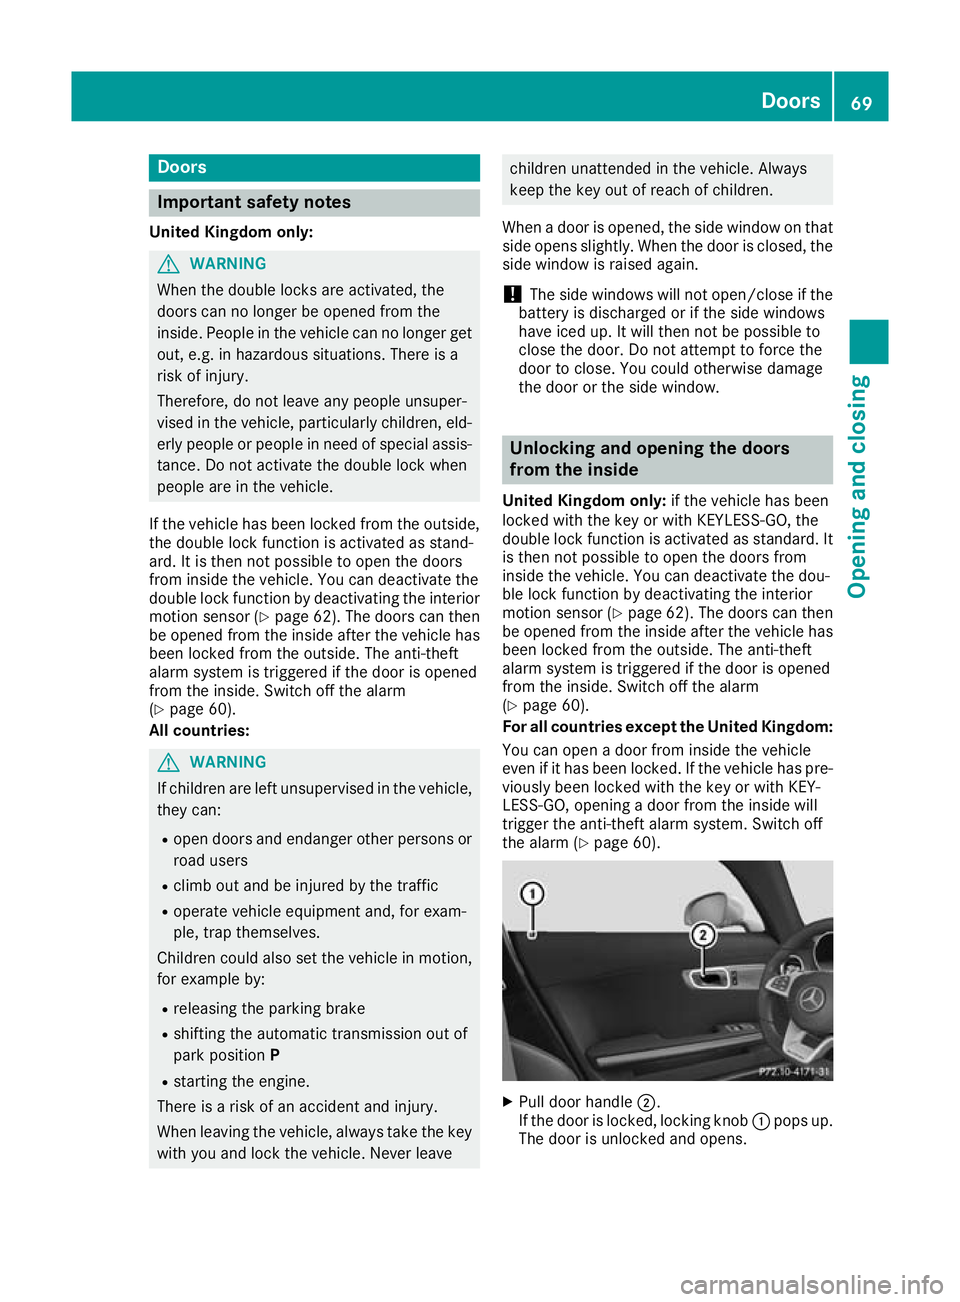
Pull door handle ;.
If the door is locked, locking knob :pops up.
The door is unlocked and opens. Doors
69Opening and closing Z
Page 73 of 289
Centrally locking and unlocking the
vehicle from the inside
You can centrally lock and unlock the vehicle
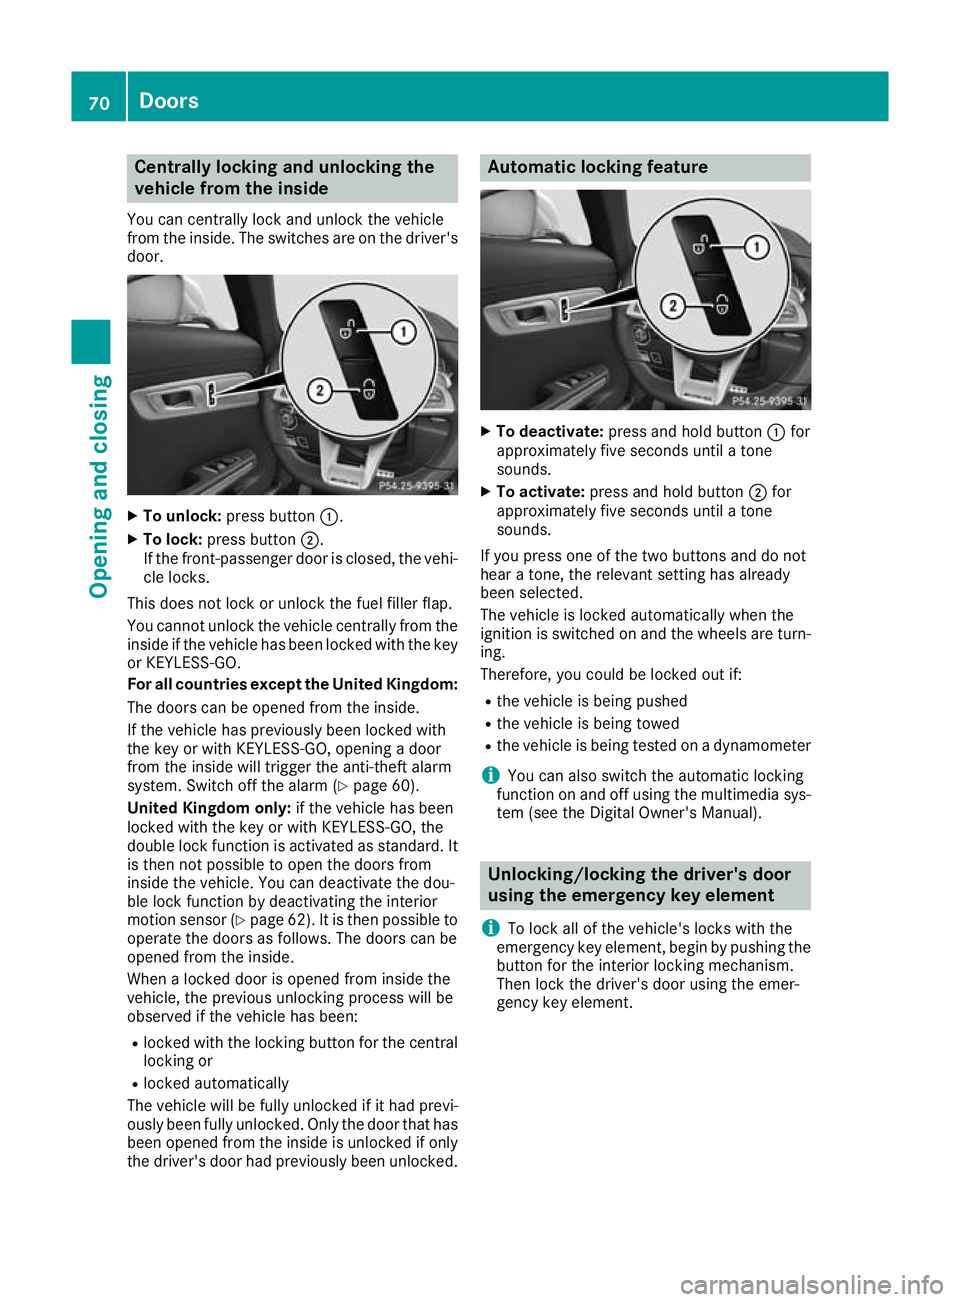
from the inside. The switches are on the driver's door. X
To unlock: press button :.
X To lock: press button ;.
If the front-passenger door is closed, the vehi-
cle locks.
This does not lock or unlock the fuel filler flap.
You cannot unlock the vehicle centrally from the
inside if the vehicle has been locked with the key or KEYLESS-GO.
For all countries except the United Kingdom:
The doors can be opened from the inside.
If the vehicle has previously been locked with
the key or with KEYLESS-GO, opening a door
from the inside will trigger the anti-theft alarm
system. Switch off the alarm (Y page 60).
United Kingdom only: if the vehicle has been
locked with the key or with KEYLESS-GO, the
double lock function is activated as standard. It is then not possible to open the doors from
inside the vehicle. You can deactivate the dou-
ble lock function by deactivating the interior
motion sensor (Y page 62). It is then possible to
operate the doors as follows. The doors can be
opened from the inside.
When a locked door is opened from inside the
vehicle, the previous unlocking process will be
observed if the vehicle has been:
R locked with the locking button for the central
locking or
R locked automatically
The vehicle will be fully unlocked if it had previ-
ously been fully unlocked. Only the door that has been opened from the inside is unlocked if only
the driver's door had previously been unlocked. Automatic locking feature
X
To deactivate: press and hold button :for
approximately five seconds until a tone
sounds.
X To activate: press and hold button ;for
approximately five seconds until a tone
sounds.
If you press one of the two buttons and do not
hear a tone, the relevant setting has already
been selected.
The vehicle is locked automatically when the
ignition is switched on and the wheels are turn-
ing.
Therefore, you could be locked out if:
R the vehicle is being pushed
R the vehicle is being towed
R the vehicle is being tested on a dynamometer
i You can also switch the automatic locking
function on and off using the multimedia sys-
tem (see the Digital Owner's Manual). Unlocking/locking the driver's door
using the emergency key element
i To lock all of the vehicle's locks with the
emergency key element, begin by pushing the
button for the interior locking mechanism.
Then lock the driver's door using the emer-
gency key element. 70
DoorsOpening and closing
Page 75 of 289
Opening/closing from outside
Opening X
Press the Fbutton on the key.
The tailgate opens slightly.
X Raise the tailgate.
Closing X
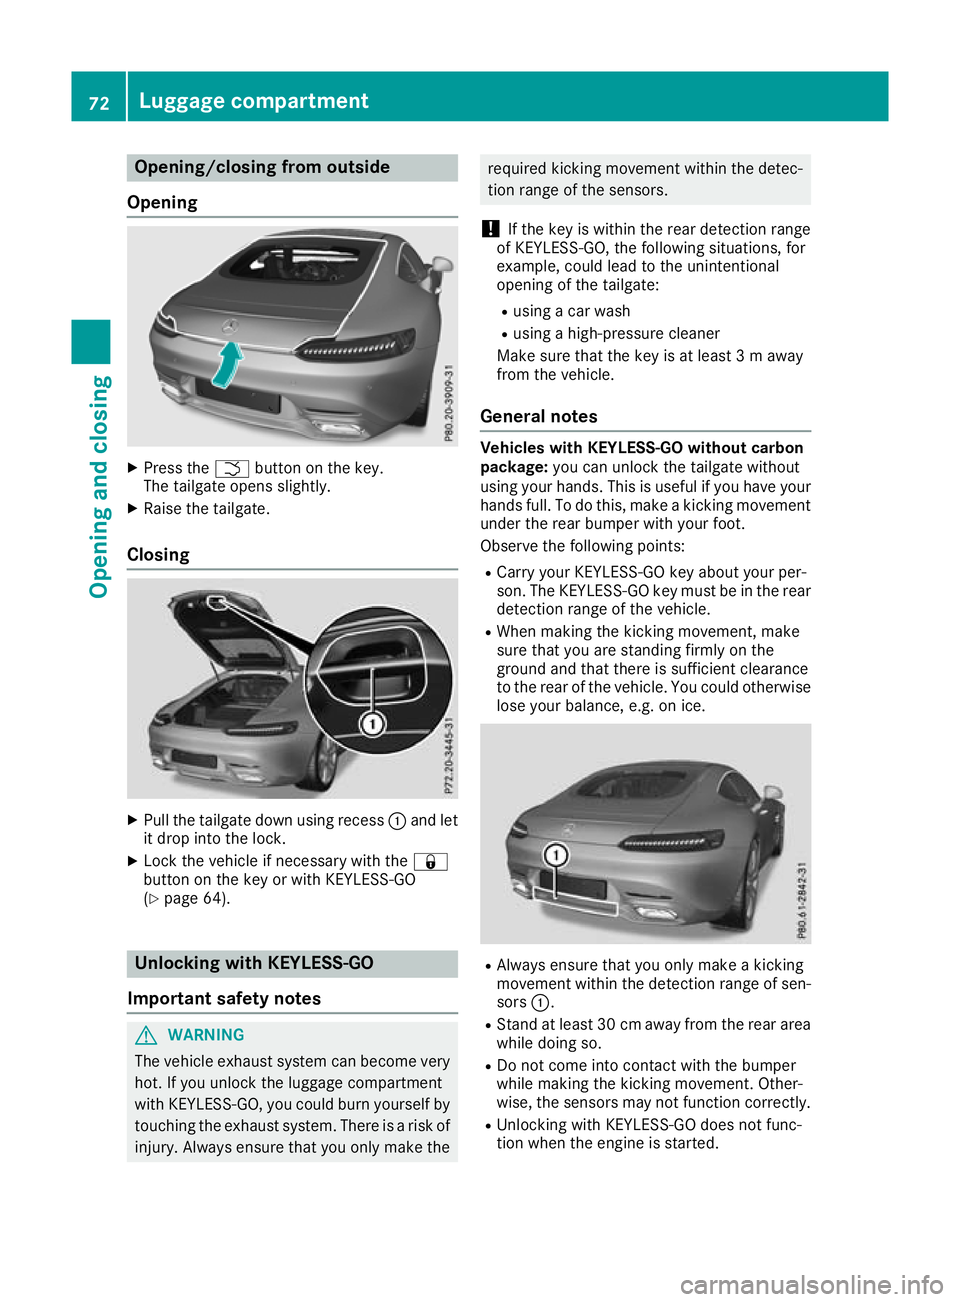
Pull the tailgate down using recess :and let
it drop into the lock.
X Lock the vehicle if necessary with the &
button on the key or with KEYLESS-GO
(Y page 64). Unlocking with KEYLESS-GO
Important safety notes G
WARNING
The vehicle exhaust system can become very
hot. If you unlock the luggage compartment
with KEYLESS-GO, you could burn yourself by touching the exhaust system. There is a risk of
injury. Always ensure that you only make the required kicking movement within the detec-
tion range of the sensors.
! If the key is within the rear detection range
of KEYLESS-GO, the following situations, for
example, could lead to the unintentional
opening of the tailgate:
R using a car wash
R using a high-pressure cleaner
Make sure that the key is at least 3 m away
from the vehicle.
General notes Vehicles with KEYLESS-GO without carbon
package:
you can unlock the tailgate without
using your hands. This is useful if you have your hands full. To do this, make a kicking movement
under the rear bumper with your foot.
Observe the following points:
R Carry your KEYLESS-GO key about your per-
son. The KEYLESS-GO key must be in the rear
detection range of the vehicle.
R When making the kicking movement, make
sure that you are standing firmly on the
ground and that there is sufficient clearance
to the rear of the vehicle. You could otherwise
lose your balance, e.g. on ice. R
Always ensure that you only make a kicking
movement within the detection range of sen- sors :.
R Stand at least 30 cm away from the rear area
while doing so.
R Do not come into contact with the bumper
while making the kicking movement. Other-
wise, the sensors may not function correctly.
R Unlocking with KEYLESS-GO does not func-
tion when the engine is started. 72
Luggage compartmentOpening and closing
Page 76 of 289
R
Dirt caused by road salt around sensors :
may restrict functionality.
Using HANDS-FREE ACCESS with a pros-
thetic leg may restrict functionality.
R If a KEYLESS-GO key is within the rear detec-
tion range of KEYLESS-GO, the sensors could be triggered. Therefore, the tailgate cannot beunlocked unintentionally if, for example, you:
- sit on the edge of the luggage compartment
- set down or lift up an object behind the
vehicle
- polish the rear of the vehicle
Do not carry the KEYLESS-GO key about your
person in such situations. This prevents the
tailgate from being unlocked unintentionally.
Operation X
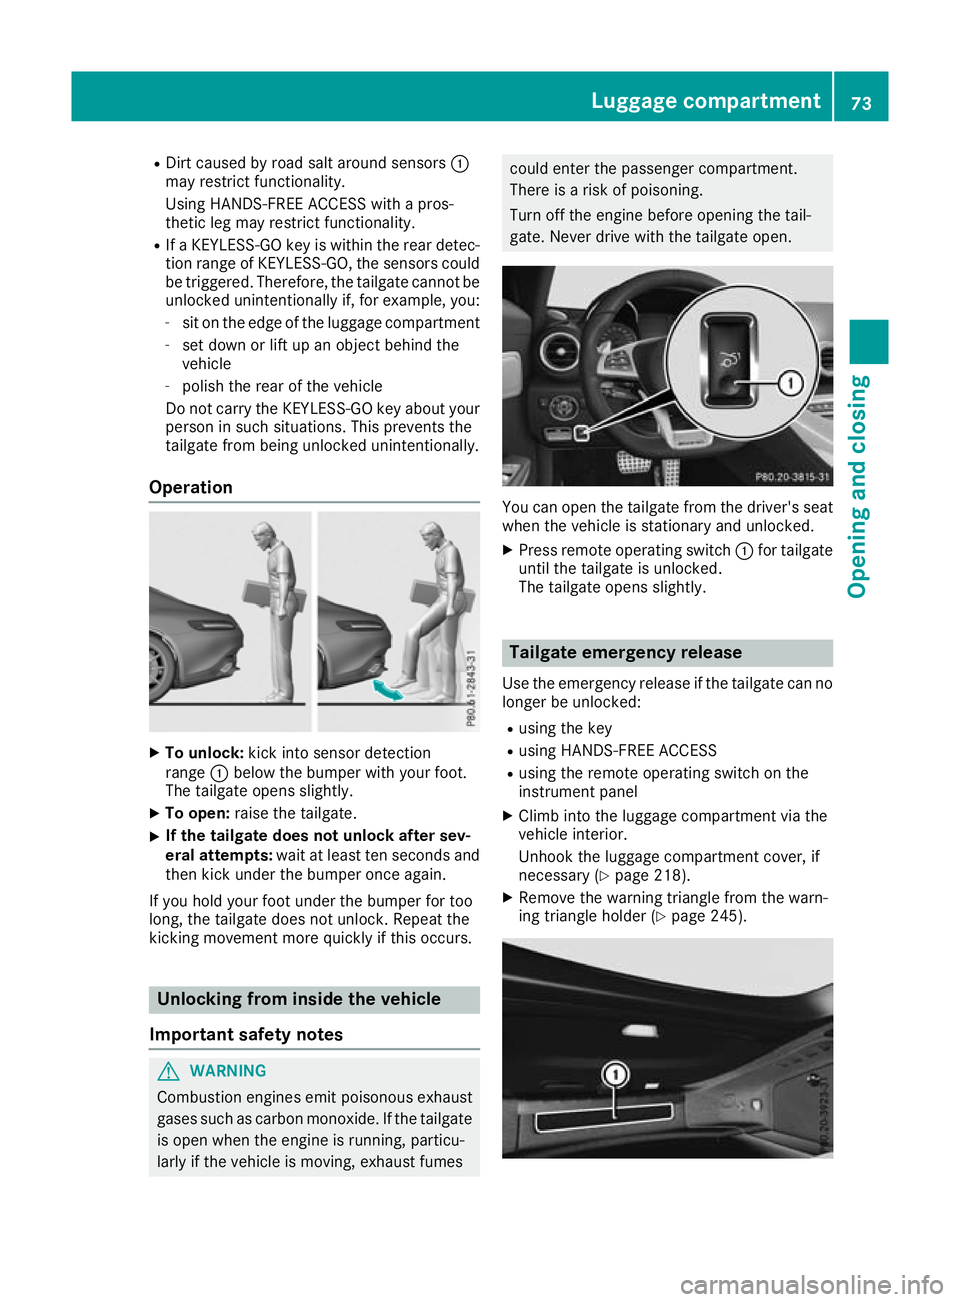
To unlock: kick into sensor detection
range :below the bumper with your foot.
The tailgate opens slightly.
X To open: raise the tailgate.
X If the tailgate does not unlock after sev-
eral attempts: wait at least ten seconds and
then kick under the bumper once again.
If you hold your foot under the bumper for too
long, the tailgate does not unlock. Repeat the
kicking movement more quickly if this occurs. Unlocking from inside the vehicle
Important safety notes G
WARNING
Combustion engines emit poisonous exhaust
gases such as carbon monoxide. If the tailgate is open when the engine is running, particu-
larly if the vehicle is moving, exhaust fumes could enter the passenger compartment.
There is a risk of poisoning.
Turn off the engine before opening the tail-
gate. Never drive with the tailgate open.
You can open the tailgate from the driver's seat
when the vehicle is stationary and unlocked.
X Press remote operating switch :for tailgate
until the tailgate is unlocked.
The tailgate opens slightly. Tailgate emergency release
Use the emergency release if the tailgate can no
longer be unlocked:
R using the key
R using HANDS-FREE ACCESS
R using the remote operating switch on the
instrument panel
X Climb into the luggage compartment via the
vehicle interior.
Unhook the luggage compartment cover, if
necessary (Y page 218).
X Remove the warning triangle from the warn-
ing triangle holder (Y page 245). Luggage compartment
73Opening and closing Z
Page 78 of 289
X
To close manually: pull the corresponding
button and hold it.
X To close fully: pull the button beyond the
point of resistance and release it.
Automatic operation is started.
X To interrupt automatic operation: press/
pull the corresponding switch again.
If you press/pull the switch beyond the point of resistance and release, automatic operation is
started in the corresponding direction. You can
stop automatic operation by pressing/pulling
again.
You can still operate the side windows when you switch off the power supply or the ignition. This
function remains active for five minutes or until
you open a door. Convenience opening feature
General notes You can ventilate the vehicle before you start
driving.
If the key is in close proximity to the vehicle, the
convenience opening function is available.
To do so, open the side windows using the key.
The "convenience opening" feature is also avail-
able when the vehicle is unlocked.
Convenience opening feature X
After unlocking the vehicle, press and hold
the % button on the key until the side win-
dows begin to open.
or X When the vehicle is unlocked, press and hold
the % button until the side windows have
reached the desired position.
X To interrupt convenience opening: release
the % button. Convenience closing feature
Important safety notes G
WARNING
When using convenience closing, you could
become trapped within the sweep of the clos- ing window. There is a risk of injury. Monitor the entire closing procedure when
using convenience closing. When closing,
make sure that no one has any parts of the
body within the closing area.
When you lock the vehicle, you can close the
windows at the same time.
Using the key X
Press and hold the &button until the side
windows are fully closed.
X Make sure that all the side windows are
closed.
X To interrupt convenience closing: release
the & button.
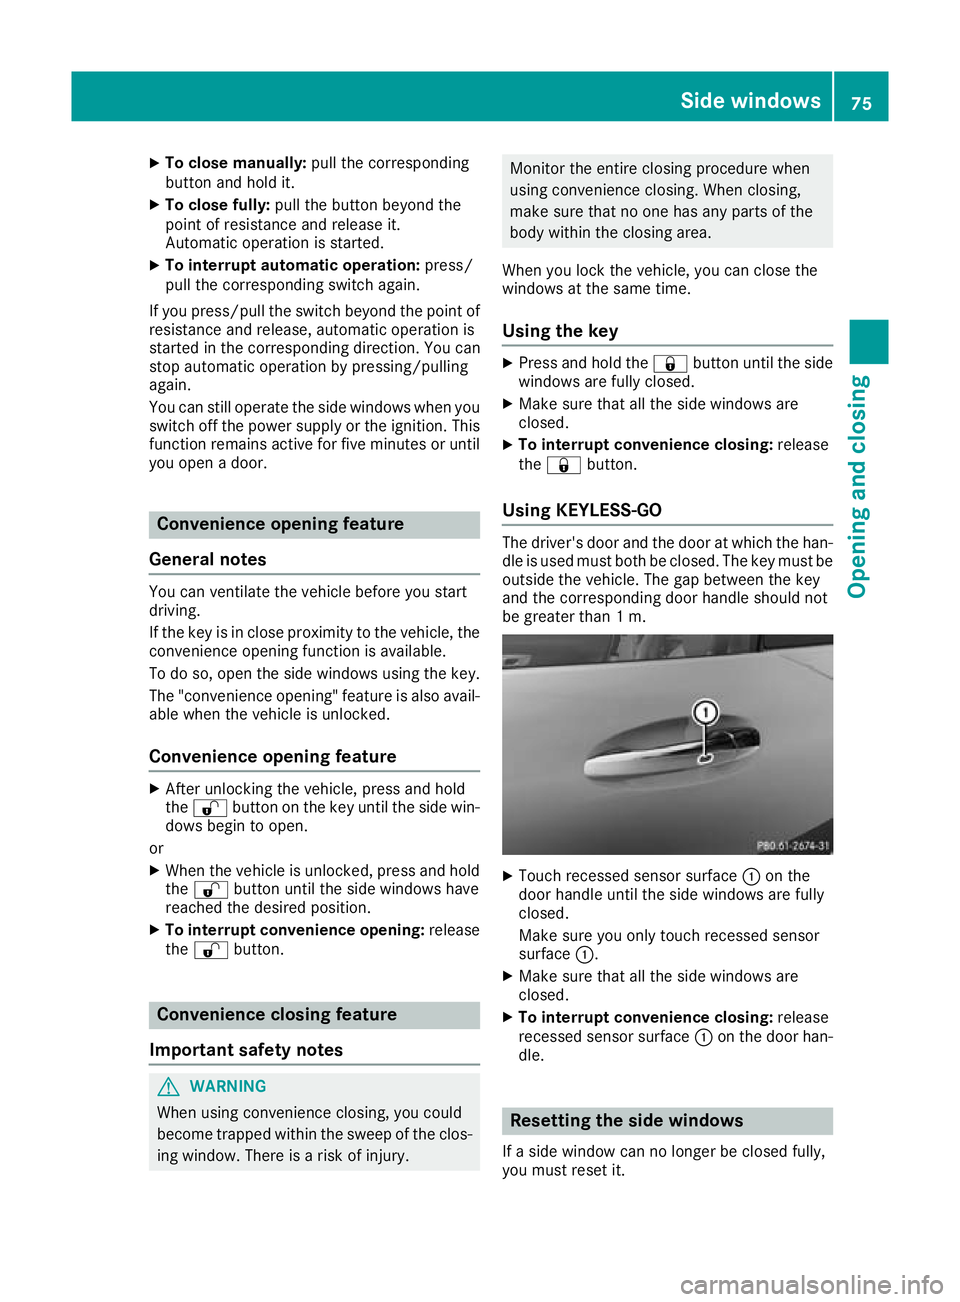
Using KEYLESS-GO The driver's door and the door at which the han-
dle is used must both be closed. The key must beoutside the vehicle. The gap between the key
and the corresponding door handle should not
be greater than 1 m. X
Touch recessed sensor surface :on the
door handle until the side windows are fully
closed.
Make sure you only touch recessed sensor
surface :.
X Make sure that all the side windows are
closed.
X To interrupt convenience closing: release
recessed sensor surface :on the door han-
dle. Resetting the side windows
If a side window can no longer be closed fully,
you must reset it. Side windows
75Opening and closing Z
Page 91 of 289
Exterior lighting
General notes
For reasons of safety, Mercedes-Benz recom-
mends that you drive with the lights switched on even during the daytime. In some countries,
operation of the headlamps varies due to legal
requirements and self-imposed obligations. Driving abroad
It is not necessary to switch your headlamps to symmetrical dipped beam when driving in coun-
tries where vehicles are driven on the opposite
side of the road to the country in which the vehi- cle is registered. Legal requirements are fulfilled
without switching the headlamps to symmetri-
cal dipped beam. Setting the exterior lighting
Setting options Exterior lighting can be set by:
R the light switch
R the combination switch (Y page 89)
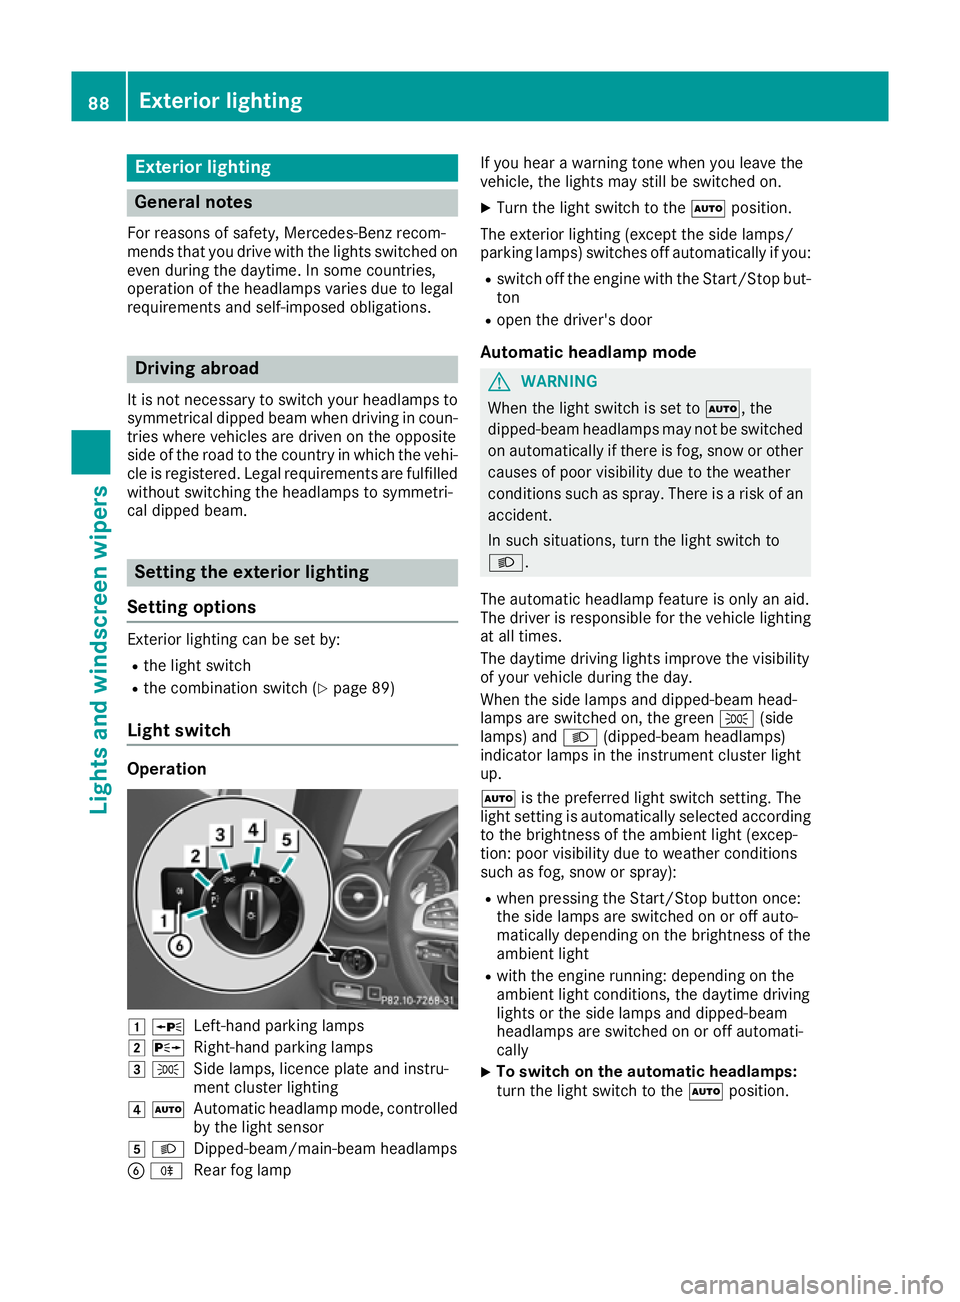
Light switch Operation
1
W
Left-hand parking lamps
2 X
Right-hand parking lamps
3 T
Side lamps, licence plate and instru-
ment cluster lighting
4 Ã
Automatic headlamp mode, controlled
by the light sensor
5 L
Dipped-beam/main-beam headlamps
B R
Rear fog lamp If you hear a warning tone when you leave the
vehicle, the lights may still be switched on.
X Turn the light switch to the Ãposition.
The exterior lighting (except the side lamps/
parking lamps) switches off automatically if you: R switch off the engine with the Start/Stop but-
ton
R open the driver's door
Automatic headlamp mode G
WARNING
When the light switch is set to Ã, the
dipped-beam headlamps may not be switched on automatically if there is fog, snow or othercauses of poor visibility due to the weather
conditions such as spray. There is a risk of an
accident.
In such situations, turn the light switch to
L.
The automatic headlamp feature is only an aid.
The driver is responsible for the vehicle lighting at all times.
The daytime driving lights improve the visibility
of your vehicle during the day.
When the side lamps and dipped-beam head-
lamps are switched on, the green T(side
lamps) and L(dipped-beam headlamps)
indicator lamps in the instrument cluster light
up.
à is the preferred light switch setting. The
light setting is automatically selected according to the brightness of the ambient light (excep-
tion: poor visibility due to weather conditions
such as fog, snow or spray):
R when pressing the Start/Stop button once:
the side lamps are switched on or off auto-
matically depending on the brightness of the
ambient light
R with the engine running: depending on the
ambient light conditions, the daytime driving
lights or the side lamps and dipped-beam
headlamps are switched on or off automati-
cally
X To switch on the automatic headlamps:
turn the light switch to the
Ãposition. 88
Exterior lightingLights and windscreen wipers
Page 92 of 289
Dipped-beam headlamps
G
WARNING
When the light switch is set to Ã, the
dipped-beam headlamps may not be switched on automatically if there is fog, snow or othercauses of poor visibility due to the weather
conditions such as spray. There is a risk of an
accident.
In such situations, turn the light switch to
L.
When the ignition is switched on and the light
switch is in the Lposition, the side lamps
and dipped-beam headlamps are switched on
even if the light sensor does not sense dark
ambient light conditions. This is advantageous
when there is fog or rain.
X To switch on the dipped-beam headlamps:
select key position 2with the Start/Stop but-
ton or start the engine.
X Turn the light switch to the Lposition.
The green Lindicator lamp on the instru-
ment cluster lights up.
Rear fog lamp
The rear fog lamp improves the visibility of your vehicle for the traffic behind in the event of
heavy fog. Please observe the country-specific
laws on the use of rear foglamps.
X To switch on the rear foglamp: select key
position 2with the Start/Stop button or start
the engine.
X Turn the light switch to the LorÃ
position.
X Press the Rbutton.
The yellow Rindicator lamp in the instru-
ment cluster lights up.
X To switch off the rear foglamp:press the
R button.
The yellow Rindicator lamp in the instru-
ment cluster goes out.
Side lamps ! When the battery is discharged heavily, the
side lamps or parking lamps are automatically
switched off to facilitate an engine start.
Always park your vehicle safely and in a well lit area, in accordance with the relevant legal
stipulations. Avoid using the Tside lamps
for periods lasting several hours. Where pos- sible, switch on the right
Xor left W
parking lamp.
X To switch on: turn the light switch to the
T position.
The green Tindicator lamp in the instru-
ment cluster lights up.
Parking lamps
Switching on the parking lamps ensures that the
corresponding side of the vehicle is illuminated.
X To switch on the parking lamps: switch off
the engine with the Start/Stop button.
X Turn the light switch to the W(left-hand
side of the vehicle) or X(right-hand side of
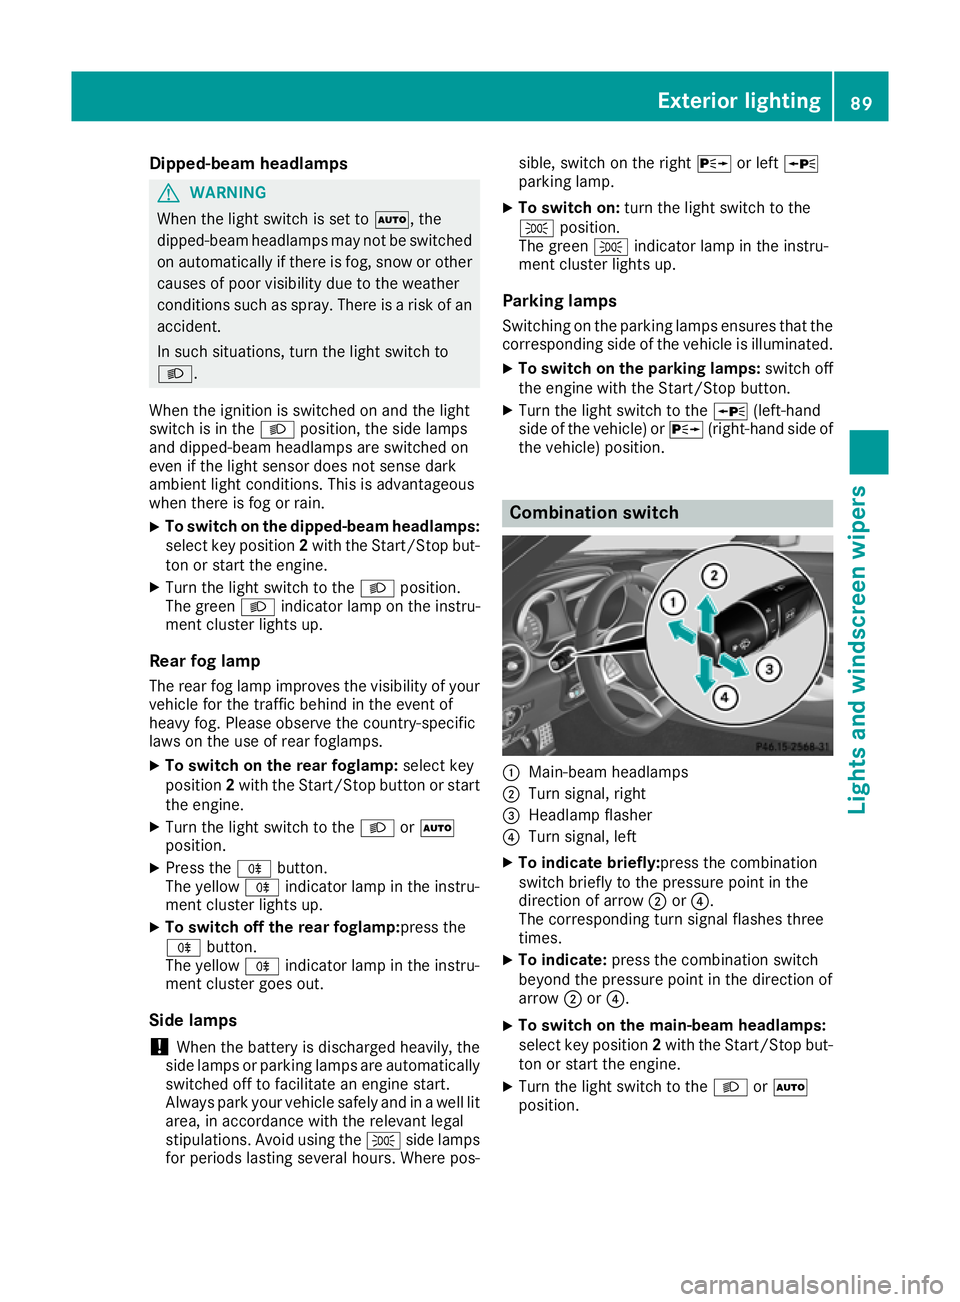
the vehicle) position. Combination switch
:
Main-beam headlamps
; Turn signal, right
= Headlamp flasher
? Turn signal, left
X To indicate briefly: press the combination
switch briefly to the pressure point in the
direction of arrow ;or?.
The corresponding turn signal flashes three
times.
X To indicate: press the combination switch
beyond the pressure point in the direction of
arrow ;or?.
X To switch on the main-beam headlamps:
select key position 2with the Start/Stop but-
ton or start the engine.
X Turn the light switch to the LorÃ
position. Exterior lighting
89Lights and windscreen wipers Z
Page 93 of 289
X
Press the combination switch beyond the
pressure point in the direction of arrow :.
In the Ãposition, the main-beam head-
lamps are only switched on when it is dark and the engine is running.
The K indicator lamp in the instrument
cluster lights up when the main-beam head-
lamps are switched on.
X To switch off the main-beam headlamps:
move the combination switch back to its nor-
mal position.
The K indicator lamp in the instrument
cluster goes out.
Vehicles with Adaptive Highbeam Assist: when
Adaptive Highbeam Assist is active, it controls
switching on/off of the main-beam headlamps
(Y page 90).
X To flash the headlamps: pull the combina-
tion switch in the direction of arrow =.Hazard warning lamps
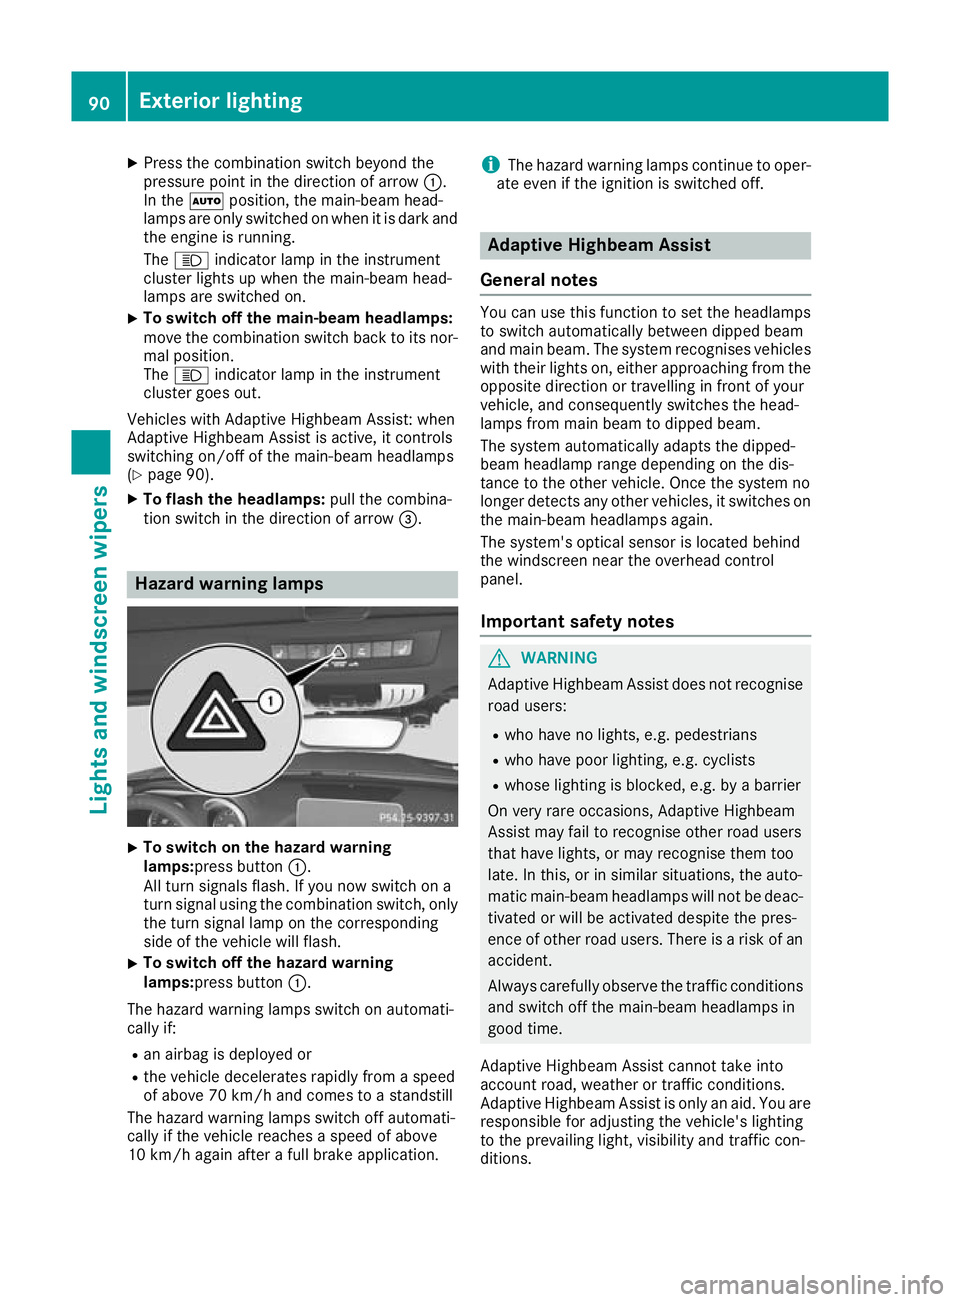
X
To switch on the hazard warning
lamps:press button
:.
All turn signals flash. If you now switch on a
turn signal using the combination switch, only the turn signal lamp on the corresponding
side of the vehicle will flash.
X To switch off the hazard warning
lamps:press button
:.
The hazard warning lamps switch on automati-
cally if:
R an airbag is deployed or
R the vehicle decelerates rapidly from a speed
of above 70 km/h and comes to a standstill
The hazard warning lamps switch off automati-
cally if the vehicle reaches a speed of above
10 km/h again after a full brake application. i
The hazard warning lamps continue to oper-
ate even if the ignition is switched off. Adaptive Highbeam Assist
General notes You can use this function to set the headlamps
to switch automatically between dipped beam
and main beam. The system recognises vehicles
with their lights on, either approaching from the opposite direction or travelling in front of your
vehicle, and consequently switches the head-
lamps from main beam to dipped beam.
The system automatically adapts the dipped-
beam headlamp range depending on the dis-
tance to the other vehicle. Once the system no
longer detects any other vehicles, it switches on the main-beam headlamps again.
The system's optical sensor is located behind
the windscreen near the overhead control
panel.
Important safety notes G
WARNING
Adaptive Highbeam Assist does not recognise road users:
R who have no lights, e.g. pedestrians
R who have poor lighting, e.g. cyclists
R whose lighting is blocked, e.g. by a barrier
On very rare occasions, Adaptive Highbeam
Assist may fail to recognise other road users
that have lights, or may recognise them too
late. In this, or in similar situations, the auto-
matic main-beam headlamps will not be deac-
tivated or will be activated despite the pres-
ence of other road users. There is a risk of an accident.
Always carefully observe the traffic conditions and switch off the main-beam headlamps in
good time.
Adaptive Highbeam Assist cannot take into
account road, weather or traffic conditions.
Adaptive Highbeam Assist is only an aid. You are
responsible for adjusting the vehicle's lighting
to the prevailing light, visibility and traffic con-
ditions. 90
Exterior lightingLights and windscreen wipers