2016 MERCEDES-BENZ AMG GT ROADSTER instrument cluster
[x] Cancel search: instrument clusterPage 81 of 289
Correct driver's seat position
G
WARNING
You could lose control of the vehicle while
driving if you:
R adjust the driver's seat, steering wheel or
mirrors
R fasten the seat belt
There is a risk of an accident.
Adjust the driver's seat, head restraint, steer-
ing wheel and mirrors and fasten your seat
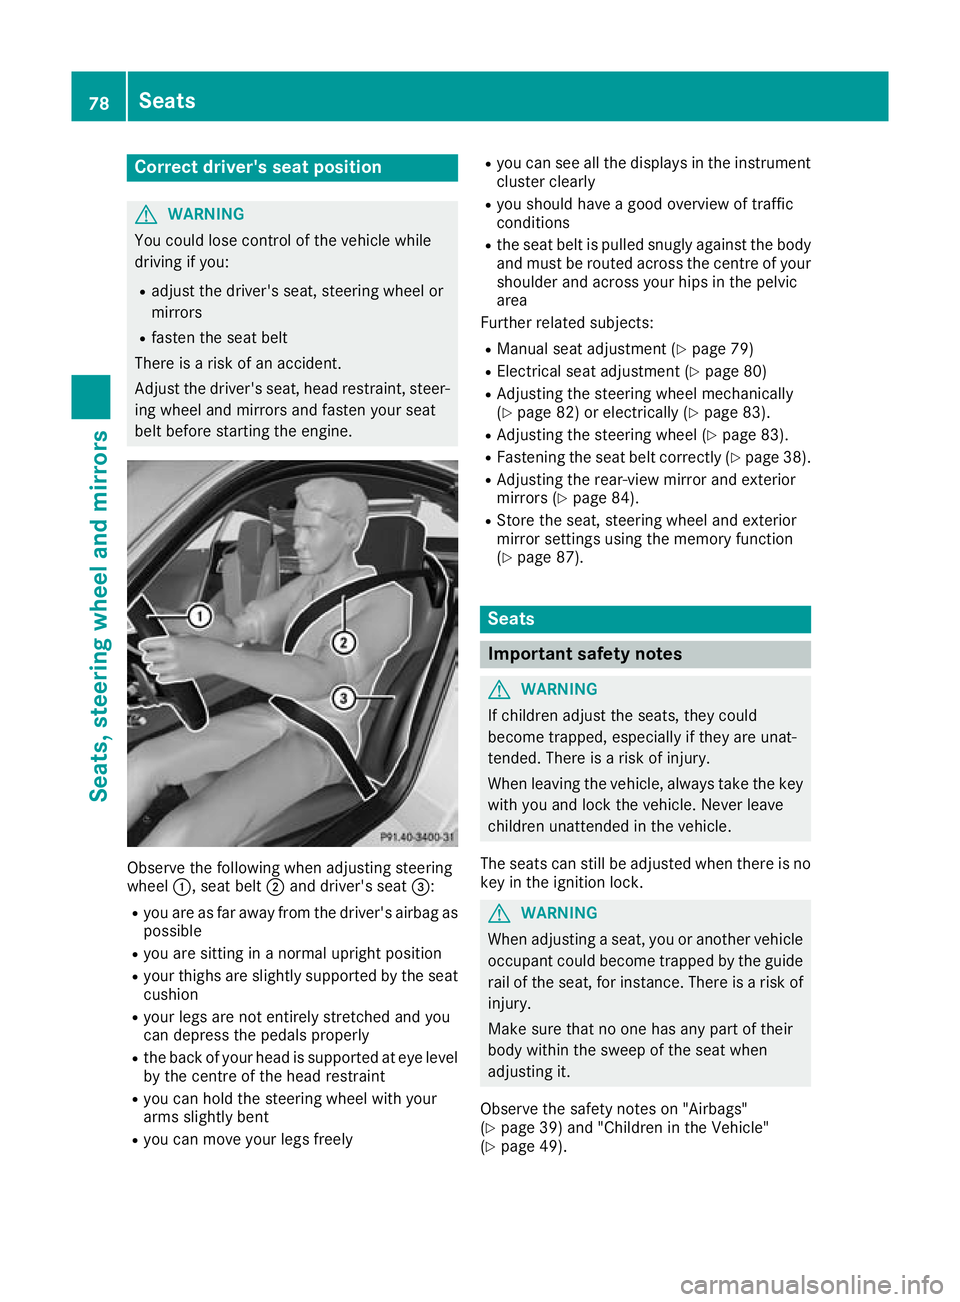
belt before starting the engine. Observe the following when adjusting steering
wheel
:, seat belt ;and driver's seat =:
R you are as far away from the driver's airbag as
possible
R you are sitting in a normal upright position
R your thighs are slightly supported by the seat
cushion
R your legs are not entirely stretched and you
can depress the pedals properly
R the back of your head is supported at eye level
by the centre of the head restraint
R you can hold the steering wheel with your
arms slightly bent
R you can move your legs freely R
you can see all the displays in the instrument
cluster clearly
R you should have a good overview of traffic
conditions
R the seat belt is pulled snugly against the body
and must be routed across the centre of your
shoulder and across your hips in the pelvic
area
Further related subjects:
R Manual seat adjustment (Y page 79)
R Electrical seat adjustment (Y page 80)
R Adjusting the steering wheel mechanically
(Y page 82) or electrically (Y page 83).
R Adjusting the steering wheel (Y page 83).
R Fastening the seat belt correctly (Y page 38).
R Adjusting the rear-view mirror and exterior
mirrors (Y page 84).
R Store the seat, steering wheel and exterior
mirror settings using the memory function
(Y page 87). Seats
Important safety notes
G
WARNING
If children adjust the seats, they could
become trapped, especially if they are unat-
tended. There is a risk of injury.
When leaving the vehicle, always take the key with you and lock the vehicle. Never leave
children unattended in the vehicle.
The seats can still be adjusted when there is no
key in the ignition lock. G
WARNING
When adjusting a seat, you or another vehicle occupant could become trapped by the guiderail of the seat, for instance. There is a risk of
injury.
Make sure that no one has any part of their
body within the sweep of the seat when
adjusting it.
Observe the safety notes on "Airbags"
(Y page 39) and "Children in the Vehicle"
(Y page 49). 78
SeatsSeats, steering wheel and
mirrors
Page 91 of 289
Exterior lighting
General notes
For reasons of safety, Mercedes-Benz recom-
mends that you drive with the lights switched on even during the daytime. In some countries,
operation of the headlamps varies due to legal
requirements and self-imposed obligations. Driving abroad
It is not necessary to switch your headlamps to symmetrical dipped beam when driving in coun-
tries where vehicles are driven on the opposite
side of the road to the country in which the vehi- cle is registered. Legal requirements are fulfilled
without switching the headlamps to symmetri-
cal dipped beam. Setting the exterior lighting
Setting options Exterior lighting can be set by:
R the light switch
R the combination switch (Y page 89)
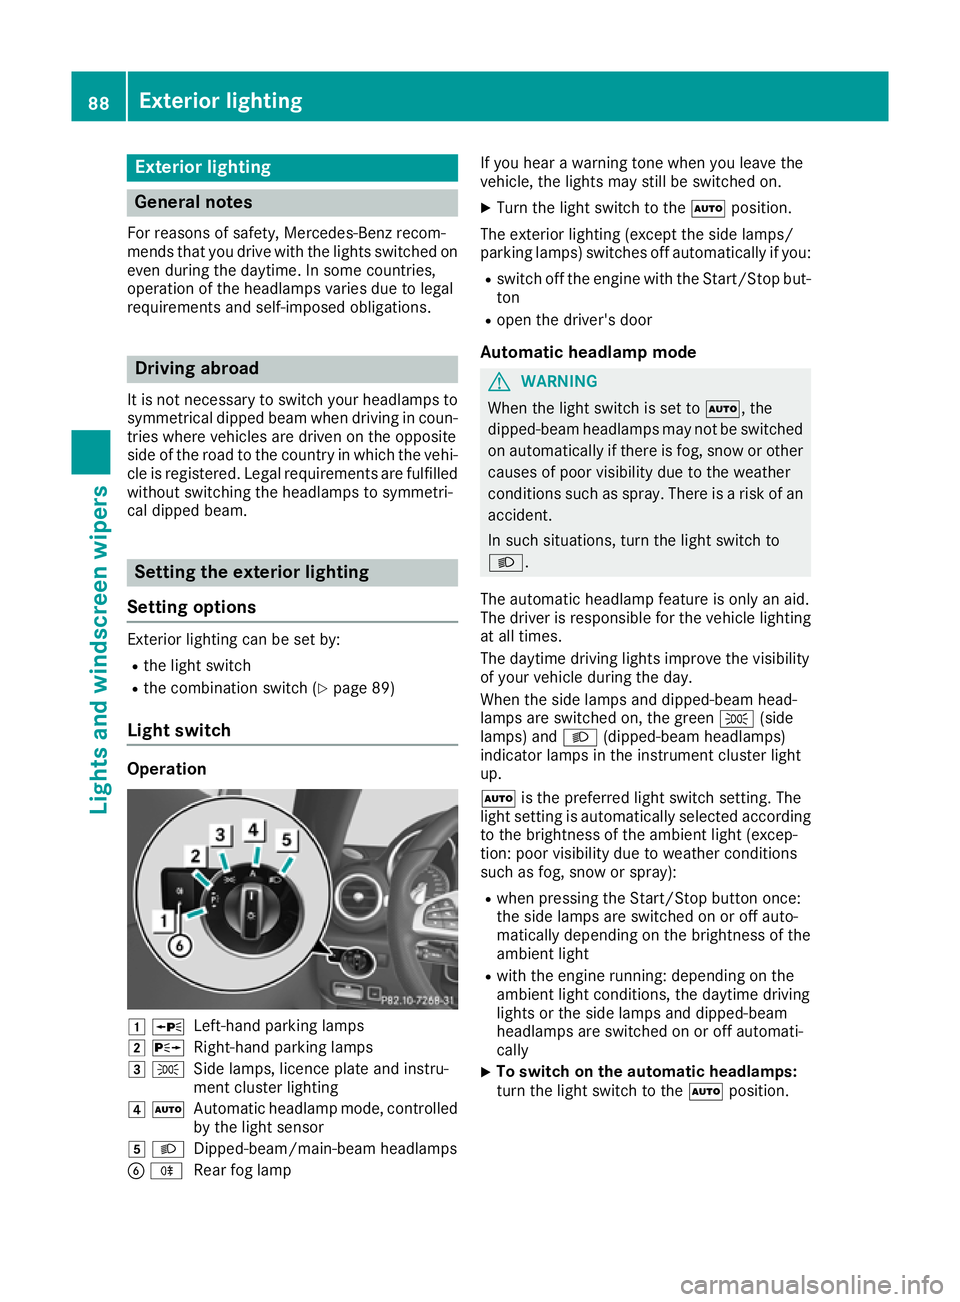
Light switch Operation
1
W
Left-hand parking lamps
2 X
Right-hand parking lamps
3 T
Side lamps, licence plate and instru-
ment cluster lighting
4 Ã
Automatic headlamp mode, controlled
by the light sensor
5 L
Dipped-beam/main-beam headlamps
B R
Rear fog lamp If you hear a warning tone when you leave the
vehicle, the lights may still be switched on.
X Turn the light switch to the Ãposition.
The exterior lighting (except the side lamps/
parking lamps) switches off automatically if you: R switch off the engine with the Start/Stop but-
ton
R open the driver's door
Automatic headlamp mode G
WARNING
When the light switch is set to Ã, the
dipped-beam headlamps may not be switched on automatically if there is fog, snow or othercauses of poor visibility due to the weather
conditions such as spray. There is a risk of an
accident.
In such situations, turn the light switch to
L.
The automatic headlamp feature is only an aid.
The driver is responsible for the vehicle lighting at all times.
The daytime driving lights improve the visibility
of your vehicle during the day.
When the side lamps and dipped-beam head-
lamps are switched on, the green T(side
lamps) and L(dipped-beam headlamps)
indicator lamps in the instrument cluster light
up.
à is the preferred light switch setting. The
light setting is automatically selected according to the brightness of the ambient light (excep-
tion: poor visibility due to weather conditions
such as fog, snow or spray):
R when pressing the Start/Stop button once:
the side lamps are switched on or off auto-
matically depending on the brightness of the
ambient light
R with the engine running: depending on the
ambient light conditions, the daytime driving
lights or the side lamps and dipped-beam
headlamps are switched on or off automati-
cally
X To switch on the automatic headlamps:
turn the light switch to the
Ãposition. 88
Exterior lightingLights and windscreen wipers
Page 93 of 289
X
Press the combination switch beyond the
pressure point in the direction of arrow :.
In the Ãposition, the main-beam head-
lamps are only switched on when it is dark and the engine is running.
The K indicator lamp in the instrument
cluster lights up when the main-beam head-
lamps are switched on.
X To switch off the main-beam headlamps:
move the combination switch back to its nor-
mal position.
The K indicator lamp in the instrument
cluster goes out.
Vehicles with Adaptive Highbeam Assist: when
Adaptive Highbeam Assist is active, it controls
switching on/off of the main-beam headlamps
(Y page 90).
X To flash the headlamps: pull the combina-
tion switch in the direction of arrow =.Hazard warning lamps
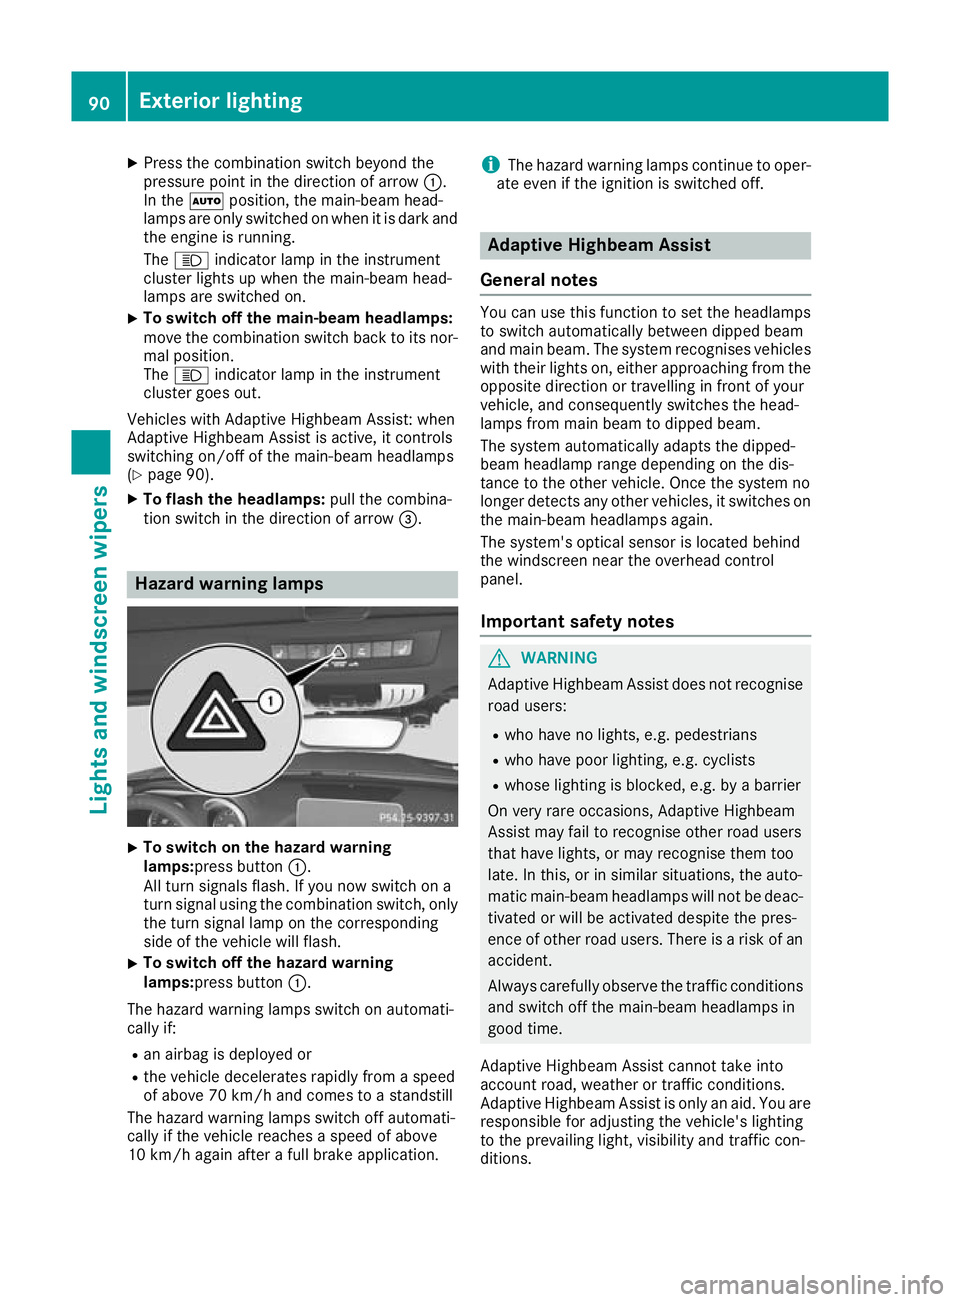
X
To switch on the hazard warning
lamps:press button
:.
All turn signals flash. If you now switch on a
turn signal using the combination switch, only the turn signal lamp on the corresponding
side of the vehicle will flash.
X To switch off the hazard warning
lamps:press button
:.
The hazard warning lamps switch on automati-
cally if:
R an airbag is deployed or
R the vehicle decelerates rapidly from a speed
of above 70 km/h and comes to a standstill
The hazard warning lamps switch off automati-
cally if the vehicle reaches a speed of above
10 km/h again after a full brake application. i
The hazard warning lamps continue to oper-
ate even if the ignition is switched off. Adaptive Highbeam Assist
General notes You can use this function to set the headlamps
to switch automatically between dipped beam
and main beam. The system recognises vehicles
with their lights on, either approaching from the opposite direction or travelling in front of your
vehicle, and consequently switches the head-
lamps from main beam to dipped beam.
The system automatically adapts the dipped-
beam headlamp range depending on the dis-
tance to the other vehicle. Once the system no
longer detects any other vehicles, it switches on the main-beam headlamps again.
The system's optical sensor is located behind
the windscreen near the overhead control
panel.
Important safety notes G
WARNING
Adaptive Highbeam Assist does not recognise road users:
R who have no lights, e.g. pedestrians
R who have poor lighting, e.g. cyclists
R whose lighting is blocked, e.g. by a barrier
On very rare occasions, Adaptive Highbeam
Assist may fail to recognise other road users
that have lights, or may recognise them too
late. In this, or in similar situations, the auto-
matic main-beam headlamps will not be deac-
tivated or will be activated despite the pres-
ence of other road users. There is a risk of an accident.
Always carefully observe the traffic conditions and switch off the main-beam headlamps in
good time.
Adaptive Highbeam Assist cannot take into
account road, weather or traffic conditions.
Adaptive Highbeam Assist is only an aid. You are
responsible for adjusting the vehicle's lighting
to the prevailing light, visibility and traffic con-
ditions. 90
Exterior lightingLights and windscreen wipers
Page 94 of 289
In particular, the detection of obstacles can be
restricted if there is:
R poor visibility, e.g. due to fog, heavy rain or
snow
R dirt on the sensors or if the sensors are
obscured
Switching Adaptive Highbeam Assist
on/off X
To switch on: turn the light switch to the
à position.
X Press the combination switch beyond the
pressure point in the direction of arrow :.
The _ indicator lamp in the multifunction
display lights up when it is dark and the light
sensor switches on the dipped-beam head-
lamps.
If you are driving at speeds above approx-
imately 25 km/h:
The headlamp range is set automatically
depending on the distance between the vehi-
cle and other road users.
If you are driving at speeds above approx-
imately 30 km/h and no other road users are detected:
The main-beam headlamps are switched on
automatically. The Kindicator lamp in the
instrument cluster also lights up.
If you are driving at speeds below approx-
imately 25 km/h or other road users are
detected or the roads are adequately lit:
The main-beam headlamps are switched off
automatically. The Kindicator lamp in the
instrument cluster goes out. The _indi-
cator lamp in the multifunction display
remains lit.
X To switch off:move the combination switch
back to its normal position or move the light
switch to another position.
The _ indicator lamp in the instrument
cluster goes out. Headlamps misted up on the inside
Certain climatic and physical conditions may
cause moisture to form in the headlamp. This
moisture does not affect the functionality of the headlamp. Interior lighting
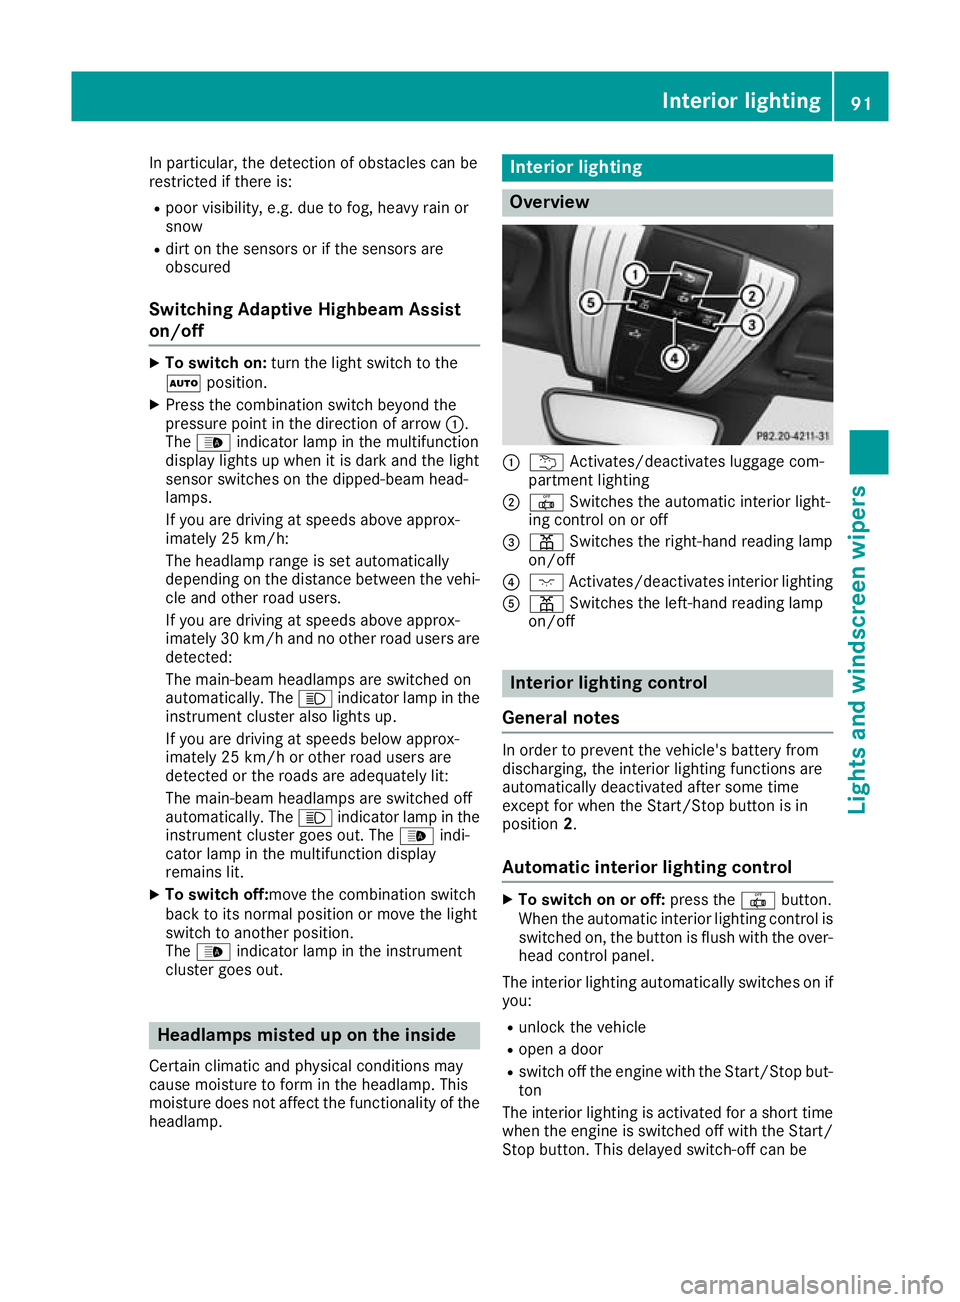
Overview
:
u Activates/deactivates luggage com-
partment lighting
; | Switches the automatic interior light-
ing control on or off
= p Switches the right-hand reading lamp
on/off
? c Activates/deactivates interior lighting
A p Switches the left-hand reading lamp
on/off Interior lighting control
General notes In order to prevent the vehicle's battery from
discharging, the interior lighting functions are
automatically deactivated after some time
except for when the Start/Stop button is in
position
2.
Automatic interior lighting control X
To switch on or off: press the|button.
When the automatic interior lighting control is
switched on, the button is flush with the over- head control panel.
The interior lighting automatically switches on if
you:
R unlock the vehicle
R open a door
R switch off the engine with the Start/Stop but-
ton
The interior lighting is activated for a short time when the engine is switched off with the Start/
Stop button. This delayed switch-off can be Interior lighting
91Lights and windscreen wipers Z
Page 105 of 289
!
Do not warm up the engine when the vehicle
is stationary. Drive off immediately. Avoid
high engine speeds and driving at full throttle
until the engine has reached its operating
temperature.
Only shift the automatic transmission to the
desired drive position when the vehicle is sta- tionary.
Where possible, avoid spinning the drive
wheels when pulling away on slippery roads.
You could otherwise damage the drive train.
! During a cold start with low engine oil tem-
peratures (below 0 †), the maximum engine
speed is restricted in order to protect the
engine. To protect the engine and maintain
smooth engine operation, avoid driving at full throttle when the engine is cold. Key positions
Start/Stop button General notes
All vehicles are equipped with a Start/Stop but-
ton.
The Start/Stop button is located on the centre
console and is illuminated when the vehicle is
unlocked.
The key must be in the vehicle.
Pressing the Start/Stop button several times in
succession corresponds to the different key
positions in the ignition lock. This is only the
case if you are not depressing the brake pedal.
If you depress the brake pedal and press the
Start/Stop button, the engine starts immedi-
ately.
A check which periodically establishes a radio
connection between the vehicle and the key
determines whether a valid key is in the vehicle. This occurs, for example, when starting the
engine.
If there is a key in the ignition lock, this takes
precedence over the KEYLESS-GO start func-
tion.
To start the vehicle without actively using the
key:
R the key must be in the vehicle
R the vehicle must not be locked with the key or
KEYLESS-GO (Y page 64) Do not keep the key:
R
with electronic devices, e.g. a mobile phone
or another key
R with metallic objects, e.g. coins or metal film
R inside metallic objects, e.g. a metal case
This can affect the key's functionality.
If you lock the vehicle with the key's remote
control or with KEYLESS-GO, after a short time:
R you will not be able to switch on the ignition
with the Start/Stop button
R you will not be able to start the engine with the
Start/Stop button until the vehicle is
unlocked again
If you lock the vehicle centrally using the button
on the driver's door (Y page 70), you can con-
tinue to start the engine with the Start/Stop
button.
The engine can be switched off while the vehicle is in motion by pressing and holding the Start/
Stop button for three seconds. This function
operates independently of the ECO start/stop
automatic engine switch-off function.
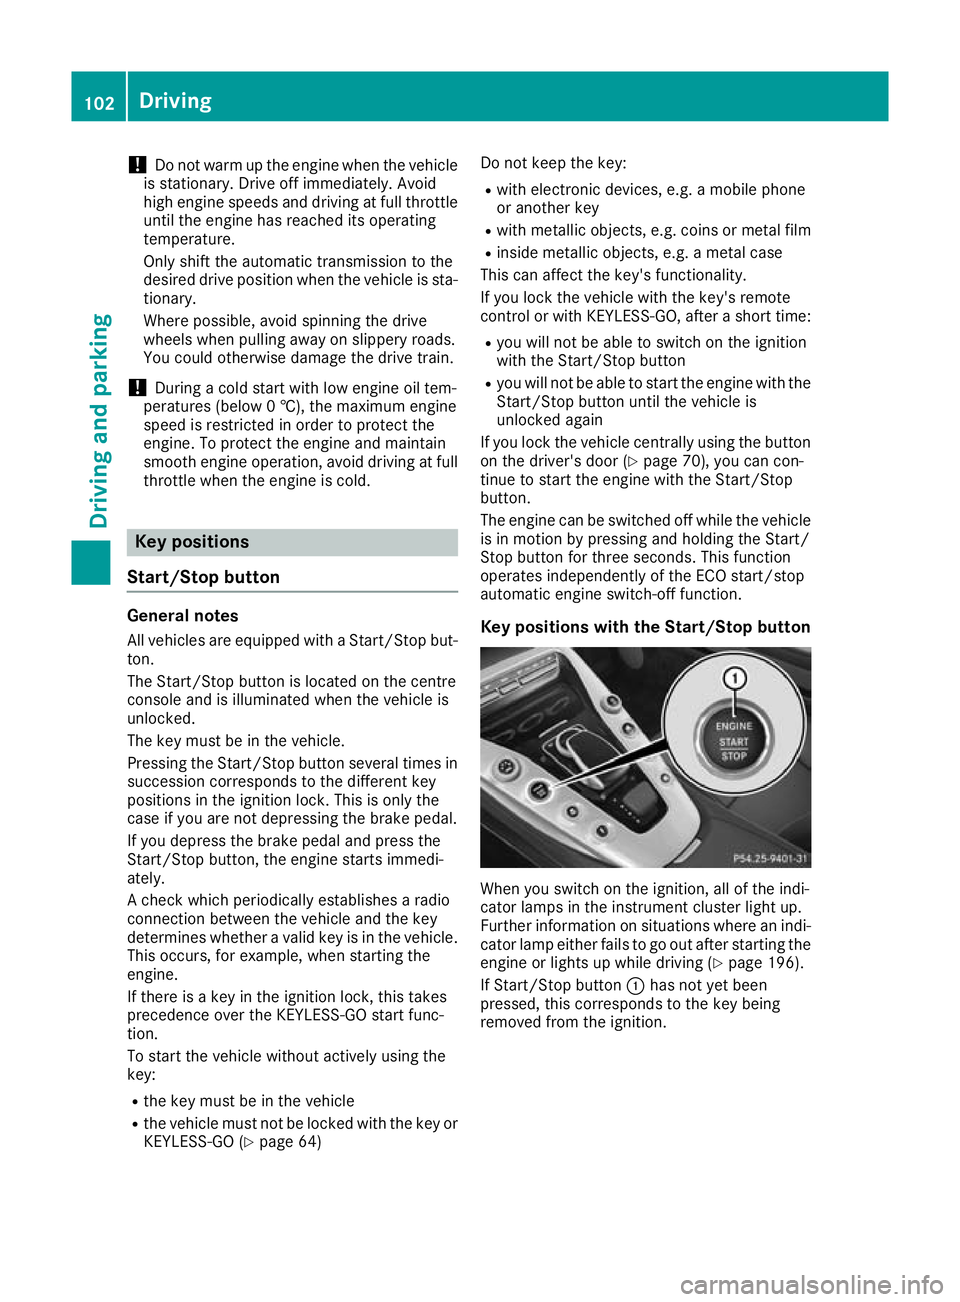
Key positions with the Start/Stop button When you switch on the ignition, all of the indi-
cator lamps in the instrument cluster light up.
Further information on situations where an indi-
cator lamp either fails to go out after starting the engine or lights up while driving (Y page 196).
If Start/Stop button :has not yet been
pressed, this corresponds to the key being
removed from the ignition. 102
DrivingDriving and parking
Page 107 of 289

General notes
The catalytic converter is preheated for up to
30 seconds after a cold start. The sound of the
engine may change during this time.
AMG SPEEDSHIFT DCT 7-speed sport
transmission X
Shift the transmission to position P
(Y page 109).
The transmission position indicator in the
multifunction display shows P(Y page 111).
You can start the engine in transmission posi-
tion Pand N.
Starting procedure using the Start/
Stop button The Start/Stop button can be used to start the
vehicle manually without inserting the key into
the ignition lock. You merely need to carry the
key on your person. This mode for starting the
engine operates independently of the ECO
start/stop automatic engine start function.
You can start the engine if a valid key is in the
vehicle. Switch off the engine and always take
the key with you when leaving the vehicle, even if you only leave it for a short time. Pay attention
to the important safety notes.
X Depress the brake pedal and keep it
depressed.
X Press the Start/Stop button once
(Y page 102).
The engine starts.
Starting procedure with the key X
Turn the key to position 3(Y page 103) in the
ignition lock and release it as soon as the
engine is running.
If the engine will not start: X Remove the key from the ignition lock.
X Reinsert the key into the ignition lock after
waiting for a short period.
X Turn the key to position 2in the ignition lock
(Y page 103).
The indicator lamps in the instrument cluster
light up (Y page 195).
X Turn the key to position 3(Y page 103)in the
ignition lock and release it as soon as the
engine is running. Pulling away
General notes G
WARNING
If the engine speed is above the idling speed
and you engage transmission position Dor R,
the vehicle could pull away suddenly. There is a risk of an accident.
When engaging transmission position Dor R,
always firmly depress the brake pedal and do not simultaneously accelerate.
Depress the accelerator carefully when pulling
away.
The vehicle locks centrally once you have pulled
away. The locking knobs in the doors drop down.
You can open the doors from the inside at any
time.
You can also deactivate the automatic locking
feature (Y page 70).
It is only possible to shift the transmission from position Pto the desired position, if:
R the engine is running and
R you depress the brake pedal
If you do not depress the brake pedal, the E-
SELECT lever can still be moved but the parking lock remains applied.
Information on automatically releasing the elec-
trical parking brake (Y page 122).
Hill start assist Hill start assist helps you when pulling away for-
wards or in reverse on an uphill gradient. It holds
the vehicle for a short time after you have
removed your foot from the brake pedal. This
gives you enough time to move your foot from
the brake pedal to the accelerator pedal and
depress it before the vehicle begins to roll. G
WARNING
After a while, hill start assist no longer holds
the vehicle and it may roll away. There is a risk of an accident and injury.
Therefore, quickly move your foot from the
brake pedal to the accelerator pedal. Never
leave the vehicle when it is held by hill start
assist. 104
DrivingDriving and parking
Page 110 of 289

Setting the volume:
X Press button :.
If you select the loudest setting, indicator
lamp ;lights up. You can also adjust the position of the exhaust
flap using the:
R DYNAMIC SELECT controller (Y page 108)
R Multimedia system Problems with the engine
Problem
Possible causes/consequences and
M MSolutions The engine does not
start. The HOLD function or DISTRONIC PLUS is activated.
X Deactivate the HOLD function (Y page 138) or DISTRONIC PLUS
(Y page 130).
X Start the engine again (Y page 103).The engine does not
start. The starter motor
can be heard. R
The engine electronics are malfunctioning.
R The fuel supply is malfunctioning.
Before attempting to restart the engine:
X Press the Start/Stop button repeatedly until all indicator lamps on
the instrument cluster go out.
or X Turn the key back to position 0in the ignition lock.
X Restart the engine (Y page 103). Avoid excessively long and fre-
quent attempts to start the engine, as this will drain the battery.
If the engine does not start after several attempts: X Consult a qualified specialist workshop. The engine does not
start. The starter motor
can be heard. The
reserve fuel warning
lamp is lit and the fuel
gauge display is at the
reserve level. The fuel tank is empty.
X Refuel the vehicle. The engine does not
start. You cannot hear
the starter motor. The on-board voltage is too low because the battery is too weak or
discharged.
X Jump-start the vehicle (Y page 253).
If the engine does not start despite attempts to jump-start it:
X Consult a qualified specialist workshop. The starter motor was exposed to excessively high thermal load.
X Start the engine again (Y page 103).
If the engine still does not start: X Consult a qualified specialist workshop. Driving
107Driving and parking Z
Page 119 of 289
ommended gear is shown in the multifunction
display.
X Shift to recommended gear ;according to
gearshift recommendation :when shown in
the multifunction display of the instrument
cluster.
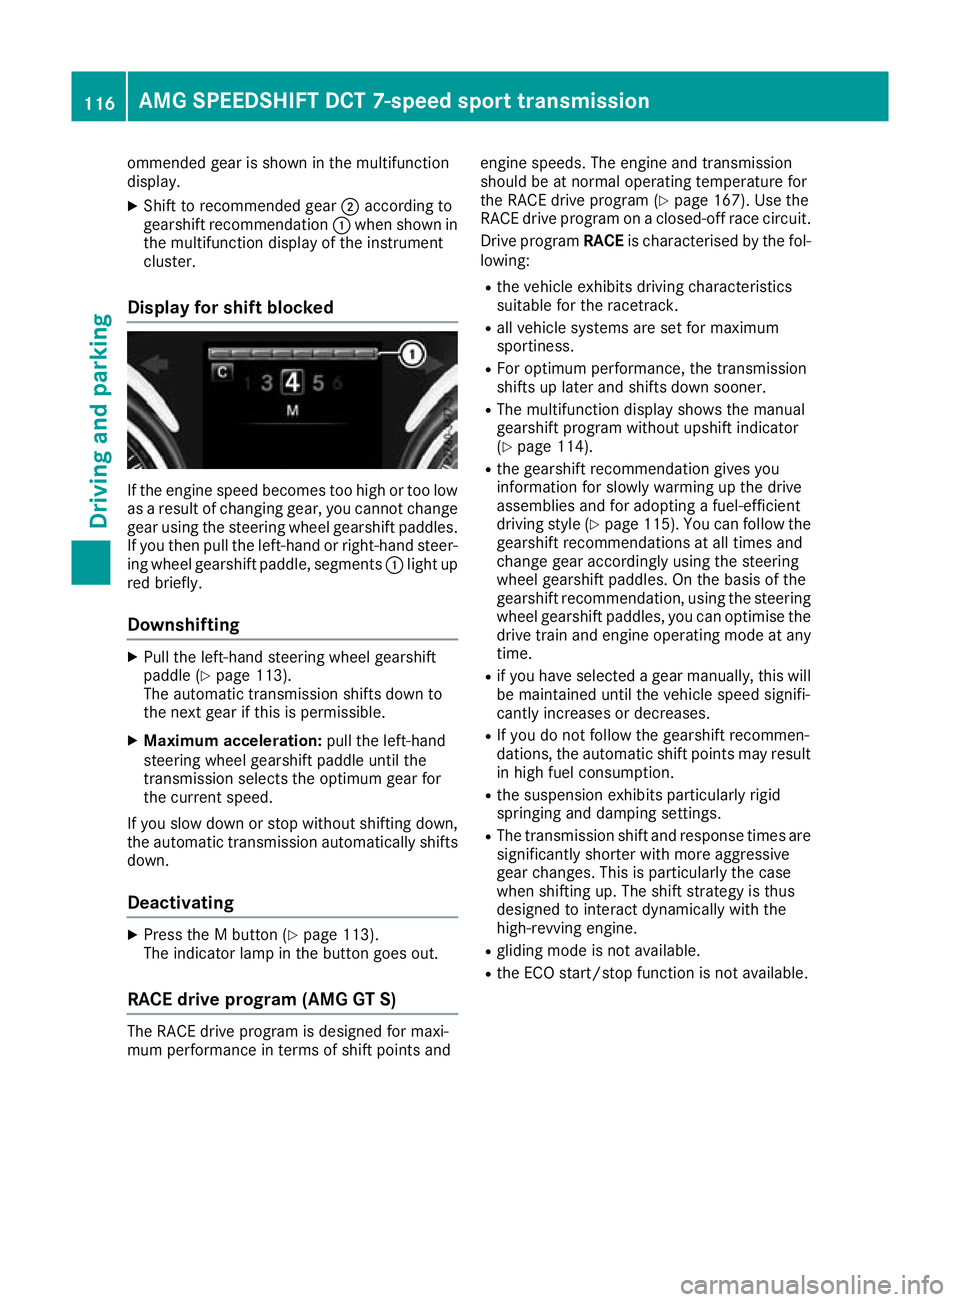
Display for shift blocked If the engine speed becomes too high or too low
as a result of changing gear, you cannot change
gear using the steering wheel gearshift paddles.
If you then pull the left-hand or right-hand steer- ing wheel gearshift paddle, segments :light up
red briefly.
Downshifting X
Pull the left-hand steering wheel gearshift
paddle (Y page 113).
The automatic transmission shifts down to
the next gear if this is permissible.
X Maximum acceleration: pull the left-hand
steering wheel gearshift paddle until the
transmission selects the optimum gear for
the current speed.
If you slow down or stop without shifting down,
the automatic transmission automatically shifts
down.
Deactivating X
Press the M button (Y page 113).
The indicator lamp in the button goes out.
RACE drive program (AMG GT S) The RACE drive program is designed for maxi-
mum performance in terms of shift points and engine speeds. The engine and transmission
should be at normal operating temperature for
the RACE drive program (Y
page 167). Use the
RACE drive program on a closed-off race circuit.
Drive program RACEis characterised by the fol-
lowing:
R the vehicle exhibits driving characteristics
suitable for the racetrack.
R all vehicle systems are set for maximum
sportiness.
R For optimum performance, the transmission
shifts up later and shifts down sooner.
R The multifunction display shows the manual
gearshift program without upshift indicator
(Y page 114).
R the gearshift recommendation gives you
information for slowly warming up the drive
assemblies and for adopting a fuel-efficient
driving style (Y page 115). You can follow the
gearshift recommendations at all times and
change gear accordingly using the steering
wheel gearshift paddles. On the basis of the
gearshift recommendation, using the steering wheel gearshift paddles, you can optimise the
drive train and engine operating mode at any
time.
R if you have selected a gear manually, this will
be maintained until the vehicle speed signifi-
cantly increases or decreases.
R If you do not follow the gearshift recommen-
dations, the automatic shift points may result
in high fuel consumption.
R the suspension exhibits particularly rigid
springing and damping settings.
R The transmission shift and response times are
significantly shorter with more aggressive
gear changes. This is particularly the case
when shifting up. The shift strategy is thus
designed to interact dynamically with the
high-revving engine.
R gliding mode is not available.
R the ECO start/stop function is not available. 116
AMG SPEEDSHIFT DCT 7-speed sport transmissionDriving and parking