2016 MERCEDES-BENZ AMG GT ROADSTER tailgate
[x] Cancel search: tailgatePage 74 of 289
X
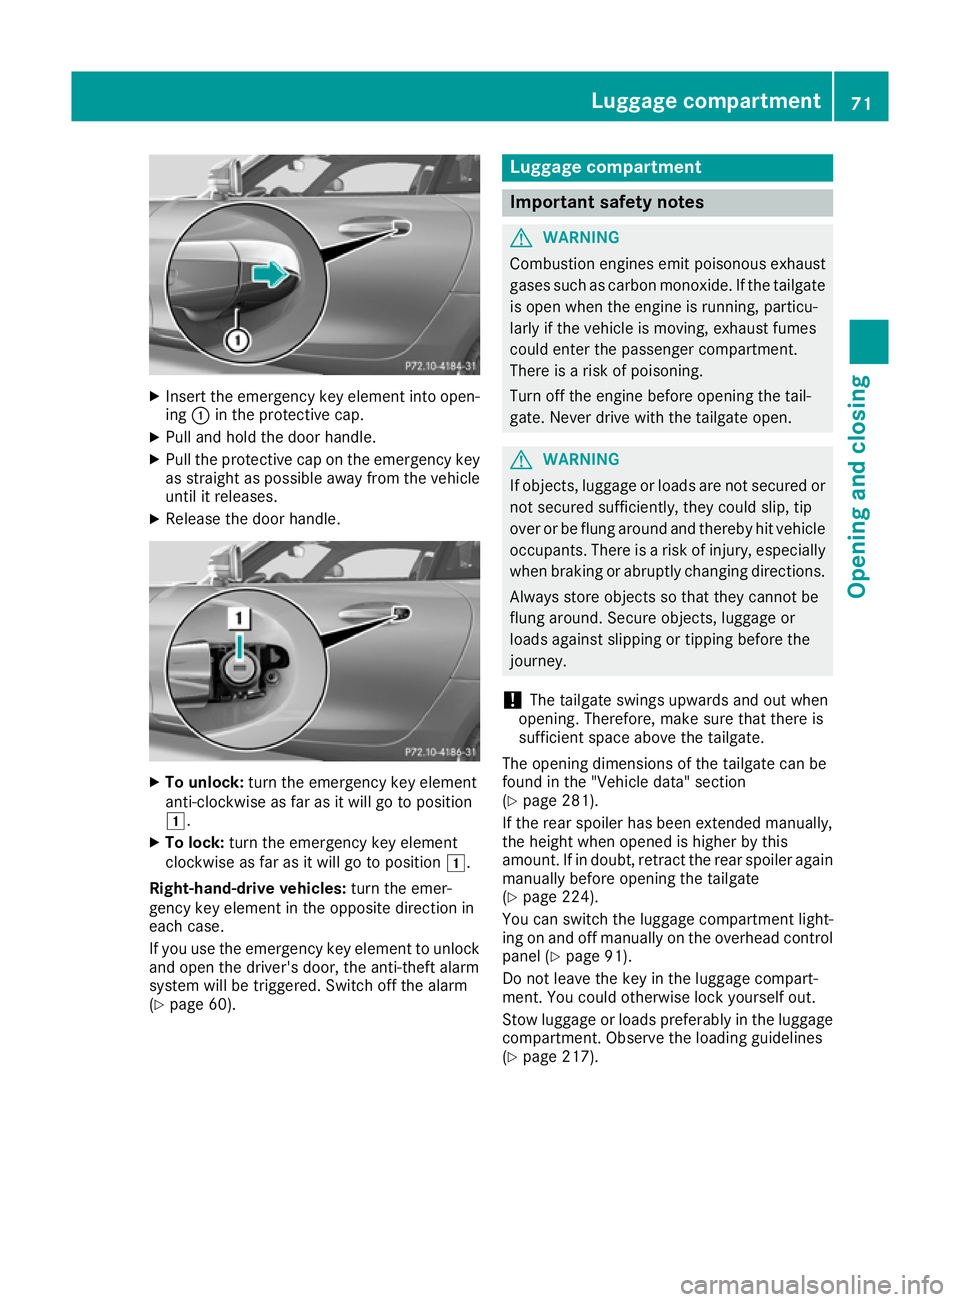
Insert the emergency key element into open-
ing :in the protective cap.
X Pull and hold the door handle.
X Pull the protective cap on the emergency key
as straight as possible away from the vehicle until it releases.
X Release the door handle. X
To unlock: turn the emergency key element
anti-clockwise as far as it will go to position
1.
X To lock: turn the emergency key element
clockwise as far as it will go to position 1.
Right-hand-drive vehicles: turn the emer-
gency key element in the opposite direction in
each case.
If you use the emergency key element to unlock
and open the driver's door, the anti-theft alarm
system will be triggered. Switch off the alarm
(Y page 60). Luggage compartment
Important safety notes
G
WARNING
Combustion engines emit poisonous exhaust
gases such as carbon monoxide. If the tailgate is open when the engine is running, particu-
larly if the vehicle is moving, exhaust fumes
could enter the passenger compartment.
There is a risk of poisoning.
Turn off the engine before opening the tail-
gate. Never drive with the tailgate open. G
WARNING
If objects, luggage or loads are not secured or not secured sufficiently, they could slip, tip
over or be flung around and thereby hit vehicle
occupants. There is a risk of injury, especially when braking or abruptly changing directions.
Always store objects so that they cannot be
flung around. Secure objects, luggage or
loads against slipping or tipping before the
journey.
! The tailgate swings upwards and out when
opening. Therefore, make sure that there is
sufficient space above the tailgate.
The opening dimensions of the tailgate can be
found in the "Vehicle data" section
(Y page 281).
If the rear spoiler has been extended manually,
the height when opened is higher by this
amount. If in doubt, retract the rear spoiler again manually before opening the tailgate
(Y page 224).
You can switch the luggage compartment light-
ing on and off manually on the overhead control
panel (Y page 91).
Do not leave the key in the luggage compart-
ment. You could otherwise lock yourself out.
Stow luggage or loads preferably in the luggage compartment. Observe the loading guidelines
(Y page 217). Luggage compartment
71Opening and closing Z
Page 75 of 289
Opening/closing from outside
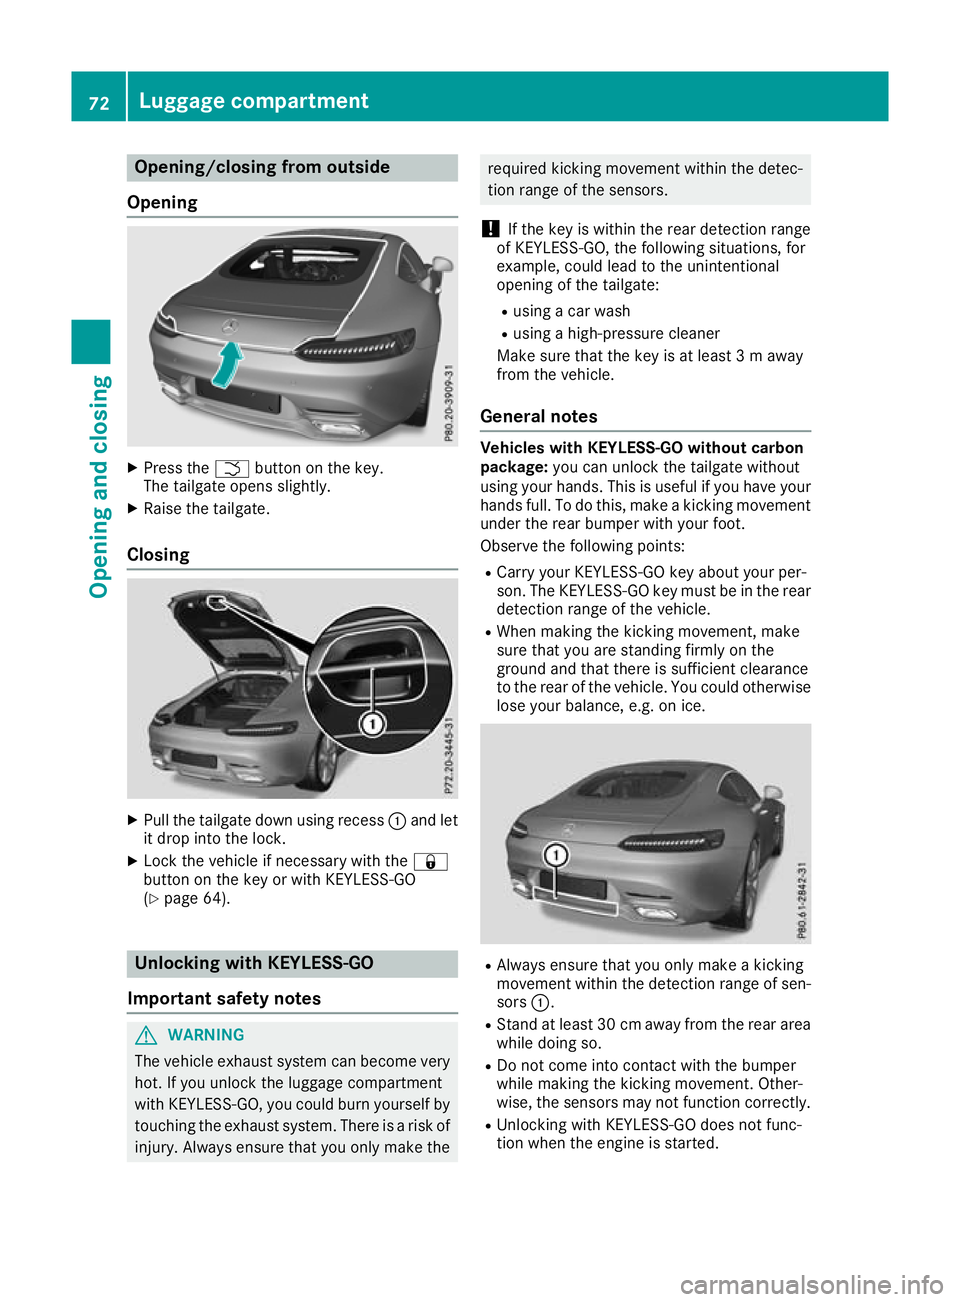
Opening X
Press the Fbutton on the key.
The tailgate opens slightly.
X Raise the tailgate.
Closing X
Pull the tailgate down using recess :and let
it drop into the lock.
X Lock the vehicle if necessary with the &
button on the key or with KEYLESS-GO
(Y page 64). Unlocking with KEYLESS-GO
Important safety notes G
WARNING
The vehicle exhaust system can become very
hot. If you unlock the luggage compartment
with KEYLESS-GO, you could burn yourself by touching the exhaust system. There is a risk of
injury. Always ensure that you only make the required kicking movement within the detec-
tion range of the sensors.
! If the key is within the rear detection range
of KEYLESS-GO, the following situations, for
example, could lead to the unintentional
opening of the tailgate:
R using a car wash
R using a high-pressure cleaner
Make sure that the key is at least 3 m away
from the vehicle.
General notes Vehicles with KEYLESS-GO without carbon
package:
you can unlock the tailgate without
using your hands. This is useful if you have your hands full. To do this, make a kicking movement
under the rear bumper with your foot.
Observe the following points:
R Carry your KEYLESS-GO key about your per-
son. The KEYLESS-GO key must be in the rear
detection range of the vehicle.
R When making the kicking movement, make
sure that you are standing firmly on the
ground and that there is sufficient clearance
to the rear of the vehicle. You could otherwise
lose your balance, e.g. on ice. R
Always ensure that you only make a kicking
movement within the detection range of sen- sors :.
R Stand at least 30 cm away from the rear area
while doing so.
R Do not come into contact with the bumper
while making the kicking movement. Other-
wise, the sensors may not function correctly.
R Unlocking with KEYLESS-GO does not func-
tion when the engine is started. 72
Luggage compartmentOpening and closing
Page 76 of 289
R
Dirt caused by road salt around sensors :
may restrict functionality.
Using HANDS-FREE ACCESS with a pros-
thetic leg may restrict functionality.
R If a KEYLESS-GO key is within the rear detec-
tion range of KEYLESS-GO, the sensors could be triggered. Therefore, the tailgate cannot beunlocked unintentionally if, for example, you:
- sit on the edge of the luggage compartment
- set down or lift up an object behind the
vehicle
- polish the rear of the vehicle
Do not carry the KEYLESS-GO key about your
person in such situations. This prevents the
tailgate from being unlocked unintentionally.
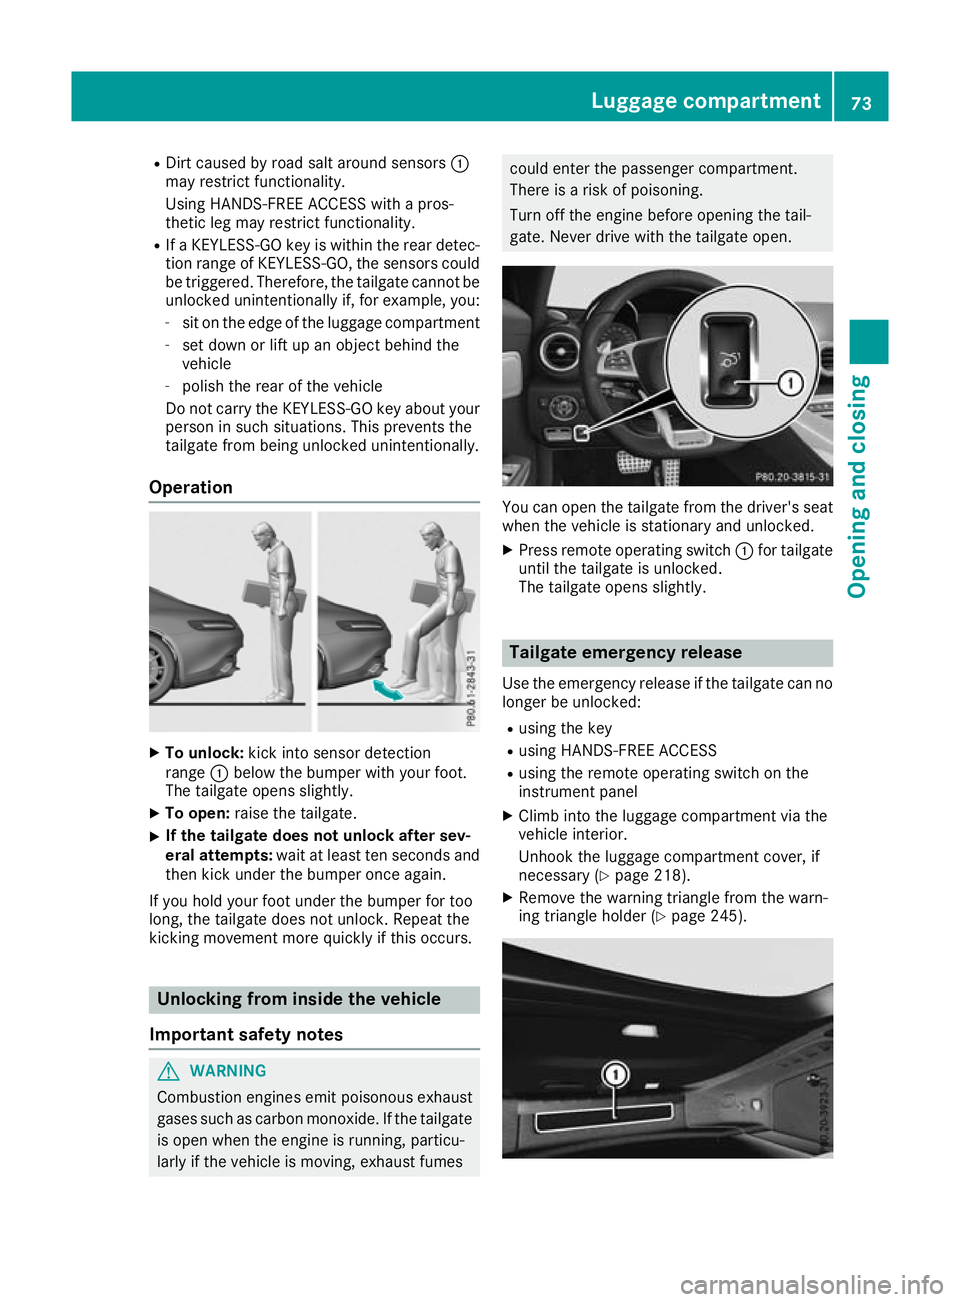
Operation X
To unlock: kick into sensor detection
range :below the bumper with your foot.
The tailgate opens slightly.
X To open: raise the tailgate.
X If the tailgate does not unlock after sev-
eral attempts: wait at least ten seconds and
then kick under the bumper once again.
If you hold your foot under the bumper for too
long, the tailgate does not unlock. Repeat the
kicking movement more quickly if this occurs. Unlocking from inside the vehicle
Important safety notes G
WARNING
Combustion engines emit poisonous exhaust
gases such as carbon monoxide. If the tailgate is open when the engine is running, particu-
larly if the vehicle is moving, exhaust fumes could enter the passenger compartment.
There is a risk of poisoning.
Turn off the engine before opening the tail-
gate. Never drive with the tailgate open.
You can open the tailgate from the driver's seat
when the vehicle is stationary and unlocked.
X Press remote operating switch :for tailgate
until the tailgate is unlocked.
The tailgate opens slightly. Tailgate emergency release
Use the emergency release if the tailgate can no
longer be unlocked:
R using the key
R using HANDS-FREE ACCESS
R using the remote operating switch on the
instrument panel
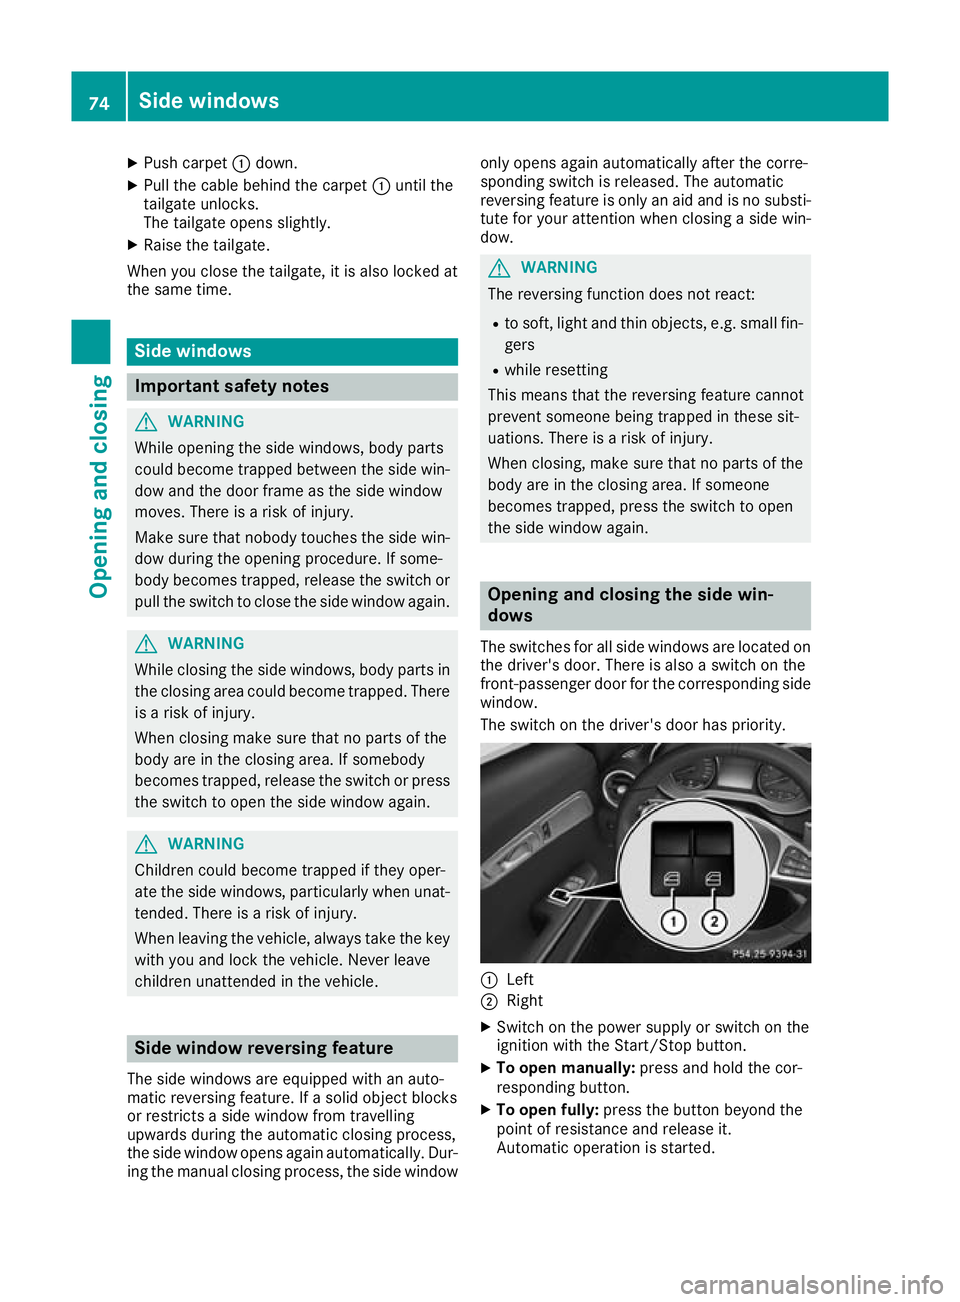
X Climb into the luggage compartment via the
vehicle interior.
Unhook the luggage compartment cover, if
necessary (Y page 218).
X Remove the warning triangle from the warn-
ing triangle holder (Y page 245). Luggage compartment
73Opening and closing Z
Page 77 of 289
X
Push carpet :down.
X Pull the cable behind the carpet :until the
tailgate unlocks.
The tailgate opens slightly.
X Raise the tailgate.
When you close the tailgate, it is also locked at
the same time. Side windows
Important safety notes
G
WARNING
While opening the side windows, body parts
could become trapped between the side win- dow and the door frame as the side window
moves. There is a risk of injury.
Make sure that nobody touches the side win-
dow during the opening procedure. If some-
body becomes trapped, release the switch or pull the switch to close the side window again. G
WARNING
While closing the side windows, body parts in the closing area could become trapped. There is a risk of injury.
When closing make sure that no parts of the
body are in the closing area. If somebody
becomes trapped, release the switch or press
the switch to open the side window again. G
WARNING
Children could become trapped if they oper-
ate the side windows, particularly when unat- tended. There is a risk of injury.
When leaving the vehicle, always take the key
with you and lock the vehicle. Never leave
children unattended in the vehicle. Side window reversing feature
The side windows are equipped with an auto-
matic reversing feature. If a solid object blocks
or restricts a side window from travelling
upwards during the automatic closing process,
the side window opens again automatically. Dur- ing the manual closing process, the side window only opens again automatically after the corre-
sponding switch is released. The automatic
reversing feature is only an aid and is no substi-
tute for your attention when closing a side win-
dow. G
WARNING
The reversing function does not react:
R to soft, light and thin objects, e.g. small fin-
gers
R while resetting
This means that the reversing feature cannot
prevent someone being trapped in these sit-
uations. There is a risk of injury.
When closing, make sure that no parts of the
body are in the closing area. If someone
becomes trapped, press the switch to open
the side window again. Opening and closing the side win-
dows
The switches for all side windows are located on
the driver's door. There is also a switch on the
front-passenger door for the corresponding side
window.
The switch on the driver's door has priority. :
Left
; Right
X Switch on the power supply or switch on the
ignition with the Start/Stop button.
X To open manually: press and hold the cor-
responding button.
X To open fully: press the button beyond the
point of resistance and release it.
Automatic operation is started. 74
Side windowsOpening and closing
Page 125 of 289
In addition, at least one of the following condi-
tions must be fulfilled:
R there is a system malfunction
R the power supply is insufficient
R the vehicle is stationary for a lengthy period
The red !indicator lamp in the instrument
cluster lights up.
The electric parking brake is not automatically
applied if the engine is switched off by the ECO start/stop function.
Releasing automatically The electric parking brake of your vehicle is
released automatically when all the following
conditions are fulfilled:
R the engine is running
R the transmission is in position Dor R
R the seat belt is fastened
R you depress the accelerator pedal
If the transmission is in position R, the tailgate
must be closed.
If your seat belt is not fastened, the following
conditions must be fulfilled for the electric park- ing brake to be released automatically:
R the driver's door is closed
R you are shifting from transmission position P
or you have previously driven at speeds
greater than 3 km/h
Ensure that you do not depress the accelerator
pedal unintentionally. Otherwise, the parking
brake will be released and the vehicle will start
to move.
Emergency braking The vehicle can also be braked during an emer-
gency by using the electric parking brake.
X While driving, push handle :of the electric
parking brake (Y page 121).
The vehicle is braked as long as you keep
handle :of the electric parking brake
pressed. The longer electric parking brake
handle :is depressed, the greater the brak-
ing force. During braking:
R a warning tone sounds
R the Release parking brake
Release parking brake display mes-
sage appears
R the red !indicator lamp on the instrument
cluster flashes
When the vehicle has been braked to a stand-
still, the electric parking brake is applied. Parking up the vehicle
General notes If you leave the vehicle parked up for longer than
four weeks, the battery may be damaged by
exhaustive discharging.
If you leave the vehicle parked up for longer than
six weeks, it may suffer from lack of use.
X Contact a qualified specialist workshop and
seek advice.
i You can obtain information about trickle
chargers from a qualified specialist work-
shop.
Charge retention of the on-board elec-
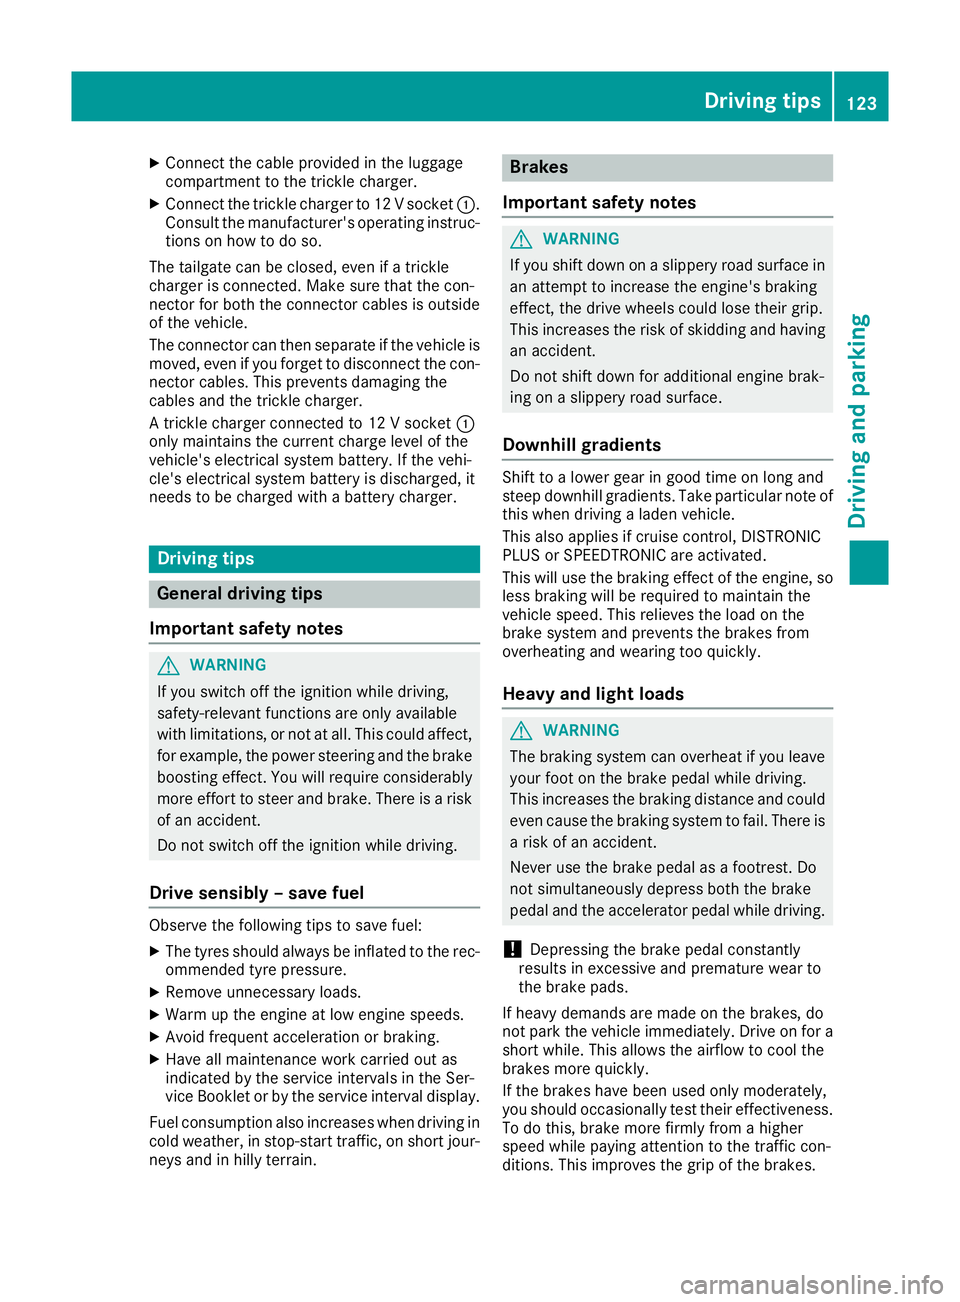
trical system battery The battery may drain if the vehicle is left sta-
tionary for long periods. In this case, Mercedes- Benz recommends attaching the trickle charger
to the 12 V socket in the luggage compartment. A trickle charger can be obtained from a
Mercedes-Benz Service Centre, for example.
X Switch the ignition off.
X Open the tailgate. 122
ParkingDriving and parking
Page 126 of 289
X
Connect the cable provided in the luggage
compartment to the trickle charger.
X Connect the trickle charger to 12 V socket :.
Consult the manufacturer's operating instruc- tions on how to do so.
The tailgate can be closed, even if a trickle
charger is connected. Make sure that the con-
nector for both the connector cables is outside
of the vehicle.
The connector can then separate if the vehicle is
moved, even if you forget to disconnect the con- nector cables. This prevents damaging the
cables and the trickle charger.
A trickle charger connected to 12 V socket :
only maintains the current charge level of the
vehicle's electrical system battery. If the vehi-
cle's electrical system battery is discharged, it
needs to be charged with a battery charger. Driving tips
General driving tips
Important safety notes G
WARNING
If you switch off the ignition while driving,
safety-relevant functions are only available
with limitations, or not at all. This could affect, for example, the power steering and the brake
boosting effect. You will require considerably
more effort to steer and brake. There is a risk of an accident.
Do not switch off the ignition while driving.
Drive sensibly – save fuel Observe the following tips to save fuel:
X The tyres should always be inflated to the rec-
ommended tyre pressure.
X Remove unnecessary loads.
X Warm up the engine at low engine speeds.
X Avoid frequent acceleration or braking.
X Have all maintenance work carried out as
indicated by the service intervals in the Ser-
vice Booklet or by the service interval display.
Fuel consumption also increases when driving in
cold weather, in stop-start traffic, on short jour- neys and in hilly terrain. Brakes
Important safety notes G
WARNING
If you shift down on a slippery road surface in an attempt to increase the engine's braking
effect, the drive wheels could lose their grip.
This increases the risk of skidding and having
an accident.
Do not shift down for additional engine brak-
ing on a slippery road surface.
Downhill gradients Shift to a lower gear in good time on long and
steep downhill gradients. Take particular note of
this when driving a laden vehicle.
This also applies if cruise control, DISTRONIC
PLUS or SPEEDTRONIC are activated.
This will use the braking effect of the engine, so less braking will be required to maintain the
vehicle speed. This relieves the load on the
brake system and prevents the brakes from
overheating and wearing too quickly.
Heavy and light loads G
WARNING
The braking system can overheat if you leave your foot on the brake pedal while driving.
This increases the braking distance and could
even cause the braking system to fail. There is
a risk of an accident.
Never use the brake pedal as a footrest. Do
not simultaneously depress both the brake
pedal and the accelerator pedal while driving.
! Depressing the brake pedal constantly
results in excessive and premature wear to
the brake pads.
If heavy demands are made on the brakes, do
not park the vehicle immediately. Drive on for a
short while. This allows the airflow to cool the
brakes more quickly.
If the brakes have been used only moderately,
you should occasionally test their effectiveness.
To do this, brake more firmly from a higher
speed while paying attention to the traffic con-
ditions. This improves the grip of the brakes. Driving tips
123Driving and parking Z
Page 147 of 289
Reversing camera
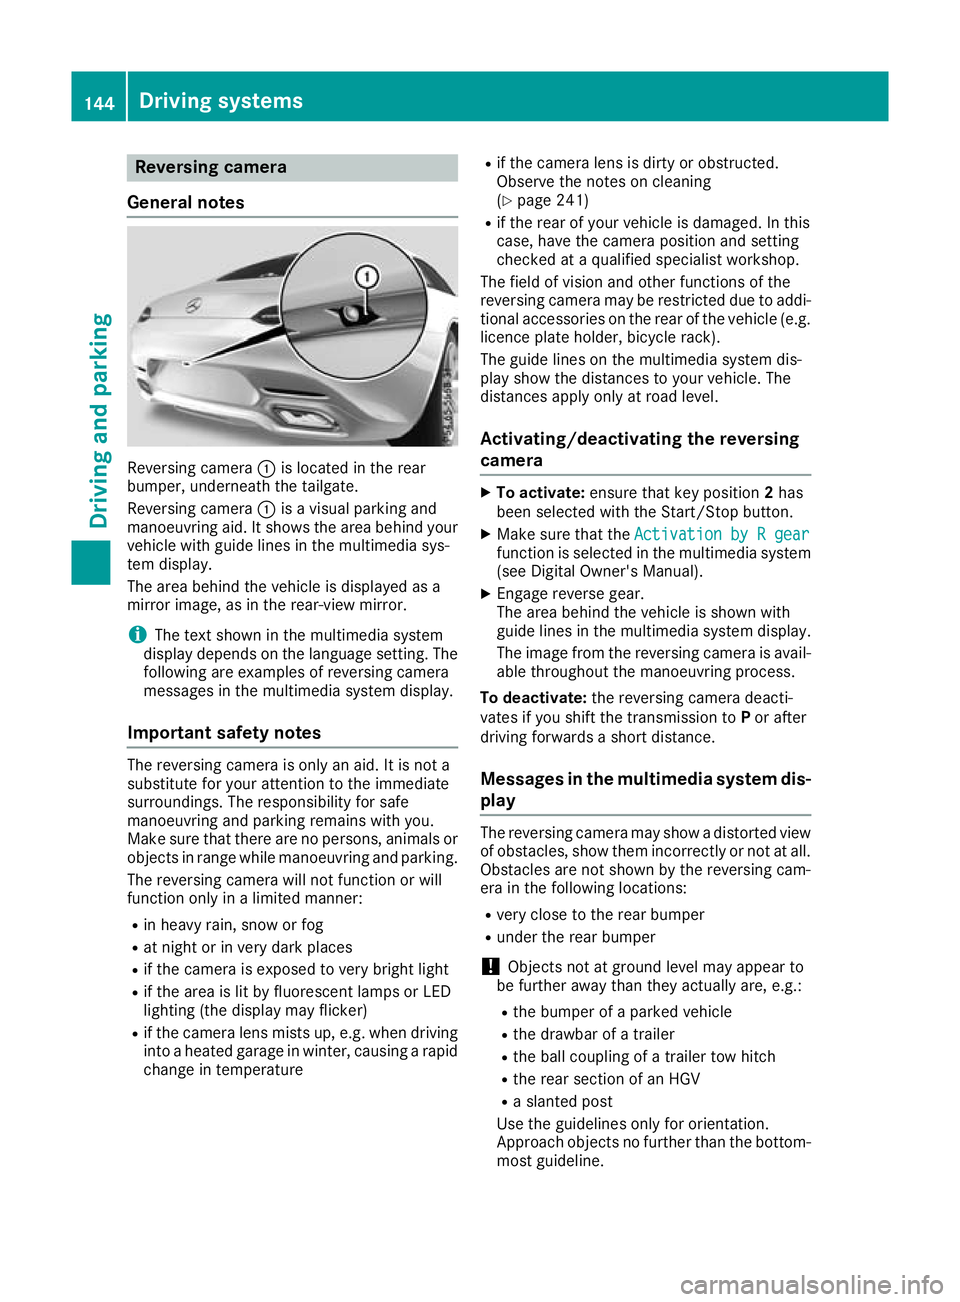
General notes Reversing camera
:is located in the rear
bumper, underneath the tailgate.
Reversing camera :is a visual parking and
manoeuvring aid. It shows the area behind your vehicle with guide lines in the multimedia sys-
tem display.
The area behind the vehicle is displayed as a
mirror image, as in the rear-view mirror.
i The text shown in the multimedia system
display depends on the language setting. The following are examples of reversing camera
messages in the multimedia system display.
Important safety notes The reversing camera is only an aid. It is not a
substitute for your attention to the immediate
surroundings. The responsibility for safe
manoeuvring and parking remains with you.
Make sure that there are no persons, animals or
objects in range while manoeuvring and parking.
The reversing camera will not function or will
function only in a limited manner:
R in heavy rain, snow or fog
R at night or in very dark places
R if the camera is exposed to very bright light
R if the area is lit by fluorescent lamps or LED
lighting (the display may flicker)
R if the camera lens mists up, e.g. when driving
into a heated garage in winter, causing a rapid
change in temperature R
if the camera lens is dirty or obstructed.
Observe the notes on cleaning
(Y page 241)
R if the rear of your vehicle is damaged. In this
case, have the camera position and setting
checked at a qualified specialist workshop.
The field of vision and other functions of the
reversing camera may be restricted due to addi-
tional accessories on the rear of the vehicle (e.g. licence plate holder, bicycle rack).
The guide lines on the multimedia system dis-
play show the distances to your vehicle. The
distances apply only at road level.
Activating/deactivating the reversing
camera X
To activate: ensure that key position 2has
been selected with the Start/Stop button.
X Make sure that the Activation by R gear Activation by R gear
function is selected in the multimedia system (see Digital Owner's Manual).
X Engage reverse gear.
The area behind the vehicle is shown with
guide lines in the multimedia system display.
The image from the reversing camera is avail-
able throughout the manoeuvring process.
To deactivate: the reversing camera deacti-
vates if you shift the transmission to Por after
driving forwards a short distance.
Messages in the multimedia system dis-
play The reversing camera may show a distorted view
of obstacles, show them incorrectly or not at all. Obstacles are not shown by the reversing cam-
era in the following locations:
R very close to the rear bumper
R under the rear bumper
! Objects not at ground level may appear to
be further away than they actually are, e.g.:
R the bumper of a parked vehicle
R the drawbar of a trailer
R the ball coupling of a trailer tow hitch
R the rear section of an HGV
R a slanted post
Use the guidelines only for orientation.
Approach objects no further than the bottom- most guideline. 144
Driving systemsDriving and parking
Page 195 of 289
Display messages
Possible causes/consequences and
M
MSolutions j
Parking lock mal‐ Parking lock mal‐
funct. Apply park‐ funct. Apply park‐
ing brake ing brake Transmission position
Pcannot be selected.
X Make sure that the electric parking brake is applied.
X Safeguard the vehicle against rolling away before you leave it
(Y page 268).
X Consult a qualified specialist workshop. d
Transmission oil Transmission oil
cooling Malfunction cooling Malfunction The transmission coolant pump is faulty. The transmission may over-
heat.
X In the on-board computer, select the AMG
AMG menu and check the
transmission oil temperature (Y page 167).
X Avoid excessive loading, e.g. due to dynamic driving.
X If the transmission oil temperature is less than 120 †, you can
continue driving to the nearest qualified specialist workshop. d
Trans. oil overhea‐ Trans. oil overhea‐
ted Drive on with ted Drive on with
care care The transmission oil has overheated.
Manual mode
Mand temporary manual drive program are no longer
available. Only the Comfort setting is available for the transmission.
The engine output is reduced according to the degree of overheating.
X Allow the transmission oil to cool by adopting a defensive driving
style. Electronic rear Electronic rear
axle differential axle differential
lock inoperative lock inoperative The electronic rear axle differential lock is inoperative.
X Consult a qualified specialist workshop. Electronic rear
Electronic rear
axle differential axle differential
lock currently lock currently
unavailable unavailable The electronic rear axle differential lock motor has overheated.
X Allow the electronic rear axle differential lock to cool by adopting a
defensive driving style. N The tailgate is open.
G WARNING
When the engine is running, exhaust gases can enter the vehicle inte- rior if the tailgate is open.
There is a risk of poisoning.
X Close the tailgate. M The bonnet is open. A warning tone also sounds.
G WARNING
The open bonnet may then block your view when the vehicle is in
motion.
There is a risk of an accident.
X Stop the vehicle safely as soon as possible, paying attention to road
and traffic conditions.
X Secure the vehicle against rolling away (Y page 119).
X Close the bonnet. 192
Display
messagesOn-board computer and displays