2016 MERCEDES-BENZ AMG GT ROADSTER climate control
[x] Cancel search: climate controlPage 31 of 289

Function Page
:
Overhead control panel 32
;
Combination switch 89
=
Steering wheel gearshift pad-
dles 113
?
Instrument cluster 29
A
Rear fog lamp 89
B
Light switch 88
C
Opens the bonnet 232 Function Page
D
Diagnostics connection 25
E
Electric parking brake 121
F
Unlocks the tailgate 73
G
Horn
H
Adjusts the steering wheel
electrically
83
I
Cruise control lever 126
J
Climate control systems 9628
CockpitAt a glance
Page 98 of 289
Overview of climate control systems
General notes
Observe the settings recommended on the fol-
lowing pages. The windows could otherwise
mist up.
To prevent the windows from misting up:
R switch off climate control only briefly
R switch on air-recirculation mode only briefly
R switch on the cooling with air dehumidifica-
tion function
R switch on the windscreen demisting function
briefly, if required
Climate control regulates the temperature and
air humidity in the vehicle interior. The interior
filter cleans the air, thus improving the interior
climate.
The cooling with air dehumidification function is
only available when the engine is running. Opti- mum climate control is only achieved with the
side windows closed.
i Ventilate the vehicle for a brief period during
warm weather, e.g. using the convenience opening feature (Y
page 75). This will speed
up the cooling process and the desired inte-
rior temperature will be reached more
quickly.
i The integrated filter filters out most parti-
cles of dust and soot and completely filters
out pollen. It also reduces gaseous pollutants and odours. A clogged filter reduces the
amount of air supplied to the vehicle interior.
For this reason, you should always observe
the interval for replacing the filter, which is
specified in the Service Booklet. As this
depends on environmental conditions, e.g.
heavy air pollution, the interval may be
shorter than stated in the Service Booklet.
i It is possible that the blower may be activa-
ted automatically 60 minutes after the engine
has been switched off depending on various
factors, e.g. the outside temperature. The
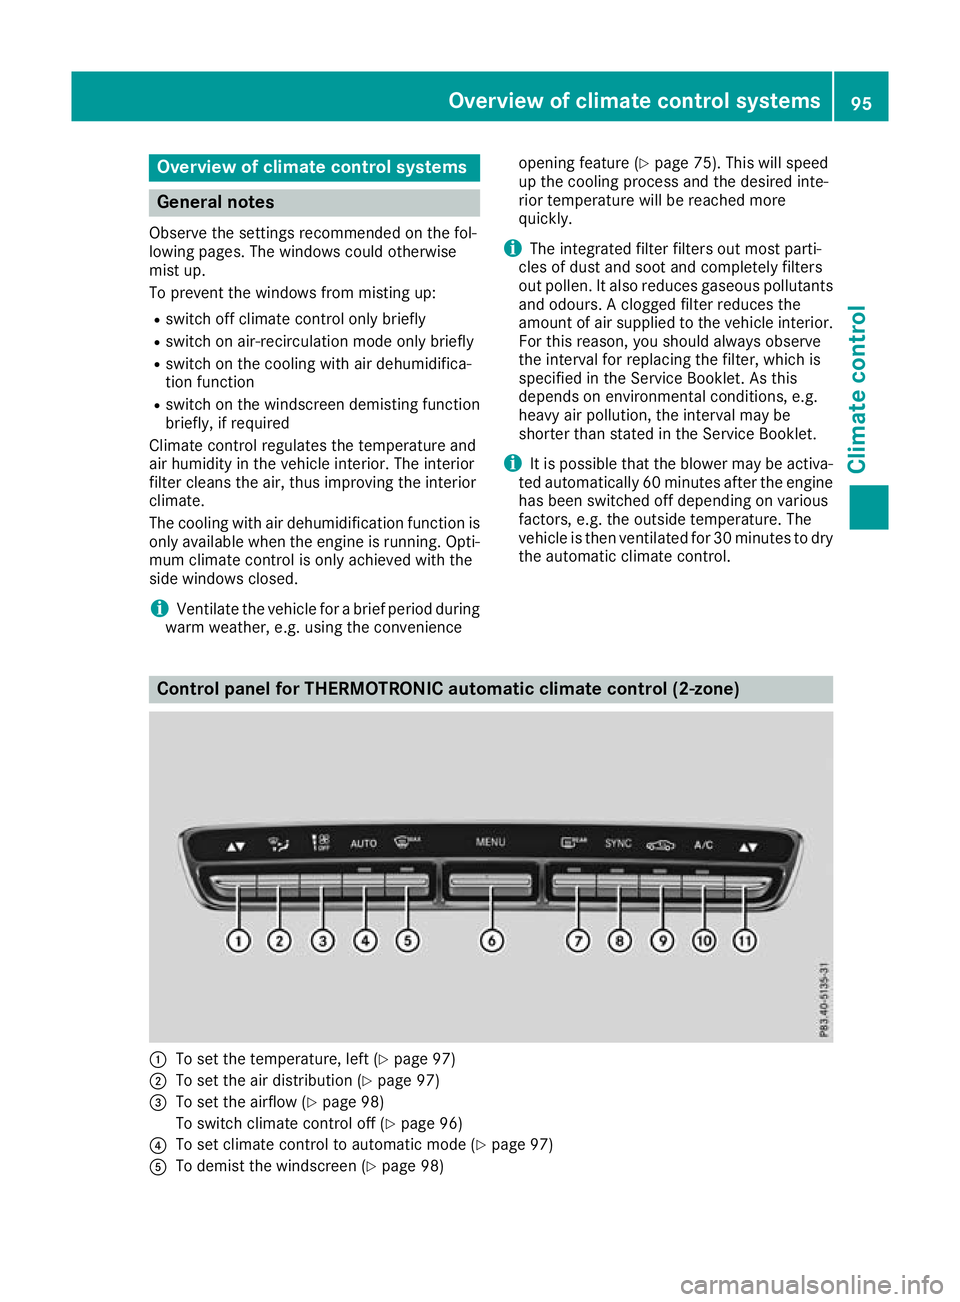
vehicle is then ventilated for 30 minutes to dry the automatic climate control. Control panel for THERMOTRONIC automatic climate control (2-zone)
:
To set the temperature, left (Y page 97)
; To set the air distribution (Y page 97)
= To set the airflow (Y page 98)
To switch climate control off (Y page 96)
? To set climate control to automatic mode (Y page 97)
A To demist the windscreen (Y page 98) Overview of climate control systems
95Climate control
Page 99 of 289
B
To call up the climate control menu of the multimedia system (Y page 209)
C To switch the rear window heating on/off (Y page 99)
D To activate or deactivate synchronisation (Y page 98)
E To activate or deactivate air-recirculation mode manually (Y page 99)
F To activate or deactivate cooling with air dehumidification (Y page 96)
G To set the temperature, right (Y page 97)Information on operating
THERMOTRONIC automatic climate
control
THERMOTRONIC automatic climate
control The following contains instructions and recom-
mendations to enable you to get the most out of
your THERMOTRONIC automatic climate con-
trol:
R Activate climate control using the Ã
rocker switch. The indicator lamp above the
à rocker switch lights up. The "Cooling
with air dehumidification" function is not acti- vated automatically in automatic mode. Acti-
vate this function as necessary (Y page 96).
R Set the temperature to 22 †.
R Use the windscreen demisting function only
briefly until the windscreen is clear again.
R Use the "Air-recirculation mode" function only
briefly, e.g. if there are unpleasant outside
odours or when in a tunnel. The windows
could otherwise mist up as no fresh air is
drawn into the vehicle in air-recirculation
mode.
ECO start/stop function During automatic engine switch-off, the climate
control operates only at a reduced capacity. If
you require the full climate control output, you
can switch off the ECO start/stop function by
pressing the ECO button (Y page 106).Operating the climate control system
Switching climate control on/off
General notes When climate control is switched off, the air
supply and air circulation are also switched off. The windows could mist up. Therefore, only
switch off climate control briefly.
Switch on climate control primarily using the
Ã
rocker switch (Y page 97).
Switching on/off X
Select key position 2with the Start/Stop but-
ton (Y page 103).
X To switch on: set the airflow to level 1 or
higher using the Hrocker switch.
X To switch off: set the airflow to level 0 using
the H rocker switch. Activating/deactivating the cooling
with air dehumidification function
General notes If you deactivate the "Cooling with air dehumid-
ification" function, the air inside the vehicle will
not be cooled. The air inside the vehicle will also
not be dehumidified. The windows can mist up
more quickly. Therefore, deactivate the "Cooling
with air dehumidification" function only briefly.
The "Cooling with air dehumidification" function
is only available when the engine is running. The air inside the vehicle is cooled and dehumidified
according to the temperature selected.
Condensation may drip from the underside of
the vehicle when cooling mode is active. This is
normal and not a sign that there is a malfunc-
tion.
Activating/deactivating X
Press the ¿rocker switch up or down.
The indicator lamp above the ¿rocker
switch lights up or goes out. 96
Operating the climate control systemClimate control
Page 100 of 289
Problems with the "Cooling with air dehumidification" function
Problem
Possible causes/consequences and
M
MSolutions The indicator lamp over
the
¿ rocker switch
flashes three times or
remains off. The cooling
with air dehumidification
function cannot be acti-
vated via the multimedia system any longer
(Y page 209). The cooling with air dehumidification function has been deactivated
due to a malfunction.
X Consult a qualified specialist workshop. Setting climate control to automatic
mode
General notes In automatic mode, the set temperature is main-
tained automatically at a constant level. The
system automatically regulates the temperature of the dispensed air, the airflow and the air dis- tribution.
The "Cooling with air dehumidification" function
is activated automatically in automatic mode.
Automatic control X
Select key position 2with the Start/Stop but-
ton (Y page 103).
X Set the desired temperature using the w
rocker switch.
X To activate: press theÃrocker switch up
or down.
The indicator lamp above the Ãrocker
switch lights up.
X To switch to manual operation:press the
H rocker switch up or down.
or X Press the upper or lower section of the _
rocker switch.
In automatic mode, if you adjust the airflow or
air distribution manually, the indicator lamp
above the Ãrocker switch goes out. The
function which has not been changed manually,
however, continues to be controlled automati-
cally. When the manually set function switches
back to automatic mode, the indicator lamp
above the Ãrocker switch lights up again. Setting the temperature
Different temperatures can be set for the driv-
er's and front-passenger sides.
X Select key position 2with the Start/Stop but-
ton (Y page 103).
X To increase or reduce: press thew
rocker switch up or down.
Only change the temperature setting in small
increments. Start at 22 †. Setting the air distribution
Air distribution settings ¯
Directs the airflow through the demister
vents
P Directs the airflow through the centre
and side air vents
O Directs the airflow through the footwell
air vents
S Directs the airflow through the centre
and side air vents as well as the footwell
air vents
_ Directs the airflow through the demister
vents, the centre and side air vents as
well as the footwell air vents
b Directs the airflow through the centre
and side air vents as well as the demister
vents
a Directs the airflow through the footwell
and demister vents Operating the climate control system
97Climate control
Page 101 of 289
Setting
X
Select key position 2with the Start/Stop but-
ton (Y page 103).
X Press the _rocker switch up or down.
The various air distribution settings appear in
the multimedia system. Setting the airflow
X Select key position 2with the Start/Stop but-
ton (Y page 103).
X To increase or reduce: press theH
rocker switch up or down. Activating/deactivating the synchro-
nisation function
General notes Climate control can be set centrally using the
synchronisation function. The temperature set-
ting is adopted for the front-passenger side.
Activating/deactivating X
Press the 0rocker switch up or down.
The indicator lamp above the 0rocker
switch lights up or goes out.
The synchronisation function is deactivated if
the settings for the front-passenger side are
changed. Demisting the windscreen
General notes You can use this function to defrost the wind-
screen or to demist the inside of the windscreen and the front side windows.
Switch off the windscreen demisting function as
soon as the windscreen is clear again. Switching on/off X
Select key position 2with the Start/Stop but-
ton (Y page 103).
X To switch on:press the ¬rocker switch
up or down.
The indicator lamp above the ¬rocker
switch lights up. The current climate control
settings are deactivated.
The climate control system switches to the
following functions:
R high airflow
R high temperature
R air distribution to the windscreen and front
side windows
R air-recirculation mode off
i If necessary, the "Cooling with air dehumid-
ification" function is activated. In this case,
the indicator lamp above the ¿rocker
switch remains switched off.
X To switch off: press the¬rocker switch
up or down.
The indicator lamp above the ¬rocker
switch goes out. The previous settings are
reactivated. Air-recirculation mode remains
deactivated. Demisting the windows
Windows misted up on the inside X
Activate the "Cooling with air dehumidifica-
tion" function with the ¿rocker switch.
X Switch on automatic mode using the Ã
rocker switch.
X If the windows continue to mist up, activate
the windscreen demisting function using the
¬ rocker switch.
i You should only select this setting until the
windscreen is clear again.
Windows misted up on the outside X
Switch on the windscreen wipers.
X Switch on automatic mode using the Ã
rocker switch.
i If you clean the windows regularly, they do
not mist up so quickly. 98
Operating the climate control systemClimate control
Page 102 of 289
Rear window heating
General notes The rear window heating has a high current
draw. You should therefore switch it off as soon
as the window is clear. It otherwise switches off automatically after several minutes.
If the battery voltage is too low, the rear window
heating may switch off. Switching on/off X
Select key position 2with the Start/Stop but-
ton (Y page 103).
X Press the ¤rocker switch up or down.
The indicator lamp above the ¤rocker
switch lights up or goes out.
Problems with the rear window heating Problem
Possible causes/consequences and
M MSolutions The rear window heating
has switched off prema-
turely or cannot be acti-
vated. The battery has not been sufficiently charged.
X Switch off any consumers that are not required, e.g. reading lamps,
interior lighting or the seat heating.
When the battery is sufficiently charged, the rear window heating
can be activated again. Activating/deactivating air-recircula-
tion mode
General notes You can also temporarily deactivate the flow of
fresh air manually if unpleasant odours are
entering the vehicle from outside. The air
already inside the vehicle will then be recircula-
ted.
If you activate air-recirculation mode, the win-
dows can mist up more quickly, in particular at
low temperatures. Only use air-recirculation
mode briefly to prevent the windows misting up.
Activating/deactivating X
Select key position 2with the Start/Stop but-
ton (Y page 103).
X To activate: press thegrocker switch up
or down.
The indicator lamp above the grocker
switch lights up.
Air-recirculation mode is activated automati-
cally: R at high outside temperatures
R in a tunnel (vehicles with a navigation system
only)
The indicator lamp above the grocker
switch is not lit when automatic air-recirculation mode is activated. Outside air is added after
approximately 30 minutes.
X To deactivate:press the grocker switch
up or down.
The indicator lamp above the grocker
switch goes out.
Air-recirculation mode is deactivated automati-
cally:
R after approximately five minutes at outside
temperatures below approximately 5 †
R after approximately five minutes if "Cooling
with air dehumidification" is deactivated
R after approximately 30 minutes at outside
temperatures above approximately 5 †if the
"Cooling with air dehumidification" function is activated Convenience opening/closing using
the air-recirculation button
G
WARNING
When using convenience closing, you could
become trapped within the sweep of the clos- ing window. There is a risk of injury.
Monitor the entire closing procedure when
using convenience closing. When closing, Operating the climate control system
99Climate control
Z
Page 103 of 289
make sure that no one has any parts of the
body within the closing area. G
WARNING
During convenience opening parts of the body could be drawn in or become trapped
between the side window and window frame.
There is a risk of injury.
When opening, make sure that nobody is
touching the side window. If someone
becomes trapped, immediately press
the W switch in the door to stop the move-
ment of the side windows. To continue closing
the side window, pull on the Wswitch.
X Convenience closing feature: press and
hold the grocker switch up or down until
the side windows start to close automatically. The indicator lamp above the grocker
switch lights up. Air-recirculation mode is
activated.
If you open the side windows manually after
closing them using the convenience closing
feature, they will remain in this position when
opened.
If parts of the body are in the closing area during convenience closing, proceed as follows:
X Press the Wbutton to stop the side win-
dows.
The side windows stop.
X To then open the side windows, press the
W button again.
Observe the notes on the automatic reversing
feature for the side windows (Y page 74).
X Convenience opening feature: press and
hold the grocker switch up or down until
the side windows start to open automatically.
The indicator lamp above the grocker
switch goes out. Air-recirculation mode is
deactivated. Air vents
Important safety notes
G
WARNING
Very hot or very cold air can flow from the air vents. This could result in burns or frostbite in the immediate vicinity of the air vents. There
is a risk of injury.
Make sure that all vehicle occupants always
maintain a sufficient distance to the air out-
lets. If necessary, redirect the airflow to
another area of the vehicle interior.
In order to ensure the direct flow of fresh air
through the air vents into the vehicle interior,
please observe the following notes:
R keep the air inlet between the windscreen and
the bonnet free of blockages, such as ice,
snow or leaves
R never cover the vents or ventilation grilles in
the vehicle interior Adjusting the air vents
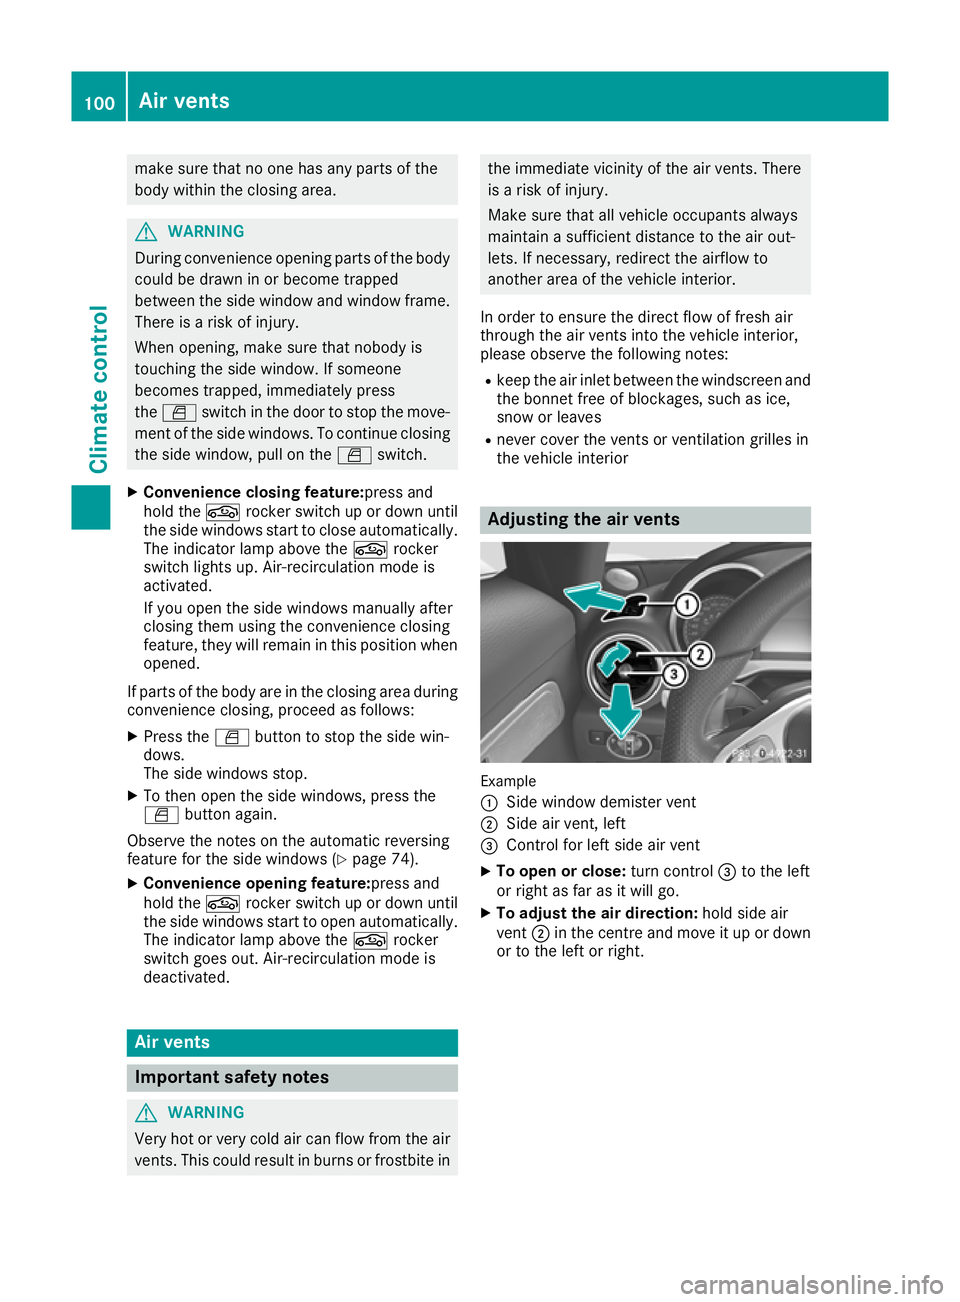
Example
:
Side window demister vent
; Side air vent, left
= Control for left side air vent
X To open or close: turn control=to the left
or right as far as it will go.
X To adjust the air direction: hold side air
vent ;in the centre and move it up or down
or to the left or right. 100
Air ventsClimate control
Page 211 of 289
Quick access for audio
Changing the station/music track
Depending on the audio source that is currently
activated, you can use this function to select thenext station or music track.
X Swipe upwards with two fingers on the touch-
pad.
The current audio source is displayed.
X To select the previous or next station/
music track:
swipe to the left or right.
The selected station/music track is played.
Switching the character entry between
touchpad and controller Requirement: an input line for text, numbers or
characters has been selected.
X To switch to the controller: press the con-
troller.
Character entry using the controller is active.
X To switch to the touchpad: press the touch-
pad with your finger.
Handwriting recognition on the touchpad is
active. Favourites
Calling up and exiting favourites X
To call up: press thegbutton on the con-
troller or on the touchpad.
X Select a favourite, e. g. Vehicle
Vehicle.
The favourites are displayed.
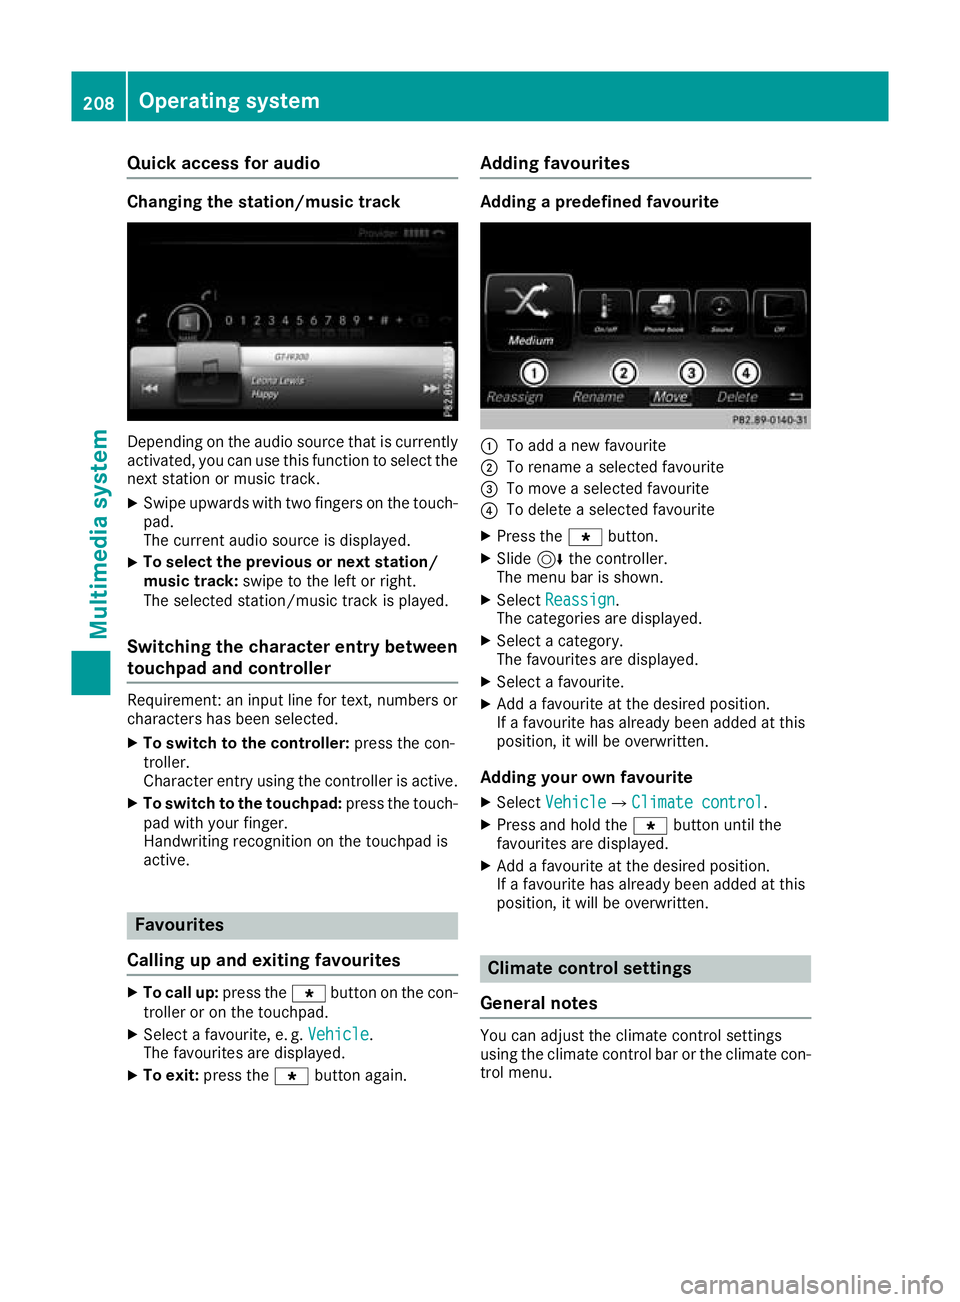
X To exit: press the gbutton again. Adding favourites Adding a predefined favourite
:
To add a new favourite
; To rename a selected favourite
= To move a selected favourite
? To delete a selected favourite
X Press the gbutton.
X Slide 6the controller.
The menu bar is shown.
X Select Reassign
Reassign .
The categories are displayed.
X Select a category.
The favourites are displayed.
X Select a favourite.
X Add a favourite at the desired position.
If a favourite has already been added at this
position, it will be overwritten.
Adding your own favourite
X Select Vehicle VehicleQ Climate control
Climate control.
X Press and hold the gbutton until the
favourites are displayed.
X Add a favourite at the desired position.
If a favourite has already been added at this
position, it will be overwritten. Climate control settings
General notes You can adjust the climate control settings
using the climate control bar or the climate con-
trol menu. 208
Operating systemMultimedia system