2016 MAZDA MODEL CX-5 wheel
[x] Cancel search: wheelPage 282 of 626

Black plate (282,1)
Tire Pressure Monitoring System
lThe Tire Pressure Monitoring System (TPMS) monitors the air pressure of all four tires.
If the air pressure of one or more tires is too low, the system warns the driver by
indicating the tire pressure monitoring system warning light in the instrument cluster
(the warning is also indicated in the display on the type A
*1instrument cluster) and
operating a beep sound. The system monitors the tire pressures indirectly using the data
sent from the ABS wheel speed sensors.
To allow the system to operate correctly, the system needs to be initialized with the
specified tire pressure (value on the tire pressure label). Follow the procedure and
perform the initialization.
*1 Refer to Type A on page 4-20.
lFor vehicles with the type A*1instrument cluster, check the vehicle condition or have
the vehicle inspected at an Authorized Mazda Dealer according to the indication.
*1 Refer to Type A on page 4-20.
lA system malfunction or operation conditions are indicated by a warning.
Refer to Warning/Indicator Lights on page 4-20.
Refer to Tire Inflation Pressure Warning Beep on page 7-37.
ABS wheel speed sensor
4-148
When Driving
Tire Pressure Monitoring System
CX-5_8DV2-EA-14K_Edition3 Page282
Thursday, February 26 2015 5:33 PM
Form No.8DV2-EA-14K
Page 283 of 626

Black plate (283,1)
CAUTION
Each tire, including the spare (if provided), should be checked monthly when cold
and inflated to the inflation pressure recommended by the vehicle manufacturer on
the vehicle placard or tire inflation pressure label. (If your vehicle has tires of a
different size than the size indicated on the vehicle placard or tire inflation pressure
label, you should determine the proper tire inflation pressure for those tires.)
As an added safety feature, your vehicle has been equipped with a tire pressure
monitoring system (TPMS) that illuminates a low tire pressure telltale when one or
more of your tires is significantly under-inflated. Accordingly, when the low tire
pressure telltale illuminates, you should stop and check your tires as soon as
possible, and inflate them to the proper pressure. Driving on a significantly under-
inflated tire causes the tire to overheat and can lead to tire failure. Under-inflation
also reduces fuel efficiency and tire tread life, and may affect the vehicle's handling
and stopping ability.
Please note that the TPMS is not a substitute for proper tire maintenance, and it is
the driver's responsibility to maintain correct tire pressure, even if under-inflation
has not reached the level to trigger illumination of the TPMS low tire pressure
telltale.
Your vehicle has also been equipped with a TPMS malfunction indicator to indicate
when the system is not operating properly.
The TPMS malfunction indicator is combined with the low tire pressure telltale.
When the system detects a malfunction, the telltale will flash for approximately one
minute and then remain continuously illuminated. This sequence will continue upon
subsequent vehicle start-ups as long as the malfunction exists. When the
malfunction indicator is illuminated, the system may not be able to detect or signal
low tire pressure as intended. TPMS malfunctions may occur for a variety of reasons,
including the installation of replacement or alternate tires or wheels on the vehicle
that prevent the TPMS from functioning properly. Always check the TPMS
malfunction telltale after replacing one or more tires or wheels on your vehicle to
ensure that the replacement or alternate tires and wheels allow the TPMS to
continue to function properly.
To avoid false readings, the system samples for a little while before indicating a
problem. As a result it will not instantaneously register a rapid tire deflation or blow
out.
When Driving
Tire Pressure Monitoring System
4-149
CX-5_8DV2-EA-14K_Edition3 Page283
Thursday, February 26 2015 5:33 PM
Form No.8DV2-EA-14K
Page 284 of 626

Black plate (284,1)
NOTE
Because this system detects slight changes in tire conditions, the timing of the warning may be faster
or slower in the following cases:
lThe size, manufacturer, or the type of tires is different from the specification.lThe size, manufacturer, or the type of a tire is different from the others, or the level of tire wear is
excessively different between them.
lA run-flat tire, studless tire, snow tire, or tire chains are used.lAn emergency tire is used (The tire pressure monitoring system warning light may flash and then
continue illuminating).
lA tire is repaired using the emergency flat tire repair kit.lThe tire pressure is excessively higher than the specified pressure, or the tire pressure is suddenly
lowered for some reason such as a tire burst during driving.
lThe vehicle speed is lower than about 15 km/h (9.3 mph) (including when the vehicle is stopped),
or the drive period is shorter than 5 minutes.
lThe vehicle is driven on an extremely rough road or a slippery, icy road.lHard steering and rapid acceleration/deceleration are repeated such as during aggressive driving
on a winding road.
lLoad on the vehicle is applied to a tire such as by loading heavy luggage to one side of the
vehicle.
lSystem initialization has not been implemented with the specified tire pressure.
qTire Pressure Monitoring System
Initialization
In the following cases, system
initialization must be performed so that
the system operates normally.
lA tire pressure is adjusted.lTire rotation is performed.lA tire or wheel is replaced.lThe battery is replaced or completely
drained.
lThe tire pressure monitoring system
warning light is illuminated.
Initialization method
1. Park the car in a safe place and firmly
apply the parking brake.2. Let the tires cool, then adjust the tire
pressure of all four (4) tires to the
specified pressure indicated on the tire
pressure label located on the door jamb
of the driver's door (door open). Refer
to Tires on page 9-8.
3. Switch the ignition ON.
4-150
When Driving
Tire Pressure Monitoring System
CX-5_8DV2-EA-14K_Edition3 Page284
Thursday, February 26 2015 5:33 PM
Form No.8DV2-EA-14K
Page 289 of 626

Black plate (289,1)
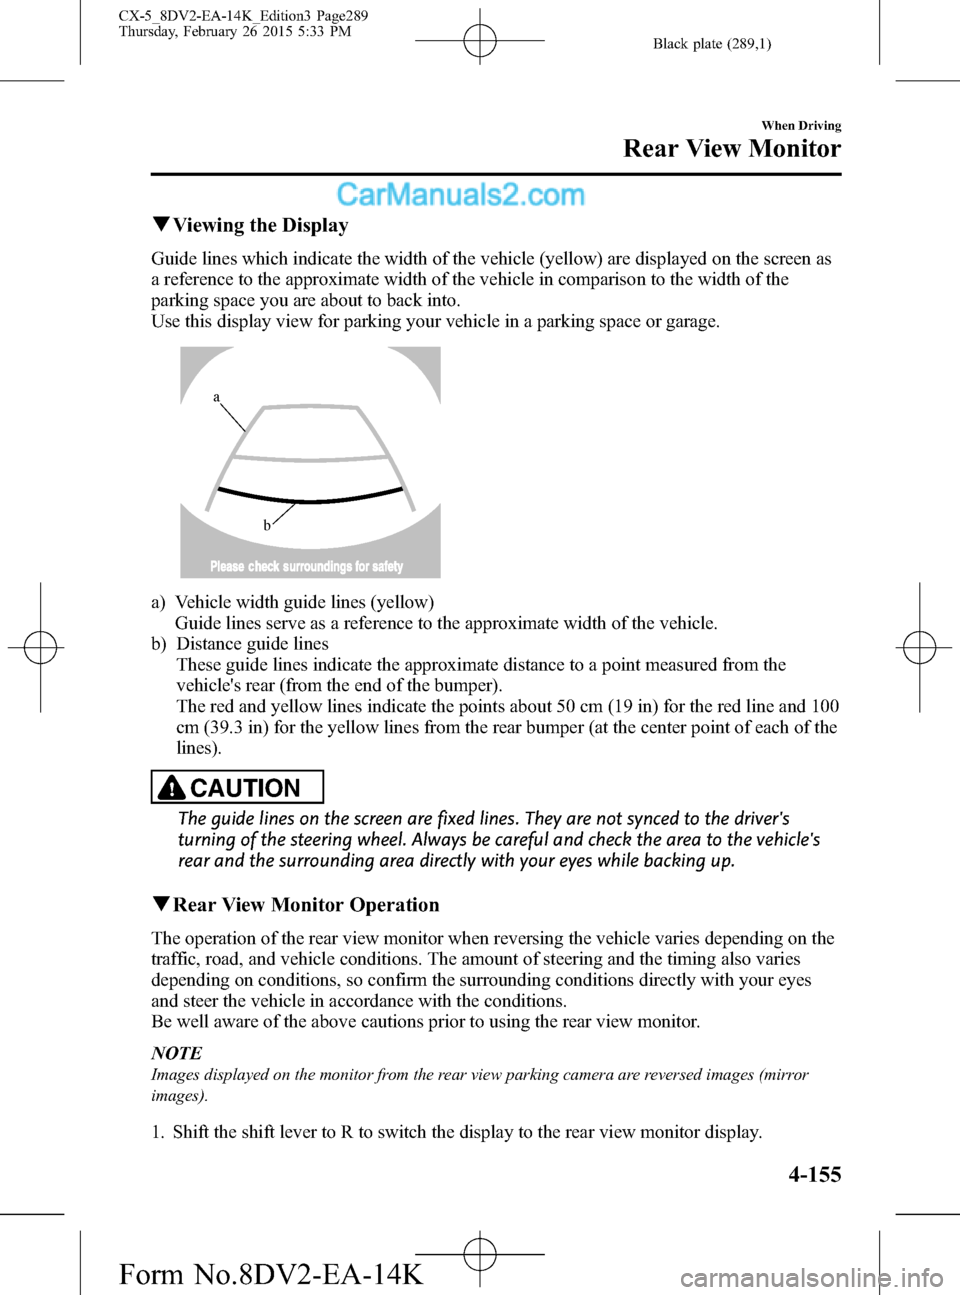
qViewing the Display
Guide lines which indicate the width of the vehicle (yellow) are displayed on the screen as
a reference to the approximate width of the vehicle in comparison to the width of the
parking space you are about to back into.
Use this display view for parking your vehicle in a parking space or garage.
b
a
a) Vehicle width guide lines (yellow)
Guide lines serve as a reference to the approximate width of the vehicle.
b) Distance guide lines
These guide lines indicate the approximate distance to a point measured from the
vehicle's rear (from the end of the bumper).
The red and yellow lines indicate the points about 50 cm (19 in) for the red line and 100
cm (39.3 in) for the yellow lines from the rear bumper (at the center point of each of the
lines).
CAUTION
The guide lines on the screen are fixed lines. They are not synced to the driver's
turning of the steering wheel. Always be careful and check the area to the vehicle's
rear and the surrounding area directly with your eyes while backing up.
qRear View Monitor Operation
The operation of the rear view monitor when reversing the vehicle varies depending on the
traffic, road, and vehicle conditions. The amount of steering and the timing also varies
depending on conditions, so confirm the surrounding conditions directly with your eyes
and steer the vehicle in accordance with the conditions.
Be well aware of the above cautions prior to using the rear view monitor.
NOTE
Images displayed on the monitor from the rear view parking camera are reversed images (mirror
images).
1. Shift the shift lever to R to switch the display to the rear view monitor display.
When Driving
Rear View Monitor
4-155
CX-5_8DV2-EA-14K_Edition3 Page289
Thursday, February 26 2015 5:33 PM
Form No.8DV2-EA-14K
Page 290 of 626

Black plate (290,1)
2. Confirming the surrounding conditions, reverse the vehicle.
(Display condition) (Vehicle condition)
3. After your vehicle begins entering the parking space, continue backing up slowly so that
the distance between the vehicle width lines and the sides of the parking space on the
left and right are roughly equal.
4. Continue to adjust the steering wheel until the vehicle width guide lines are parallel to
the left and right sides of the parking space.
4-156
When Driving
Rear View Monitor
CX-5_8DV2-EA-14K_Edition3 Page290
Thursday, February 26 2015 5:33 PM
Form No.8DV2-EA-14K
Page 291 of 626

Black plate (291,1)
5. Once they are parallel, straighten the wheels and back your vehicle slowly into the
parking space. Continue checking the vehicle's surroundings and then stop the vehicle in
the best possible position. (If the parking space has division lines, check whether the
vehicle width guide lines are parallel to them.)
(Display condition) (Vehicle condition)
6. When the shift lever is shifted from R to another shift lever position, the screen returns
to the previous display.
When Driving
Rear View Monitor
4-157
CX-5_8DV2-EA-14K_Edition3 Page291
Thursday, February 26 2015 5:33 PM
Form No.8DV2-EA-14K
Page 309 of 626

Black plate (309,1)
Antenna
Antenna
Operating Tips for Audio
System
WARNING
Always adjust the audio while the
vehicle is stopped:
Do not adjust the audio control
switches while driving the vehicle.
Adjusting the audio while driving the
vehicle is dangerous as it could
distract your attention from the
vehicle operation which could lead to
a serious accident.
Even if the audio control switches are
equipped on the steering wheel, learn
to use the switches without looking
down at them so that you can keep
your maximum attention on the road
while driving the vehicle.
CAUTION
For the purposes of safe driving,
adjust the audio volume to a level
that allows you to hear sounds
outside of the vehicle including car
horns and particularly emergency
vehicle sirens.
NOTE
lTo prevent the battery from being
discharged, do not leave the audio system
on for a long period of time when the
engine is not running.
lIf a cellular phone or CB radio is used in
or near the vehicle, it could cause noise to
occur from the audio system, however, this
does not indicate that the system has been
damaged.
Interior Features
Audio System
5-13
CX-5_8DV2-EA-14K_Edition3 Page309
Thursday, February 26 2015 5:33 PM
Form No.8DV2-EA-14K
Page 366 of 626

Black plate (366,1)
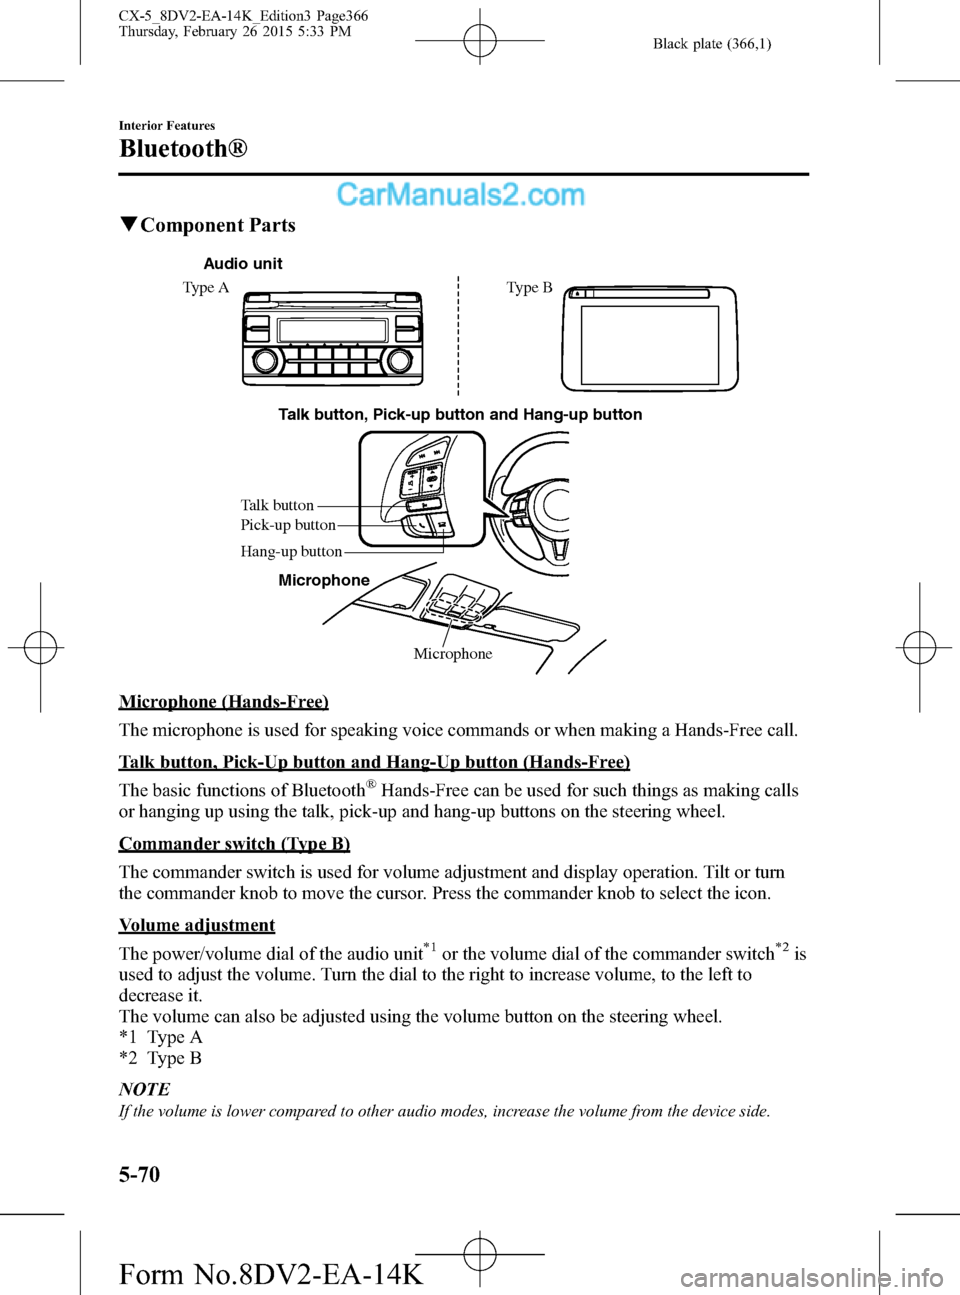
qComponent Parts
Talk button, Pick-up button and Hang-up button
Microphone Talk button
Hang-up button Pick-up button
Audio unit
Type A Type B
Microphone
Microphone (Hands-Free)
The microphone is used for speaking voice commands or when making a Hands-Free call.
Talk button, Pick-Up button and Hang-Up button (Hands-Free)
The basic functions of Bluetooth
®Hands-Free can be used for such things as making calls
or hanging up using the talk, pick-up and hang-up buttons on the steering wheel.
Commander switch (Type B)
The commander switch is used for volume adjustment and display operation. Tilt or turn
the commander knob to move the cursor. Press the commander knob to select the icon.
Volume adjustment
The power/volume dial of the audio unit
*1or the volume dial of the commander switch*2is
used to adjust the volume. Turn the dial to the right to increase volume, to the left to
decrease it.
The volume can also be adjusted using the volume button on the steering wheel.
*1 Type A
*2 Type B
NOTE
If the volume is lower compared to other audio modes, increase the volume from the device side.
5-70
Interior Features
Bluetooth®
CX-5_8DV2-EA-14K_Edition3 Page366
Thursday, February 26 2015 5:33 PM
Form No.8DV2-EA-14K