2016 MAZDA MODEL CX-5 reset
[x] Cancel search: resetPage 320 of 626

Black plate (320,1)
qClock
Hour set button :00 button
Minute set buttonAudio control dial Audio display Clock button
Setting the time
The clock can be set at any time when the
ignition is switched to ACC or ON.
1. To adjust the time, press the clock
button (
) for about 2 seconds
until a beep is heard.
2. The clock's current time will flash.
Time adjustment
lTo adjust the time, press the hour/
minute set button (H, M) while the
clock's current time is flashing.
lThe hours advance while the hour
set button (H) is pressed. The
minutes advance while the minute
set button (M) is pressed.
3. Press the clock button (
) again
to start the clock.
Time resetting
1. Press the clock button (
) for
about 2 seconds until a beep is heard.
2. Press the:00 button.3. When the button is pressed, the time
will be reset as follows:
(Example)
12:01―12:29→12:00
12:30―12:59→1:00
NOTE
lWhen the :00 button is pressed, the seconds
will start at“00”.
lSwitching between 12 and 24-hour clock
time:
Press the audio control dial several times
until 12 and 24-hour clock time are
displayed. Turn the audio control dial in
either direction, select the desired clock
setting while the preferred clock time is
flashing.
5-24
Interior Features
Audio System
CX-5_8DV2-EA-14K_Edition3 Page320
Thursday, February 26 2015 5:33 PM
Form No.8DV2-EA-14K
Page 322 of 626

Black plate (322,1)
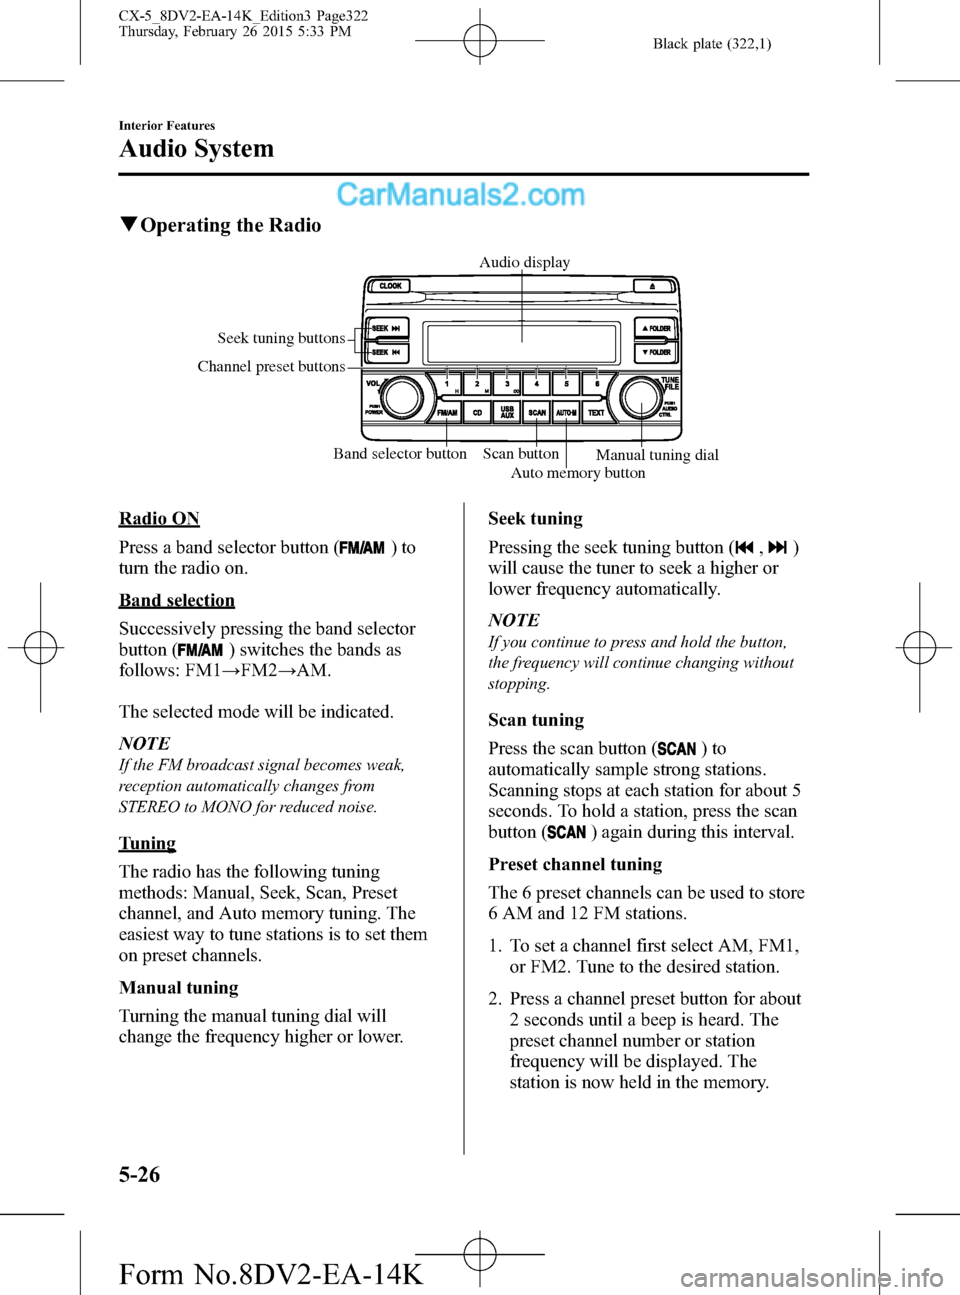
qOperating the Radio
Band selector button Scan button Seek tuning buttons
Channel preset buttons
Auto memory buttonManual tuning dial Audio display
Radio ON
Press a band selector button (
)to
turn the radio on.
Band selection
Successively pressing the band selector
button (
) switches the bands as
follows: FM1→FM2→AM.
The selected mode will be indicated.
NOTE
If the FM broadcast signal becomes weak,
reception automatically changes from
STEREO to MONO for reduced noise.
Tuning
The radio has the following tuning
methods: Manual, Seek, Scan, Preset
channel, and Auto memory tuning. The
easiest way to tune stations is to set them
on preset channels.
Manual tuning
Turning the manual tuning dial will
change the frequency higher or lower.Seek tuning
Pressing the seek tuning button (
,)
will cause the tuner to seek a higher or
lower frequency automatically.
NOTE
If you continue to press and hold the button,
the frequency will continue changing without
stopping.
Scan tuning
Press the scan button (
)to
automatically sample strong stations.
Scanning stops at each station for about 5
seconds. To hold a station, press the scan
button (
) again during this interval.
Preset channel tuning
The 6 preset channels can be used to store
6 AM and 12 FM stations.
1. To set a channel first select AM, FM1,
or FM2. Tune to the desired station.
2. Press a channel preset button for about
2 seconds until a beep is heard. The
preset channel number or station
frequency will be displayed. The
station is now held in the memory.
5-26
Interior Features
Audio System
CX-5_8DV2-EA-14K_Edition3 Page322
Thursday, February 26 2015 5:33 PM
Form No.8DV2-EA-14K
Page 323 of 626

Black plate (323,1)
3. Repeat this operation for the other
stations and bands you want to store.
To tune one in the memory, select AM,
FM1, or FM2 and then press its
channel preset button. The station
frequency or the channel number will
be displayed.
Auto memory tuning
This is especially useful when driving in
an area where the local stations are not
known.
Press and hold the auto memory button
(
) for about 2 seconds until a beep
is heard; the system will automatically
scan and temporarily store up to 6 stations
with the strongest frequencies in each
selected band in that area.
After scanning is completed, the station
with the strongest frequency will be tuned
and its frequency displayed. Press and
release the auto memory button (
)
to recall stations from the auto-stored
stations. One stored station will be
selected each time and its frequency and
channel number will be displayed.
NOTE
If no stations can be tuned after scanning
operations,“A”will be displayed.
Interior Features
Audio System
5-27
CX-5_8DV2-EA-14K_Edition3 Page323
Thursday, February 26 2015 5:33 PM
Form No.8DV2-EA-14K
Page 333 of 626

Black plate (333,1)
Volume adjustment
Turn the commander switch volume dial.
The volume switch on the steering switch
can also be pressed.
Display setting
Select the
icon on the home screen
and display the Settings screen.
Select the
tab to select the item
you would like to change.
Display OFF/Clock
The center display can be turned off.
Select
to turn the display
off.
When
is
selected the center display turns off and
the clock is displayed.
The center display can be turned back on
as follows:
lTouch the center display.lOperate the commander switch.
Daytime/nighttime (System) screen
setting
The daytime or nighttime screen can be
selected.
: Switches screen automatically
according to headlight illumination
condition
*1
: Daytime screen setting
: Nighttime screen setting
*1 The display is constantly on daytime
screen when the illumination dimmer
is cancelled.
Brightness adjustment
Adjust the center display brightness using
the slider.
Contrast adjustment
Adjust the center display contrast using
the slider.Display setting reset
All of the screen setting values can be
reset to their initial settings.
1. Select
.
2. Select
.
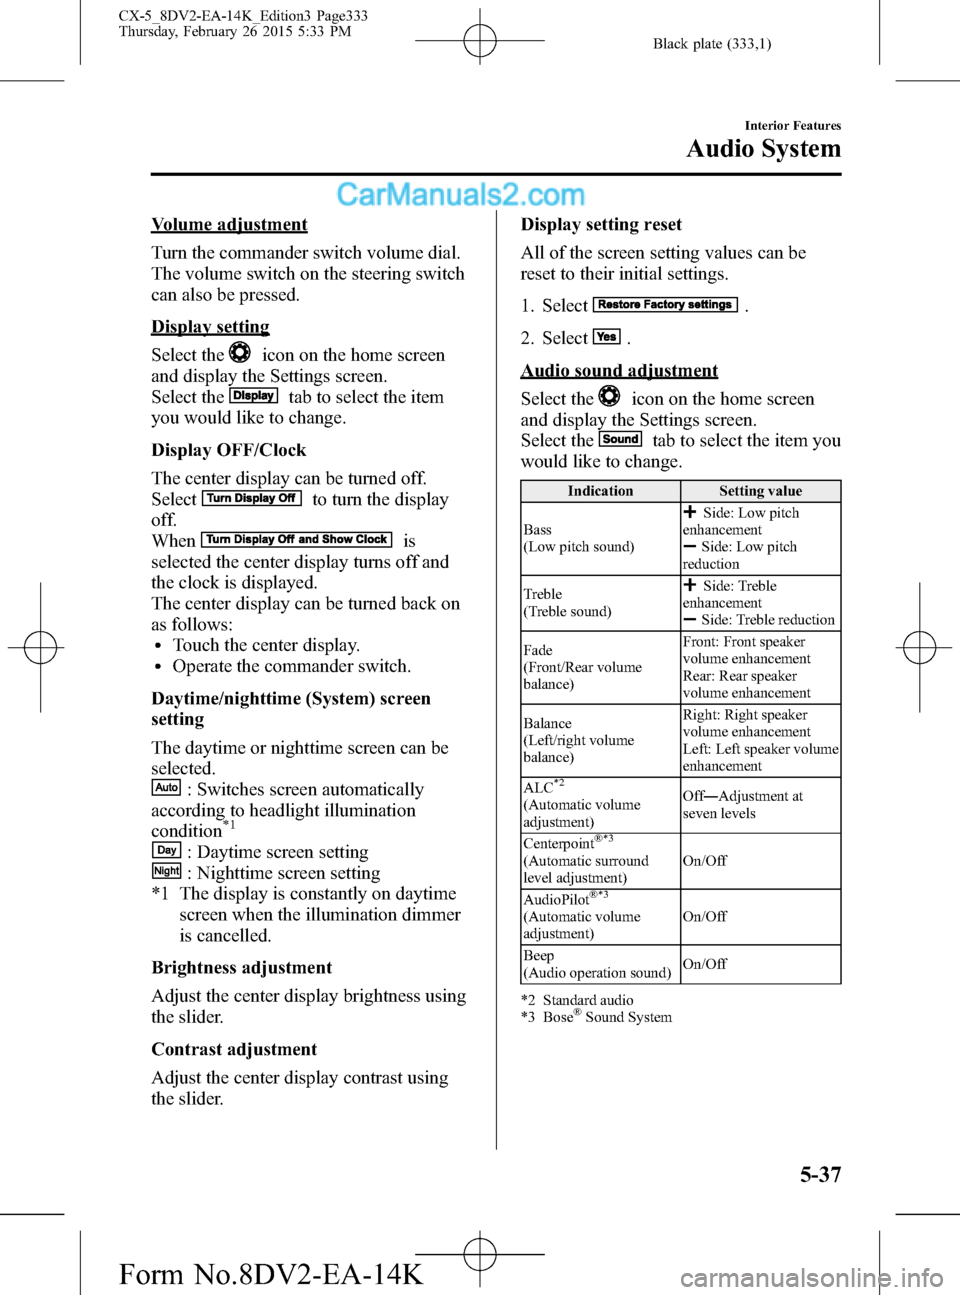
Audio sound adjustment
Select the
icon on the home screen
and display the Settings screen.
Select the
tab to select the item you
would like to change.
Indication Setting value
Bass
(Low pitch sound)
Side: Low pitch
enhancement
Side: Low pitch
reduction
Treble
(Treble sound)
Side: Treble
enhancement
Side: Treble reduction
Fade
(Front/Rear volume
balance)Front: Front speaker
volume enhancement
Rear: Rear speaker
volume enhancement
Balance
(Left/right volume
balance)Right: Right speaker
volume enhancement
Left: Left speaker volume
enhancement
ALC
*2
(Automatic volume
adjustment)Off―Adjustment at
seven levels
Centerpoint
®*3
(Automatic surround
level adjustment)On/Off
AudioPilot
®*3
(Automatic volume
adjustment)On/Off
Beep
(Audio operation sound)On/Off
*2 Standard audio
*3 Bose
®Sound System
Interior Features
Audio System
5-37
CX-5_8DV2-EA-14K_Edition3 Page333
Thursday, February 26 2015 5:33 PM
Form No.8DV2-EA-14K
Page 335 of 626

Black plate (335,1)
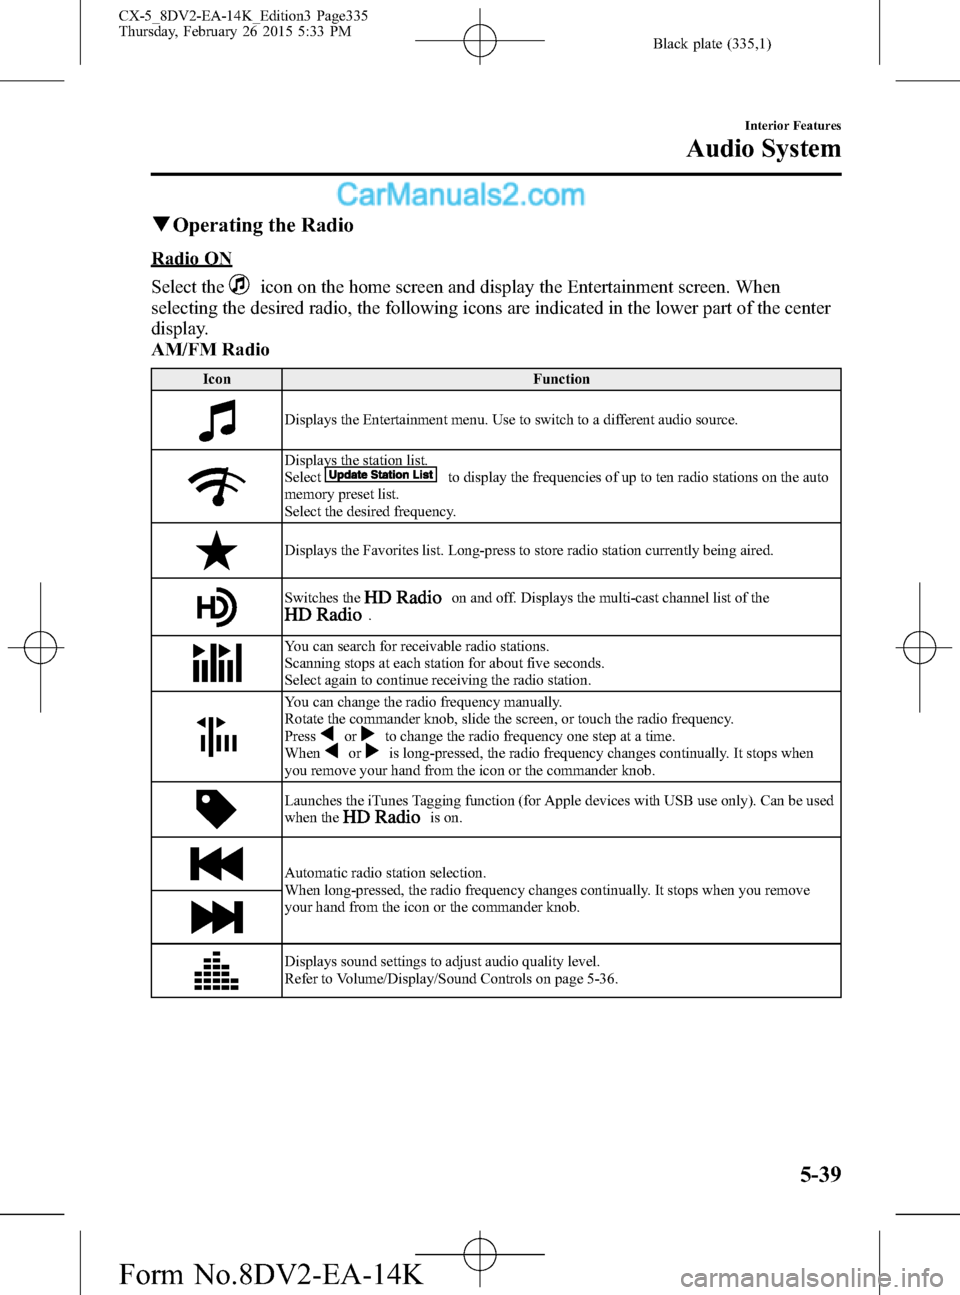
qOperating the Radio
Radio ON
Select the
icon on the home screen and display the Entertainment screen. When
selecting the desired radio, the following icons are indicated in the lower part of the center
display.
AM/FM Radio
Icon Function
Displays the Entertainment menu. Use to switch to a different audio source.
Displays the station list.
Selectto display the frequencies of up to ten radio stations on the auto
memory preset list.
Select the desired frequency.
Displays the Favorites list. Long-press to store radio station currently being aired.
Switches theon and off. Displays the multi-cast channel list of the.
You can search for receivable radio stations.
Scanning stops at each station for about five seconds.
Select again to continue receiving the radio station.
You can change the radio frequency manually.
Rotate the commander knob, slide the screen, or touch the radio frequency.
Press
orto change the radio frequency one step at a time.
Whenoris long-pressed, the radio frequency changes continually. It stops when
you remove your hand from the icon or the commander knob.
Launches the iTunes Tagging function (for Apple devices with USB use only). Can be used
when theis on.
Automatic radio station selection.
When long-pressed, the radio frequency changes continually. It stops when you remove
your hand from the icon or the commander knob.
Displays sound settings to adjust audio quality level.
Refer to Volume/Display/Sound Controls on page 5-36.
Interior Features
Audio System
5-39
CX-5_8DV2-EA-14K_Edition3 Page335
Thursday, February 26 2015 5:33 PM
Form No.8DV2-EA-14K
Page 341 of 626

Black plate (341,1)
When canceling the parental lock or
session lock, or when changing the PIN
code, PIN code input is required.
PIN code reset
If the registered code has been forgotten,
reset the code to the default [0000] code.
1. Select the
icon.
2. If the selected channel is locked, input
the PIN code to cancel the parental
lock temporarily.
3. Select
.
4. Input the default code [0000] using the
number buttons.
5. Select
.
6. Input the new PIN code using the
number buttons.
7. Select
.
Interior Features
Audio System
5-45
CX-5_8DV2-EA-14K_Edition3 Page341
Thursday, February 26 2015 5:33 PM
Form No.8DV2-EA-14K
Page 373 of 626

Black plate (373,1)
3. Input the PIN code of your Bluetooth®
audio device by pressing channel
preset buttons 1 to 4 while“PIN 0000”
is displayed.
Press channel preset button 1 to input
the first digit, 2 for the second, 3 for
the third, and 4 for the forth. For
example, if the PIN code were“4213”
press channel preset button 1 four
times (1, 2, 3, 4), button 2 twice (1, 2),
button 3 once (1), and button 4 three
times (1, 2, 3). If the“PIN 0000”
display disappears before finishing the
PIN code input, repeat the procedure
from Step 1.
NOTE
Some devices accept only a particular pairing
code (Usually,“0000”or“1234”).
If pairing cannot be completed, refer to the
owner's manual of your mobile device, and try
those numbers if necessary.
4. Press the audio control dial while the
input PIN code is displayed.
“PAIRING”flashes on the audio
display.
5. Operate the Bluetooth
®audio device
and set it to the pairing mode while
“PAIRING”is flashing.
6. When the pairing is completed,
and
“PAIR SUCCESS”are displayed after
about 10-30 seconds, after which
“PAIR SUCCESS”continues to be
displayed for three seconds, and then
the unit returns to the normal display.NOTE
lSome Bluetooth®audio devices need a
certain amount of time before the
symbol
is displayed.
lIf the pairing failed,“Err”flashes for three
seconds .
lPairing cannot be performed while the
vehicle is moving. If you attempt to perform
pairing while the vehicle is moving,“PAIR
DISABLE”is displayed .
lIf seven Bluetooth®audio devices have
already been paired to the vehicle, pairing
cannot be performed and“MEMORY
FULL”is displayed. Delete one paired
device to pair another one.
Pairing a Bluetooth®audio device
which does not have a four-digit PIN
code
1. Using the audio control dial, select the
pairing mode“PAIR DEVICE”in the
“BT SETUP”mode. (Refer to
“Bluetooth
®audio set up”for details.)
2. Press the audio control dial to
determine the mode. After“ENTER
PIN”is displayed on the audio display
for three seconds,“PIN 0000”is
displayed and the PIN code can be
input.
3. Press the audio control dial while“PIN
0000”is displayed.“PAIRING”flashes
on the audio display.
4. Operate the Bluetooth
®audio device
and set it to the pairing mode while
“PAIRING”is flashing.
5. As the Bluetooth
®audio device
requires a PIN code, input“0000”.
Interior Features
Bluetooth®
5-77
CX-5_8DV2-EA-14K_Edition3 Page373
Thursday, February 26 2015 5:33 PM
Form No.8DV2-EA-14K
Page 401 of 626

Black plate (401,1)
The following icons are displayed in the lower part of the details on the message. Icons
which can be used differ depending on use conditions.
Icon Function
Displays the Communication menu.
Displays the inbox.
Plays back a message.
When selected again, playback is temporarily stopped.
Displays the previous message.
Displays the next message.
Only replies to the sender of the currently displayed message.
Select the sentence on the displayed reply screen and select the sentence for sending from
the preset message.
Select
.
(Only E-mail)
Replies to all members including CC.
Select the sentence on the displayed reply screen and select the sentence for sending from
the preset message.
Select
.
Makes a call to a person who sent a message.
For E-mail, this function may not work depending on the device.
Deletes a message.
The messages stored in a device is also deleted.
Interior Features
Bluetooth®
5-105
CX-5_8DV2-EA-14K_Edition3 Page401
Thursday, February 26 2015 5:34 PM
Form No.8DV2-EA-14K