2016 LEXUS RX450H height
[x] Cancel search: heightPage 33 of 660

331-1. For safe use
1
For safety and security
RX450h_U_OM0E013U
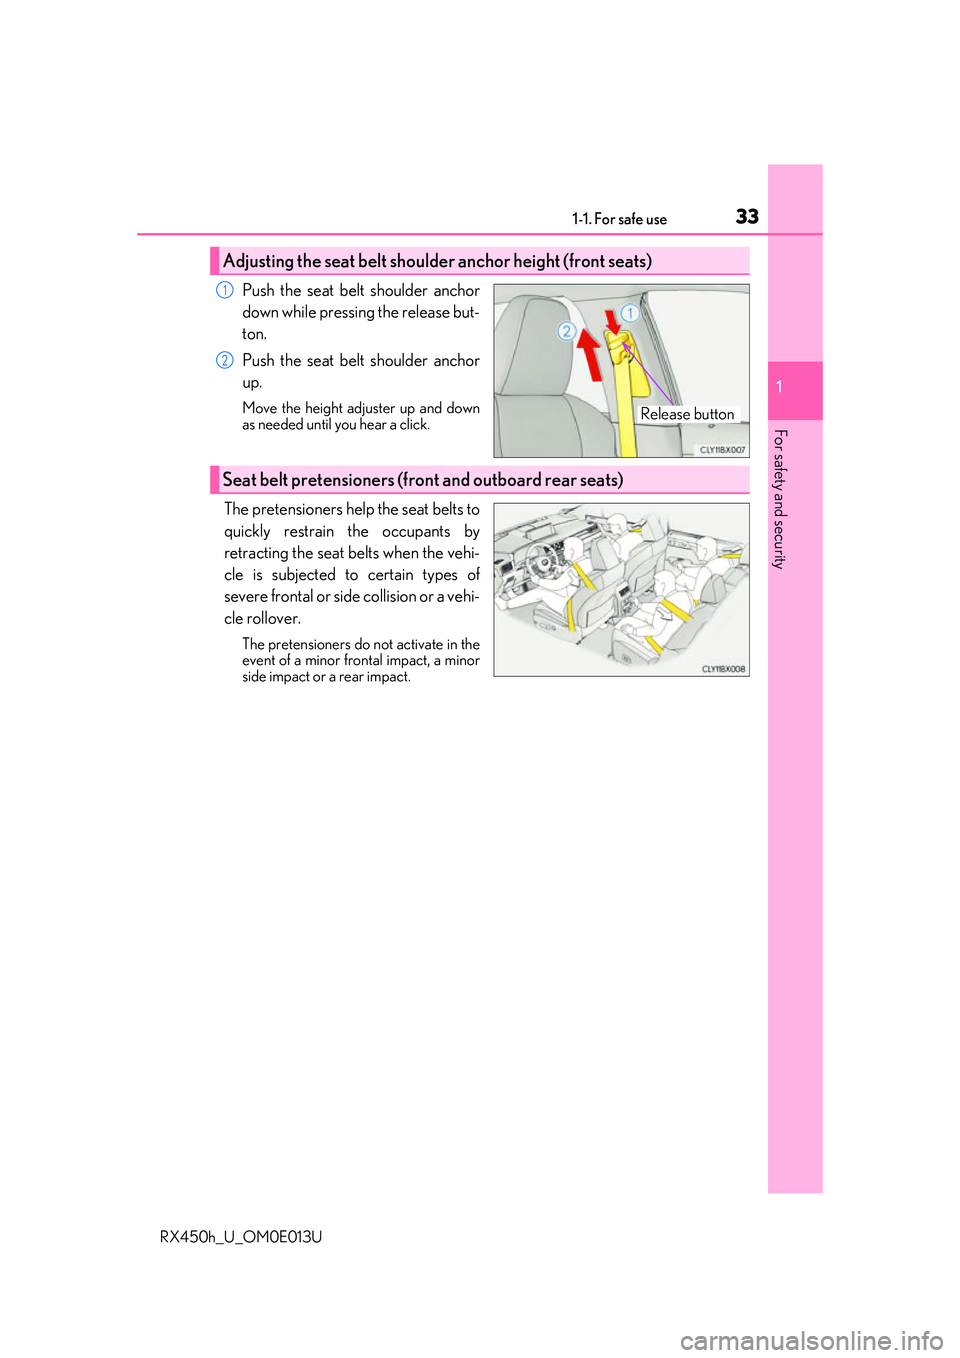
Push the seat belt shoulder anchor
down while pressing the release but-
ton.
Push the seat belt shoulder anchor
up.
Move the height adjuster up and down
as needed until you hear a click.
The pretensioners help the seat belts to
quickly restrain the occupants by
retracting the seat belts when the vehi-
cle is subjected to certain types of
severe frontal or side collision or a vehi-
cle rollover.
The pretensioners do not activate in the
event of a minor frontal impact, a minor
side impact or a rear impact.
Adjusting the seat belt shoulder anchor height (front seats)
Release button
1
2
Seat belt pretensioners (front and outboard rear seats)
Page 164 of 660

164
RX450h_U_OM0E013U3-3. Adjusting the seats
Seat position adjustment switch
Seat cushion (front) angle adjust-
ment switch
Vertical height adjustment switch
Seatback angle adjustment switch
Lumbar support firmness adjust-
ment switch
Lumbar support height adjustment
switch (if equipped)
Seat cushion length adjustment
switch (if equipped)
■Power easy access system
The driver’s seat and steering wheel move
in accordance with power switch mode and
the driver’s seat belt condition. ( P. 174)
Front seats
Adjustment procedure
1
2
3
4
5
6
7
WARNING
■When adjusting the seat position
●Take care when adjusting the seat position to ensure that other passengers are not
injured by the moving seat.
●Do not put your hands under the seat or near the moving parts to avoid injury.
Fingers or hands may become jammed in the seat mechanism.
●Make sure to leave enough space around the feet so they do not get stuck.
■Seat adjustment
To reduce the risk of sliding under the lap belt during a collision, do not recline the seat
more than necessary.
If the seat is too reclined, the lap belt may slide past the hips and apply restraint forces
directly to the abdomen, or your neck may contact the shoulder belt, increasing the risk
of death or serious injury in the event of an accident.
Adjustments should not be made while drivin g as the seat may unexpectedly move and
cause the driver to lose control of the vehicle.
Page 180 of 660

1803-3. Adjusting the seats
RX450h_U_OM0E013U
■Removing the head restraints
■Installing the head restraints
■Adjusting the height of the head restraints
■Adjusting the center rear seat head restraint
Always raise the head restraint one leve l from the stowed position when using.
Pull the head restraint up
while pressing the lock
release button.
If the head restraint to uches the ceiling, making
the removal difficult, change the seat height or
angle. ( P. 164, 165)
Align the head restraint with the installation
holes and push it down to the lock position.
Press and hold the lock release button when
lowering the head restraint.
Make sure that the head restraints are adjusted
so that the center of the head restraint is closest
to the top of your ears.
WARNING
■Head restraint precautions
Observe the following precautions regarding the head restraints.
Failure to do so may result in death or serious injury.
●Use the head restraints design ed for each respective seat.
●Adjust the head restraints to the correct position at all times.
●After adjusting the head restraints, push down on them and make sure they are
locked in position.
●Do not drive with the head restraints removed.
Lock release button
Lock release button
Page 183 of 660

1833-4. Adjusting the steering wheel and mirrors
3
Operation of each component
RX450h_U_OM0E013U
The height of the rear view mirror can be adjusted to suit your driving posture.
Adjust the height of the rear view mir-
ror by moving it up and down.
Responding to the level of brightness of the headlights of vehicles behind, the
reflected light is automatically reduced.
Changing automatic anti-glare func-
tion mode
ON/OFF
When the automatic anti-glare function
is in ON mode, the indicator illuminates.
The function will set to ON mode each
time the power switch is turned to ON
mode.
Pressing the button turns the function to
OFF mode. (The indicator also turns
off.)
Inside rear view mirror
The rear view mirror’s position can be adjusted to enable sufficient confirma-
tion of the rear view.
Adjusting the height of rear view mirror
Auto anti-glare function
Indicator
Page 226 of 660

2264-1. Before driving
RX450h_U_OM0E013U
■Matching trailer ball height to trailer coupler height
■Before towing
Check that the followin g conditions are met:
●Ensure that your vehicle’s tires are properly inflated. ( P. 589)
●Trailer tires are inflated according to the trailer manufacturer’s recommendation.
●All trailer lights work as required by law.
●All lights work each time you connect them.
●The trailer ball is set at the proper height for the coupler on the trailer.
●The trailer is level when it is hitched.
Do not drive if the trailer is not level, and check for improper to ngue weight, overload-
ing, worn suspension, or other possible causes.
●The trailer cargo is securely loaded.
●The rear view mirrors conform to all applicable federal, state/provincial or local regula-
tions. If they do not, install rear view mirrors appropriate for towing purposes.
■AVS (adaptive variable suspension system) (if equipped)
The suspension can be switched fo r improvement in driveability. (P. 382)
No matter which class of tow hitch
applies, for a more safe trailer hookup,
the trailer ball setup
must be the proper
height for the coupler on the trailer.
Coupler
Trailer ball
1
2
Page 370 of 660

3704-5. Using the driving support systems
RX450h_U_OM0E013U
■Conditions under which the BSM function may not function correctly
●The BSM function may not detect vehicles correctly in the following situations:
• When the sensor is misaligned due to a stro ng impact to the sensor or its surround-
ing area
• When mud, snow, ice, a sticke r, etc. is covering the sensor or surrounding area on
the rear bumper
• When driving on a road surf ace that is wet with standing water during bad weather,
such as heavy rain, snow, or fog
• When multiple vehicles are approaching wi th only a small gap between each vehicle
• When the distance between your vehicle and a following vehicle is short
• When there is a significant difference in speed between your vehicle and the vehicle that enters the detection area
• When the difference in speed between your vehicle and another vehicle is changing
• When a vehicle enters a detection area traveling at about the same speed as your vehicle
• As your vehicle starts from a stop, a vehicle remains in the detection area
• When driving up and down cons ecutive steep inclines, such as hills, dips in the road,
etc.
• When driving on roads with sharp bends, consecutive curves, or uneven surfaces
• When vehicle lanes are wide, or when driving on the edge of a lane, and the vehicle in an adjacent lane is far away from your vehicle
• When towing a trailer (vehicles with towing package)
• When items such as a bicycle carrier are installed on the rear of the vehicle
• When there is a significant difference in height between your vehicle and the vehicle that enters the detection area
• Immediately after the BSM function is turned on
●Instances of the BSM function unnecessarily detecting a vehicle and/or object may
increase in the following situations:
• When the sensor is misaligned due to a stro ng impact to the sensor or its surround-
ing area
• When the distance between your vehicle and a guardrail, wall, etc. that enters the detection area is short
• When driving up and down cons ecutive steep inclines, such as hills, dips in the road,
etc.
• When vehicle lanes are narrow, or when driv ing on the edge of a lane, and a vehicle
traveling in a lane other than the ad jacent lanes enters the detection area
• When driving on roads with sharp bends, consecutive curves, or uneven surfaces
• When the tires are slipping or spinning
• When the distance between your vehicle and a following vehicle is short
• When a bicycle carrier or other accessory is installed to the rear of the vehicle
• When towing a trailer (vehicles with towing package)
Page 394 of 660

3944-6. Driving tips
RX450h_U_OM0E013U
●Specific design characteristics give it a higher center of gravity than ordinary
passenger cars. This vehicle design feature causes this type of vehicle to be
more likely to rollover. And, utility vehicles have a significantly higher rollover
rate than other types of vehicles.
●An advantage of the higher ground cl earance is a better view of the road
allowing you to anticipate problems.
●It is not designed for cornering at the same speeds as ordinary passenger cars
any more than low-slung sports cars are designed to perform satisfactorily
under off-road conditions. Therefore, sharp turns at excessive speeds may
cause the vehicle to rollover.
Utility vehicle precautions
This vehicle belongs to the utility vehicle class, which has higher ground clear-
ance and narrower tread in relation to the height of its center of gravity.
Utility vehicle feature
WARNING
■Utility vehicle precautions
Always observe the following precautions to minimize the risk of death, serious injury
or damage to your vehicle:
●In a rollover crash, an unbelted person is significantly more likely to die than a person
wearing a seat belt. Therefore, the driver and all passengers should always fasten
their seat belts.
●Avoid sharp turns or abrupt maneuvers, if at all possible.
Failure to operate this vehicle correctly may result in loss of control or vehicle rollover
causing death or serious injury.
●Loading cargo on the roof luggage carrier will make the center of the vehicle gravity
higher. Avoid high speeds, sudden starts, sharp turns, sudden braking or abrupt
maneuvers, otherwise it may re sult in loss of control or vehicle rollover due to failure
to operate this vehicle correctly.
●Always slow down in gusty crosswinds. Be cause of its profile and higher center of
gravity, your vehicle is more sensitive to side winds than an ordinary passenger car.
Slowing down will allow you to have better control.
●Do not drive horizontally across steep slopes. Driving straight up or straight down is
preferred. Your vehicle (or any similar off- road vehicle) can tip over sideways much
more easily than forward or backward.
Page 551 of 660

5517-2. Steps to take in an emergency
7
When trouble arises
RX450h_U_OM0E013U
WARNING
■Using the tire jack
Observe the following precautions.
Improper use of the tire jack may cause the vehicle to suddenly fall off the jack, leading
to death or serious injury.
●Do not use the tire jack for any purpose other than replacing tires or installing and
removing tire chains.
●Only use the tire jack that comes with this vehicle for replacing a flat tire.
Do not use it on other vehicles, and do no t use other tire jacks for replacing tires on
this vehicle.
●Put the jack properly in its jack point.
●Do not put any part of your body under the vehicle while it is supported by the jack.
●Do not start the hybrid system or drive the vehicle while the vehicle is supported by
the jack.
●Do not raise the vehicle while someone is inside.
●When raising the vehicle, do not pu t an object on or under the jack.
●Do not raise the vehicle to a height greater than that required to replace the tire.
●Use a jack stand if it is necessary to get under the vehicle.
●When lowering the vehicle, make sure that there is no-one near the vehicle. If there
are people nearby, warn them vocally before lowering.