2016 LEXUS RX450H tow
[x] Cancel search: towPage 439 of 660

4395-5. Using the other interior features
5
Interior features
RX450h_U_OM0E013U
NOTICE
■Conditions in which the wireless charger may not operate correctly
In the following situations, the wireless charger may not operate correctly:
●When a portable device is fully charged
●When there is a foreign object between the charging area and portable device
●When a portable device becomes hot while charging
●When a portable device is placed on the wireless area with its charging surface fac-
ing up
●When a portable device is not centered on the charging area
●When the vehicle is near a TV tower, electric power plant, gas station, radio station,
large display, airport or other facility that generates strong radio waves or electrical
noise
●When the portable device is in contact with, or is covered by any of the following
metallic objects
• Cards to which aluminum foil is attached
• Cigarette boxes that have aluminum foil inside
• Metallic wallets or bags
• Coins
• Metal hand warmers
• Media such as CDs and DVDs
●When wireless keys (that emit radio waves) other than those of your vehicle are being
used nearby.
If in situations other than above the wirele ss charger does not operate properly or the
operation indicator light is blinking, the wireless charger may be malfunctioning. Con-
tact your Lexus dealer.
■To prevent failure or damage to data
●Do not bring magnetic cards, such as a cr edit card, or magnetic recording media,
close to the wireless charger while charging. Otherwise, data may be erased due to
the influence of magnetism.
Additionally, do not bring pr ecision instruments such as wrist watches, close to the
wireless charger, as such objects may malfunction.
●Do not leave portable devices in the cab in. The temperature inside the cabin may
become high when parked in the sun, and cause damage to the device.
■To prevent 12-volt battery discharge
Do not use the wireless charger for a long pe riod of time with the hybrid system is
stopped.
Page 455 of 660

4555-5. Using the other interior features
5
Interior features
RX450h_U_OM0E013U
■Automatic Collision Notification
In case of either airbag deployment or severe rear-end collision, the system is
designed to automatically call the re sponse center. The responding agent
receives the vehicle’s location and attempts to speak with the vehicl\
e occu-
pants to assess the level of emergency. If the occupants are unable to commu-
nicate, the agent automatically treats the call as an emergency, contacts the
nearest emergency services provider to describe the situation, and requests
that assistance be sent to the location.
■Stolen Vehicle Location
If your vehicle is stolen, Safety Conn ect can work with local authorities to
assist them in locating and recovering the vehicle. After filing a police report,
call the Safety Connect response center at 1-800-25-LEXUS
(1-800-255-3987) and follow the prompts for Safety Connect to initiate this
service.
In addition to assisting law enforcemen t with recovery of a stolen vehicle,
Safety-Connect-equipped vehicle locatio n data may, under certain circum-
stances, be shared with third parties to locate your vehicle. Further informa-
tion is available at Lexus.com.
■Emergency Assistance Button (“SOS”)
In the event of an emergency on the ro ad, push the “SOS” button to reach the
Safety Connect response center. Th e answering agent will determine your
vehicle’s location, assess the emergency, and dispatch the necessary assis-
tance required.
If you accidentally press the “SOS” button, tell the response-center agent that you
are not experiencing an emergency.
■Enhanced Roadside Assistance
Enhanced Roadside Assistance adds GP S data to the already included war-
ranty-based Lexus roadside service.
Subscribers can press the “SOS” button to reach a Safety Connect response-
center agent, who can help with a wide range of needs, such as: towing, flat
tire, fuel delivery, etc. For a descript ion of the Roadside Assistance services
and their limitations, please see the Safety Connect Terms and Conditions,
which are available at Lexus.com.
Safety Connect services
Page 471 of 660

471
RX450h_U_OM0E013U
6
Maintenance and care
6-3. Do-it-yourself maintenance
Do-it-yourself service precautions
If you perform maintenance by yourself, be sure to follow the correct proce-
dure as given in these sections.
ItemsParts and tools
12-volt battery con-
dition (P. 483)•Grease
• Conventional wrench (for terminal clamp bolts)
Brake fluid level
( P. 481)
• FMVSS No.116 DOT 3 or SAE J1703 brake fluid
• Rag or paper towel
• Funnel (used only for adding brake fluid)
Engine/power con-
trol unit coolant level
( P. 479)
• “Toyota Super Long Life Coolan t” or a similar high quality
ethylene glycol-based non-silicate, non-amine, non-nitrite
and non-borate coolant with long-life hybrid organic acid
technology
For the U.S.A.:
“Toyota Super Long Life Coolant” is pre-mixed with 50%
coolant and 50% deionized water.
For Canada:
“Toyota Super Long Life Cool ant” is pre-mixed with 55%
coolant and 45% deionized water.
• Funnel (used only for adding coolant)
Engine oil level
( P. 476)
• “Toyota Genuine Motor Oil” or equivalent
• Rag or paper towel
• Funnel (used only for adding engine oil)
Fuses ( P. 508)• Fuse with same amperage rating as original
Headlight aim*
( P. 511)• Phillips-head screwdriver
Light bulbs
( P. 513)• Bulb with same number and wattage rating as original
• Flathead screwdriver•Wrench
Radiator and con-
denser ( P. 480)
Tire inflation pres-
sure (P. 496)• Tire pressure gauge• Compressed air source
Page 477 of 660

4776-3. Do-it-yourself maintenance
6
Maintenance and care
RX450h_U_OM0E013U
■Adding engine oil
If the oil level is below or near the
low level mark, add engine oil of the
same type as that already in the
engine.
Make sure to check the oil type and prepare the items needed before adding
oil.
Remove the oil filler cap by turning it counterclockwise.
Add engine oil slowly, checking the dipstick.
Install the oil filler cap by turning it clockwise.
■Engine oil consumption
A certain amount of engine oil will be consumed while driving. In the following situations,
oil consumption may increase, and engine oil may need to be refilled in between oil
maintenance intervals.
●When the engine is new, for example directly after purchasing the vehicle or after
replacing the engine
●If low quality oil or oil of an inappropriate viscosity is used
●When driving at high engine speeds or with a heavy load, when towing, or when driving
while accelerating or decelerating frequently
●When leaving the engine idling for a long time, or when driving frequently through
heavy traffic
Engine oil selection P. 586
Oil quantity (Low Full)1.9 qt. (1.8 L, 1.6 Imp. qt.)
ItemsClean funnel
1
2
3
Page 492 of 660

4926-3. Do-it-yourself maintenance
RX450h_U_OM0E013U
■Situations in which the tire pressure warning system may not operate properly
●In the following cases, the tire pressure warning system may not operate properly.
• If non-genuine Lexus wheels are used.
• A tire has been replaced with a tire that is not an OE (Original Equipment) tire.
• A tire has been replaced with a tire that is not of the specified size.
• Tire chains etc. are equipped.
• If a window tint that affects th e radio wave signals is installed.
• If there is a lot of snow or ice on the vehi cle, particularly around the wheels or wheel
housings.
• If the tire inflation pressure is extr emely higher than the specified level.
• If wheel without the tire pressure warning valve and transmitter is used.
• If the ID code on the tire pressure warning valves and transmitters is not registered in the tire pressure warning computer.
●Performance may be affected in the following situations.
• Near a TV tower, electric power plant, gas station, radio station, large display, air-
port or other facility that generates st rong radio waves or electrical noise.
• When carrying a portable radio, cellular phone, cordless phone or other wireless
communication device.
If tire position information is not correctl y displayed due to the radio wave conditions,
the display may be corrected by driving and changing the radio wave conditions.
●When the vehicle is parked, the time taken for the warning to start or go off could be
extended.
●When tire inflation pressure declines rapidly for example when a tire has burst, the
warning may not function.
■The initialization operation
●Make sure to carry out initialization afte r adjusting the tire inflation pressure.
Also, make sure the tires are cold before carryi ng out initialization or tire inflation pres-
sure adjustment.
●If you have accidentally turned the power switch off during initialization, it is not neces-
sary to press the reset switch again as initialization will restart automatically when the
power switch has been turned to ON mode for the next time.
●If you accidentally press the re set switch when initialization is not necessary, adjust the
tire inflation pressure to the specified leve l when the tires are cold, and conduct initial-
ization again.
●While the position of each tire is being de termined and the inflation pressures are not
being displayed on the multi-info rmation display, if the inflation pressure of a tire drops,
the tire pressure warning light will come on.
Page 495 of 660

4956-3. Do-it-yourself maintenance
6
Maintenance and care
RX450h_U_OM0E013U
WARNING
■When inspecting or replacing tires
Observe the following precautions to prevent accidents.
Failure to do so may cause damage to parts of the drive train as well as dangerous han-
dling characteristics, which may lead to an accident resulting in death or serious injury.
●Do not mix tires of different makes, models or tread patterns.
Also, do not mix tires of remarkably different treadwear.
●Do not use tire sizes other than those recommended by Lexus.
●Do not mix differently constructed tires (radial, bias-belted or bias-ply tires).
●Do not mix summer, all season and snow tires.
●Do not use tires that have been used on another vehicle.
Do not use tires if you do not know how they were used previously.
●Do not tow if your vehicle has a compact spare tire installed.
■When initializing the tire pressure warning system
Do not initializing tire inflatio n pressure without first adjusting the tire inflation pressure
to the specified level. Otherwise, the tire pressure warning light may not come on even
if the tire inflation pressure is low, or it may come on when the tire inflation pressure is
actually normal.
NOTICE
■Repairing or replacing tires, wheels, tire pressure warning valves, transmitters and
tire valve caps
●When removing or fitting the wheels, tires or the tire pressure warning valves and
transmitters, contact your Lexus dealer as the tire pressure warning valves and trans-
mitters may be damaged if not handled correctly.
●Make sure to install the tire valve caps. If the tire valve caps are not installed, water
could enter the tire pressure warning valves and the tire pressure warning valves
could be bound.
●When replacing tire valve caps, do not use tire valve caps other than those specified.
The cap may become stuck.
■To avoid damage to the tire pressu re warning valves and transmitters
When a tire is repaired with liquid sealants, the tire pressure warning valve and trans-
mitter may not operate properly. If a liquid sealant is used, contact your Lexus dealer or
other qualified service shop as soon as possi ble. Make sure to replace the tire pressure
warning valve and transmitter when replacing the tire. ( P. 488)
■Driving on rough roads
Take particular care when driving on roads with loose surfaces or potholes.
These conditions may cause lo sses in tire inflation pressure, reducing the cushioning
ability of the tires. In addition, driving on rough roads may cause damage to the tires
themselves, as well as the vehicle’s wheels and body.
■If tire inflation pressure of ea ch tire becomes low while driving
Do not continue driving, or your tires and/or wheels may be ruined.
Page 521 of 660

5216-3. Do-it-yourself maintenance
6
Maintenance and care
RX450h_U_OM0E013U
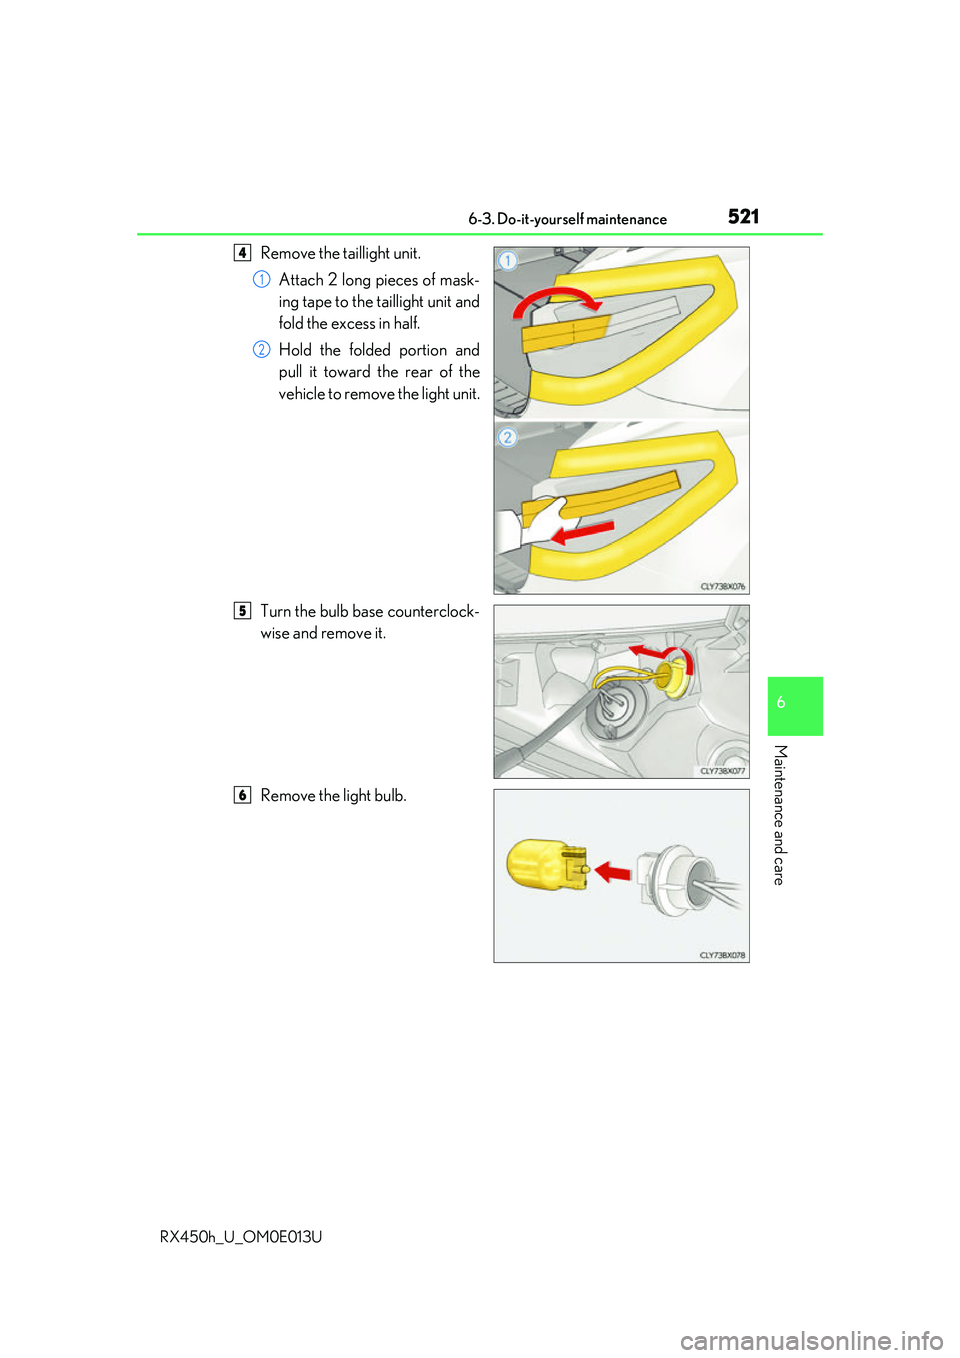
Remove the taillight unit.Attach 2 long pieces of mask-
ing tape to the taillight unit and
fold the excess in half.
Hold the folded portion and
pull it toward the rear of the
vehicle to remove the light unit.
Turn the bulb base counterclock-
wise and remove it.
Remove the light bulb.4
1
2
5
6
Page 522 of 660

5226-3. Do-it-yourself maintenance
RX450h_U_OM0E013U
Install a new light bulb and then
install the bulb base to the light
unit by inserting it and turning it
clockwise.
After installing th e bulb base, wiggle
it lightly to make sure it is securely
installed and turn on the rear turn sig-
nal lights to visually check that there
is no light leaking from between the
bulb base and light unit.
Install the light unit.
Align the tabs and push the light unit
toward the front of the vehicle to
install it.
Install the 2 screws.
Install the cover.
Remove the protective tape.
47
8
9
10
11