Page 397 of 660

397
5Interior features
RX450h_U_OM0E013U
5-1. Basic operation of the Remote Touch screen
Remote Touch ............................ 398
12.3-inch displa y.........................402
5-2. Using the air conditioning system and defogger
Lexus Climate Concierge ..... 404
Automatic air conditioning system ......................................... 405
Heated steering wheel/ seat heaters/
seat ventilators .......................... 414
5-3. Using the interior lights Interior lights list........................... 417
• Interior lights ........................... 418
• Personal lights ........................ 419
5-4. Using the storage features List of storage features.............. 421
• Glove box ............................... 422
• Console box ........................... 422
• Cup holders............................423
• Door pockets ......................... 424
• Bottle holders ........................425
• Coin box ..................................425
• Auxiliary boxes......................426
Luggage compartment features........................................ 427 5-5. Using the other interior
features
Other interior features ............ 432
• Sun visors ................................ 432
• Vanity mirrors ....................... 432
• Clock ........................................ 433
• Wireless charger ................. 433
• Power outlets (12 VDC) ................................. 440
• Power outlet (120 VAC)................................441
• Front passenger footwell hooks......................................... 442
• Rear door sunshades ......... 443
• Armrest .................................... 443
• Assist grips.............................. 444
• Coat hooks ............................. 444
Garage door opener ............... 445
LEXUS Enform Safety Connect ...................................... 452
Page 406 of 660

4065-2. Using the air conditioning system and defogger
RX450h_U_OM0E013U
■Change the airflow mode
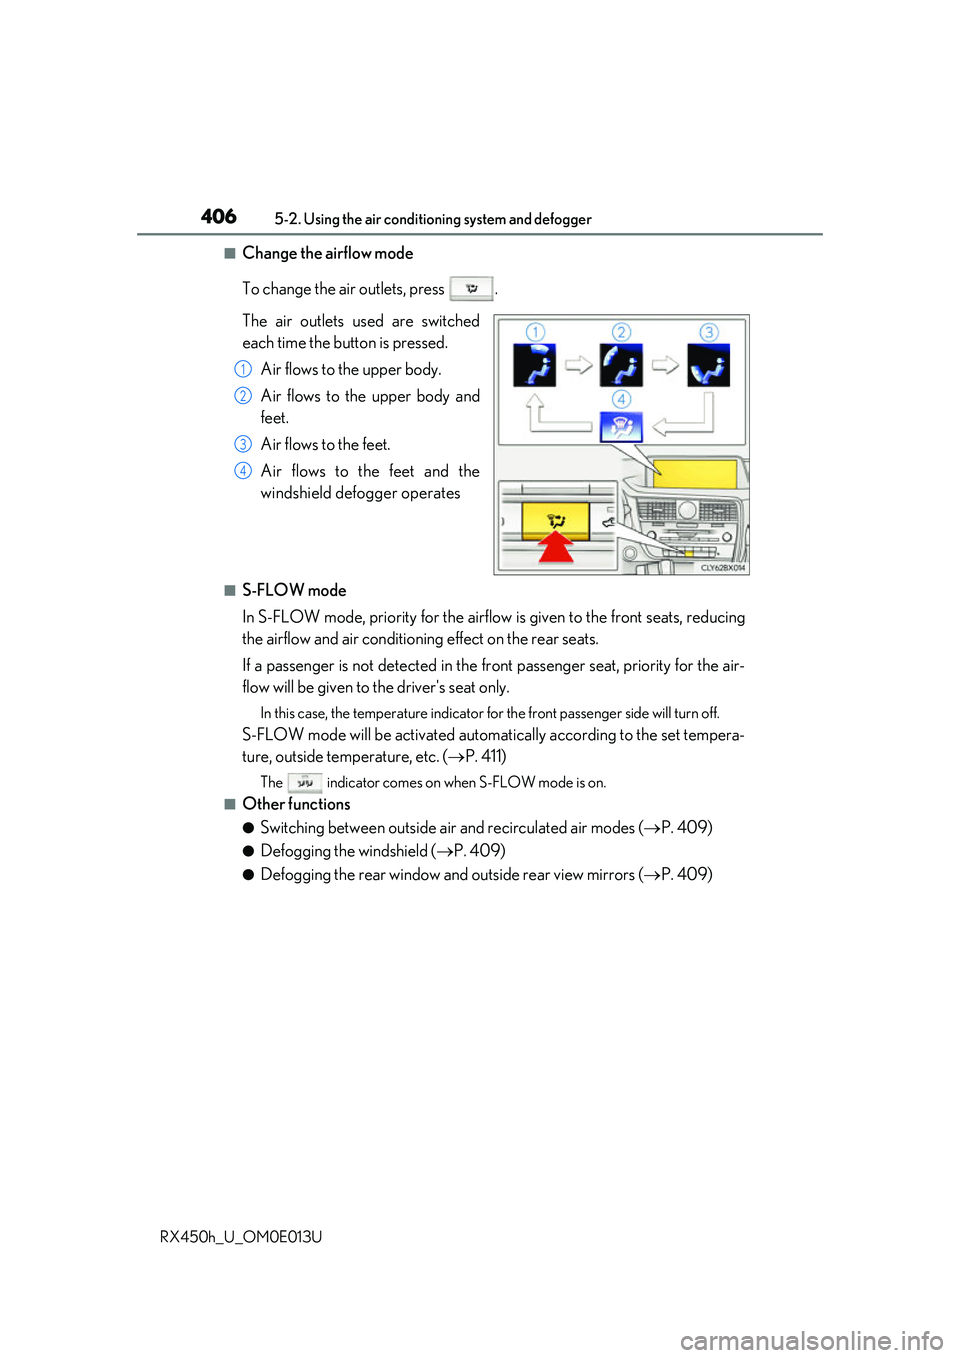
To change the air outlets, press .
The air outlets used are switched
each time the button is pressed. Air flows to the upper body.
Air flows to the upper body and
feet.
Air flows to the feet.
Air flows to the feet and the
windshield defogger operates
■S-FLOW mode
In S-FLOW mode, priority for the airflo w is given to the front seats, reducing
the airflow and air conditioning effect on the rear seats.
If a passenger is not detected in the fr ont passenger seat, priority for the air-
flow will be given to the driver's seat only.
In this case, the temperature indicator for the front passenger side will turn off.
S-FLOW mode will be activated automa tically according to the set tempera-
ture, outside temperature, etc. ( P. 411)
The indicator comes on when S-FLOW mode is on.
■Other functions
●Switching between outside air and recirculated air modes ( P. 409)
●Defogging the windshield ( P. 409)
●Defogging the rear window and outside rear view mirrors ( P. 409)
1
2
3
4
Page 409 of 660

4095-2. Using the air conditioning system and defogger
5
Interior features
RX450h_U_OM0E013U
■Switching between outside air and recirculated air modes
Press .
The mode switches between (recir culated air mode), automatic and
(outside air mode) modes each time the button is pressed.
When the system is switched to automatic mode, the air conditioning system oper-
ates automatically.
■Defogging the windshield
Defoggers are used to defog the wi ndshield and front side windows.
Press .
Set the outside/recirculated air mode button to outside air mode if the recirculated
air mode is used. (It may switch automatically.)
To defog the windshield and the side wind ows early, turn the air flow and tempera-
ture up.
To return to the previous mode, press again when the windshield is
defogged.
■Defogging the rear window and outside rear view mirrors
Defoggers are used to defog the rear window and to remove raindrops, dew
and frost from the outside rear view mirrors.
Press .
The defoggers will automatically turn off after a period of time.
■Windshield wiper de-icer (if equipped)
This feature is used to prevent ice fr om building up on the windshield and
wiper blades.
Select on the option control screen.
When the windshield wiper de-icer is on , is displayed on the air condition-
ing control screen.
The windshield wiper de-icer will automati cally turn off after a period of time.
Other functions
Page 413 of 660

4135-2. Using the air conditioning system and defogger
5
Interior features
RX450h_U_OM0E013U
WARNING
■To prevent the windshield from fogging up
●Do not use during cool air operation in extremely humid weather. The differ-
ence between the temperature of the outside air and that of the windshield can cause
the outer surface of the windshield to fog up, blocking your vision.
■To prevent burns
●Do not touch the rear view mirror surfaces when the outside rear view mirror defog-
gers are on.
●Do not touch the glass at lower part of the windshield or to the side of the front pillars
when the windshield wiper de-icer is on. (if equipped)
NOTICE
■Humidity sensor
■To prevent 12-volt battery discharge
Do not leave the air conditioning system on longer than necessary when the hybrid sys-
tem is off.
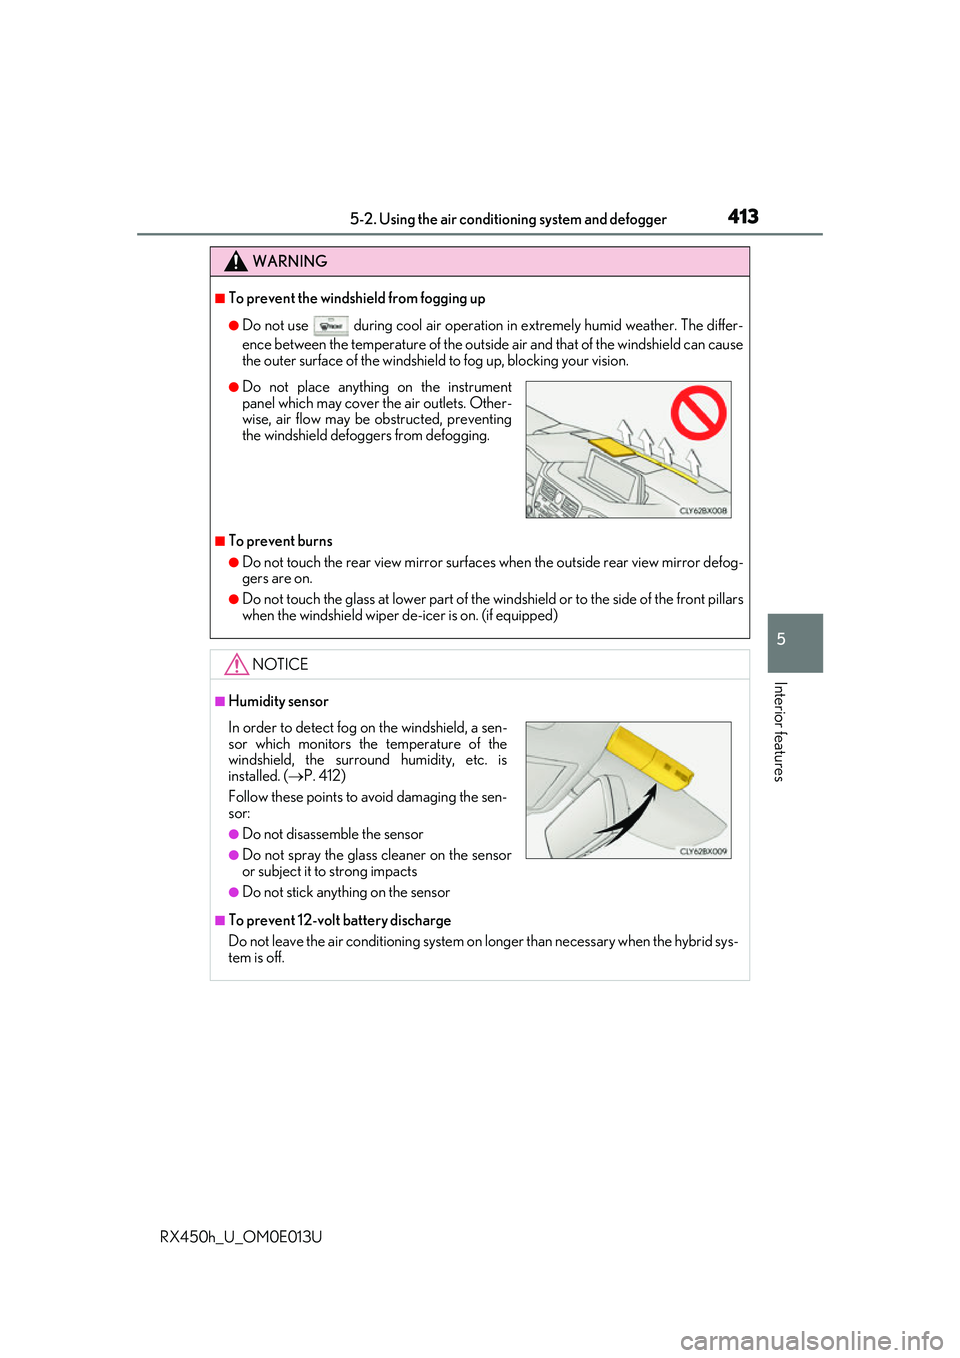
●Do not place anything on the instrument
panel which may cover the air outlets. Other-
wise, air flow may be obstructed, preventing
the windshield defoggers from defogging.
In order to detect fog on the windshield, a sen-
sor which monitors the temperature of the
windshield, the surround humidity, etc. is
installed. ( P. 412)
Follow these points to avoid damaging the sen-
sor:
●Do not disassemble the sensor
●Do not spray the glass cleaner on the sensor
or subject it to strong impacts
●Do not stick anything on the sensor
Page 432 of 660
432
RX450h_U_OM0E013U5-5. Using the other interior features
To set the visor in the forward posi-
tion, flip it down.
To set the visor in the side position,
flip down, unhook, and swing it to the
side.
To use the side extender, place the
visor in the side position, then slide it
backward.
Slide the cover to open.
The light turns on when the cover is
opened.
If the vanity lights remain on when the power switch is turned off, the light will go off auto-
matically after 20 minutes.
Other interior features
Sun visors
1
2
3
Vanity mirrors
NOTICE
To prevent 12-volt battery discharge, do not leave the vanity lights on for extended peri-
ods while the hybrid system is off.
Page 446 of 660

4465-5. Using the other interior features
RX450h_U_OM0E013U
■Programming HomeLink®
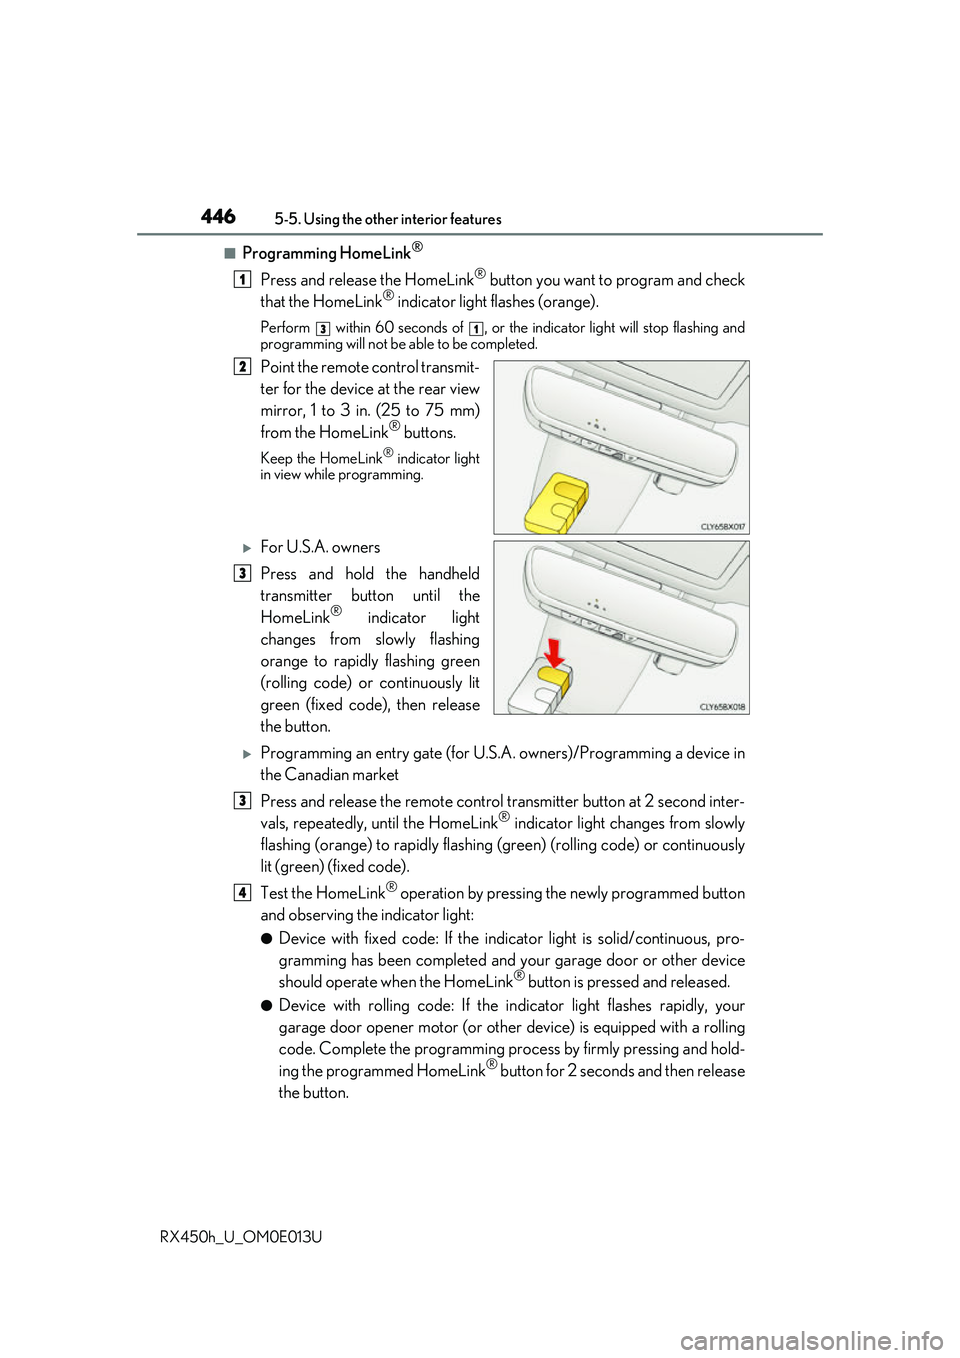
Press and release the HomeLink® button you want to program and check
that the HomeLink® indicator light flashes (orange).
Perform within 60 seconds of , or the indicator light will stop flashing and
programming will not be able to be completed.
Point the remote control transmit-
ter for the device at the rear view
mirror, 1 to 3 in. (25 to 75 mm)
from the HomeLink
® buttons.
Keep the HomeLink® indicator light
in view while programming.
For U.S.A. owners
Press and hold the handheld
transmitter button until the
HomeLink
® indicator light
changes from slowly flashing
orange to rapidly flashing green
(rolling code) or continuously lit
green (fixed code), then release
the button.
Programming an entry gate (for U.S. A. owners)/Programming a device in
the Canadian market
Press and release the remote control transm itter button at 2 second inter-
vals, repeatedly, until the HomeLink
® indicator light changes from slowly
flashing (orange) to rapidly flashing (green) (rolling code) or continuously
lit (green) (fixed code).
Test the HomeLink
® operation by pressing the newly programmed button
and observing the indicator light:
●Device with fixed code: If the indicator light is solid/continuous, pro-
gramming has been completed and your garage door or other device
should operate when the HomeLink
® button is pressed and released.
●Device with rolling code: If the in dicator light flashes rapidly, your
garage door opener motor (or other device) is equipped with a rolling
code. Complete the programming process by firmly pressing and hold-
ing the programmed HomeLink
® button for 2 seconds and then release
the button.
1
31
2
3
3
4
Page 458 of 660

458
RX450h_U_OM0E013U6-1. Maintenance and care
●Working from top to bott
om, liberally apply water to the vehicle body, wheel
wells and underside of the vehicl e to remove any dirt and dust.
●Wash the vehicle body using a sponge or soft cloth, such as a chamois.
●For hard-to-remove marks, use car wa sh soap and rinse thoroughly with
water.
●Wipe away any water.
●Wax the vehicle when the waterproof coating deteriorates.
If water does not bead on a clean surface, apply wax when the vehicle body is cool.
■Self-restoring coat
The vehicle body has a self-restoring coating that is resistant to small surface scratches
caused in a car wash etc.
●The coating lasts for 5 to 8 years from when the vehicle is delivered from the plant.
●The restoration time differs depending on the depth of the scratch and outside tem-
perature. The restoration ti me may become shorter when the coating is warmed by
applying warm water.
●Deep scratches caused by keys, coins, etc. cannot be restored.
●Do not use wax that contain abrasives.
■Automatic car washes
●Before washing the vehicle:
• Fold the mirrors
• Turn off the power back door
Start washing from the front of the vehicle. Extend the mirrors before driving.
●Brushes used in automatic car washes may scratch the vehicle surface and harm your
vehicle’s paint.
●Rear spoiler may not be wash able in some automatic car washes. There may also be an
increased risk of damage to vehicle.
■High pressure car washes
●Do not allow the nozzles of the car wash to come within close proximity of the windows.
●Before using the car wash, check that the fuel filler door on your vehicle is closed prop-
erly.
Cleaning and protecting the vehicle exterior
Perform the following to protect the ve hicle and maintain it in prime condi-
tion:
Page 612 of 660
6128-2. Customization
RX450h_U_OM0E013U
■Driving position memory ( P. 174)
■Steering wheel ( P. 181)
■Outside rear view mirrors ( P. 185)
FunctionDefault settingCustomized setting
Driver’s seat movement when
exiting the vehicleStandardOffOOPartial
Selecting doors linked to the
memory recall functionDriver’s doorAll doors—O
12
FunctionDefault settingCustomized setting
Auto tilt away functionOnOff—O
12
FunctionDefault settingCustomized setting
Automatic mirror folding and
extending operationLinked to the lock-
ing/unlocking of the
doorsOff
—OLinked to operation of the power switch
12