Page 332 of 700
3325-1. Basic Operations
RC350_RC300_RC200t_RC F_U (OM24671U)
Press and hold the switch until
you hear beeps indicating that the
system is listening.
The Mobile Assistant can be used
only when the following screen is
displayed.
To cancel the Mobile Assistant, select
“Cancel”, or press and hold the off hook
switch.
To restart the Mobile Assistant for addi-
tional commands, press the off hook
switch. Mobile Assistant can only be
restarted after the system responds to a
voice command. After some phone and
music commands, the Mobile Assistant
feature will automatically end to com-
plete the requested action.
Mobile Assistant
The Mobile Assistant feature will activate Apple’s Siri Eyes Free mode via
the steering wheel switches. To operate the Mobile Assistant, a compatible
cellular phone must be registered and connected to this system via
Bluetooth
. ( P. 3 8 3 )
1
2
Page 344 of 700
3445-3. Using the audio system
RC350_RC300_RC200t_RC F_U (OM24671U)
Display the audio menu screen. ( P. 3 4 8 )
Select “Sound Settings”.
To change between the sound setting screen and DSP setting screen, move the
controller to the right then select the desired screen.
“Sound”
Adjust the treble, mid or bass.
Adjust the front/rear audio balance.
Adjust the left/right audio balance.
“DSP”
Set the automatic sound levelizer
(ASL) on/off
Set the surround function on/off
■The sound quality level is adjusted individually
The treble, mid and bass levels can be adjusted for each audio mode separately.
■About Automatic Sound Levelizer (ASL)
ASL automatically adjusts the volume and tone quality according to the vehicle speed.
Optimal use of the audio system
On the “Sound Settings” screen, sound quality (Treble/Mid/Bass), volume
balance and DSP settings can be adjusted.
How to adjust the sound settings and sound quality
1
2
123
4
5
1
2
Page 356 of 700
3565-4. Using the radio
RC350_RC300_RC200t_RC F_U (OM24671U)
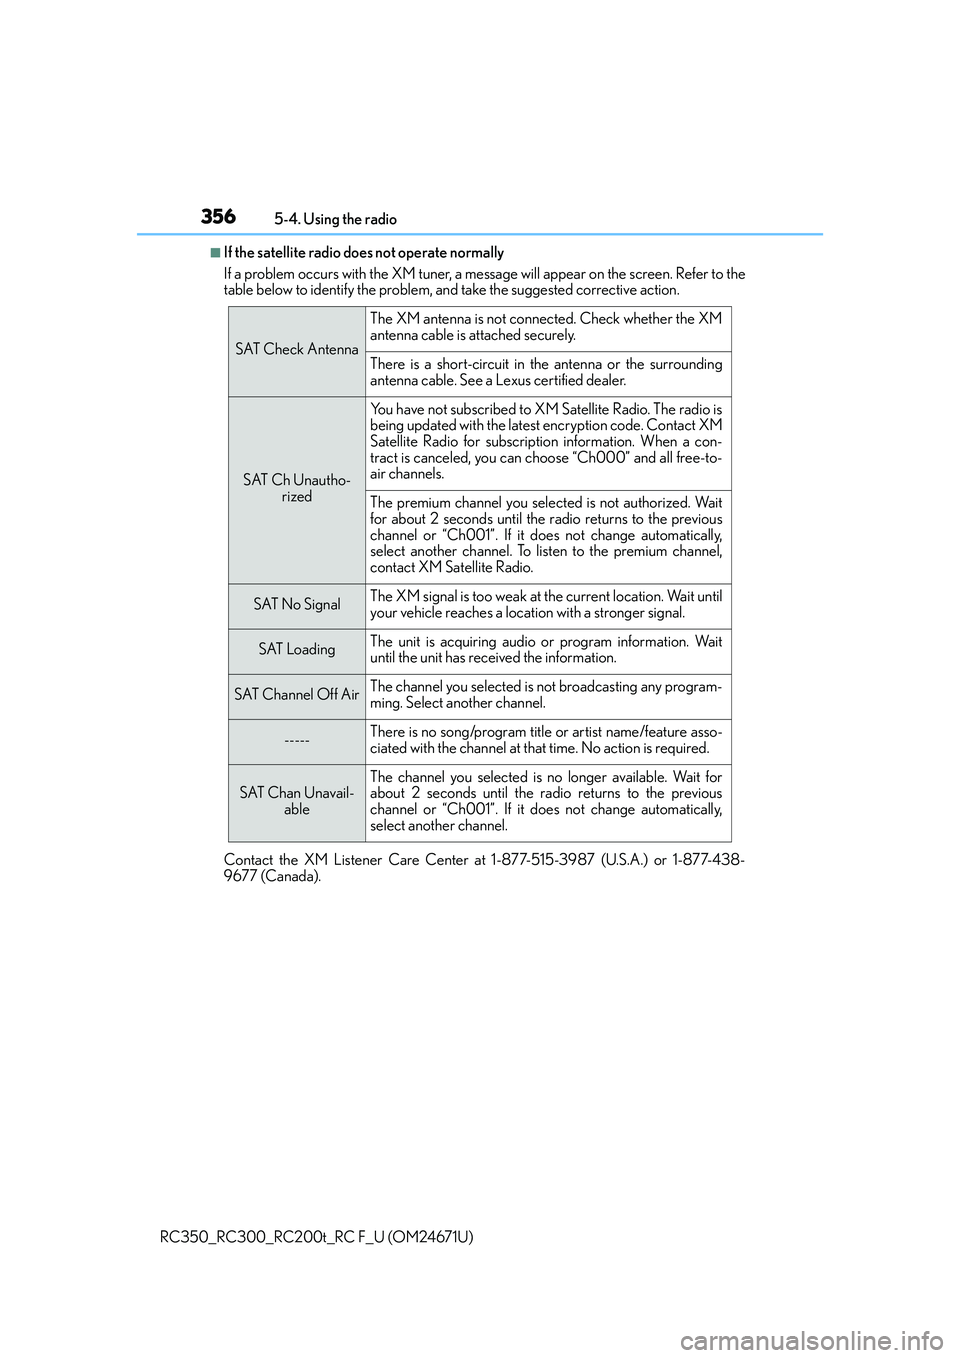
■If the satellite radio does not operate normally
If a problem occurs with the XM tuner, a me ssage will appear on the screen. Refer to the
table below to identify the problem, and take the suggested corrective action.
Contact the XM Listener Care Center at 1-877-515-3987 (U.S.A.) or 1-877-438-
9677 (Canada).
SAT Check Antenna
The XM antenna is not connected. Check whether the XM
antenna cable is attached securely.
There is a short-circuit in the antenna or the surrounding
antenna cable. See a Lexus certified dealer.
SAT Ch Unautho-
rized
Yo u h a v e n o t s u b s c r i b e d t o X M Satellite Radio. The radio is
being updated with the latest encryption code. Contact XM
Satellite Radio for subscripti on information. When a con-
tract is canceled, you can choose “Ch000” and all free-to-
air channels.
The premium channel you select ed is not authorized. Wait
for about 2 seconds until the radio returns to the previous
channel or “Ch001”. If it does not change automatically,
select another channel. To listen to the premium channel,
contact XM Satellite Radio.
SAT No SignalThe XM signal is too weak at the current location. Wait until
your vehicle reaches a location with a stronger signal.
SAT LoadingThe unit is acquiring audio or program information. Wait
until the unit has received the information.
SAT Channel Off AirThe channel you selected is not broadcasting any program-
ming. Select another channel.
-----There is no song/program title or artist name/feature asso-
ciated with the channel at that time. No action is required.
SAT Chan Unavail- ableThe channel you selected is no longer available. Wait for
about 2 seconds until the radio returns to the previous
channel or “Ch001”. If it does not change automatically,
select another channel.
Page 358 of 700
3585-5. Playing an audio CD and MP3/WMA/AAC discs
RC350_RC300_RC200t_RC F_U (OM24671U)
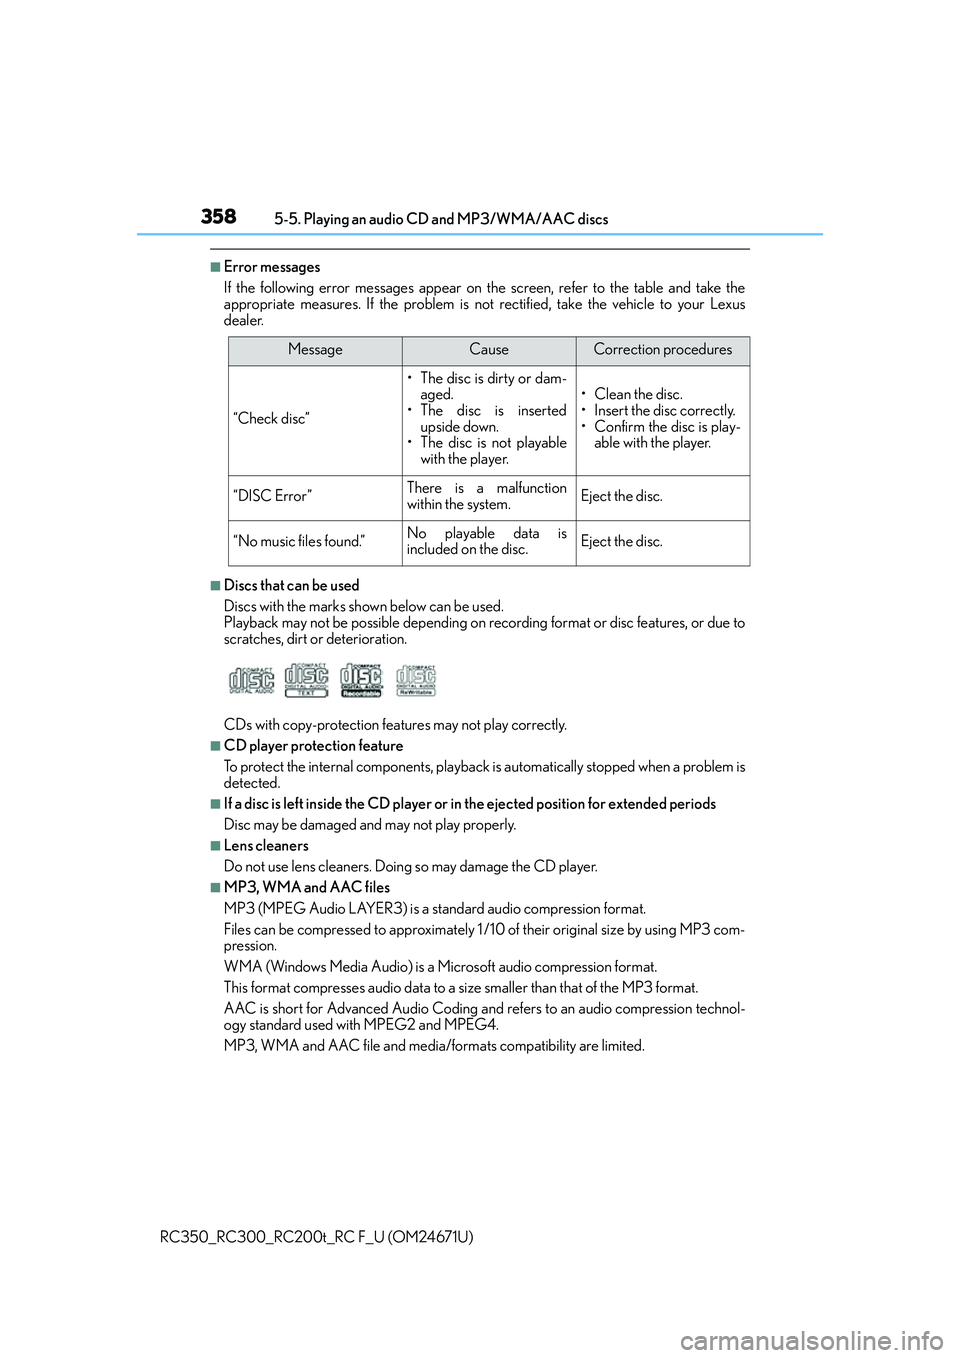
■Error messages
If the following error messages appear on the screen, refer to the table and take the
appropriate measures. If the pr oblem is not rectified, take the vehicle to your Lexus
dealer.
■Discs that can be used
Discs with the marks sh own below can be used.
Playback may not be possible depending on recording format or disc features, or due to
scratches, dirt or deterioration.
CDs with copy-protection feat ures may not play correctly.
■CD player protection feature
To protect the internal components, playback is automatically stopped when a problem is
detected.
■If a disc is left inside the CD player or in the ejected position for extended periods
Disc may be damaged and may not play properly.
■Lens cleaners
Do not use lens cleaners. Doing so may damage the CD player.
■MP3, WMA and AAC files
MP3 (MPEG Audio LAYER3) is a standard audio compression format.
Files can be compressed to approximately 1 /10 of their original size by using MP3 com-
pression.
WMA (Windows Media Audio) is a Microsoft audio compression format.
This format compresses audio data to a size smaller than that of the MP3 format.
AAC is short for Advanced Audio Coding and refers to an audio compression technol-
ogy standard used with MPEG2 and MPEG4.
MP3, WMA and AAC file and media/formats compatibility are limited.
MessageCauseCorrection procedures
“Check disc”
• The disc is dirty or dam- aged.
• The disc is inserted upside down.
• The disc is not playable with the player.
•Clean the disc.
• Insert the disc correctly.
• Confirm the disc is play- able with the player.
“DISC Error”There is a malfunction
within the system.Eject the disc.
“No music files found.”No playable data is
included on the disc.Eject the disc.
Page 378 of 700
3785-7. Connecting Bluetooth®
RC350_RC300_RC200t_RC F_U (OM24671U)
When you register a phone, auto connection will be activated. Always set it to
this mode and leave the Bluetooth® phone in a place where a connection can be
established.
When the engine switch is turned to ACCESSORY or IGNITION ON mode,
the system will search for a nearby cellular phone you have registered.
Next, the system automatically connects with the most recent phone that was
connected. The connected result is displayed.
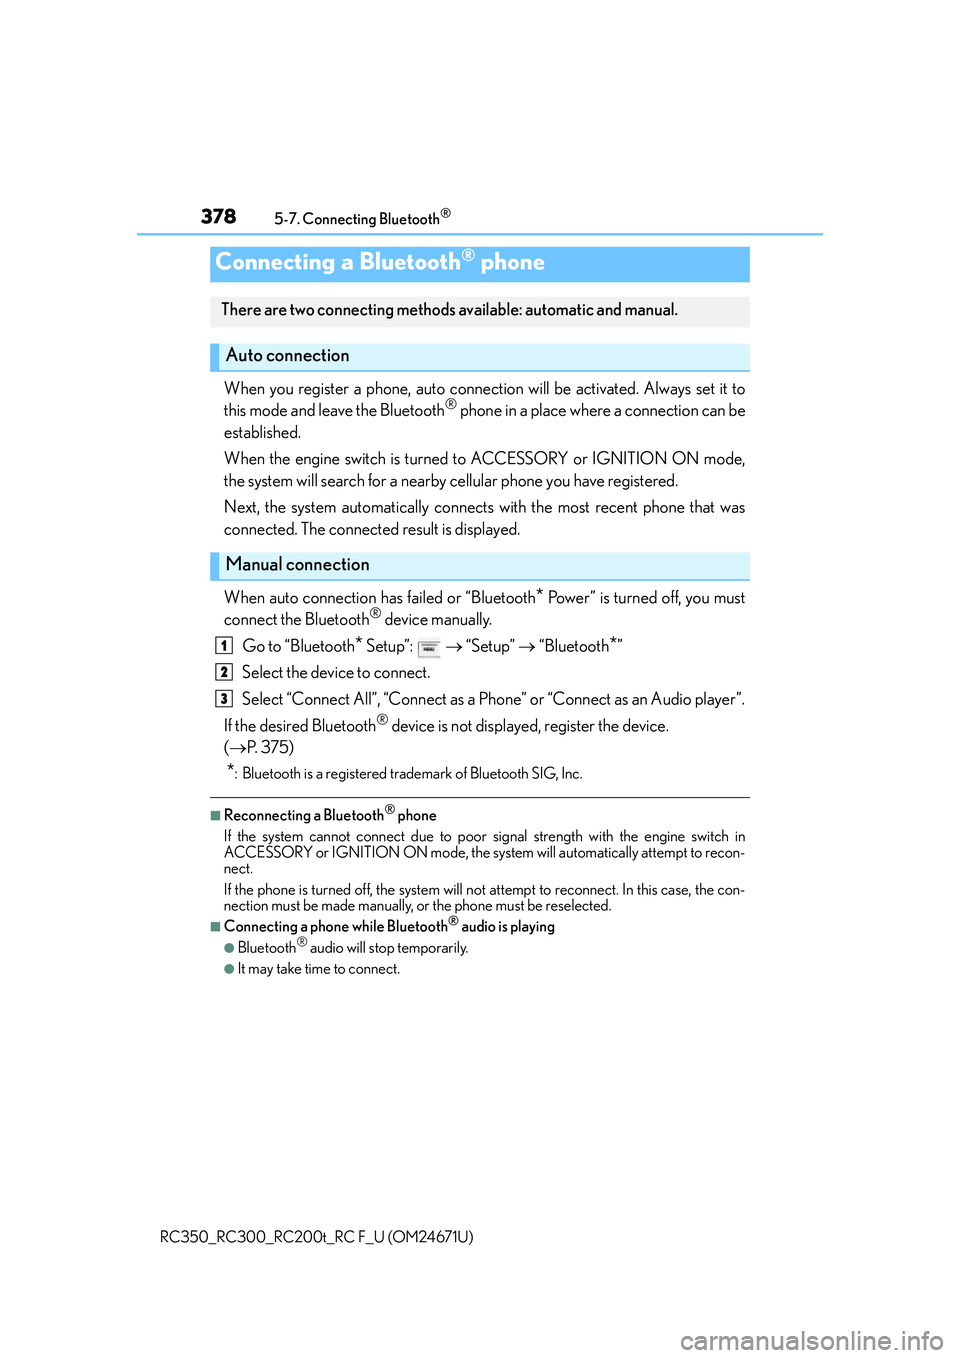
When auto connection has failed or “Bluetooth
* Power” is turned off, you must
connect the Bluetooth® device manually.
Go to “Bluetooth
* Setup”: “Setup” “Bluetooth*”
Select the device to connect.
Select “Connect All”, “Connect as a Ph one” or “Connect as an Audio player”.
If the desired Bluetooth
® device is not displayed, register the device.
( P. 3 7 5 )
*: Bluetooth is a registered trademark of Bluetooth SIG, Inc.
■Reconnecting a Bluetooth® phone
If the system cannot connect due to poor si gnal strength with the engine switch in
ACCESSORY or IGNITION ON mode, the syst em will automatically attempt to recon-
nect.
If the phone is turned off, the system will not attempt to reconnect. In this case, the con-
nection must be made manually, or the phone must be reselected.
■Connecting a phone while Bluetooth® audio is playing
●Bluetooth® audio will stop temporarily.
●It may take time to connect.
Connecting a Bluetooth® phone
There are two connecting methods av ailable: automatic and manual.
Auto connection
Manual connection
1
2
3
Page 386 of 700
3865-9. Bluetooth® Phone
RC350_RC300_RC200t_RC F_U (OM24671U)
You can transfer the phone numbers in a Bluetooth® phone to the system.
Operation methods differ between PBAP (Phone Book Access Profile) compat-
ible and PBAP inco mpatible Bluetooth
® phones. If the cellular phone does not
support either PBAP or OPP (Object Push Profile) service, you cannot transfer
contacts.
Press the switch on the steering wheel.
If the phonebook is empty, a message will be displayed.
For a PBAP compatible Bluetooth® phone and “Automatic Transfer” is off
To transfer new contacts from a cel-
lular phone, select “Always” and then
enable “Automatic Transfer”.
( P. 3 9 6 )
Select “Once” if you want to transfer
new contacts from a cellular phone.
For a PBAP incompatible and OPP compatible Bluetooth® phone
Select “Transfer” and operate your
cellular phone to transfer new con-
tacts from a cellular phone.
Select “Add” if you want to add a new
contact manually.
When the phonebook is empty
1
2
2
Page 389 of 700
3895-9. Bluetooth® Phone
5
Lexus Display Audio system
RC350_RC300_RC200t_RC F_U (OM24671U)
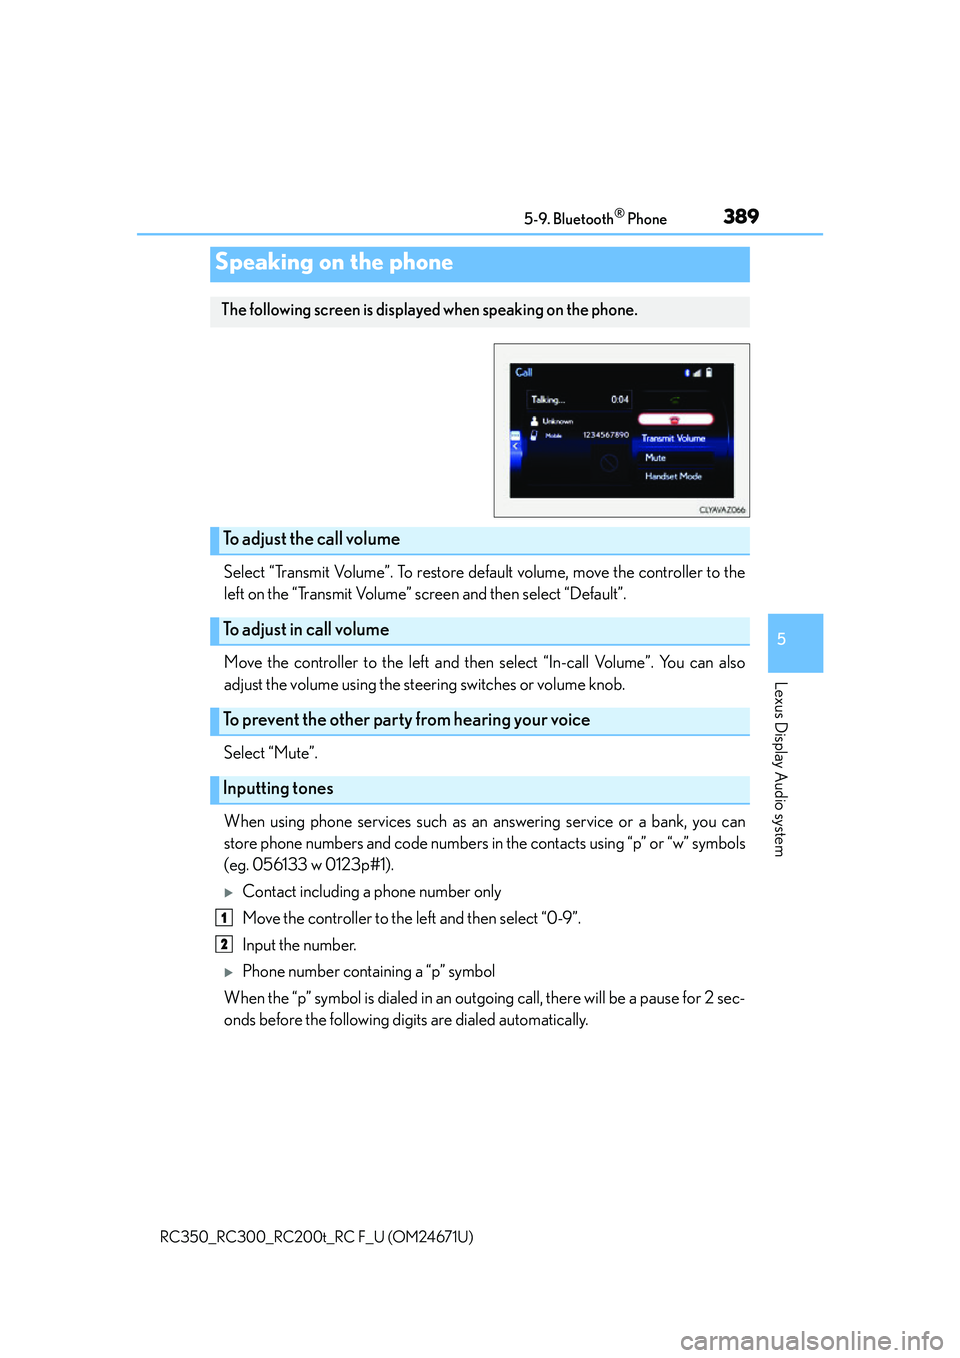
Select “Transmit Volume”. To restore default volume, move the controller to the
left on the “Transmit Volume” screen and then select “Default”.
Move the controller to the left and then select “In-call Volume”. You can also
adjust the volume using the steering switches or volume knob.
Select “Mute”.
When using phone services such as an answering service or a bank, you can
store phone numbers and code numbers in the contacts using “p” or “w” symbols
(eg. 056133 w 0123p#1).
Contact including a phone number only
Move the controller to the left and then select “0-9”.
Input the number.
Phone number containing a “p” symbol
When the “p” symbol is dialed in an outgoing call, there will be a pause for 2 sec-
onds before the following digits are dialed automatically.
Speaking on the phone
The following screen is displayed when speaking on the phone.
To adjust the call volume
To adjust in call volume
To prevent the other party from hearing your voice
Inputting tones
1
2
Page 396 of 700
396
RC350_RC300_RC200t_RC F_U (OM24671U)5-10. Phonebook
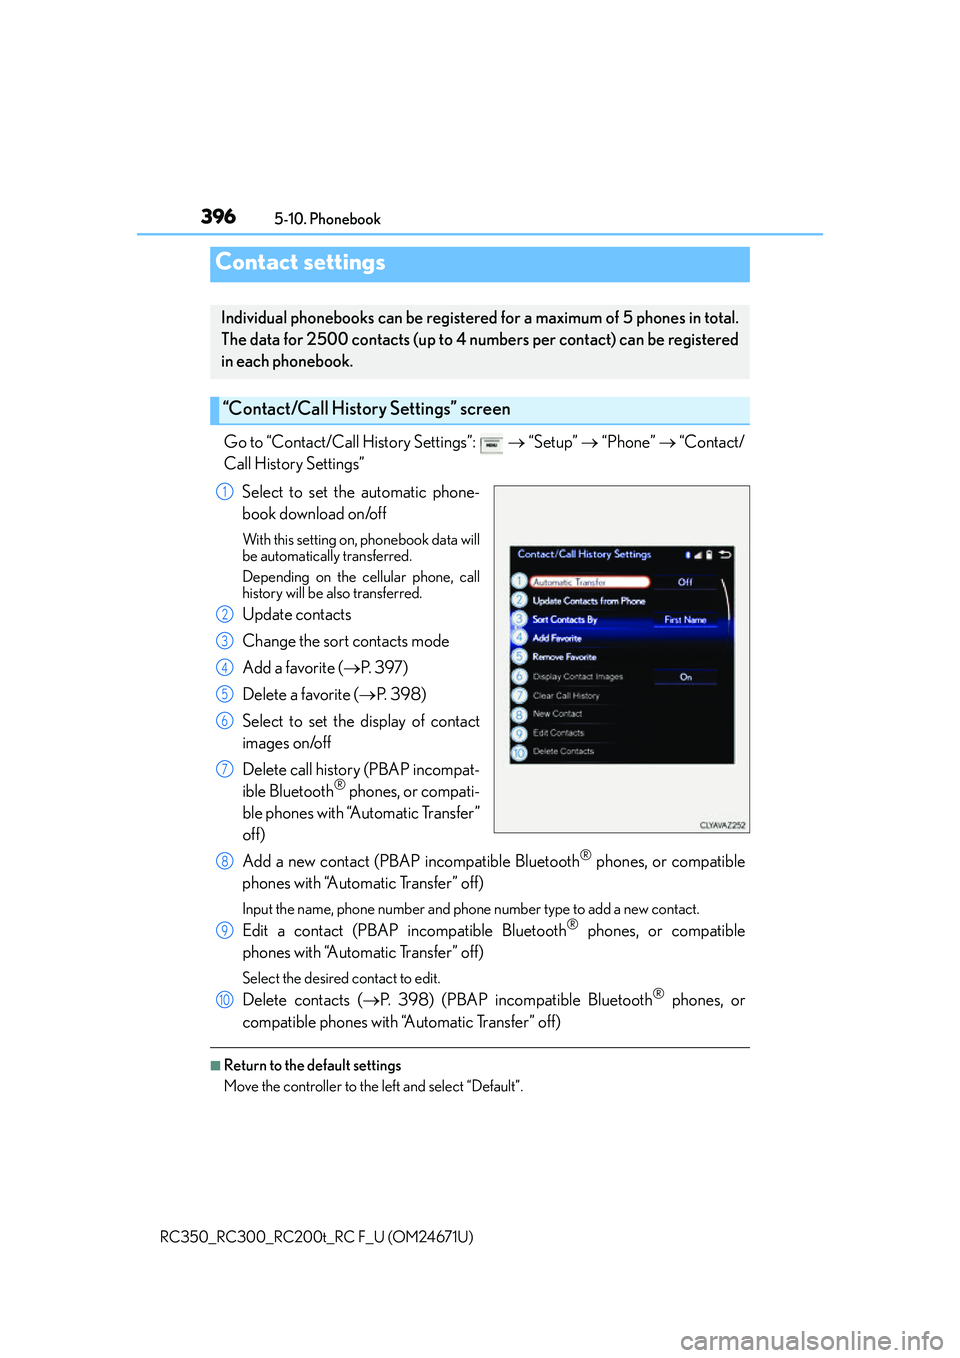
Go to “Contact/Call History Settings”:
“Setup” “Phone” “Contact/
Call History Settings”
Select to set the automatic phone-
book download on/off
With this setting on , phonebook data will
be automatically transferred.
Depending on the ce llular phone, call
history will be also transferred.
Update contacts
Change the sort contacts mode
Add a favorite ( P. 3 9 7 )
Delete a favorite ( P. 3 9 8 )
Select to set the display of contact
images on/off
Delete call history (PBAP incompat-
ible Bluetooth
® phones, or compati-
ble phones with “Automatic Transfer”
off)
Add a new contact (PBAP incompatible Bluetooth
® phones, or compatible
phones with “Automatic Transfer” off)
Input the name, phone number and phon e number type to add a new contact.
Edit a contact (PBAP incompatible Bluetooth® phones, or compatible
phones with “Automatic Transfer” off)
Select the desired contact to edit.
Delete contacts ( P. 398) (PBAP incompatible Bluetooth® phones, or
compatible phones with “Automatic Transfer” off)
■Return to the default settings
Move the controller to the left and select “Default”.
Contact settings
Individual phonebooks can be registered for a maximum of 5 phones in total.
The data for 2500 contacts (up to 4 nu mbers per contact) can be registered
in each phonebook.
“Contact/Call History Settings” screen
1
2
3
4
5
6
7
8
9
10