2016 LEXUS NX200T audio
[x] Cancel search: audioPage 417 of 660

4175-12. Other function
5
Lexus Display Audio system
NX200t_OM_USA_OM78081U
LEXUS Enform Remote
After you sign the Telematics Subscription Service Agreement, download the
Lexus Enform Remote app from your cellular phone’s app store, and register
within the app (or enroll and complete registration at the dealer), you can begin
using these services. ( P. 4 6 6 )
A variety of subscription terms are available. Contact your Lexus dealer, or call 1-
800-25-LEXUS (1-800-255-3987) fo r further subscription details.
: If equipped
Lexus Enform Remote is a cellular phone application that lets you view and
remotely control certain aspects of your vehicle.
For details about the functions and services of this application, refer to
http://www.lexus.com/enform/
.
Function of the Lexus Enform Remote is achieved by using an embedded cel-
lular device in the vehicle (D CM: Data Communication Module).
Subscription
Page 420 of 660

4206-1. Using the air conditioning system and defogger
NX200t_OM_USA_OM78081U
Automatic air conditioning system
Air outlets and fan speed are automatica lly adjusted according to the temper-
ature setting.
Vehicles with a Lexus Display Audio sy stem: Press the “MENU” button on the
Lexus Display Audio controller, then select “Climate” to display the air condi-
tioning control screen.
For details on the Lexus Display Audio controller, refer to “Lexus Display
Audio controller” on P. 328
Vehicles with a navigati on system: Press the “MENU” button on the Remote
Touch, then select “Climate” to display the air conditioning control screen.
For details on the Remote Touch, refer to the “NAVIGATION SYSTEM
OWNER’S MANUAL”.
Page 423 of 660

4236-1. Using the air conditioning system and defogger
6
Interior features
NX200t_OM_USA_OM78081U
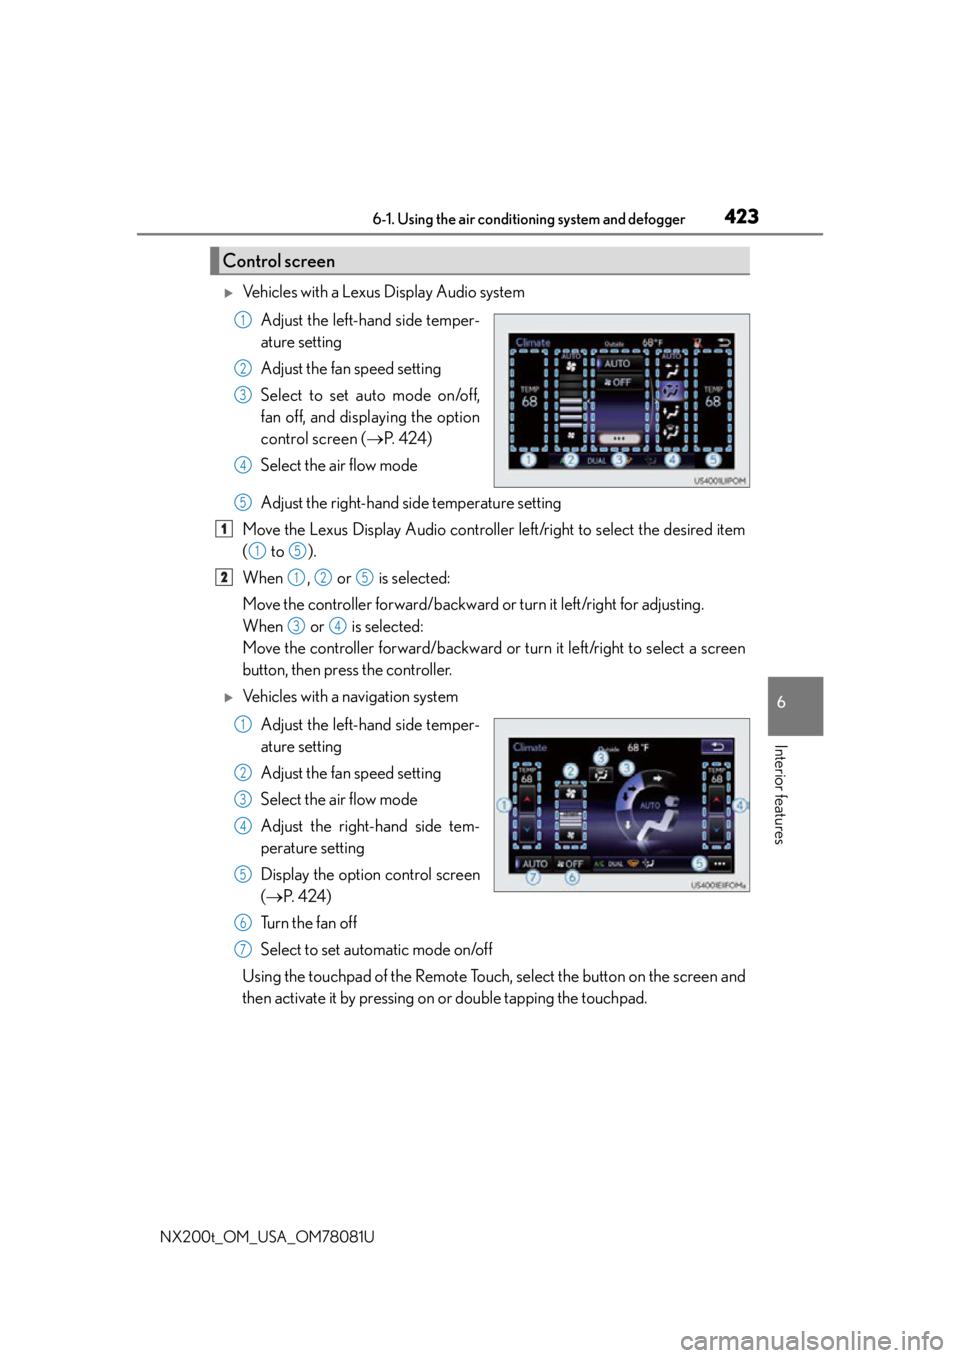
Vehicles with a Lexus Display Audio system
Adjust the left-hand side temper-
ature setting
Adjust the fan speed setting
Select to set auto mode on/off,
fan off, and displaying the option
control screen ( P. 4 2 4 )
Select the air flow mode
Adjust the right-hand side temperature setting
Move the Lexus Display Audio controller left/right to select the desired item
( to ).
When , or is selected:
Move the controller forward/backward or turn it left/right for adjusting.
When or is selected:
Move the controller forward/backward or turn it left/right to select a screen
button, then press the controller.
Vehicles with a navigation system
Adjust the left-hand side temper-
ature setting
Adjust the fan speed setting
Select the air flow mode
Adjust the right-hand side tem-
perature setting
Display the option control screen
( P. 4 2 4 )
Tu r n t h e f a n o f f
Select to set automatic mode on/off
Using the touchpad of the Remote Touch, select the button on the screen and
then activate it by pressing on or double tapping the touchpad.
Control screen
1
2
3
4
5
1
15
2125
34
1
2
3
4
5
6
7
Page 424 of 660

4246-1. Using the air conditioning system and defogger
NX200t_OM_USA_OM78081U
■Option control screen
Select on the climate screen to display the option control screen. The
functions can be switched on and off. Select to set cooling and dehumidification function on/off
Adjust the temperature for driver and passenger seats separately (“DUAL”
mode) ( P. 4 2 5 )
Prevent ice from building up on the windshield and wiper blades
(if equipped) ( P. 4 2 6 )
Remove pollen from the air (Micro dust and pollen filter) ( P. 4 2 6 )
■Using the automatic mode
Press the “AUTO” button.
Adjust the temperature setting.
To stop the operation, press the “OFF” button.
■Automatic mode indicator
If the fan speed setting or air flow modes are operated, the automatic mode
indicator goes off. However, automati c mode for functions other than that
operated are maintained.
Vehicles with a Lexus Display Audio
systemVehicles with a navigation system
Air conditioning controls
1
2
3
4
1
2
3
Page 478 of 660

4787-1. Maintenance and care
NX200t_OM_USA_OM78081U
NOTICE
■Cleaning detergents
●Do not use the following types of detergent, as they may discolor the vehicle interior
or cause streaks or damage to painted surfaces:
• Non-seat portions: Organic substances su ch as benzene or gasoline, alkaline or
acidic solutions, dye, and bleach
• Seats: Alkaline or acidic solutions, such as thinner, benzene, and alcohol
●Do not use polish wax or polish cleaner. The instrument panel’s or other interior part’s
painted surface may be damaged.
■Preventing damage to leather surfaces
Observe the following precautions to avoid damage to and deterioration of leather
surfaces:
●Remove any dust or dirt from leather surfaces immediately.
●Do not expose the vehicle to direct sunlight for extended periods of time. Park the
vehicle in the shade, especially during summer.
●Do not place items made of vinyl, plastic, or containing wax on the upholstery, as they
may stick to the leather su rface if the vehicle interior heats up significantly.
■Water on the floor
Do not wash the vehicle floor with water.
Vehicle systems such as the audio system may be damaged if water comes into contact
with electrical components such as the au dio system above or under the floor of the
vehicle. Water may also cause the body to rust.
■When cleaning the inside of the windshield (vehicles with LDA [Lane Departure
Alert] or Automatic High Beam)
Be careful not to touch the camera sensor ( P. 2 6 1 ) .
If the camera is accidentally scratched or hit, LDA and Automatic High Beam may not
operate properly or may cause a malfunction.
■Cleaning the inside of the rear window
●Do not use glass cleaner to clean the rear window, as this may cause damage to the
rear window defogger heater wires or antenna. Use a cloth dampened with luke-
warm water to gently wipe the window cl ean. Wipe the window in strokes running
parallel to the heater wires or antenna.
●Be careful not to scratch or damage the heater wires or antenna.
■Cleaning the front side windows
Do not use any compound or abrasive product (e.g., glass cleaner, detergent, wax) to
clean the windows. It may damage the coating.
Page 554 of 660

5548-2. Steps to take in an emergency
NX200t_OM_USA_OM78081U
■When the tire pressure warning light comes on
Inspect the appearance of the tire to check that the tire is not punctured.
If the tire is punctured: P. 5 6 0
If the tire is not punctured:
Carry out the following procedure after the tire temperature has lowered sufficiently.
●Check the tire inflation pressure and adjust to the appropriate level.
●If the warning light does not go out even after several minutes, check that the tire infla-
tion pressure is at the specified level and carry out initialization. ( P. 5 0 4 )
The warning light may come on again if the above operations are conducted without first
allowing the tire temperature to lower sufficiently.
■The tire pressure warning light may come on due to natural causes
The tire pressure warning light may come on due to natural causes such as natural air
leaks and tire inflation pressure changes caused by temperature. In this case, adjusting
the tire inflation pressure will turn off the warning light (after a few minutes).
■When a tire is replaced with a spare tire
Vehicles with a compact spare tire: The comp act spare tire is not equipped with a tire
pressure warning valve and transmitter. If a tire goes flat, the tire pressure warning light
will not turn off even though the flat tire ha s been replaced with the spare tire. Replace
the spare tire with the repaired tire and adjust the tire inflation pressure. The tire pressure
warning light will go off after a few minutes.
Vehicles with a full-size spare tire: The spare tire is also equipped with a tire pressure
warning valve and transmitter. The tire pressure warning light will turn on if the tire infla-
tion pressure of the spare tire is low. If a tire goes flat, the tire pressure warning light will
not turn off even though the flat tire has been replaced with the spare tire. Replace the
spare tire with the repaired tire and adjust the tire inflation pressure. The tire pressure
warning light will go off after a few minutes.
■Conditions that the tire pressure warning system may not function properly
P. 5 0 7
■If the tire pressure warning light frequently comes on after blinking for 1 minute
If the tire pressure warning light frequently comes on after blinking for 1 minute when the
engine switch is turned to IGNITION ON mo de, have it checked by your Lexus dealer.
■Warning buzzer
In some cases, the buzzer may not be heard due to being in a noisy location or audio
sound.
Page 582 of 660

5828-2. Steps to take in an emergency
NX200t_OM_USA_OM78081U
■Starting the engine when the battery is discharged
The engine cannot be started by push-starting.
■To prevent battery discharge
●Turn off the headlights and the audio system while the engine is off.
●Turn off any unnecessary electrical components when the vehicle is running at a low
speed for an extended period, such as in heavy traffic.
■Charging the battery
The electricity stored in the battery will discharge gradually even when the vehicle is not
in use, due to natural discharge and the draining effects of certain electrical appliances. If
the vehicle is left for a long time, the battery may discharge, and the engine may be
unable to start. (The battery recharges automatically during driving.)
■When the battery is removed or discharged
●In some cases, it may not be possible to unlock the doors using the smart access system
with push-button start when the battery is discharged. Use the wireless remote control
or the mechanical key to lock or unlock the doors.
●The engine may not start on the first attempt after the battery has recharged but will
start normally after the second attempt. This is not a malfunction.
●The engine switch mode is memorized by the vehicle. When the battery is recon-
nected, the system will return to the mode it was in before the battery was discharged.
Before disconnecting the battery, turn the engine switch off.
If you are unsure what mode the engine switch was in before the battery discharged, be
especially careful when reconnecting the battery.
●The power back door must be initialized. ( P. 1 2 5 )
Page 614 of 660

6149-2. Customization
NX200t_OM_USA_OM78081U
Customizable features
Some function settings are changed simultaneously with other functions being
customized. Contact your Lexus dealer.
When customizing vehicle features, ensure that the vehicle is parked in a safe
place with the shift lever in P and the parking brake set.
■Changing using the Remote Touch Press the “MENU” button on the Remote Touch.
Select “Setup” on the “MENU” screen and select “Vehicle”.
Various setting can be changed. Refer to the list of settings that can be
changed for details.
■Changing using the Lexus Display Audio controller Press the “MENU” button on the Lexus Display Audio controller.
Select “Setup” on the “MENU” screen and select “Vehicle”.
Various setting can be changed. Refer to the list of settings that can be
changed for details.
■Changing using the multi-information display
Press or of the meter control switches, select , and then
press .
Press or of the meter control switches, select the item, and then
press .
Press or of the meter control switches, select the desired setting,
and then press .
To go back to the previous screen or exit the customize mode, press .
Your vehicle includes a variety of electronic features that can be personalized
to suit your preferences. The settings of these features can be changed using
the multi-information display, the Remo te Touch or Lexus Display Audio con-
troller, or at your Lexus dealer.
Customizing vehicle features
1
2
1
2
1
2
3