Page 419 of 544
4197-2. Steps to take in an emergency
GS450h_OM_OM30E99U_(U)
7
When trouble arises
(If equipped)
Indicates a malfunction in the BSM (Blind Spot Monitor)
systemA buzzer also sounds.
Have the vehicle inspected by your Lexus dealer.
Indicates abnormal engine oil pressure
A buzzer also sounds.
Immediately stop the vehicle in a safe place and
contact your Lexus dealer.
(If equipped)
Indicates a malfunction in the VGRS (Variable Gear
Ratio Steering)
A buzzer also sounds.
Have the vehicle inspected by your Lexus dealer.
Wa r n i n g m e s s a g eDetails/Actions
Page 424 of 544
4247-2. Steps to take in an emergency
GS450h_OM_OM30E99U_(U)
Indicates a malfunction in the brake override systemA buzzer also sounds.
Have the vehicle inspected by your Lexus dealer.
Indicates that engine oil level is low
This message may appear if the vehicle is stopped on a
slope. Move the vehicle to a level surface and check to
see if the message disappears.
A buzzer also sounds.
Check the level of engine oil, and add if necessary.
Indicates that the hybrid system has overheated
This message may be disp layed when driving under
severe operating conditions. (For example, when driv-
ing up a long steep hill.)
A buzzer also sounds.
Stop and check. ( P. 4 5 7 )
Indicates a malfunction in:
• The Automatic High Beam system (if equipped);
• The AFS (Adaptive Front-lighting System) (if equipped); or
• The LED headlight system
A buzzer also sounds.
Have the vehicle inspected by your Lexus dealer.
Wa r n i n g m e s s a g eDetails/Actions
(Flashes)
Page 426 of 544

4267-2. Steps to take in an emergency
GS450h_OM_OM30E99U_(U)
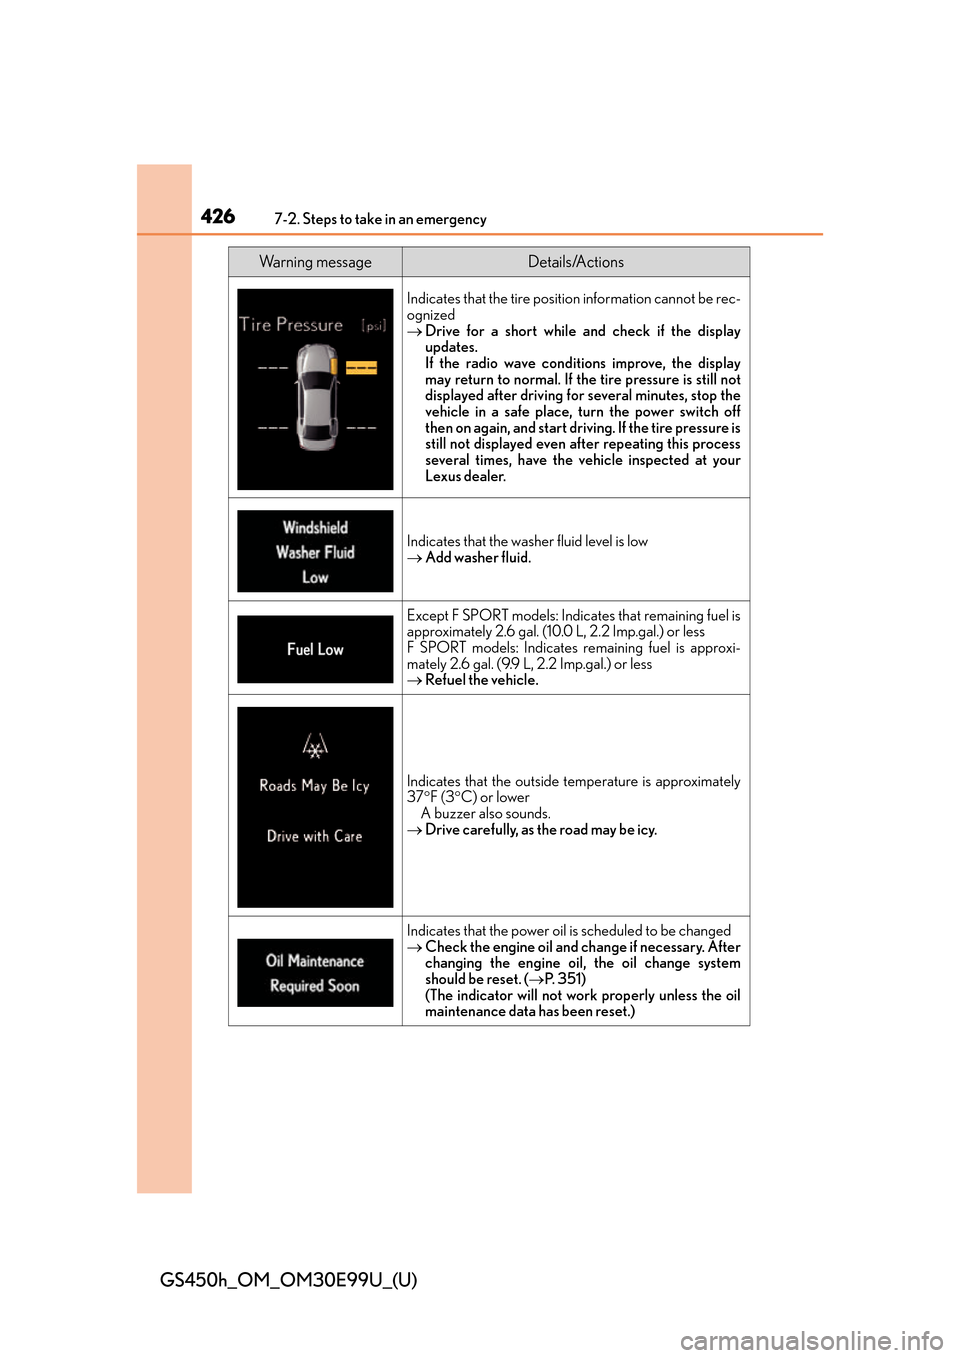
Indicates that the tire position information cannot be rec-
ognized
Drive for a short while an d check if the display
updates.
If the radio wave conditions improve, the display
may return to normal. If th e tire pressure is still not
displayed after driving for several minutes, stop the
vehicle in a safe place, turn the power switch off
then on again, and start driving. If the tire pressure is
still not displayed even after repeating this process
several times, have the vehicle inspected at your
Lexus dealer.
Indicates that the wash er fluid level is low
Add washer fluid.
Except F SPORT models: Indicates that remaining fuel is
approximately 2.6 gal. (10.0 L, 2.2 Imp.gal.) or less
F SPORT models: Indicates remaining fuel is approxi-
mately 2.6 gal. (9.9 L, 2.2 Imp.gal.) or less
Refuel the vehicle.
Indicates that the outside temperature is approximately
37F (3 C) or lower
A buzzer also sounds.
Drive carefully, as the road may be icy.
Indicates that the power oil is scheduled to be changed
Check the engine oil and ch ange if necessary. After
changing the engine oil, the oil change system
should be reset. ( P. 3 5 1 )
(The indicator will not work properly unless the oil
maintenance data has been reset.)
Wa r n i n g m e s s a g eDetails/Actions
Page 427 of 544

4277-2. Steps to take in an emergency
GS450h_OM_OM30E99U_(U)
7
When trouble arises
*: Refer to the separate “Scheduled Maintenance” or “Owner’s Manual Supplement”
for the maintenance interval applicable to your vehicle.
(U.S.A. only)
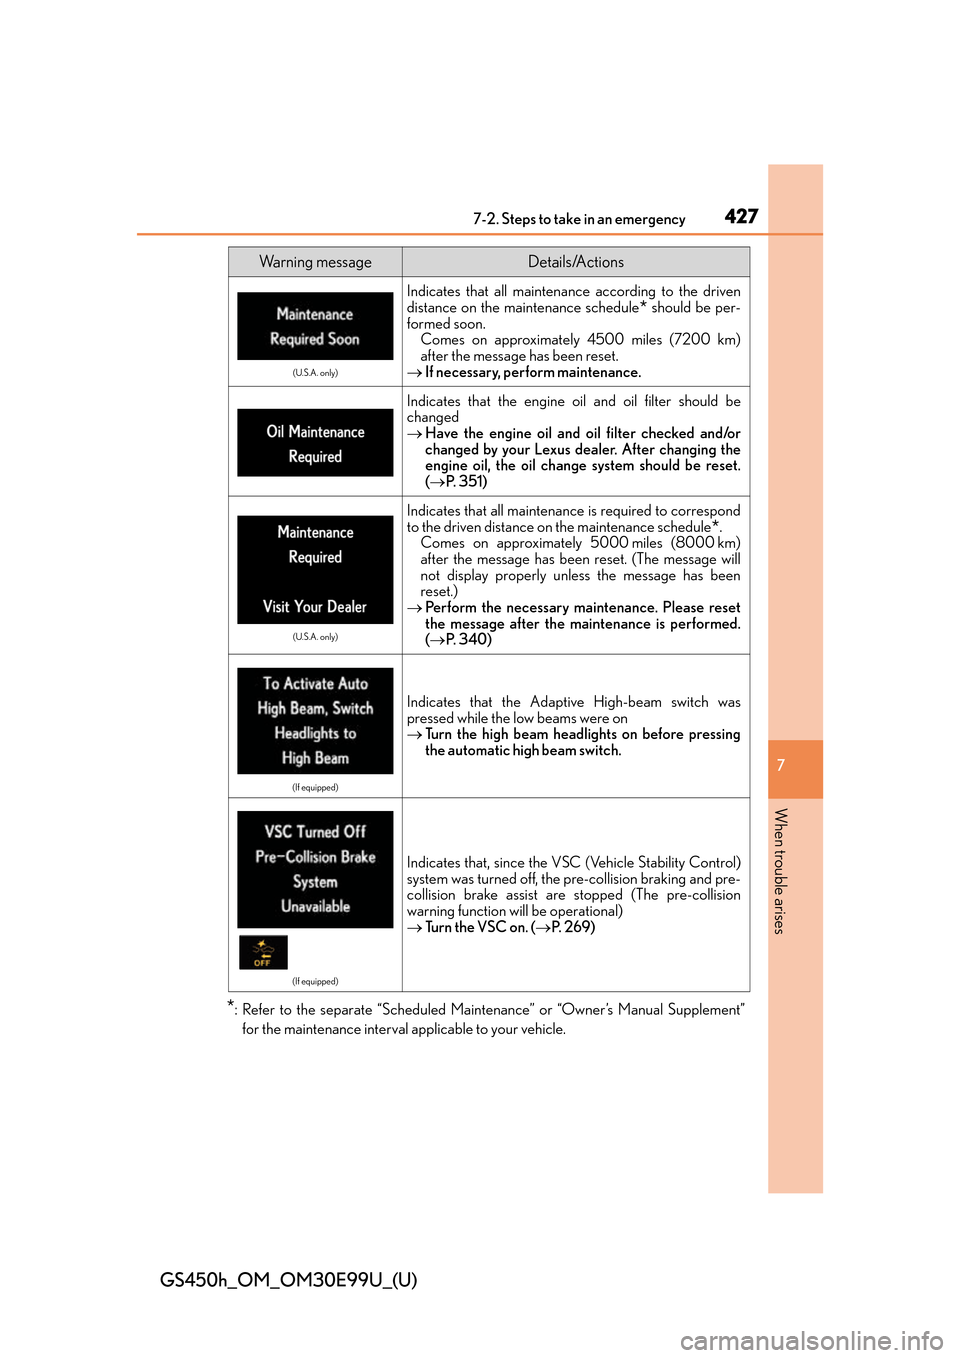
Indicates that all maintenance according to the driven
distance on the maintenance schedule
* should be per-
formed soon.
Comes on approximately 4500 miles (7200 km)
after the message has been reset.
If necessary, perform maintenance.
Indicates that the engine o il and oil filter should be
changed
Have the engine oil and oil filter checked and/or
changed by your Lexus dealer. After changing the
engine oil, the oil change system should be reset.
( P. 3 5 1 )
(U.S.A. only)
Indicates that all maintenance is required to correspond
to the driven distance on the maintenance schedule
*.
Comes on approximately 5000 miles (8000 km)
after the message has been reset. (The message will
not display properly unless the message has been
reset.)
Perform the necessary maintenance. Please reset
the message after the maintenance is performed.
( P. 3 4 0 )
(If equipped)
Indicates that the Adaptive High-beam switch was
pressed while the low beams were on
Turn the high beam headlights on before pressing
the automatic high beam switch.
(If equipped)
Indicates that, since the VSC (Vehicle Stability Control)
system was turned off, the pre-collision braking and pre-
collision brake assist are stopped (The pre-collision
warning function will be operational)
Turn the VSC on. ( P. 2 6 9 )
Wa r n i n g m e s s a g eDetails/Actions
Page 444 of 544

4447-2. Steps to take in an emergency
GS450h_OM_OM30E99U_(U)
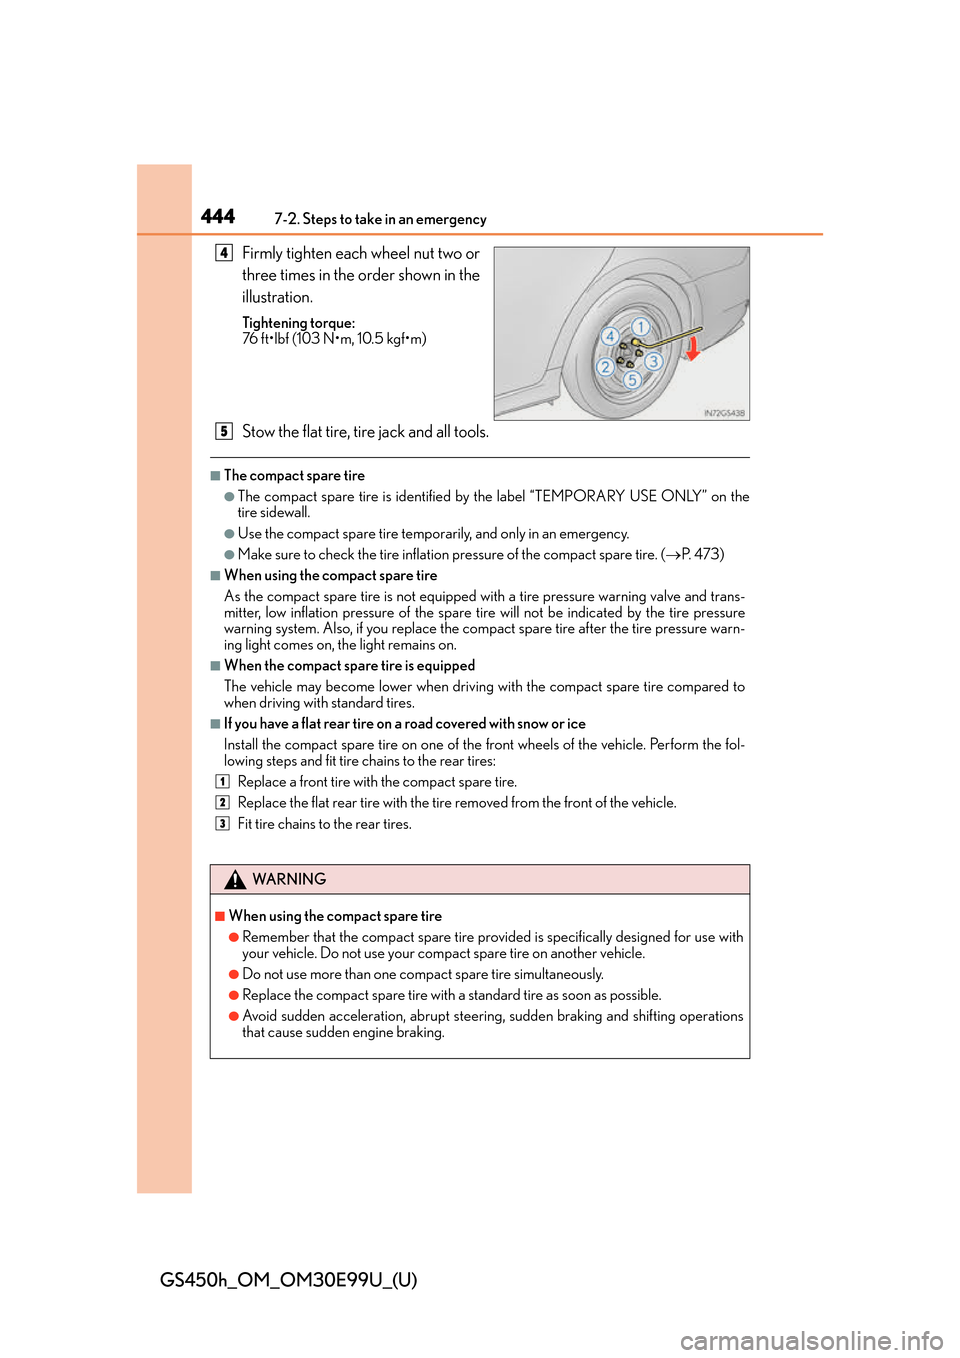
Firmly tighten each wheel nut two or
three times in the order shown in the
illustration.
Tightening torque:
76 ft•lbf (103 N•m, 10.5 kgf•m)
Stow the flat tire, tire jack and all tools.
■The compact spare tire
●The compact spare tire is identified by the label “TEMPORARY USE ONLY” on the
tire sidewall.
●Use the compact spare tire temporarily, and only in an emergency.
●Make sure to check the tire inflation pressure of the compact spare tire. ( P. 4 7 3 )
■When using the compact spare tire
As the compact spare tire is not equipped wi th a tire pressure warning valve and trans-
mitter, low inflation pressure of the spare ti re will not be indicated by the tire pressure
warning system. Also, if you replace the compact spare tire after the tire pressure warn-
ing light comes on, th e light remains on.
■When the compact spare tire is equipped
The vehicle may become lower when driving with the compact spare tire compared to
when driving with standard tires.
■If you have a flat rear tire on a road covered with snow or ice
Install the compact spare tire on one of the front wheels of the vehicle. Perform the fol-
lowing steps and fit tire chains to the rear tires:
Replace a front tire with the compact spare tire.
Replace the flat rear tire with the tire removed from the front of the vehicle.
Fit tire chains to the rear tires.
4
5
1
2
3
WA R N I N G
■When using the compact spare tire
●Remember that the compact spare tire provid ed is specifically designed for use with
your vehicle. Do not use your compact spare tire on another vehicle.
●Do not use more than one compact spare tire simultaneously.
●Replace the compact spare tire with a standard tire as soon as possible.
●Avoid sudden acceleration, ab rupt steering, sudden braking and shifting operations
that cause sudden engine braking.
Page 453 of 544
453
GS450h_OM_OM30E99U_(U)
7
When trouble arises
7-2. Steps to take in an emergency
If the 12-volt battery is discharged
If you have a set of jumper (or booster) cables and a second vehicle with a 12-volt
battery, you can jump start your vehicle by following the steps below.
Confirm that the electronic key is
being carried.
When connecting the jumper (or
booster) cables, depending on the situa-
tion, the alarm may activate and doors
locked. ( P. 7 8 )
Open the hood ( P. 3 4 7 ) , r e m o v e
the engine compartment covers
( P. 350) and open the fuse box
cover.
Remove all of the clips.
Push the tabs on either side to
detach the lock and lift the lid off
while pulling the lock plate.
Open the exclusive jump starting
terminal cover.
The following procedures may be used to start the hybrid system if the 12-volt
battery is discharged.
You can also call your Lexus dealer or a qualified repair shop.
1
2
1
2
3
Page 454 of 544
4547-2. Steps to take in an emergency
GS450h_OM_OM30E99U_(U)
Remove the engine cover.
Connect the jumper cables according to the following procedure:Connect a positive jumper cable clamp to the exclusive jump starting ter-
minal on your vehicle.
Connect the clamp on the other end of the positive cable to the positive (+)
battery terminal on the second vehicle.
Connect a negative cable clamp to the negative (-) battery terminal on the
second vehicle.
Connect the clamp at the other end of the negative cable to a solid, station-
ary, unpainted metallic point away from the exclusive jump starting terminal
and any moving parts, as shown in the illustration.4
5
1
2
3
4
Page 455 of 544

4557-2. Steps to take in an emergency
GS450h_OM_OM30E99U_(U)
7
When trouble arises
Start the engine of the second vehicle. Increase the engine speed slightly and
maintain at that level for approximately 5 minutes to recharge the 12-volt bat-
tery of your vehicle.
Open and close any of the doors of your vehicle with the power switch off.
Maintain the engine speed of the second vehicle and start the hybrid system
of your vehicle by turning the power switch to ON mode.
Make sure the “READY” indicator comes on. If the indicator does not come
on, contact your Lexus dealer.
Once the hybrid system has started, remove the jumper cables in the exact
reverse order from which they were connected.
Once the hybrid system starts, have th e vehicle inspected at your Lexus dealer
as soon as possible.
■Starting the hybrid system when the 12-volt battery is discharged
The hybrid system cannot be started by push-starting.
■To prevent 12-volt battery discharge
●Turn off the headlights and the audio system while the hybrid system is off.
●Turn off any unnecessary electrical components when the vehicle is running at a low
speed for an extended period, such as in heavy traffic.
■Charging the 12-volt battery
The electricity stored in the 12-volt battery will discharge gradually even when the vehicle
is not in use, due to natural discharge and th e draining effects of certain electrical appli-
ances. If the vehicle is left for a long time, the 12-volt battery may discharge, and the
hybrid system may be unable to start. (The 12-volt battery recharges automatically while
the hybrid system is operating.)
■When recharging or replacing the 12-volt battery
●In some cases, it may not be possible to unlock the doors using the smart access system
with push-button start when the 12-volt battery is discharged. Use the wireless remote
control or the mechanical key to lock or unlock the doors.
●The hybrid system may not start on the first attempt after the 12-volt battery has
recharged but will start normally after the second attempt. This is not a malfunction.
●The power switch mode is memorized by the vehicle. When the 12-volt battery is
reconnected, the system will return to the mode it was in before the 12-volt battery was
discharged. Before disconnecting the 12-volt battery, turn the power switch off.
If you are unsure what mode the power switch was in before the 12-volt battery dis-
charged, be especially careful when reconnecting the 12-volt battery.
6
7
8
9
10