Page 76 of 668
761-1. For safe use
GS350_200t_GS F_OM_OM30E87E_(EE)
Installing child restraints
Seat belts (An ELR belt requires a lock-
ing clip)
ISOFIX rigid anchors
Lower anchors are provided for the out-
board rear seats. (Buttons displaying the
location of the anchors are attached to
the seats.)
Anchor brackets (for top strap)
Anchor brackets are provided for the
outboard rear seats.
Follow the child restraint system manufacturer’s instructions. Firmly secure
child restraints to the seats using a seat belt or ISOFIX rigid anchors. Attach
the top strap when installing a child restraint.
Page 77 of 668
771-1. For safe use
1
For safety and security
GS350_200t_GS F_OM_OM30E87E_(EE)
■Rear-facing Baby seat/child seat
Place the child restraint system
on the rear seat facing the rear of
the vehicle.
Run the seat belt through the
child restraint system and insert
the plate into the buckle. Make
sure that the belt is not twisted.
Install a locking clip near the tab
of the lap and shoulder belt by
inserting the lap and shoulder
webbing through the recesses of
the locking clip. Buckle the belt
again. If the belt has any slack,
release the buckle and reinstall
the locking clip.
Installing child restraints using a seat belt
1
2
3
Page 78 of 668
781-1. For safe use
GS350_200t_GS F_OM_OM30E87E_(EE)
■Forward-facing Child seat
Remove the head restraint if it
interferes with your child restraint
system.
Place the child restraint system
on the seat facing the front of the
vehicle.
Run the seat belt through the
child restraint system and insert
the plate into the buckle. Make
sure that the belt is not twisted.
Install a locking clip near the tab
of the lap and shoulder belt by
inserting the lap and shoulder
webbing through the recesses of
the locking clip. Buckle the belt
again. If the belt has any slack,
release the buckle and reinstall
the locking clip.
1
2
3
4
Page 81 of 668
811-1. For safe use
1
For safety and security
GS350_200t_GS F_OM_OM30E87E_(EE)
Remove the head restraint.
Secure the child restraint system
using the seat belt or ISOFIX rigid
anchors.
Open the anchor bracket cover,
latch the hook onto the anchor
bracket and tighten the top strap.
Make sure the top strap is securely
latched.
■When installing a child restraint system
You need a locking clip to install the child restraint system. Follow the instructions pro-
vided by the manufacturer of the system. If yo ur child restraint system does not provide a
locking clip, you can purchase the following item from any authorized Lexus dealer or
repairer, or another duly qualified and equipped professional:
Locking clip for child restraint system
(Part No. 73119-22010)
Child restraint systems with a top strap
1
2
3
Page 84 of 668

841-1. For safe use
GS350_200t_GS F_OM_OM30E87E_(EE)
WA R N I N G
■When installing a child restraint system
●If child restraint system regulations exist in the country where you reside, please con-
tact any authorized Lexus dealer or repair er, or another duly qualified and equipped
professional for the child restraint system installation.
●When a junior seat is installed, always en sure that the shoulder belt is positioned
across the center of the child’s shoulder. The belt should be kept away from the child’s
neck, but not so that it could fall off the child’s shoulder. Failing to do so may result in
death or serious injury in the event of su dden braking, sudden swerving or an acci-
dent.
●Ensure that the belt and plate are securely locked and the seat belt is not twisted.
●Shake the child restraint system left and right, and forward and backward to ensure
that it has been securely installed.
●After securing a child restraint system, never adjust the seat.
●Follow all installation instructions provided by the child restraint system manufacturer.
■To correctly attach a child restraint system to the anchors
When using the lower anchors, be sure that there are no foreign objects around the
anchors and that the seat belt is not caught behind the child restraint system. Make sure
the child restraint system is securely attached, or it may cause death or serious injury to
the child or other passengers in the event of sudden braking, sudden swerving or an
accident.
Page 161 of 668
1613-2. Opening, closing and locking the doors and trunk
3
Operation of each component
GS350_200t_GS F_OM_OM30E87E_(EE)
WA R N I N G
Observe the following precautions.
Failing to do so may result in death or serious injury.
■When using the wireless remote control and operating the power windows or moon
roof (if equipped)
Operate the power window or moon roof after checking to make sure that there is no
possibility of any passenger having any of their body parts caught in the window or
moon roof. Also, do not allow children to operate the wireless remote control. It is pos-
sible for children and other passengers to get caught in the power window or moon
roof.
■Jam protection function
●Never try jamming any part of your body to activate the jam protection function
intentionally.
●The jam protection function may not work if something gets caught just before the
window or moon roof fully closes.
Page 163 of 668

1633-2. Opening, closing and locking the doors and trunk
3
Operation of each component
GS350_200t_GS F_OM_OM30E87E_(EE)
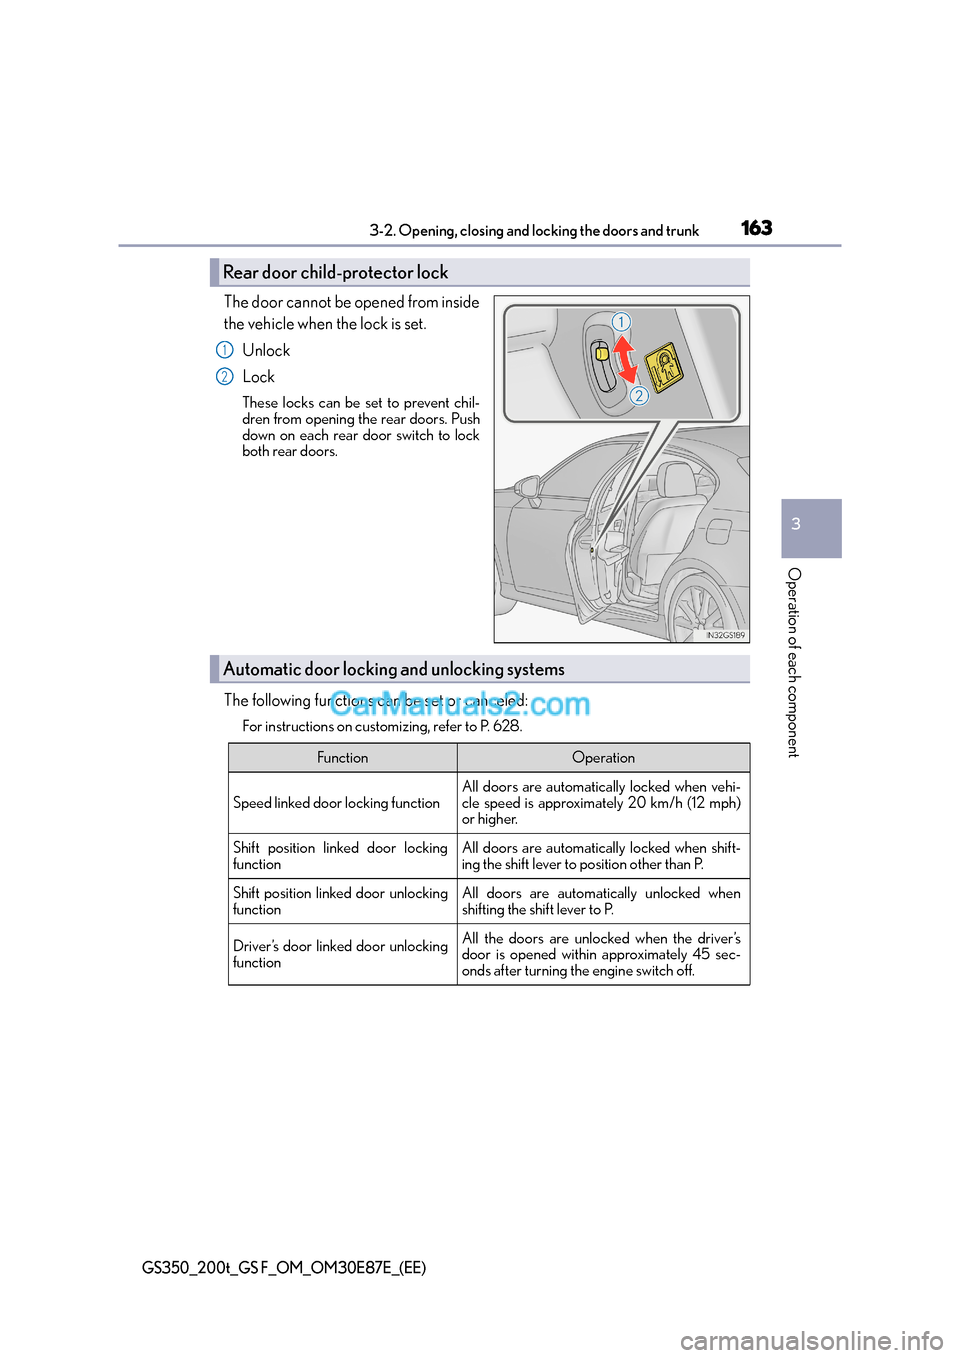
The door cannot be opened from inside
the vehicle when the lock is set.Unlock
Lock
These locks can be set to prevent chil-
dren from opening the rear doors. Push
down on each rear door switch to lock
both rear doors.
The following functions can be set or canceled:
For instructions on customizing, refer to P. 628.
Rear door child-protector lock
1
2
Automatic door locking and unlocking systems
FunctionOperation
Speed linked door locking function
All doors are automatically locked when vehi-
cle speed is approximately 20 km/h (12 mph)
or higher.
Shift position linked door locking
functionAll doors are automatically locked when shift-
ing the shift lever to position other than P.
Shift position linked door unlocking
functionAll doors are automatically unlocked when
shifting the shift lever to P.
Driver’s door linked door unlocking
functionAll the doors are unlocked when the driver’s
door is opened within approximately 45 sec-
onds after turning the engine switch off.
Page 165 of 668
1653-2. Opening, closing and locking the doors and trunk
3
Operation of each component
GS350_200t_GS F_OM_OM30E87E_(EE)
WA R N I N G
■To prevent an accident
Observe the following precautions while driving the vehicle.
Failure to do so may result in a door opening and an occupant throwing out of the vehi-
cle, resulting in death or serious injury.
●Ensure that all doors are properly closed.
●Do not pull the inside handle of the doors while driving.
Be especially careful for the front doors, as the doors may be opened even if the
inside lock buttons are in locked position.
●Set the rear door child-protector locks when children are seated in the rear seats.