Page 7 of 632

7
1
9 8
7
6 4 3
2
CT200h_OM_OM76197U_(U)
10
5
6-3. Using the storage features List of storage features ............ 429
• Glove box ............................... 430
• Console box .......................... 430
•Cup holders/bottle holders/
door pockets.......................... 430
• Auxiliary boxes ..................... 432
Luggage compartment features ....................................... 434
6-4. Using the other interior features Other interior features ............ 439• Sun visors ................................ 439
• Vanity mirrors ........................ 439
• Clock ........................................ 440
• Power outlet ........................... 440
• Assist grips ............................. 442
Garage door opener ............... 443
Compass ....................................... 449
LEXUS Enform Safety Connect...................................... 455 7-1. Maintenance and care
Cleaning and protecting the vehicle exterior .........................462
Cleaning and protecting the vehicle interior ......................... 465
7-2. Maintenance Maintenance requirements .............................467
General maintenance.............. 469
Emission inspection and maintenance (I/M)
programs ..................................... 472
7-3. Do-it-yourself maintenance Do-it-yourself service precautions.................................473
Hood ................................................475
Positioning a floor jack.............. 477
Engine compartment ................478
12-volt battery ............................. 486
Tires.................................................. 490
Tire inflation pressure ................ 497
Wheels ...........................................500
Air conditio ning filter ............... 502
Electronic key battery.............. 504
Checking and replacing fuses.............................................. 506
Light bulbs .................................... 5097Maintenance and care
Page 257 of 632

257
CT200h_OM_OM76197U_(U)5-2. Using the audio system
5
Audio system
Optimal use of the audio system
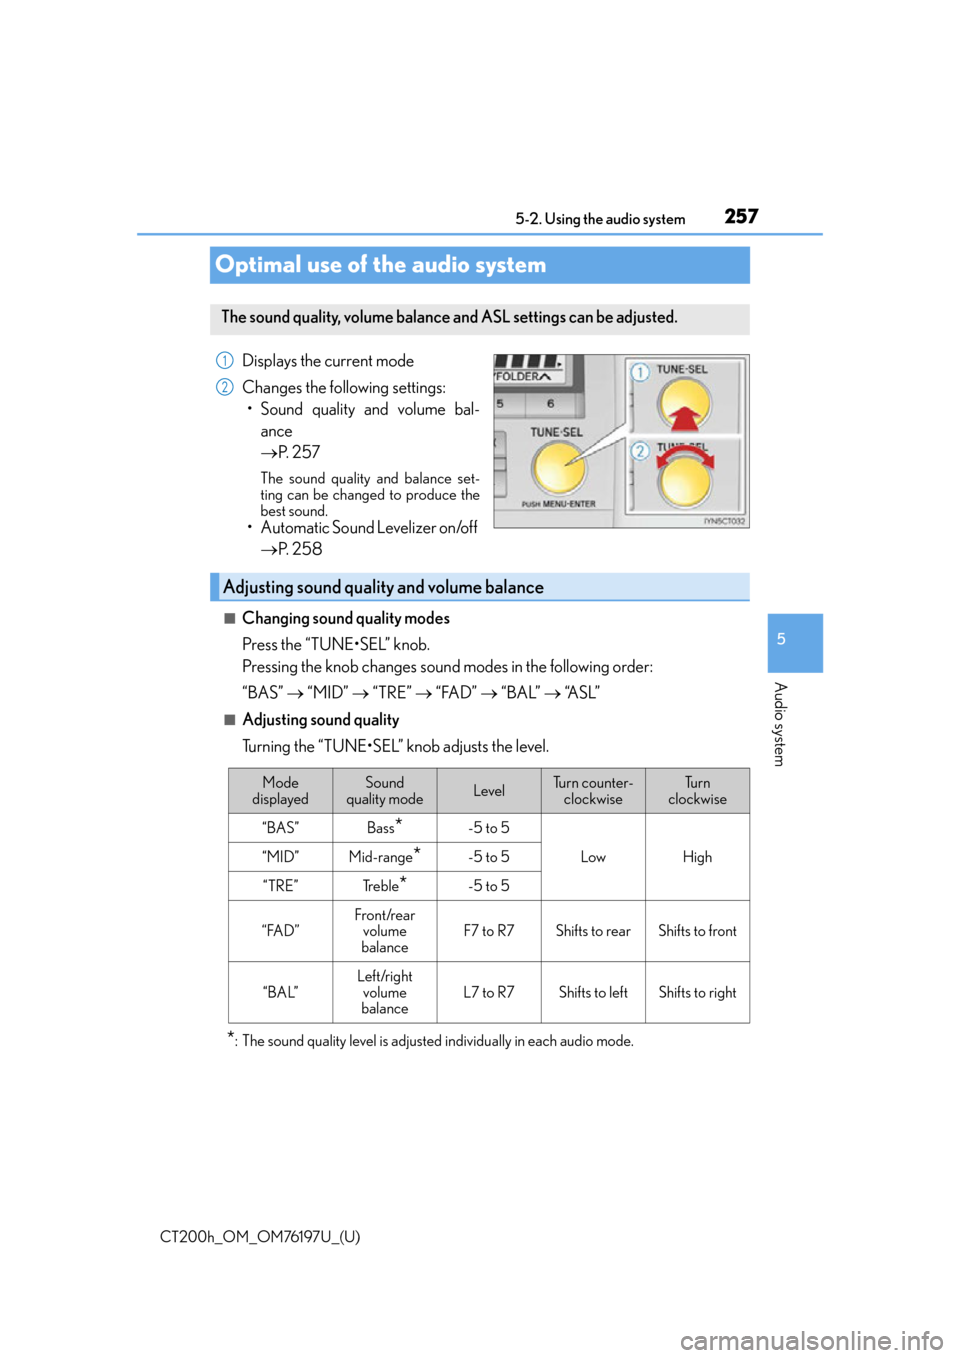
Displays the current mode
Changes the following settings:
• Sound quality and volume bal- ance
P. 2 5 7
The sound quality and balance set-
ting can be changed to produce the
best sound.
• Automatic Sound Levelizer on/off
P. 2 5 8
■Changing sound quality modes
Press the “TUNE•SEL” knob.
Pressing the knob changes sound modes in the following order:
“BAS” “MID” “TRE” “FAD” “BAL” “A S L ”
■Adjusting sound quality
Turning the “TUNE•SEL” knob adjusts the level.
*: The sound quality level is adjusted individually in each audio mode.
The sound quality, volume balance and ASL settings can be adjusted.
1
2
Adjusting sound quality and volume balance
Mode
displayedSound
quality modeLevelTu r n c o u n t e r - clockwiseTu r n
clockwise
“BAS”Bass*-5 to 5
LowHigh“MID”Mid-range*-5 to 5
“TRE”Tr e b l e*-5 to 5
“FAD”Front/rear volume
balanceF7 to R7Shifts to rearShifts to front
“BAL”
Left/right volume
balance
L7 to R7Shifts to leftShifts to right
Page 258 of 632
2585-2. Using the audio system
CT200h_OM_OM76197U_(U)
Turning the “TUNE•SEL” knob clockwis e turns on the ASL, and turning the
“TUNE•SEL” knob counterclockwise turns off the ASL.
ASL automatically adjusts the volume and tone quality according to the noise level as
you drive your vehicle.
Turning the Automatic Sound Levelizer (ASL) on/off
Page 303 of 632

CT200h_OM_OM76197U_(U)
3035-7. Setup menu
5
Audio system
Select “Phonebook Lock (Phbk Lock)” or “Phonebook Unlock (Phbk
Unlock)” using a voice command or the “TUNE•SEL” knob.
Input the PIN by either of the following methods and select “Confirm” using a
voice command or the knob:
a. Press the talk switch and say the registered PIN.
b. Input a new PIN using the knob.
Select “Guidance Vol” using the “TUNE•SEL” knob.
Change the voice guidance volume.
To decrease the volume: Turn the knob counterclockwise.
To increase the volume: Turn the knob clockwise.
Select “Device Name” using the “TUNE•SEL” knob.
Turn the knob to display the Bluetooth
® device address and name.
Select “Go Back” using the knob to return to “System Setup”.
Select “Initialize” and then “Confirm” using the “TUNE•SEL” knob.
Select “Confirm” again using the knob.
Locking or unlocking the phone book
Setting voice guidance volume
Displaying the Bluetooth® device address and name
Initializing the system
1
2
1
2
1
2
3
1
2
Page 333 of 632

333
CT200h_OM_OM76197U_(U)5-12. Setup (Lexus Display Audio System)
5
Audio system
Display settings
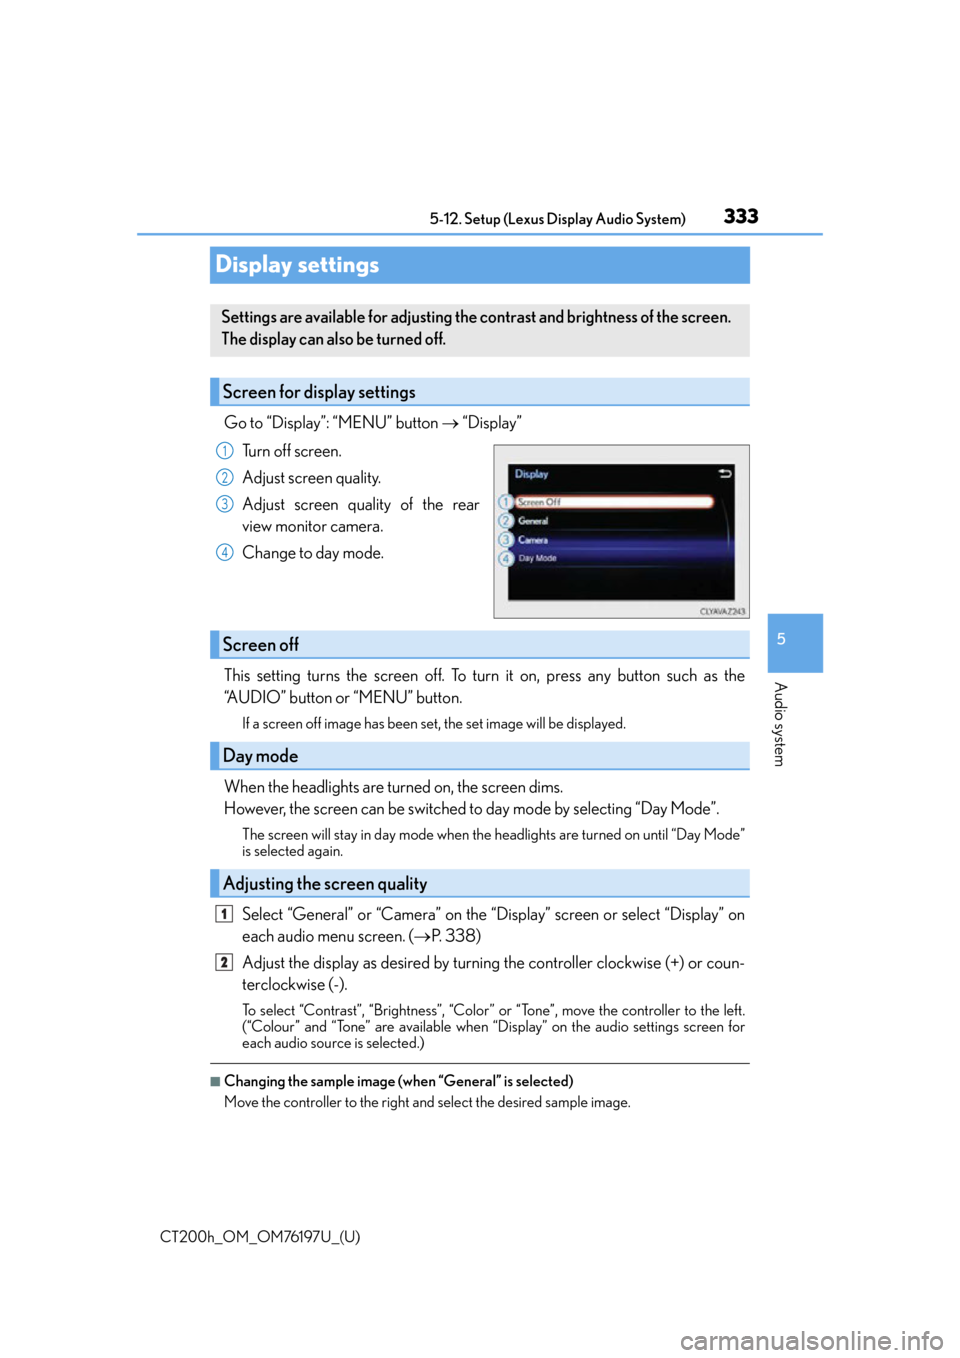
Go to “Display”: “MENU” button
“Display”
Turn off screen.
Adjust screen quality.
Adjust screen quality of the rear
view monitor camera.
Change to day mode.
This setting turns the screen off. To turn it on, press any button such as the
“AUDIO” button or “MENU” button.
If a screen off image has been set, the set image will be displayed.
When the headlights are turned on, the screen dims.
However, the screen can be switched to day mode by selecting “Day Mode”.
The screen will stay in day mode when the headlights are turned on until “Day Mode”
is selected again.
Select “General” or “Camera” on the “Display” screen or select “Display” on
each audio menu screen. ( P. 3 3 8 )
Adjust the display as desired by turning the controller clockwise (+) or coun-
terclockwise (-).
To select “Contrast”, “Brightness”, “Color” or “Tone”, move the controller to the left.
(“Colour” and “Tone” are available when “D isplay” on the audio settings screen for
each audio source is selected.)
■Changing the sample image (when “General” is selected)
Move the controller to the right and select the desired sample image.
Settings are available for adjusting the contrast and brightness of the screen.
The display can also be turned off.
Screen for display settings
1
2
3
4
Screen off
Day mode
Adjusting the screen quality
1
2
Page 409 of 632

409
CT200h_OM_OM76197U_(U)
6Interior features
6-1. Using the air conditioning system and defogger
Automatic air conditioning system (Vehicles with a
navigation system or Lexus
Display Audio System)........... 410
Automatic air conditioning system (Vehicles without a
navigation system or Lexus
Display Audio System)........... 418
Heated steering wheel/ seat heaters................................425
• Heated steering wheel....... 426
• Seat heaters............................ 426 6-2. Using the interior lights
Interior lights list ..........................427• Personal/interior light main switch ..............................427
•Front personal/ interior lights .......................... 428
• Rear interior light ................. 428
6-3. Using the storage features List of storage features ............ 429• Glove box ...............................430
• Console box...........................430
•Cup holders/bottle holders/
door pockets ..........................430
• Auxiliary boxes ..................... 432
Luggage compartment features........................................ 434
6-4. Using the other interior features Other interior features ............ 439• Sun visors ................................ 439
• Vanity mirrors ........................ 439
• Clock ........................................ 440
• Power outlet ........................... 440
• Assist grips.............................. 442
Garage door opener................ 443
Compass ....................................... 449
LEXUS Enform Safety Connect ...................................... 455
Page 426 of 632
4266-1. Using the air conditioning system and defogger
CT200h_OM_OM76197U_(U)
Turns the heated steering wheel on/off
The indicator light comes on when the
heated steering wheel is operating.
●The heated steering wheel can be used when the power switch is in ON mode.
●The heated steering wheel will automati cally turn off after about 30 minutes.
Po p s t h e k n o b o u t
Turns the seat heater on
The indicator light comes on.
Adjusts the seat temperature
The further you turn the knob clockwise,
the warmer the seat becomes.
●The seat heaters can be used when the power switch is in ON mode.
●When not in use, turn the knob fully coun terclockwise. The indicator light goes off.
Press the knob into the recessed position.
Heated steering wheel
Seat heaters
1
2
3
Page 440 of 632
440
CT200h_OM_OM76197U_(U)6-4. Using the other interior features
Vehicles with a navigation system
Refer to the “NAVIGATION SYSTEM OWNER’S MANUAL”.
Vehicles without navigation system
The clock can be adjusted by pressing the buttons.
Adjusts the hours
Adjusts the minutes
Rounds to the nearest hour
*
*
:e.g. 1:00 to 1:29 1:00
1:30 to 1:59 2:00
The clock is displayed when the power switch is in ACCESSORY or ON mode.
Please use a power supply for electronic goods that use less than 12 VDC /10 A
(power consumption of 120 W).
When using electronic goods, make sure that the power consumption of all the
connected power outlets is less than 120 W.
Center console
Press down and release the lid.
Clock
1
2
3
Power outlet
1