2016 KIA VENGA warning
[x] Cancel search: warningPage 355 of 404

Maintenance
52
7
Memory fuse
Your vehicle is equipped with a memory
fuse to prevent battery discharge if your
vehicle is parked without being operated
for prolonged periods. Use the following
procedures before parking the vehicle for
prolonged periods.
1. Turn off the engine.
2. Turn off the headlights and tail lights.
3. Open the driver’s side panel cover and
pull up the memory fuse.
✽✽ NOTICE
If the memory fuse is pulled up from the fuse panel, the warning chime,
audio, clock and interior lamps, etc.,
will not operate. Some items must be
reset after replacement. Refer to
“Battery” in this section.
Even though the memory fuse is pulled up, the battery can still be dis-
charged by operation of the head-
lights or other electrical devices.
Engine compartment panel fuse replacement
1. Turn the ignition switch and all other switches off.
OYN072020
OYN079021/OYN079022
Diesel only
YN ENG 7.QXP 9/5/2016 4:36 PM Page 52
Page 359 of 404

Maintenance
56
7
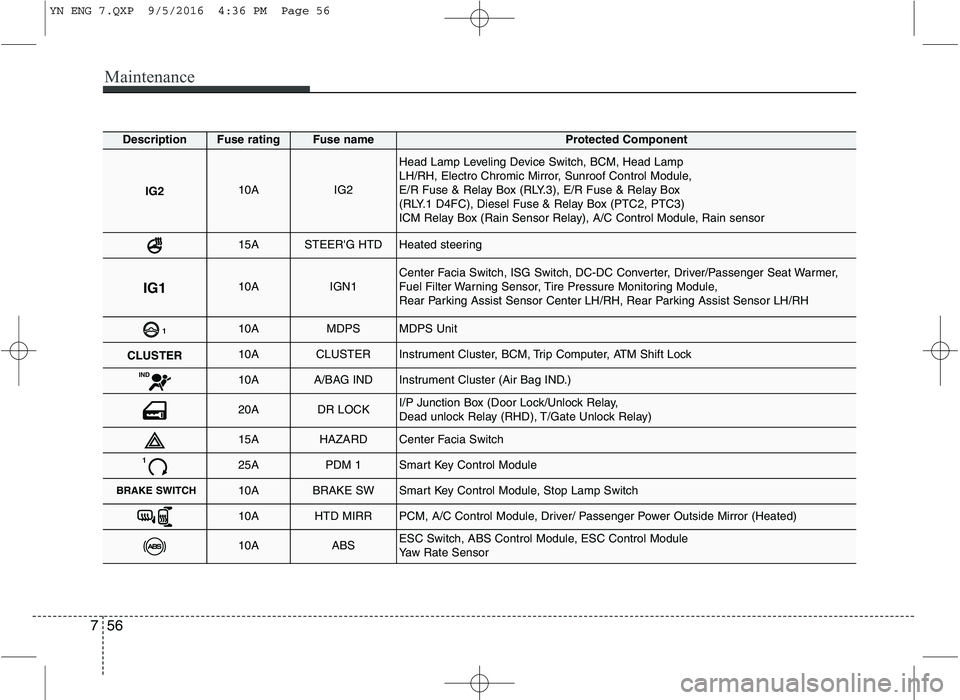
DescriptionFuse ratingFuse nameProtected Component
IG210AIG2
Head Lamp Leveling Device Switch, BCM, Head Lamp
LH/RH, Electro Chromic Mirror, Sunroof Control Module,
E/R Fuse & Relay Box (RLY.3), E/R Fuse & Relay Box
(RLY.1 D4FC), Diesel Fuse & Relay Box (PTC2, PTC3)
ICM Relay Box (Rain Sensor Relay), A/C Control Module, Rain sensor
15ASTEER'G HTDHeated steering
IG110AIGN1Center Facia Switch, ISG Switch, DC-DC Converter, Driver/Passenger Seat Warmer,
Fuel Filter Warning Sensor, Tire Pressure Monitoring Module,
Rear Parking Assist Sensor Center LH/RH, Rear Parking Assist Sensor LH/RH
110AMDPSMDPS Unit
CLU STER10ACLUSTERInstrument Cluster, BCM, Trip Computer, ATM Shift Lock
IND10AA/BAG INDInstrument Cluster (Air Bag IND.)
20ADR LOCKI/P Junction Box (Door Lock/Unlock Relay,
Dead unlock Relay (RHD), T/Gate Unlock Relay)
15AHAZARDCenter Facia Switch
125APDM 1Smart Key Control Module
BRAKE SWITCH10ABRAKE SWSmart Key Control Module, Stop Lamp Switch
10AHTD MIRRPCM, A/C Control Module, Driver/ Passenger Power Outside Mirror (Heated)
10AABSESC Switch, ABS Control Module, ESC Control Module
Yaw Rate Sensor
YN ENG 7.QXP 9/5/2016 4:36 PM Page 56
Page 360 of 404

757
Maintenance
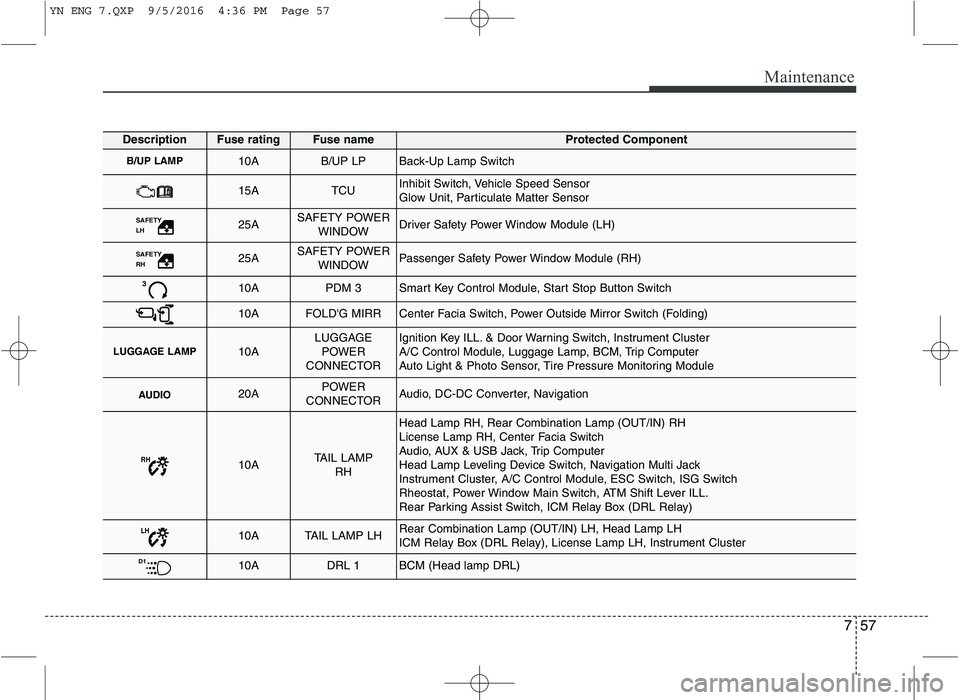
DescriptionFuse ratingFuse nameProtected Component
B/UP LAMP10AB/UP LPBack-Up Lamp Switch
15ATCUInhibit Switch, Vehicle Speed Sensor
Glow Unit, Particulate Matter Sensor
SAFETY
LH 25ASAFETY POWER
WINDOWDriver Safety Power Window Module (LH)
SAFETY
RH 25ASAFETY POWER
WINDOWPassenger Safety Power Window Module (RH)
310APDM 3Smart Key Control Module, Start Stop Button Switch
10AFOLD'G MIRRCenter Facia Switch, Power Outside Mirror Switch (Folding)
LUGGAGE LAMP10ALUGGAGEPOWER
CONNECTORIgnition Key ILL. & Door Warning Switch, Instrument Cluster
A/C Control Module, Luggage Lamp, BCM, Trip Computer
Auto Light & Photo Sensor, Tire Pressure Monitoring Module
AUDIO20APOWER
CONNECTORAudio, DC-DC Converter, Navigation
RH10ATAIL LAMP RH
Head Lamp RH, Rear Combination Lamp (OUT/IN) RH
License Lamp RH, Center Facia Switch
Audio, AUX & USB Jack, Trip Computer
Head Lamp Leveling Device Switch, Navigation Multi Jack
Instrument Cluster, A/C Control Module, ESC Switch, ISG Switch
Rheostat, Power Window Main Switch, ATM Shift Lever ILL.
Rear Parking Assist Switch, ICM Relay Box (DRL Relay)
LH10ATAIL LAMP LHRear Combination Lamp (OUT/IN) LH, Head Lamp LH
ICM Relay Box (DRL Relay), License Lamp LH, Instrument Cluster
D110ADRL 1BCM (Head lamp DRL)
YN ENG 7.QXP 9/5/2016 4:36 PM Page 57
Page 365 of 404

Maintenance
62
7
LIGHT BULBS
Use only the bulbs of the specified
wattage.
✽✽ NOTICE
After heavy, driving rain or washing,
headlight and taillight lenses could
appear frosty. This condition is caused by
the temperature difference between the
lamp inside and outside. This is similar
to the condensation on your windows
inside your vehicle during the rain and
doesn’t indicate a problem with your
vehicle. If the water leaks into the lamp
bulb circuitry, we recommend that the
system be checked by an authorized Kia
dealer.
Headlight, position light, turn sig-
nal light, front fog light bulbreplacement
(1) Headlight (Low) (2) Headlight (High)
(3) Position light
(4) Front turn signal light
(5) Front fog light (if equipped)
(6) Daytime running light(if equipped)
* The actual lamp in the vehicle may differ from the illustration.
WARNING - Working on
the lights
Prior to working on the light, firmly
apply the parking brake, ensure
that the ignition switch is turned tothe LOCK position and turn off the
lights to avoid sudden movement
of the vehicle and burning your fin-
gers or receiving an electric shock.
CAUTION
Be sure to replace the burned-out bulb with one of the same wattage rating. Otherwise, it may causedamage to the fuse or electricwiring system.
CAUTION
If you don’t have necessary tools,
the correct bulbs and the expertise,we recommend that you consult an authorized Kia dealer. In many
cases, it is difficult to replace vehi-cle light bulbs because other parts of the vehicle must be removedbefore you can get to the bulb. This
is especially true if you have to remove the headlight assembly to
get to the bulb(s). Removing/installingthe headlight assembly
can result in damage to the vehicle.OYN075027L
YN ENG 7.QXP 9/5/2016 4:36 PM Page 62
Page 366 of 404

763
Maintenance
Headlight bulb1. Open the hood.
2. Loosen the retaining bolts and removethe headlight assembly from the body
of the vehicle.
3. Disconnect the power connector from the back of the headlight assembly.
(Continued)
If a bulb becomes damaged orcracked, replace it immediately
and carefully dispose of it.
Wear eye protection when chang- ing a bulb. Allow the bulb to cool
down before handling it.
G270A03O
WARNING - Halogen bulbs
Halogen bulbs contain pressur-
ized gas that will produce flying
pieces of glass if broken.
Always handle them carefully, and avoid scratches and abra-
sions. If the bulbs are lit, avoid
contact with liquids. Never touchthe glass with bare hands.
Residual oil may cause the bulb
to overheat and burst when lit. A
bulb should be operated onlywhen installed in a headlight.
(Continued)
OYN079028
YN ENG 7.QXP 9/5/2016 4:36 PM Page 63
Page 373 of 404

Maintenance
70
7
Interior light bulb replacement
1. Using a flat-blade screwdriver, gently
pry the lens from the interior light housing.
2. Remove the bulb by pulling it straight out.
3. Install a new bulb in the socket.
4. Align the lens tabs with the interior light housing notches and snap the
lens into place.Front map lamp
Side room lamp
OYN079052/OYN079049
Glove box lamp
Luggage room lamp
OYN079046/OYN079047
WARNING
Prior to working on the Interior
Lights, ensure that the “OFF” but-
ton is depressed to avoid burning
your fingers or receiving an electric
shock.
CAUTION
Use care not to dirty or damage lens, lens tab, and plastic housings.
YN ENG 7.QXP 9/5/2016 4:37 PM Page 70
Page 374 of 404

771
Maintenance
APPEARANCE CARE
Exterior care
Exterior general caution
It is very important to follow the label
directions when using any chemical
cleaner or polish. Read all warning andcaution statements that appear on thelabel.
Finish maintenance
Washing
To help protect your vehicle’s finish from
rust and deterioration, wash it thoroughlyand frequently at least once a month with
lukewarm or cold water.
If you use your vehicle for off-road driv-
ing, you should wash it after each off-
road trip. Pay special attention to the
removal of any accumulation of salt, dirt,
mud, and other foreign materials. Make
sure the drain holes in the lower edges of
the doors and rocker panels are keptclear and clean.
Insects, tar, tree sap, bird droppings,
industrial pollution and similar deposits
can damage your vehicle’s finish if not
removed immediately.
Even prompt washing with plain water
may not completely remove all these
deposits. A mild soap, safe for use on
painted surfaces, may be used. After washing, rinse the vehicle thor-
oughly with lukewarm or cold water. Do
not allow soap to dry on the finish.
High-pressure washing
When using high-pressure washers,
make sure to maintain sufficient dis-
tance from the vehicle.
Insufficient clearance or excessive pressure can lead to component dam-
age or water penetration.
Do not spray the camera, sensors or its surrounding area directly with a high
pressure washer. Shock applied from
high pressure water may cause the
device to not operate normally.
Do not bring the nozzle tip close to boots (rubber or plastic covers) or con-
nectors as they may be damaged if
they come into contact with high pres-
sure water.
WARNING - Wet brakes
After washing the vehicle, test the
brakes while driving slowly to see if
they have been affected by water. If
braking performance is impaired,
dry the brakes by applying them
lightly while maintaining a slow for-
ward speed.
CAUTION
Do not use strong soap, chemical detergents or hot water, and do
not wash the vehicle in directsunlight or when the body of thevehicle is warm.
Be careful when washing the side windows of your vehicle.Especially, with high-pressure water, water may leak through thewindows and wet the interior.
To prevent damage to the plastic parts and lamps, do not cleanwith chemical solvents or strongdetergents.
YN ENG 7.QXP 9/5/2016 4:37 PM Page 71
Page 376 of 404

773
Maintenance
Bright-metal maintenance
To remove road tar and insects, use atar remover, not a scraper or other
sharp object.
To protect the surfaces of bright-metal parts from corrosion, apply a coating of
wax or chrome preservative and rub to
a high luster.
During winter weather or in coastal areas, cover the bright metal parts with
a heavier coating of wax or preserva-
tive. If necessary, coat the parts with
non-corrosive petroleum jelly or other
protective compound.
Underbody maintenance
Corrosive materials used for ice and
snow removal and dust control may col-
lect on the underbody. If these materials
are not removed, accelerated rusting can
occur on the underbody parts such as
the fuel lines, frame, floor pan and
exhaust system, even though they have
been treated with rust protection.
Thoroughly flush the vehicle underbody
and wheel openings with lukewarm or
cold water once a month, after off-road
driving and at the end of each winter. Payspecial attention to these areas because
it is difficult to see all the mud and dirt. It
will do more harm than good to wet down
the road grime without removing it. The
lower edges of the doors, rocker panels,
and frame members have drain holes
that should not clog with dirt; trapped
water in these areas can cause rusting.
Aluminum wheel maintenance
The aluminum wheels are coated with a
clear protective finish.
Do not use any abrasive cleaner, pol-ishing compound, solvent, or wire
brushes on aluminum wheels. They
may scratch or damage the finish.
Clean the wheel when it has cooled.
Use only a mild soap or neutral deter- gent, and rinse thoroughly with water.
Also, be sure to clean the wheels after
driving on salted roads. This helps pre-
vent corrosion.
Avoid washing the wheels with high- speed car wash brushes.
Do not use any alkaline or acid deter- gent. It may damage and corrode the
aluminum wheels coated with a clear
protective finish.
WARNING
After washing the vehicle, test the
brakes while driving slowly to see if
they have been affected by water. If
braking performance is impaired,
dry the brakes by applying them
lightly while maintaining a slow for-
ward speed.
YN ENG 7.QXP 9/5/2016 4:37 PM Page 73