Page 354 of 404

751
Maintenance
✽✽NOTICE
The actual fuse/relay panel label may
differ from equipped items.
Instrument panel fuse replace- ment
1. Turn the ignition switch and all other switches off.
2. Open the fuse panel cover. 3. Pull the suspected fuse straight out.
Use the removal tool provided in the
engine compartment fuse panel cover.
4. Check the removed fuse; replace it if it is blown.
5. Push in a new fuse of the same rating, and make sure it fits tightly in the clips.
If it fits loosely, we recommend that you
consult an authorized Kia dealer.
If you do not have a spare, use a fuse of the same rating from a circuit you may not need for operating the vehicle, suchas the cigarette lighter fuse.
If the headlights or other electrical com-
ponents do not work and the fuses are
OK, check the fuse panel in the engine
compartment. If a fuse is blown, it mustbe replaced.
OYN079023OYN075018
CAUTION
When replacing a blown fuse or relay with a new one, make sure
the new fuse or relay fits tightly into the clips The incomplete fas-tening fuse or relay may cause the
vehicle wiring and electric systemsdamage and a possible fire.
Do not remove fuses, relays and terminals fastened with bolts ornuts. The fuses, relays and termi-
nals may be fastened incompletely,and it may cause a possible fire. Iffuses, relays and terminals fas-tened with bolts or nuts are blown,
we recommend that you consultwith an authorized Kia dealer.
Do not plug in screwdrivers or aftermarket wiring into the terminaloriginally designed for fuse and
relays only. The electrical systemand wiring of the vehicle interiormay be damaged or burned due to
contact failure.
YN ENG 7.QXP 9/5/2016 4:36 PM Page 51
Page 355 of 404
Maintenance
52
7
Memory fuse
Your vehicle is equipped with a memory
fuse to prevent battery discharge if your
vehicle is parked without being operated
for prolonged periods. Use the following
procedures before parking the vehicle for
prolonged periods.
1. Turn off the engine.
2. Turn off the headlights and tail lights.
3. Open the driver’s side panel cover and
pull up the memory fuse.
✽✽ NOTICE
If the memory fuse is pulled up from the fuse panel, the warning chime,
audio, clock and interior lamps, etc.,
will not operate. Some items must be
reset after replacement. Refer to
“Battery” in this section.
Even though the memory fuse is pulled up, the battery can still be dis-
charged by operation of the head-
lights or other electrical devices.
Engine compartment panel fuse replacement
1. Turn the ignition switch and all other switches off.
OYN072020
OYN079021/OYN079022
Diesel only
YN ENG 7.QXP 9/5/2016 4:36 PM Page 52
Page 358 of 404

755
Maintenance
Inner fuse panel
DescriptionFuse ratingFuse nameProtected Component
15ADEICERI/P Junction Box (Front Deicer Relay)
15AS/HEATERDriver/Passenger Seat Warmer
210APDM 2Smart Key Control Module, BCM
D210ADRL 2BCM (Dedicated DRL)
125AWIPER FRT 1Multifunction Switch, Front Wiper Motor E/R Fuse & Relay Box (RLY.11)
FRT POWER OUTLET20AP/OUTLET FRTFront Power Outlet
ACC10AACCPower Outside Mirror Switch, Audio, DC-DC Converter, Navigation, BCM,
Smart Key Control Module, Sunroof Control Module Trip Computer
210ABLOWER 2A/C Control Module, ECM, PCM, Blower Resistor, Blower Motor
10AECUSmart Key Control Module, ECM, PCM
10AT/SIGMultifunction Switch (Turn Signal Lamp Switch)
10AA/BAGSRS Control Module
RR10AFOG LP RRRR Fog Relay
STOP LAMP15ASTOP LPStop Signal Electronic Module, Stop lamp
FRT10AFOG LP FRTFRT Fog Relay
10AROOMData Link Connector, I/P Junction Box (Auto Cut Relay)
15AWIPER RRMultifunction Switch, Rear Wiper Motor,
E/R Fuse & Relay Box (RLY.12)
YN ENG 7.QXP 9/5/2016 4:36 PM Page 55
Page 359 of 404

Maintenance
56
7
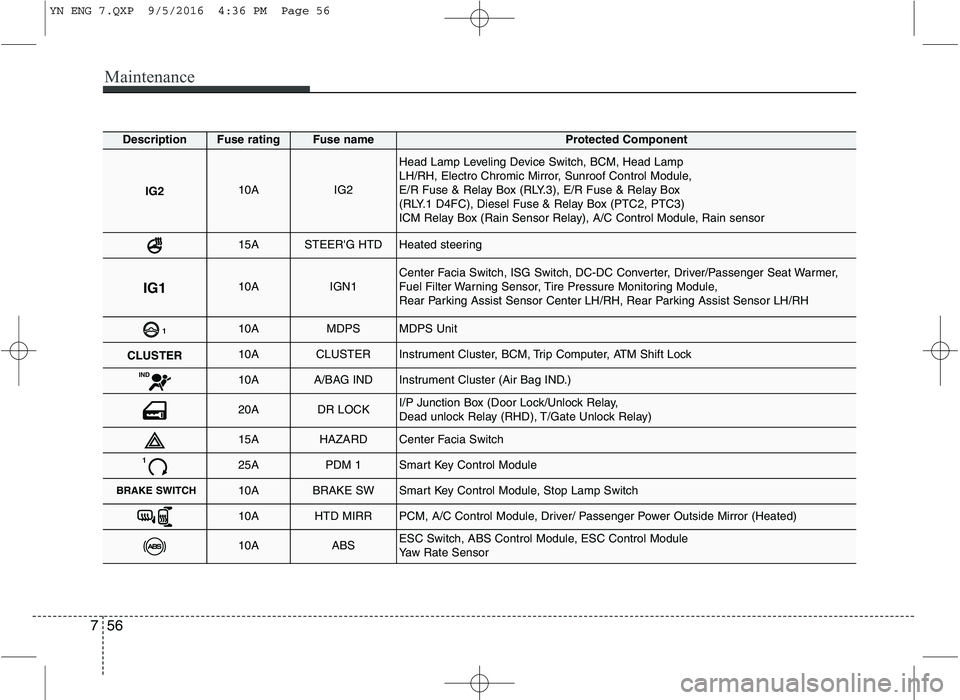
DescriptionFuse ratingFuse nameProtected Component
IG210AIG2
Head Lamp Leveling Device Switch, BCM, Head Lamp
LH/RH, Electro Chromic Mirror, Sunroof Control Module,
E/R Fuse & Relay Box (RLY.3), E/R Fuse & Relay Box
(RLY.1 D4FC), Diesel Fuse & Relay Box (PTC2, PTC3)
ICM Relay Box (Rain Sensor Relay), A/C Control Module, Rain sensor
15ASTEER'G HTDHeated steering
IG110AIGN1Center Facia Switch, ISG Switch, DC-DC Converter, Driver/Passenger Seat Warmer,
Fuel Filter Warning Sensor, Tire Pressure Monitoring Module,
Rear Parking Assist Sensor Center LH/RH, Rear Parking Assist Sensor LH/RH
110AMDPSMDPS Unit
CLU STER10ACLUSTERInstrument Cluster, BCM, Trip Computer, ATM Shift Lock
IND10AA/BAG INDInstrument Cluster (Air Bag IND.)
20ADR LOCKI/P Junction Box (Door Lock/Unlock Relay,
Dead unlock Relay (RHD), T/Gate Unlock Relay)
15AHAZARDCenter Facia Switch
125APDM 1Smart Key Control Module
BRAKE SWITCH10ABRAKE SWSmart Key Control Module, Stop Lamp Switch
10AHTD MIRRPCM, A/C Control Module, Driver/ Passenger Power Outside Mirror (Heated)
10AABSESC Switch, ABS Control Module, ESC Control Module
Yaw Rate Sensor
YN ENG 7.QXP 9/5/2016 4:36 PM Page 56
Page 360 of 404

757
Maintenance
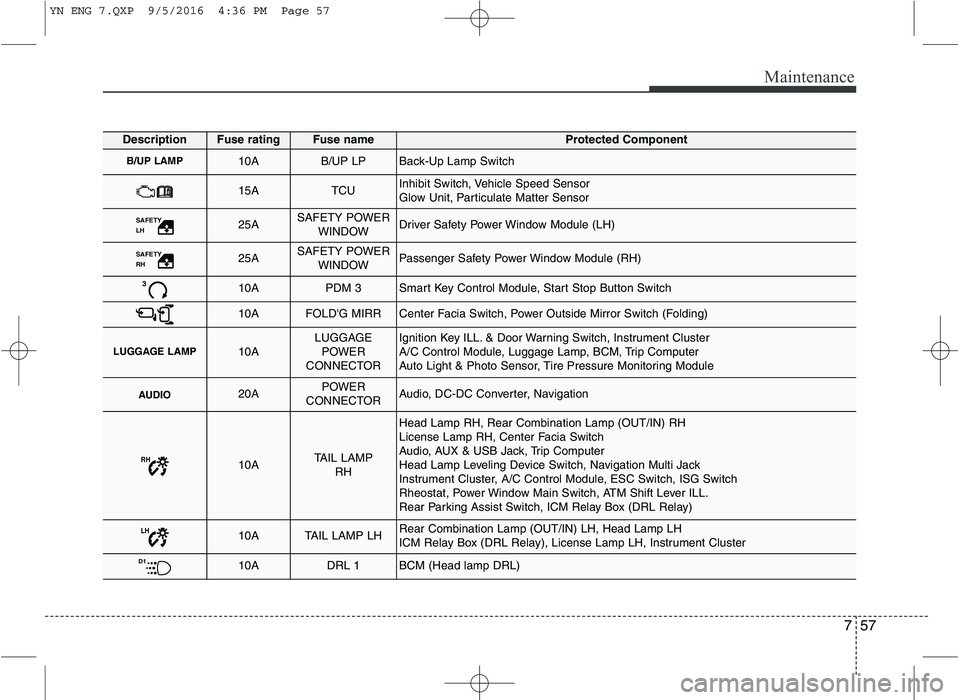
DescriptionFuse ratingFuse nameProtected Component
B/UP LAMP10AB/UP LPBack-Up Lamp Switch
15ATCUInhibit Switch, Vehicle Speed Sensor
Glow Unit, Particulate Matter Sensor
SAFETY
LH 25ASAFETY POWER
WINDOWDriver Safety Power Window Module (LH)
SAFETY
RH 25ASAFETY POWER
WINDOWPassenger Safety Power Window Module (RH)
310APDM 3Smart Key Control Module, Start Stop Button Switch
10AFOLD'G MIRRCenter Facia Switch, Power Outside Mirror Switch (Folding)
LUGGAGE LAMP10ALUGGAGEPOWER
CONNECTORIgnition Key ILL. & Door Warning Switch, Instrument Cluster
A/C Control Module, Luggage Lamp, BCM, Trip Computer
Auto Light & Photo Sensor, Tire Pressure Monitoring Module
AUDIO20APOWER
CONNECTORAudio, DC-DC Converter, Navigation
RH10ATAIL LAMP RH
Head Lamp RH, Rear Combination Lamp (OUT/IN) RH
License Lamp RH, Center Facia Switch
Audio, AUX & USB Jack, Trip Computer
Head Lamp Leveling Device Switch, Navigation Multi Jack
Instrument Cluster, A/C Control Module, ESC Switch, ISG Switch
Rheostat, Power Window Main Switch, ATM Shift Lever ILL.
Rear Parking Assist Switch, ICM Relay Box (DRL Relay)
LH10ATAIL LAMP LHRear Combination Lamp (OUT/IN) LH, Head Lamp LH
ICM Relay Box (DRL Relay), License Lamp LH, Instrument Cluster
D110ADRL 1BCM (Head lamp DRL)
YN ENG 7.QXP 9/5/2016 4:36 PM Page 57
Page 369 of 404
Maintenance
66
7
✽✽
NOTICE
We recommend that the headlight aim-
ing be adjusted after an accident or
after the headlight assembly is rein-
stalled at an authorized Kia dealer.
DRL (LED type, if equipped)
If the light does not operate, we recom-
mend that the system be checked by an
authorized Kia dealer.
Side repeater light bulb replace- ment (if equipped)
Type A
1. Using a flat-blade screwdriver, gentlypry the mirror from the assembly. 2. Remove the socket from the housing.
3. Remove the bulb from the socket.
4. Insert a new bulb into the socket.
5. Reinstall the assembly in the reverse
order of removal.
OYN079033
OYN079034
OYN079035
YN ENG 7.QXP 9/5/2016 4:36 PM Page 66
Page 370 of 404

767
Maintenance
Type B
1. Remove the light assembly from thevehicle by pushing the lens forward
and pulling the assembly out.
2. Disconnect the bulb electrical connec- tor.
3. Separate the socket and the lens parts by turning the socket counter clock-
wise until the tabs on the socket align
with the slots on the lens part.
4. Remove the bulb by pulling it straight out.
5. Insert a new bulb in the socket.
6. Reassemble the socket and the lens part.
7. Connect the bulb electrical connector.
8. Reinstall the light assembly to the body of the vehicle. Rear combination light bulb replacement
1. Open the tailgate. 2.
Outside
Loosen the outside light assembly
retaining screws with a cross-tip screw-
driver.
OYN079051
OYN079037
OYN075038L
OYN079036
OYN075036L
TTTTaaaaiiiillll
TTTTaaaaiiiillll
BBBBaaaacccckkkk uuuupppp
BBBBaaaacccckkkk uuuupppp
TTTTuuuurrrrnnnn ssssiiiiggggnnnnaaaallll
TTTTuuuurrrrnnnn ssssiiiiggggnnnnaaaallll
SSSSttttoooopppp aaaannnndddd ttttaaaaiiiillll
FFFFoooogggg ((((iiiiffff eeeeqqqquuuuiiiippppppppeeeedddd))))
FFFFoooogggg ((((iiiiffff eeeeqqqquuuuiiiippppppppeeeedddd))))
■ Type A
■Type B
SSSSttttoooopppp aaaannnndddd ttttaaaaiiiillll
YN ENG 7.QXP 9/5/2016 4:36 PM Page 67
Page 373 of 404
Maintenance
70
7
Interior light bulb replacement
1. Using a flat-blade screwdriver, gently
pry the lens from the interior light housing.
2. Remove the bulb by pulling it straight out.
3. Install a new bulb in the socket.
4. Align the lens tabs with the interior light housing notches and snap the
lens into place.Front map lamp
Side room lamp
OYN079052/OYN079049
Glove box lamp
Luggage room lamp
OYN079046/OYN079047
WARNING
Prior to working on the Interior
Lights, ensure that the “OFF” but-
ton is depressed to avoid burning
your fingers or receiving an electric
shock.
CAUTION
Use care not to dirty or damage lens, lens tab, and plastic housings.
YN ENG 7.QXP 9/5/2016 4:37 PM Page 70