2016 KIA Sportage light
[x] Cancel search: lightPage 463 of 501
745
Maintenance
Low aspect ratio tire
(if equipped)
Low aspect ratio tires, whose aspect
ratio is lower than 50, are provided
for sporty looks.
Because the low aspect ratio tires
are optimized for handling and brak-
ing, it may be more uncomfortable to
ride in and there is more noise com-
pare with normal tires.
CAUTION
Because the sidewall of the lowaspect ratio tire is shorter thanthe normal, the wheel and tire ofthe low aspect ratio tire is easi-er to be damaged. So, follow theinstructions below.
When driving on a rough road or off road, drive cautiouslybecause tires and wheels maybe damaged. And after driv-ing, inspect tires and wheels.
When passing over a pothole, speed bump, manhole, or curbstone, drive slowly so that thetires and wheels are not dam-aged.
If the tire is impacted, we rec- ommend that you inspect thetire condition or contact anauthorized Kia dealer.
To prevent damage to the tire, inspect the tire condition andpressure every 3,000km.
CAUTION
It is not easy to recognize the tire damage with your owneyes. But if there is the slight-est hint of tire damage, eventhough you cannot see the tiredamage with your own eyes,have the tire checked orreplaced because the tiredamage may cause air leak-age from the tire.
If the tire is damaged by driv- ing on a rough road, off road,pothole, manhole, or curbstone, it will not be covered bythe warranty.
You can find out the tire infor- mation on the tire sidewall.
Page 464 of 501
Maintenance
46
7
FUSES
G210000AAM
A vehicle’s electrical system is pro-
tected from electrical overload dam-
age by fuses.
This vehicle has 3 fuse panels, one
located in the driver’s side panel bol-
ster, the other in the engine compart-
ment near the battery.
If any of your vehicle’s lights, acces-
sories, or controls do not work, check
the appropriate circuit fuse. If a fuse
has blown, the element inside the
fuse will melt.
If the electrical system does not
work, first check the driver’s side
fuse panel.
Before replacing a blown fuse, dis-
connect the negative battery cable.
Always replace a blown fuse with
one of the same rating.
If the replacement fuse blows, this
indicates an electrical problem. Avoid
using the system involved and imme-
diately consult an authorized Kia
dealer.
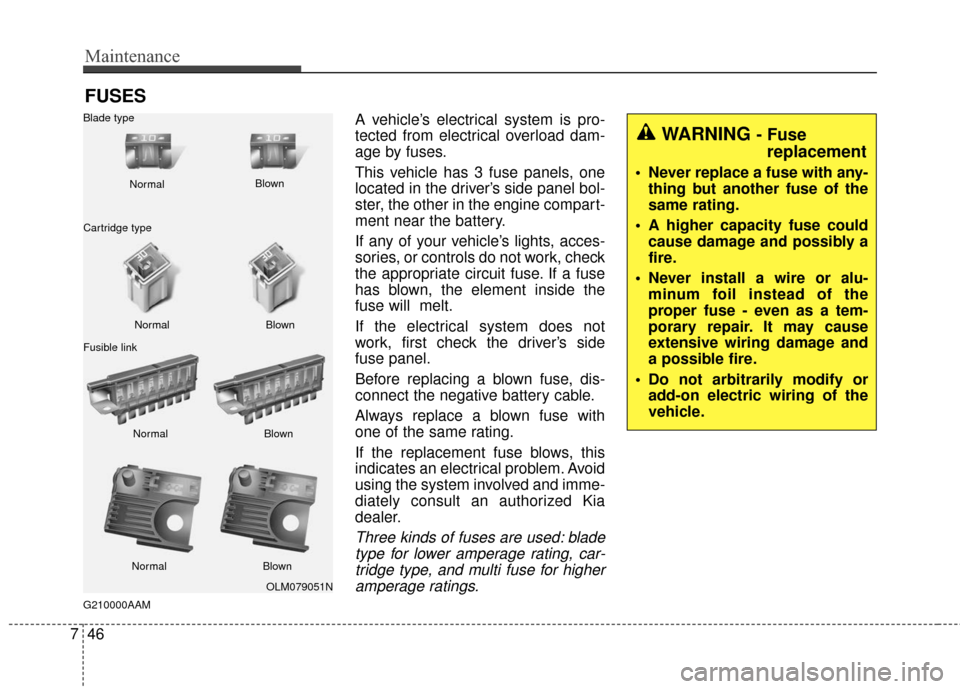
Three kinds of fuses are used: blade
type for lower amperage rating, car-tridge type, and multi fuse for higheramperage ratings.
WARNING - Fuse replacement
Never replace a fuse with any-
thing but another fuse of the
same rating.
A higher capacity fuse could cause damage and possibly a
fire.
Never install a wire or alu- minum foil instead of the
proper fuse - even as a tem-
porary repair. It may cause
extensive wiring damage and
a possible fire.
Do not arbitrarily modify or add-on electric wiring of the
vehicle.
OLM079051N
Normal
Normal
Blade type
Cartridge type
Fusible link Blown
Blown
Normal Blown
Normal Blown
Page 466 of 501
Maintenance
48
7
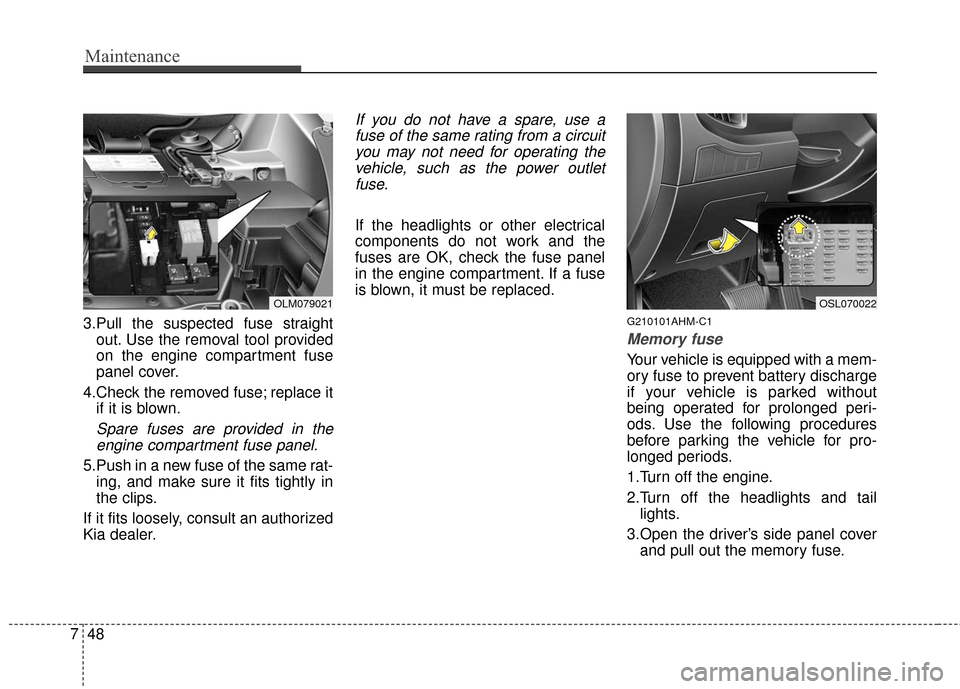
3.Pull the suspected fuse straight
out. Use the removal tool provided
on the engine compartment fuse
panel cover.
4.Check the removed fuse; replace it if it is blown.
Spare fuses are provided in theengine compartment fuse panel.
5.Push in a new fuse of the same rat- ing, and make sure it fits tightly in
the clips.
If it fits loosely, consult an authorized
Kia dealer.
If you do not have a spare, use a fuse of the same rating from a circuityou may not need for operating thevehicle, such as the power outletfuse.
If the headlights or other electrical
components do not work and the
fuses are OK, check the fuse panel
in the engine compartment. If a fuse
is blown, it must be replaced.
G210101AHM-C1
Memory fuse
Your vehicle is equipped with a mem-
ory fuse to prevent battery discharge
if your vehicle is parked without
being operated for prolonged peri-
ods. Use the following procedures
before parking the vehicle for pro-
longed periods.
1.Turn off the engine.
2.Turn off the headlights and tail lights.
3.Open the driver’s side panel cover and pull out the memory fuse.
OSL070022OLM079021
Page 467 of 501
749
Maintenance
✽
✽NOTICE
• If the memory fuse is pulled out
from the fuse panel, the warning
chime, audio, clock and interior
lamps, etc., will not operate. Some
items must be reset after replace-
ment. Refer to “Battery” in this
section.
• Even though the memory fuse is pulled out, the battery can still be
discharged by operation of the
headlights or other electrical
devices.
G210200AHM
❈ The actual feature may differ from the
illustration.
Engine compartment fuse
replacement
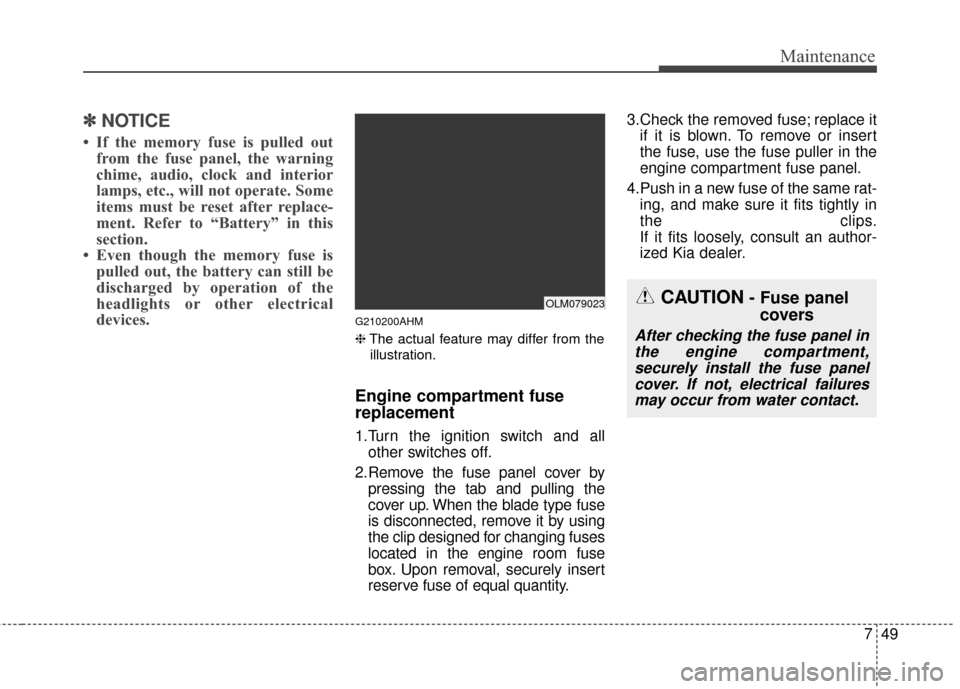
1.Turn the ignition switch and all other switches off.
2.Remove the fuse panel cover by pressing the tab and pulling the
cover up. When the blade type fuse
is disconnected, remove it by using
the clip designed for changing fuses
located in the engine room fuse
box. Upon removal, securely insert
reserve fuse of equal quantity. 3.Check the removed fuse; replace it
if it is blown. To remove or insert
the fuse, use the fuse puller in the
engine compartment fuse panel.
4.Push in a new fuse of the same rat- ing, and make sure it fits tightly in
the clips.
If it fits loosely, consult an author-
ized Kia dealer.
CAUTION- Fuse panelcovers
After checking the fuse panel in
the engine compartment,securely install the fuse panelcover. If not, electrical failuresmay occur from water contact.
OLM079023
Page 472 of 501
Maintenance
54
7
Inner fuse panel
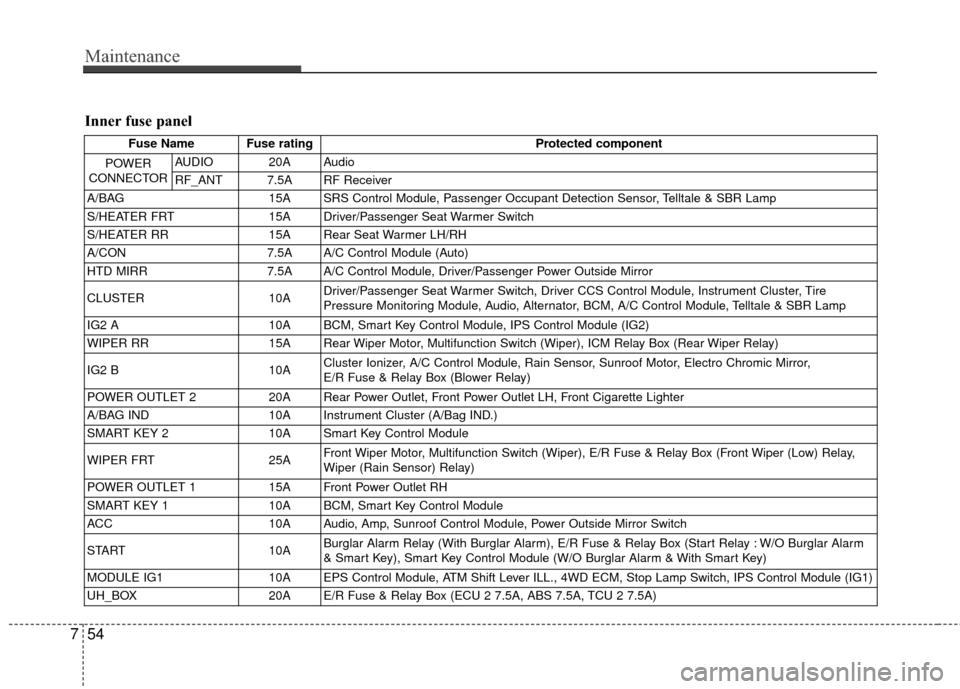
Fuse Name Fuse rating Protected component
POWER
CONNECTOR
AUDIO 20A Audio
RF_ANT 7.5A RF Receiver
A/BAG 15A SRS Control Module, Passenger Occupant Detection Sensor, Telltale & SBR Lamp
S/HEATER FRT 15A Driver/Passenger Seat Warmer Switch
S/HEATER RR 15A Rear Seat Warmer LH/RH
A/CON 7.5A A/C Control Module (Auto)
HTD MIRR 7.5A A/C Control Module, Driver/Passenger Power Outside Mirror
CLUSTER 10A Driver/Passenger Seat Warmer Switch, Driver CCS Control Module, Instrument Cluster, Tire
Pressure Monitoring Module, Audio, Alternator, BCM, A/C Control Module, Telltale & SBR Lamp
IG2 A 10A BCM, Smart Key Control Module, IPS Control Module (IG2)
WIPER RR 15A Rear Wiper Motor, Multifunction Switch (Wiper), ICM Relay Box (Rear Wiper Relay)
IG2 B 10A Cluster Ionizer, A/C Control Module, Rain Sensor, Sunroof Motor, Electro Chromic Mirror,
E/R Fuse & Relay Box (Blower Relay)
POWER OUTLET 2 20A Rear Power Outlet, Front Power Outlet LH, Front Cigarette Lighter
A/BAG IND 10A Instrument Cluster (A/Bag IND.)
SMART KEY 2 10A Smart Key Control Module
WIPER FRT 25A Front Wiper Motor, Multifunction Switch (Wiper), E/R Fuse & Relay Box (Front Wiper (Low) Relay,
Wiper (Rain Sensor) Relay)
POWER OUTLET 1 15A Front Power Outlet RH
SMART KEY 1 10A BCM, Smart Key Control Module
ACC 10A Audio, Amp, Sunroof Control Module, Power Outside Mirror Switch
START 10A Burglar Alarm Relay (With Burglar Alarm), E/R Fuse & Relay Box (Start Relay : W/O Burglar Alarm
& Smart Key), Smart Key Control Module (W/O Burglar Alarm & With Smart Key)
MODULE IG1 10A EPS Control Module, ATM Shift Lever ILL., 4WD ECM, Stop Lamp Switch, IPS Control Module (IG1)
UH_BOX 20A E/R Fuse & Relay Box (ECU 2 7.5A, ABS 7.5A, TCU 2 7.5A)
Page 476 of 501
Maintenance
58
7
APPEARANCE CARE
Exterior care
G230101AUN
Exterior general caution
It is very important to follow the label
directions when using any chemical
cleaner or polish. Read all warning
and caution statements that appear
on the label.
G230102BUN
Finish maintenance
Washing
To help protect your vehicle’s finish
from rust and deterioration, wash it
thoroughly and frequently at least once
a month with lukewarm or cold water.
If you use your vehicle for off-road driv-
ing, you should wash it after each off-
road trip. Pay special attention to the
removal of any accumulation of salt,
dirt, mud, and other foreign materials.
Make sure the drain holes in the lower
edges of the doors and rocker panels
are kept clear and clean.
Insects, tar, tree sap, bird droppings,
industrial pollution and similar deposits
can damage your vehicle’s finish if not
removed immediately.
Even prompt washing with plain water
may not completely remove all these
deposits. A mild soap, safe for use on
painted surfaces, may be used.
After washing, rinse the vehicle thor-
oughly with lukewarm or cold water. Do
not allow soap to dry on the finish. After washing the vehicle, test the
brakes while driving slowly to see if
they have been affected by water. If
braking performance is impaired, dry
the brakes by applying them lightly
while maintaining a slow forward
speed.
High-pressure washing
When using high-pressure wash-
ers, make sure to maintain suffi-
cient distance from the vehicle.
Insufficient clearance or excessive
pressure can lead to component
damage or water penetration.
Do not spray the camera, sensors or its surrounding area directly with
a high pressure washer. Shock
applied from high pressure water
may cause the device to not oper-
ate normally.
Do not bring the nozzle tip close to boots (rubber or plastic covers) or
connectors as they may be dam-
aged if they come into contact with
high pressure water.
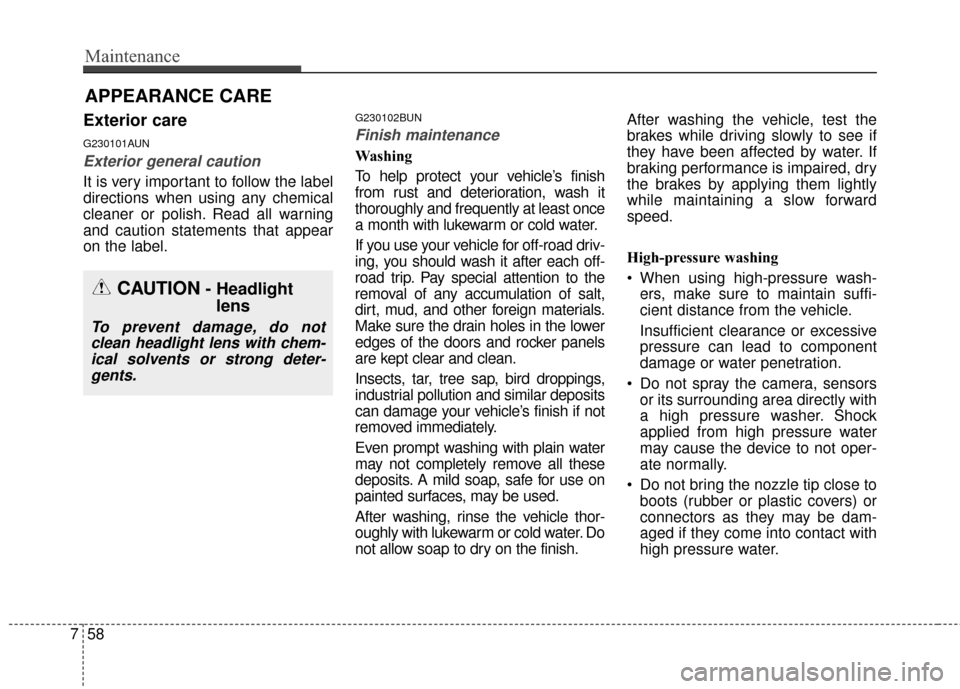
CAUTION- Headlightlens
To prevent damage, do not
clean headlight lens with chem-ical solvents or strong deter-gents.
Page 488 of 501
28
Specifications & Consumer information
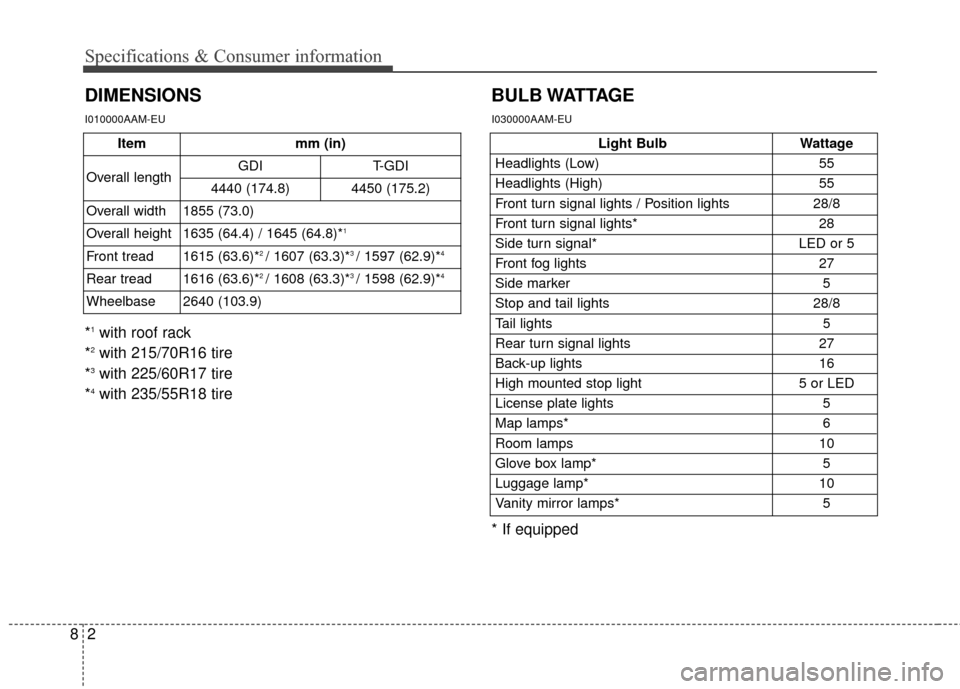
DIMENSIONSBULB WATTAGE
I010000AAM-EU
Light Bulb
Wattage
Headlights (Low) 55
Headlights (High) 55
Front turn signal lights / Position lights 28/8
Front turn signal lights* 28
Side turn signal* LED or 5
Front fog lights 27
Side marker 5
Stop and tail lights 28/8
Tail lights
5
Rear turn signal lights 27
Back-up lights 16
High mounted stop light 5 or LED
License plate lights 5
Map lamps* 6
Room lamps 10
Glove box lamp* 5
Luggage lamp* 10
Vanity mirror lamps* 5
* If equipped
I030000AAM-EU
*1with roof rack
*2with 215/70R16 tire
*3with 225/60R17 tire
*4with 235/55R18 tire
Itemmm (in)
Overall length
GDI T-GDI
4440 (174.8) 4450 (175.2)
Overall width
1855 (73.0)
Overall height
1635 (64.4) / 1645 (64.8)*1
Front tread1615 (63.6)*2 / 1607 (63.3)*3 / 1597 (62.9)*4
Rear tread1616 (63.6)*2 / 1608 (63.3)*3 / 1598 (62.9)*4
Wheelbase2640 (103.9)
Page 496 of 501
Index
2I
Air bag - advanced supplemental restraint system . . . . 3-46Air bag warning label. . . . . . . . . . . . . . . . . . . . . . . . 3-71
Air bag warning light . . . . . . . . . . . . . . . . . . . . . . . . 3-49
Curtain air bag . . . . . . . . . . . . . . . . . . . . . . . . . . . . . 3-63
Driver's and passenger's front air bag . . . . . . . . . . . 3-59
How does the air bag system operate. . . . . . . . . . . . 3-47
Occupant Detection System (ODS) . . . . . . . . . . . . . 3-53
Side impact air bag. . . . . . . . . . . . . . . . . . . . . . . . . . 3-62
SRS care . . . . . . . . . . . . . . . . . . . . . . . . . . . . . . . . . . 3-70\
SRS components and functions . . . . . . . . . . . . . . . . 3-50
Air cleaner . . . . . . . . . . . . . . . . . . . . . . . . . . . . . . . . . . 7-24\
Appearance care . . . . . . . . . . . . . . . . . . . . . . . . . . . . . . 7-58 Exterior care . . . . . . . . . . . . . . . . . . . . . . . . . . . . . . . 7-58
Interior care . . . . . . . . . . . . . . . . . . . . . . . . . . . . . . . 7-63
Audio system . . . . . . . . . . . . . . . . . . . . . . . . . . . . . . . 4-130 Antenna . . . . . . . . . . . . . . . . . . . . . . . . . . . . . . . . . 4-130
Aux, USB and iPod
®port . . . . . . . . . . . . . . . . . . . 4-132
Bluetooth®Wireless Technology . . . . . . . . . . 4-166, 226
SIRIUS®Satellite Radio information . . . . . . 4-156, 199
Steering wheel audio control . . . . . . . . . . . . . . . . . 4-131
Automatic climate control system . . . . . . . . . . . . . . . 4-107
Automatic transaxle . . . . . . . . . . . . . . . . . . . . . . . . . . . 5-15 Automatic transaxle operation . . . . . . . . . . . . . . . . . 5-15 Back-up warning system . . . . . . . . . . . . . . . . . . . . . . . 4-79
Back-up warning system . . . . . . . . . . . . . . . . . . . . . 4-81
Non-operational conditions of back-upwarning system . . . . . . . . . . . . . . . . . . . . . . . . . . . 4-80
Operation of the back-up warning system . . . . . . . . 4-79
Self-diagnosis . . . . . . . . . . . . . . . . . . . . . . . . . . . . . . 4-82
Battery. . . . . . . . . . . . . . . . . . . . . . . . . . . . . . . . . . . . \
. . 7-29
Before driving . . . . . . . . . . . . . . . . . . . . . . . . . . . . . . . . . 5-3
Brake system. . . . . . . . . . . . . . . . . . . . . . . . . . . . . . . . . 5-27 Anti-lock brake system (ABS) . . . . . . . . . . . . . . . . . 5-31
Downhill brake control (DBC). . . . . . . . . . . . . . . . . 5-39
Electronic stability control (ESC) . . . . . . . . . . . . . . 5-33
Hill-start assist control (HAC) . . . . . . . . . . . . . . . . . 5-39
Parking brake . . . . . . . . . . . . . . . . . . . . . . . . . . . . . . 5-29
Power brakes . . . . . . . . . . . . . . . . . . . . . . . . . . . . . 5-27
Vehicle stability management (VSM) . . . . . . . . . . . 5-37
Brake/clutch fluid . . . . . . . . . . . . . . . . . . . . . . . . . . . . . 7-22
Bulb wattage . . . . . . . . . . . . . . . . . . . . . . . . . . . . . . . . . . 8-2
Child restraint system . . . . . . . . . . . . . . . . . . . . . . . . . . 3-37 Using a child restraint system . . . . . . . . . . . . . . . . . 3-38
Climate control air filter . . . . . . . . . . . . . . . . . . . . . . . . 7-25
Cruise control system . . . . . . . . . . . . . . . . . . . . . . . . . . 5-43
AB
C