Page 172 of 556

Features of your vehicle
92
4
To flash the headlights, pull the lever
towards you. It will return to the nor-
mal (low beam) position when
released. The headlight switch does
not need to be on to use this flashing
feature.
Turn signals and lane change
signals
The ignition switch must be on for the
turn signals to function. To turn on
the turn signals, move the lever up or
down (A). The green arrow indicators
on the instrument panel indicate
which turn signal is operating. They
will self-cancel after a turn is com-
pleted. If the indicator continues to
flash after a turn, manually return the
lever to the OFF position. To signal a lane change, move the
turn signal lever slightly and hold it in
position (B). The lever will return to
the OFF position when released.
If an indicator stays on and does not
flash or if it flashes abnormally, one of
the turn signal bulbs may be burned
out and will require replacement.
If an indicator flash is abnormally
quick or slow, a bulb may be burned
out or have a poor electrical connec-
tion in the circuit.
OAM049045
OAM049043
WARNING - High beams
Do not use high beam when
there are other vehicles. Using
high beam could obstruct the
other driver's vision.
Page 175 of 556

495
Features of your vehicle
LO : Normal wiper speed
HI : Fast wiper speed
✽ ✽NOTICE
If there is heavy accumulation of
snow or ice on the windshield,
defrost the windshield for about 10
minutes, or until the snow and/or ice
is removed before using the wind-
shield wipers to ensure proper oper-
ation.
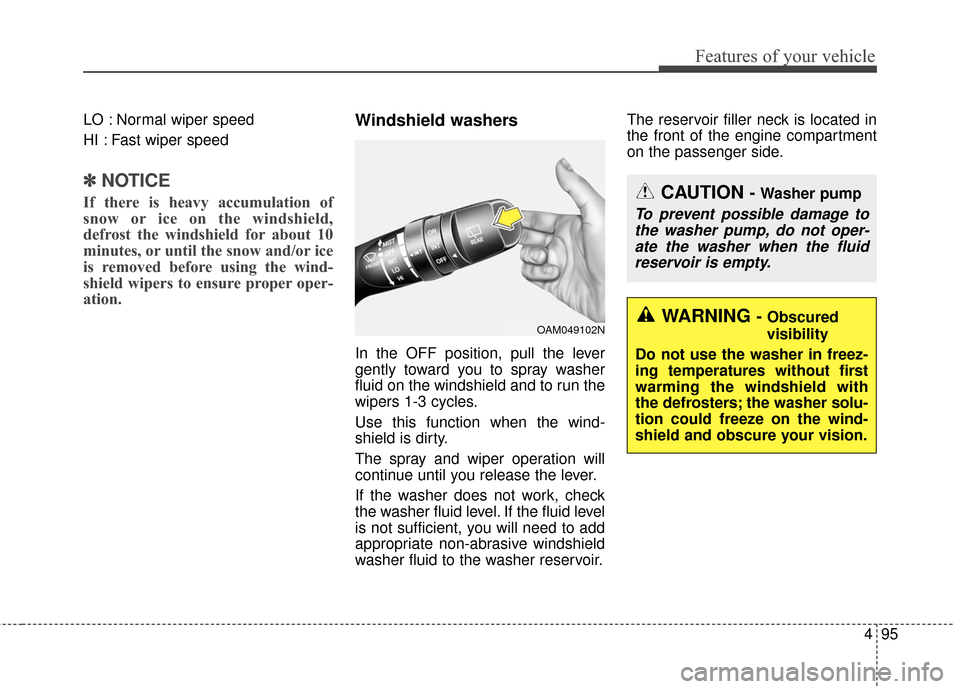
Windshield washers
In the OFF position, pull the lever
gently toward you to spray washer
fluid on the windshield and to run the
wipers 1-3 cycles.
Use this function when the wind-
shield is dirty.
The spray and wiper operation will
continue until you release the lever.
If the washer does not work, check
the washer fluid level. If the fluid level
is not sufficient, you will need to add
appropriate non-abrasive windshield
washer fluid to the washer reservoir. The reservoir filler neck is located in
the front of the engine compartment
on the passenger side.
OAM049102N
CAUTION - Washer pump
To prevent possible damage to
the washer pump, do not oper-ate the washer when the fluidreservoir is empty.
WARNING - Obscured
visibility
Do not use the washer in freez-
ing temperatures without first
warming the windshield with
the defrosters; the washer solu-
tion could freeze on the wind-
shield and obscure your vision.
Page 186 of 556
Features of your vehicle
106
4
Mode selection
The mode selection knob controls
the direction of the air flow through
the ventilation system.
Air can be directed to the floor, dash-
board outlets, or windshield. Five
symbols are used to represent. Vent mode (B, D)
Air flow is directed toward the upper
body and face. Additionally, each
outlet can be controlled to direct the
air discharged from the outlet.
Vent-Floor mode (B, D, C, E)
Air flow is directed towards the face
and the floor.
Floor mode (C, E, A, D)
Most of the air flow is directed to the
floor, with a small amount of the air
being directed to the windshield and
side window defrosters. Floor/Defrost mode
(A, C, E, D)
Most of the air flow is directed to the
floor and the windshield with a small
amount directed to the side window
defrosters.
Defrost mode (A, D)
Most of the air flow is directed to the
windshield with a small amount of air
directed to the side window
defrosters.
OPS043155
Page 187 of 556
4107
Features of your vehicle
Instrument panel vents
The outlet vents can be opened or
closed separately using the thumb-
wheel.
Also, you can adjust the direction of
air delivery from these vents using
the vent control lever as shown.
Temperature control
The temperature control knob allows
you to control the temperature of the
air flow from the ventilation system.
To change the air temperature in the
passenger compartment, turn the
knob to the right position for warm air
or left position for cooler air.To operate the MAX A/C, turn the
temperature knob to extreme left. Air
flow is directed toward the upper
body and face.
In this mode, the air conditioning and
the recirculated air position will be
selected automatically.
OPS043059
OPS043156
OPS043159
Page 197 of 556
4117
Features of your vehicle
The air flow outlet port is converted
as follows:Vent mode (B, D)
Air flow is directed toward the upper
body and face. Additionally, each out-
let can be controlled to direct the air
discharged from the outlet.
Vent-Floor mode (B, D, C, E)
Air flow is discharged towards the
face and floor. Floor mode (C, E, A, D)
Most of the air flow is directed to the
floor, with a small amount of the air
being directed to the windshield and
side window defroster.
Floor/Defrost mode
(A, C, E, D)
Most of the air flow is directed to the
floor and the windshield with a small
amount directed to the side window
defrosters.
Defrost mode (A, D)
Most of the air flow is directed to the
windshield with a small amount of air
directed to the side window defrosters.
OPS043168
OPS043169
■Type B
■Type A
Page 217 of 556

4137
Features of your vehicle
During mild weather or under condi-
tions where the operation of the seat
warmer is not needed, keep the
switches in the "OFF" position.
Each time you press the switch,the temperature setting of the seat
will change as follows :
The seat warmer defaults to the OFF position whenever the ignition
switch is turned on.
When pressing the switch for more than 1.5 seconds with the seat
warmer operating, the seat warmer
will turn OFF.
✽ ✽ NOTICE
With the seat warmer switch in the
ON position, the heating system in the
seat turns off or on automatically
depending on the seat temperature.
✽ ✽NOTICE
Be careful not to spill liquid such as
water or beverages on the seat. If you
spill some liquid, wipe the seat with a
dry towel. Before using the seat
warmer, dry the seat completely.
CAUTION - Seat damage
When cleaning the seats, do
not use an organic solventsuch as paint thinner, ben-zene, alcohol and gasoline.Doing so may damage the sur-face of the heater or seats.
To prevent overheating the seat warmer, do not place any-thing on the seats that insu-lates against heat, such asblankets, cushions or seatcovers while the seat warmeris in operation.
Do not place heavy or sharp objects on seats equippedwith seat warmers. Damage tothe seat warming componentscould occur.
OFF
HIGH ( ) LOW ( )→→→ OFF
HIGH ( )
MIDDLE ( )* LOW ( )
→→→→
WARNING- Seat heater
burns
The seat warmer may cause
burns, even at low tempera-
tures, if used over a long period
of time. Never allow passengers
who may not be able to take
care of themselves to be
exposed to the risk of seat
heater burns. These include:
1. Infants, children, elderly or disabled persons, or hospital
outpatients
2. Persons with sensitive skin or those that burn easily
3. Fatigued individuals
4. Intoxicated individuals
5. Individuals taking medication that can cause drowsiness or
sleepiness (sleeping pills,
cold tablets, etc.)
Page 218 of 556

Features of your vehicle
138
4
Seat air ventilation (if equipped)
The temperature setting of the seat
changes according to the switch
position.
If you want to cool your seat cush-
ion, press the switch (blue color).
Each time you press the button, the airflow will change as follows: When pressing the switch for more
than 1.5 seconds with the seat air
ventilation operating, the seat air
ventilation will turn OFF.
The seat air ventilation defaults to the OFF position whenever the
ignition switch is turned on.
✽ ✽ NOTICE
Be careful not to spill liquid such as
water or beverages on the seat. If
you spill some liquid, wipe the seat
with a dry towel. Before using the
air ventilation seat, dry the seat
completely.
Rear seat warmer (if equipped)
The seat warmer is provided to warm
the rear outboard seats during cold
weather. With the ignition switch in
the ON position, push either of the
switches to warm rear seats.
During mild weather or under condi-
tions where the operation of the seat
warmer is not needed, keep the
switches in the "OFF" position.
OPS033014
OFF
HIGH ( ) MIDDLE ( ) LOW ( )→→→→
CAUTION - Seat damage
When cleaning the seats, donot use an organic solventsuch as paint thinner, ben-zene, alcohol and gasoline.Doing so may damage the airventilation seat.
Do not place heavy or sharp objects on the seat. Thosethings may damage the airventilation seat.
OPS033031
→
OFF → HIGH ( ) → LOW ( )
Page 219 of 556

4139
Features of your vehicle
When pressing the switch for morethan 1.5 seconds with the seat
warmer operating, the seat warmer
will turn OFF.
The seat warmer defaults to the OFF position whenever the engine
start/stop button (the ignition switch)
is turned on.
✽ ✽ NOTICE
With the seat warmer switch in the
ON position, the heating system in
the seat turns off or on automatically
depending on the seat temperature.
✽ ✽NOTICE
Be careful not to spill liquid such as
water or beverages on the seat. If you
spill some liquid, wipe the seat with a
dry towel. Before using the seat
warmer, dry the seat completely.
CAUTION
-
Seat damage
When cleaning the seats, do
not use an organic solventsuch as thinner, benzene, alco-hol and gasoline. Doing so maydamage the surface of theheater or seats.
To prevent overheating the seat warmer, do not place anythingon the seats that insulatesagainst heat, such as blankets,cushions or seat covers whilethe seat warmer is in operation.
Do not place heavy or sharp objects on seats equippedwith seat warmers. Damage tothe seat warming componentscould occur.
WARNING- Seat heater
burns
The seat warmer may cause
burns, even at low tempera-
tures, if used over a long period
of time. Never allow passengers
who may not be able to take
care of themselves to be
exposed to the risk of seat
heater burns. These include:
1. Infants, children, elderly or disabled persons, or hospital
outpatients
2. Persons with sensitive skin or those that burn easily
3. Fatigued individuals
4. Intoxicated individuals
5. Individuals taking medication that can cause drowsiness or
sleepiness (sleeping pills,
cold tablets, etc.)