2016 KIA SOUL change time
[x] Cancel search: change timePage 2 of 50

GETTING TO KNOW YOUR SOUL
Congratulations on Your New Kia Purchase!
Your new Kia vehicle has been designed, engineered and manufactured to provide you with years of comfortable and dependable
driving. Kia is committed to quality, innovation, safety and — above all — your satisfaction.
Using This Guide
The information contained in this guide is a brief overview that will help you become familiar with the operation and features of your
new Kia vehicle. The flipbook format facilitates information access, while the detailed illustrations help to ensure the instructions are
easy to follow.
This Features & Functions Guide, and the specific operational and safety information it provides, is not a substitute for your Owner’s
Manual. In the interest of your safety and that of your family, and to help you avoid risks that may result in death or serious injury,
Kia reminds you to carefully read your Owner’s Manual in order to fully familiarize yourself with the important information it contains.
While the information contained in this guide is accurate at the time of printing, Kia may change vehicle specifications without
notice in advance or after the fact, and assumes no liability in connection with such changes.
www.kia.com
Consumer - Roadside Assistance
1-800-333-4KIA (4542)
See Back Pages for Vehicle Maintenance Schedule
Always check the Owner’s Manual for complete operating information and safety warnings.
Page 8 of 50
6
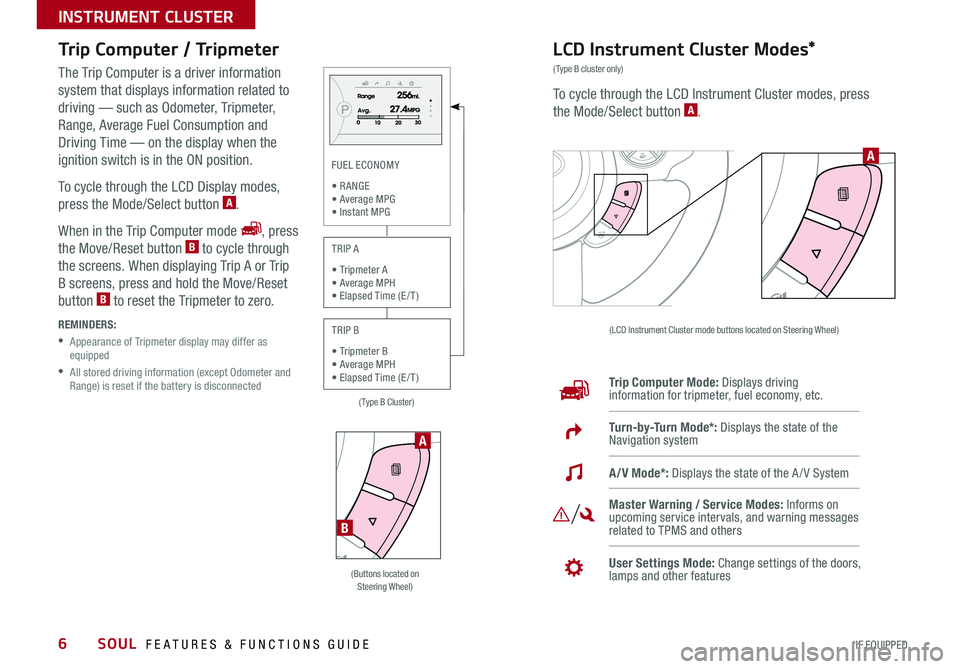
Trip Computer / Tripmeter
The Trip Computer is a driver information
system that displays information related to
driving — such as Odometer, Tripmeter,
Range, Average Fuel Consumption and
Driving Time — on the display when the
ignition switch is in the ON position
To cycle through the LCD Display modes,
press the Mode/Select button
A
When in the Trip Computer mode
, press
the Move/Reset button B to cycle through
the screens When displaying Trip A or Trip
B screens, press and hold the Move/Reset
button
B to reset the Tripmeter to zero
REMINDERS:
• Appearance of Tripmeter display may differ as
equipped
• All stored driving information (except Odometer and
Range) is reset if the battery is disconnected
LCD Instrument Cluster Modes*
(Type B cluster only)
To cycle through the LCD Instrument Cluster modes, press
the Mode/Select button A
(LCD Instrument Cluster mode buttons located on Steering Wheel)
Trip Computer Mode: Displays driving
information for tripmeter, fuel economy, etc
Turn-by-Turn Mode*: Displays the state of the
Navigation system
Master Warning / Service Modes: Informs on
upcoming service intervals, and warning messages
related to TPMS and others
User Settings Mode: Change settings of the doors,
lamps and other features
A/V Mode*: Displays the state of the A / V System
A
(Buttons located on
Steering Wheel)
A
B
(Type B Cluster)
FUEL ECONOMY
• R ANGE
• Average MPG • Instant MPG
TRIP A
• Tripmeter A
• Average MPH • Elapsed Time (E / T )
TRIP B
• Tripmeter B
• Average MPH • Elapsed Time (E / T )
SOUL FEATURES & FUNCTIONS GUIDE
*IF EQUIPPED
INSTRUMENT CLUSTER
Page 16 of 50

14
Headlights & High BeamsTurn Signals & Fog Lights*
To operate:
• Rotate switch to change the Headlight function
• Push lever to turn High Beams ON
• Pull lever to flash Headlights / High Beams
AUTO Light* function — When the light switch is in the AUTO light
position, the tail lights and headlights will turn ON/OFF automatically,
depending on the amount of light outside the vehicle To operate:
• Turn Signals - Move lever Up/Down for Right /Left Turn Signal
• Rotate lever ring to turn Fog Lights ON/OFF
One-Touch Lane Change Signal is activated by moving the Turn Signal
Lever up/down slightly for less than 1 second and then releasing The lane
change signal will blink 3 times
To change how many times the Lane Change Signal blinks (3/5/7), go to User
Settings Mode* in the LCD Instrument Cluster modes ( Type B cluster)
REMINDER: Headlights must be ON for Fog Light operation
AUTO*Automatic Headlights position
Headlight position
Parking Light position
OFF OFF position
O ne -Touch
Lane Change Signal
For more information on the User Settings Mode, please refer to your Owner’s Manual.
SOUL FEATURES & FUNCTIONS GUIDE
*IF EQUIPPED
STEERING WHEEL CONTROLS
Page 22 of 50
20
Standard Audio System
Videos
To view a video on your
mobile device, snap this
QR Code or visit the listed
website
Refer to page 2 for more
information
KuTechVideos.com/audio/base_system
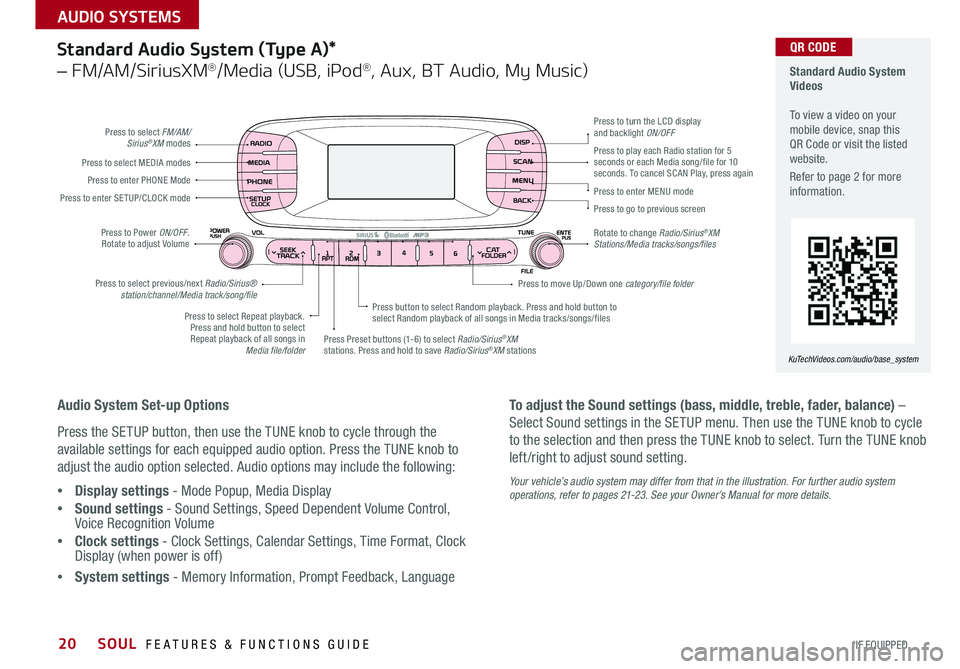
QR CODEStandard Audio System (Type A)*
– FM/AM/SiriusXM®/Media (USB, iPod®, Aux, BT Audio, My Music)
Audio System Set-up Options
Press the SETUP button, then use the TUNE knob to cycle through the
available settings for each equipped audio option Press the TUNE knob to
adjust the audio option selected Audio options may include the following:
• Display settings - Mode Popup, Media Display
• Sound settings - Sound Settings, Speed Dependent Volume Control,
Voice Recognition Volume
• Clock settings - Clock Settings, Calendar Settings, Time Format, Clock
Display (when power is off)
• System settings - Memory Information, Prompt Feedback, Language To adjust the Sound settings (bass, middle, treble, fader, balance) –
Select Sound settings in the SETUP menu
Then use the TUNE knob to cycle
to the selection and then press the TUNE knob to select Turn the TUNE knob
left /right to adjust sound setting
Your vehicle’s audio system may differ from that in the illustration. For further audio system
operations, refer to pages 21-23. See your Owner’s Manual for more details.
Press to select FM/AM/
Sirius®XM modes
Press to Power ON/OFF
Rotate to adjust Volume
Press Preset buttons (1-6) to select Radio/Sirius
®XM
stations Press and hold to save Radio/Sirius®XM stations
Press to select Repeat playback
Press and hold button to select Repeat playback of all songs in Media file/folder Press button to select Random playback
Press and hold button to
select Random playback of all songs in Media tracks/songs/files
Press to select MEDIA modes
Press to play each Radio station for 5
seconds or each Media song/file for 10
seconds
To cancel SCAN Play, press again
Press to enter PHONE Mode
Press to enter SE TUP/ CLOCK mode
Press to select previous/next Radio/Sirius® station/channel/Media track/song/file Press to enter MENU mode
Press to go to previous screen
Rotate to change Radio/Sirius
®XM
Stations/Media tracks/songs/files Press to turn the LCD display
and backlight ON/OFF
Press to move Up/Down one category/file folder
SOUL FEATURES & FUNCTIONS GUIDE
*IF EQUIPPED
AUDIO SYSTEMS
Page 23 of 50
21
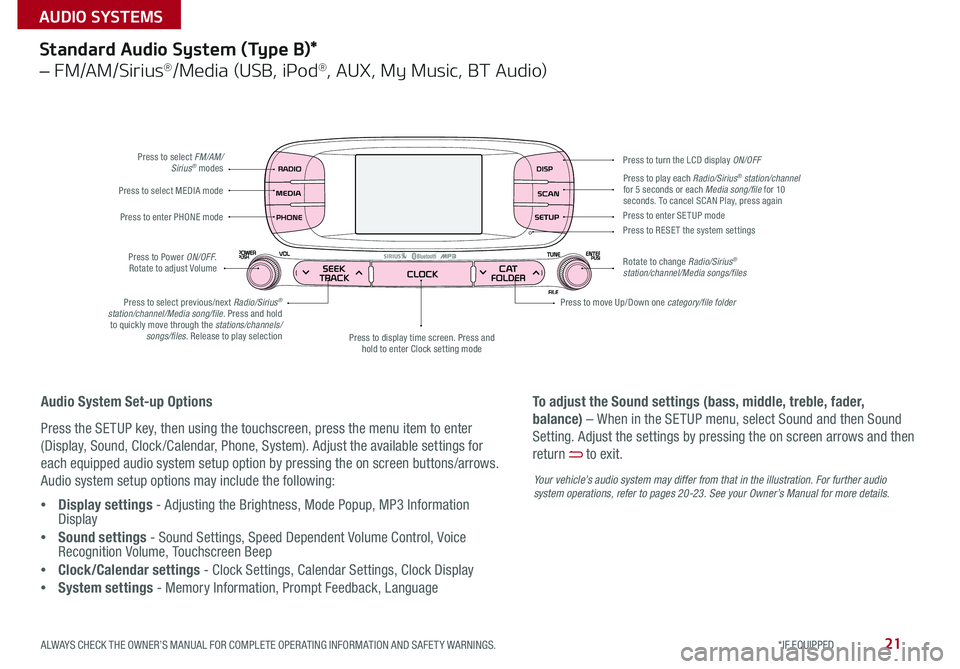
Standard Audio System (Type B)*
– FM/AM/Sirius®/Media (USB, iPod®, AUX, My Music, BT Audio)
Press to select FM/AM/Sirius® modes
Press to Power ON/OFF
Rotate to adjust Volume
Press to display time screen Press and
hold to enter Clock setting mode
Press to select MEDIA mode
Press to play each Radio/Sirius® station/channel
for 5 seconds or each Media song/file for 10
seconds To cancel SCAN Play, press again
Press to enter PHONE mode
Press to select previous/next Radio/Sirius
®
station/channel/Media song/file. Press and hold to quickly move through the stations/channels/ songs/files. Release to play selection Press to enter SE TUP mode
Press to RESE T the system settings
Rotate to change Radio/Sirius
®
station/channel/Media songs/files Press to turn the LCD display ON/OFF
Press to move Up/Down one category/file folder
Audio System Set-up Options
Press the SETUP key, then using the touchscreen, press the menu item to enter
(Display, Sound, Clock /Calendar, Phone, System) Adjust the available settings for
each equipped audio system setup option by pressing the on screen buttons/arrows
Audio system setup options may include the following:
• Display settings - Adjusting the Brightness, Mode Popup, MP3 Information
Display
• Sound settings - Sound Settings, Speed Dependent Volume Control, Voice
Recognition Volume, Touchscreen Beep
• Clock/Calendar settings - Clock Settings, Calendar Settings, Clock Display
• System settings - Memory Information, Prompt Feedback, Language To adjust the Sound settings (bass, middle, treble, fader,
balance) – When in the SETUP menu, select Sound and then Sound
Setting
Adjust the settings by pressing the on screen arrows and then
return
to exit
Your vehicle’s audio system may differ from that in the illustration. For further audio
system operations, refer to pages 20-2 3. See your Owner’s Manual for more details.
ALWAYS CHECK THE OWNER’S MANUAL FOR COMPLETE OPER ATING INFORMATION AND SAFET Y WARNINGS. *IF EQUIPPED
AUDIO SYSTEMS
Page 24 of 50
22
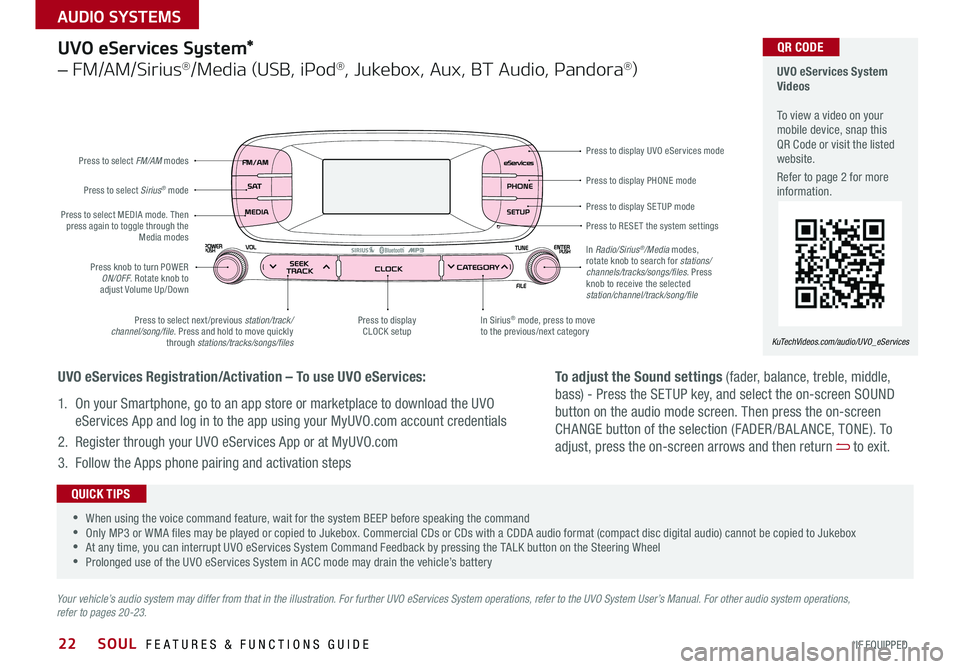
Press to display PHONE mode
Press to display SE TUP mode
Press to RESE T the system settings Press to display UVO eServices mode
In Sirius
® mode, press to move
to the previous/next category
Press to select next /previous station/track/
channel/song/file Press and hold to move quickly
through stations/tracks/songs/files Press to display
CLOCK setup
Press knob to turn POWER
ON/OFF Rotate knob to
adjust Volume Up/Down
Press to select MEDIA mode
Then
press again to toggle through the Media modes
Press to select Sirius
® mode
Press to select FM/AM
modes
In Radio/Sirius
®/Media modes,
rotate knob to search for stations/
channels/tracks/songs/files. Press
knob to receive the selected
station/channel/track/song/file
UVO eServices System*
– FM/AM/Sirius®/Media (USB, iPod®, Jukebox, Aux, BT Audio, Pandora®)
Your vehicle’s audio system may differ from that in the illustration. For further UVO eServices System operations, refer to the UVO System User’s Manual. For other audio system operations,
refer to pages 20-23.
UVO eServices System
Videos
To view a video on your
mobile device, snap this
QR Code or visit the listed
website
Refer to page 2 for more
information
KuTechVideos.com/audio/UVO_eServices
•
•When using the voice command feature, wait for the system BEEP before speaking the command
•Only MP3 or WMA files may be played or copied to Jukebox Commercial CDs or CDs with a CDDA audio format (compact disc digital audio) cannot be copied to Jukebox
•At any time, you can interrupt UVO eServices System Command Feedback by pressing the TALK button on the Steering Wheel
•Prolonged use of the UVO eServices System in ACC mode may drain the vehicle’s battery
QUICK TIPS
UVO eServices Registration/Activation – To use UVO eServices:
1 On your Smartphone, go to an app store or marketplace to download the UVO
eServices App and log in to the app using your MyUVO com account credentials
2 Register through your UVO eServices App or at MyUVO com
3 Follow the Apps phone pairing and activation steps
QR CODE
To adjust the Sound settings (fader, balance, treble, middle,
bass) - Press the SETUP key, and select the on-screen SOUND
button on the audio mode screen Then press the on-screen
CHANGE button of the selection (FADER /BAL ANCE, TONE) To
adjust, press the on-screen arrows and then return
to exit
SOUL FEATURES & FUNCTIONS GUIDE
*IF EQUIPPED
AUDIO SYSTEMS
Page 25 of 50

23
UVO eServices System with Premium Navigation System*
– FM/AM/SiriusXM®/Media (Aux, USB, iPod®, BT Audio, My Music)
Press to Power ON/OFF
Rotate to adjust Volume
Press to enter UVO eServices mode
Press to select FM/AM/
Sirius
®XM modes
Press to select MEDIA mode
Rotate to change Radio/Sirius
®XM
Stations/Media tracks/files Press to display the Map screen for
the current position / VOICE mode Press to RESE T the system settings
SD Card Insert Slot
Press to display the Destination menu screen
Press to enter PHONE mode
Press to display the SE TUP mode Press to display INFO mode
Press to change Radio/Sirius
®XM
Stations/Media tracks/files
Press to select previous/next
Radio/Sirius
®XM stations/Media
tracks/files. Press and hold to
move quickly through stations/ tracks/files
Your vehicle’s audio system may differ from that in the illustration. For more information, refer to the Car Multimedia System User’s Manual. For other audio system operations, refer to pages 20-22.
UVO eServices with
Premium Navigation
System Videos
To view a video on your
mobile device, snap this
QR Code or visit the listed
website
Refer to page 2 for more
information
www.KuTechVideos.com/audio/avn4
•
•When using the voice command feature, wait for the system BEEP before speaking the command
•At any time, you can interrupt the Command Feedback by pressing the TALK button on the Steering Wheel
•Prolonged use of the UVO eServices with Premium Navigation System in ACC mode may drain the vehicle’s battery A warning screen may appear periodically to remind users that the
UVO eServices with with Premium Navigation System should be operated with the engine running to prevent battery discharge
QUICK TIPS
UVO eServices Registration/Activation – To use UVO eServices:
1 On your Smartphone, go to an app store or marketplace to download the UVO
eServices App and log in to the app using your MyUVO com account credentials
2 Register through your UVO eServices App or at MyUVO com
3 Follow the Apps phone pairing and activation steps
QR CODE
To adjust the Sound settings (bass,
middle, treble, fader, balance) - Press
the SETUP key, and select the on-screen
SOUND button Select the item and use
the on-screen arrows to adjust Press
return
to exit
ALWAYS CHECK THE OWNER’S MANUAL FOR COMPLETE OPER ATING INFORMATION AND SAFET Y WARNINGS. *IF EQUIPPED
AUDIO SYSTEMS
Page 26 of 50
24
The Advanced (Mood) Lighting Speaker that lights around the front
speaker is controlled by turning the knob and pressing the buttons
(located to the left of the steering wheel)
MOOD: Light intensity and color changes
automatically at regular intervals
MUSIC: Speaker light pulses and changes
intensity according to the audio sound (audio
must be on for this feature to work)
OFF: Speaker light turns OFF
+/– : When light is ON, press illumination
buttons to adjust light intensity
Aux/USB/iPod® Port &
Power Outlets
Digital Clock
Standard Audio System (Type A)* Clock Setup*:
1 Press the SETUP key (under 1 second) or press and hold the CLOCK key
to enter settings mode
2 Select Clock /Calendar and then Clock Settings
3 Use the touchscreen buttons to adjust the time
Standard Audio System (Type B)* Clock Setup*:
1 Briefly press the CLOCK key (under 1 second) to display time screen
2 Press and hold CLOCK key for more than 1 second to enter the time
setting mode
3 Use the touchscreen buttons to adjust the time
Advanced (Mood) Lighting Speaker*
OFF MOOD
MUSIC
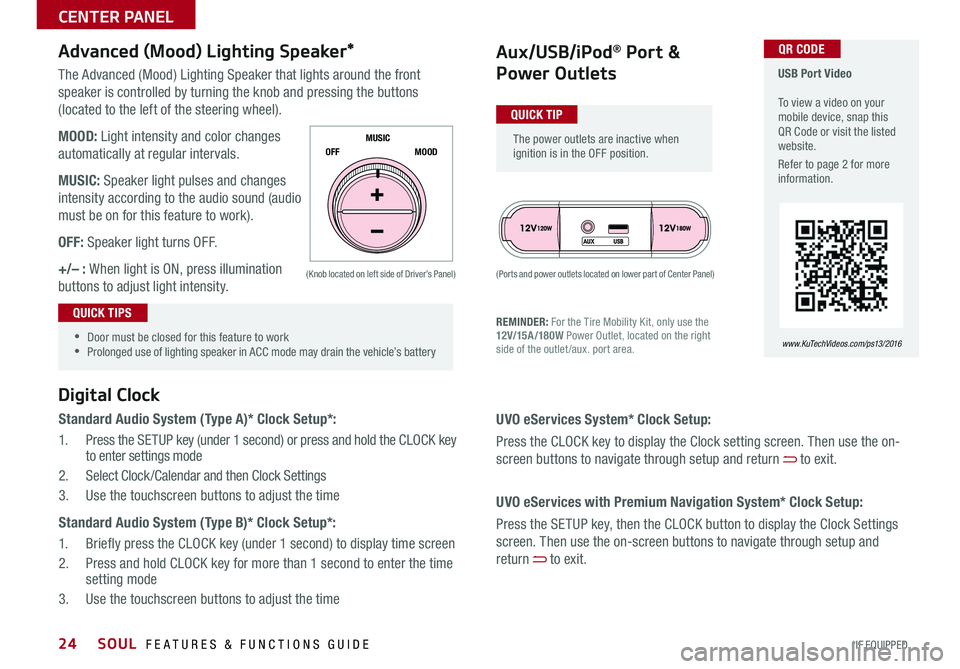
REMINDER: For the Tire Mobility Kit, only use the
12V/15A/180W
Power Outlet, located on the right
side of the outlet /aux port area
(Ports and power outlets located on lower part of Center Panel)
(Knob located on left side of Driver’s Panel)
UVO eServices System* Clock Setup:
Press the CLOCK key to display the Clock setting screen Then use the on-
screen buttons to navigate through setup and return
to exit
UVO eServices with Premium Navigation System* Clock Setup:
Press the SETUP key, then the CLOCK button to display the Clock Settings
screen Then use the on-screen buttons to navigate through setup and
return
to exit
•
•Door must be closed for this feature to work
•Prolonged use of lighting speaker in ACC mode may drain the vehicle’s battery
The power outlets are inactive when
ignition is in the OFF position
USB Port Video
To view a video on your
mobile device, snap this
QR Code or visit the listed
website
Refer to page 2 for more
information
www. KuTechVideo s.c om/p s13/2016
QUICK TIP
QUICK TIPS
QR CODE
SOUL FEATURES & FUNCTIONS GUIDE
*IF EQUIPPED
CENTER PANEL