2016 KIA SOUL ignition
[x] Cancel search: ignitionPage 8 of 50

6
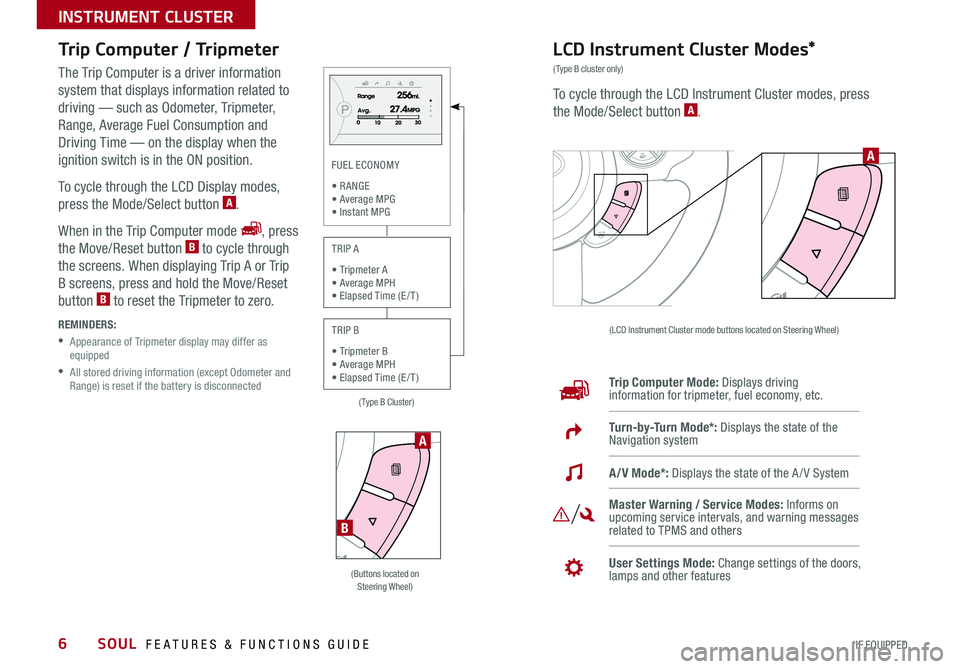
Trip Computer / Tripmeter
The Trip Computer is a driver information
system that displays information related to
driving — such as Odometer, Tripmeter,
Range, Average Fuel Consumption and
Driving Time — on the display when the
ignition switch is in the ON position
To cycle through the LCD Display modes,
press the Mode/Select button
A
When in the Trip Computer mode
, press
the Move/Reset button B to cycle through
the screens When displaying Trip A or Trip
B screens, press and hold the Move/Reset
button
B to reset the Tripmeter to zero
REMINDERS:
• Appearance of Tripmeter display may differ as
equipped
• All stored driving information (except Odometer and
Range) is reset if the battery is disconnected
LCD Instrument Cluster Modes*
(Type B cluster only)
To cycle through the LCD Instrument Cluster modes, press
the Mode/Select button A
(LCD Instrument Cluster mode buttons located on Steering Wheel)
Trip Computer Mode: Displays driving
information for tripmeter, fuel economy, etc
Turn-by-Turn Mode*: Displays the state of the
Navigation system
Master Warning / Service Modes: Informs on
upcoming service intervals, and warning messages
related to TPMS and others
User Settings Mode: Change settings of the doors,
lamps and other features
A/V Mode*: Displays the state of the A / V System
A
(Buttons located on
Steering Wheel)
A
B
(Type B Cluster)
FUEL ECONOMY
• R ANGE
• Average MPG • Instant MPG
TRIP A
• Tripmeter A
• Average MPH • Elapsed Time (E / T )
TRIP B
• Tripmeter B
• Average MPH • Elapsed Time (E / T )
SOUL FEATURES & FUNCTIONS GUIDE
*IF EQUIPPED
INSTRUMENT CLUSTER
Page 10 of 50

8
Active ECO System*
For more information on the Active ECO System, refer to your Owner’s Manual or contact
your local dealership.
Active ECO helps improve fuel economy by controlling several vehicle
components When activated, it optimizes drivetrain operations such as
engine power and transmission to help improve fuel economy
To turn ON, press the Active ECO button
A The green ECO indicator
light B in the instrument cluster will illuminate, indicating that Active
ECO is operating
The Active ECO System will remain on even when the ignition is cycled
To turn Active ECO OFF, press the button
A again
(Type B cluster)
B
OFF
REAR
P ASSE NGE R
A IR BA Gactive
ECO
(Button located on Center Panel)
A
To help improve your fuel efficiency:
• Drive at a moderate speed, accelerating smoothly and at a moderate rate
• Keep tires inflated to the recommended pressure
•Be sure the wheels are properly aligned
QUICK TIPS
Active ECO System Video
To view a video on your
mobile device, snap this
QR Code or visit the listed
website
Refer to page 2 for more
information
www. KuTechVideo s.c om/p s13/2016
QR CODE
Forward Collision Warning System (FCWS)*
The FCWS helps to alert the driver when rapidly approaching a vehicle that is slowing down, braking or stopped A warning message will
appear on the LCD screen and a chime will sound The FCWS will become active when the vehicle is traveling more than 25 mph
To turn the FCWS off, go to User Settings in the LCD Instrument Cluster Modes*
REMINDERS:
•The FCWS will be activated by default when the ignition is cycled ON, even when previous setting to OFF
•The FCWS will not operate when the vehicle is traveling more than approximately 50 mph
The Forward Collision Warning System (FCWS) is not a substitute for safe and proper driving. Always drive safely and use caution.
FCWS may not always alert the driver when the vehicle is approaching another vehicle.
SOUL FEATURES & FUNCTIONS GUIDE
*IF EQUIPPED
INSTRUMENT CLUSTER
Page 12 of 50

10
Electronic Stability Control (ESC)
The ESC system is designed to help stabilize the vehicle during cornering
maneuvers It is a good idea to keep the ESC turned ON for daily driving
whenever possible
Press ESC button
A to turn ESC OFF/ON
REMINDERS:
• ESC is turned ON by default at vehicle start-up When ignition is cycled, ESC will
turn ON again
• The ESC Indicator Light in the instrument cluster will be lit momentarily whenever
the ESC is active
Hill-Start Assist Control (HAC)
HAC helps prevent the vehicle from rolling backward when accelerating from
a stop while on a steep incline The HAC automatically activates whether the
ESC is OFF or ON, but does NOT activate when the ESC has malfunctioned
REMINDER: The HAC does not operate when the gear shift is in the P (Park) or the N (Neutral) position
•
•HAC provides a 2-second delay before the vehicle may start rolling backwards
•When HAC is active (e g , accelerating from a stop on an incline), you may notice
that the brakes will momentarily remain engaged after you depress the accelerator
QUICK TIPS
A
(Buttons located on left side of Driver’s Panel)
For more information on Electronic Stability Control (ESC) and its specific features and operations, please refer to your
Owner’s Manual.
SOUL FEATURES & FUNCTIONS GUIDE
*IF EQUIPPED
DRIVER'S PANEL
Page 15 of 50

13
To adjust the Steering Wheel, push down the lock-release
lever A and adjust to desired distance B and angle C
When finished, pull up the lock-release lever
A to lock
Steering Wheel in place
Tilt/Telescoping Steering Wheel Heated Steering Wheel Button*
Press button D to turn ON/OFF steering wheel heater, while the Engine
Start /Stop Button is in the ON position Steering wheel heater will turn off
automatically in 30 minutes, or when button is pressed again to deactivate
C
B
A
D
If ignition is turned OFF, then ON again, within 30 minutes of steering wheel
heater being turned on, system will automatically be set ON again QUICK TIP
(Buttons located on left side of Driver’s Panel)
It may be helpful to pull/push bottom of Steering Wheel towards/away
from you to adjust desired distance
QUICK TIPS
ALWAYS CHECK THE OWNER’S MANUAL FOR COMPLETE OPER ATING INFORMATION AND SAFET Y WARNINGS. *IF EQUIPPED
STEERING WHEEL CONTROLS
Page 19 of 50

17
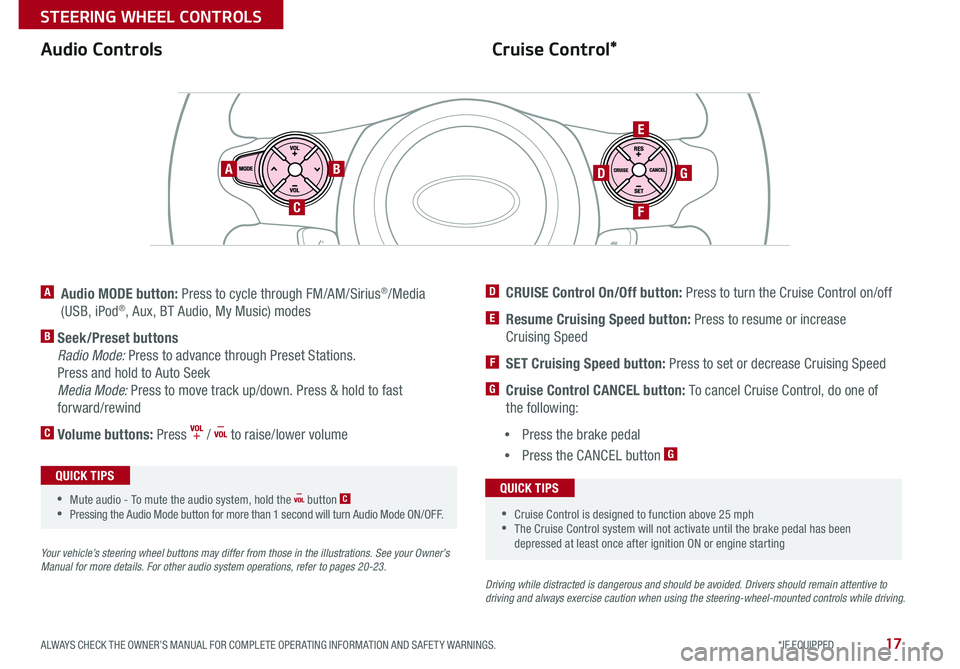
Cruise Control*
Audio Controls
A Audio MODE button: Press to cycle through FM/AM/Sirius®/Media
(USB, iPod®, Aux, BT Audio, My Music) modes
B Seek/Preset buttons
Radio Mode: Press to advance through Preset Stations
Press and hold to Auto Seek
Media Mode: Press to move track up/down Press & hold to fast
forward/rewind
C Volume buttons: Press / to raise/lower volume
Your vehicle’s steering wheel buttons may differ from those in the illustrations. See your Owner’s
Manual for more details. For other audio system operations, refer to pages 20-2 3.
Driving while distracted is dangerous and should be avoided. Drivers should remain attentive to
driving and always exercise caution when using the steering-wheel-mounted controls while driving .
AB
C
E
GD
F
•Cruise Control is designed to function above 25 mph
•The Cruise Control system will not activate until the brake pedal has been
depressed at least once after ignition ON or engine starting
QUICK TIPS
•Mute audio - To mute the audio system, hold the button C
•Pressing the Audio Mode button for more than 1 second will turn Audio Mode ON/OFF
QUICK TIPS
D CRUISE Control On/Off button: Press to turn the Cruise Control on/off
E Resume Cruising Speed button: Press to resume or increase
Cruising Speed
F SET Cruising Speed button: Press to set or decrease Cruising Speed
G Cruise Control CANCEL button: To cancel Cruise Control, do one of
the following:
• Press the brake pedal
• Press the CANCEL button
G
ALWAYS CHECK THE OWNER’S MANUAL FOR COMPLETE OPER ATING INFORMATION AND SAFET Y WARNINGS. *IF EQUIPPED
STEERING WHEEL CONTROLS
Page 26 of 50

24
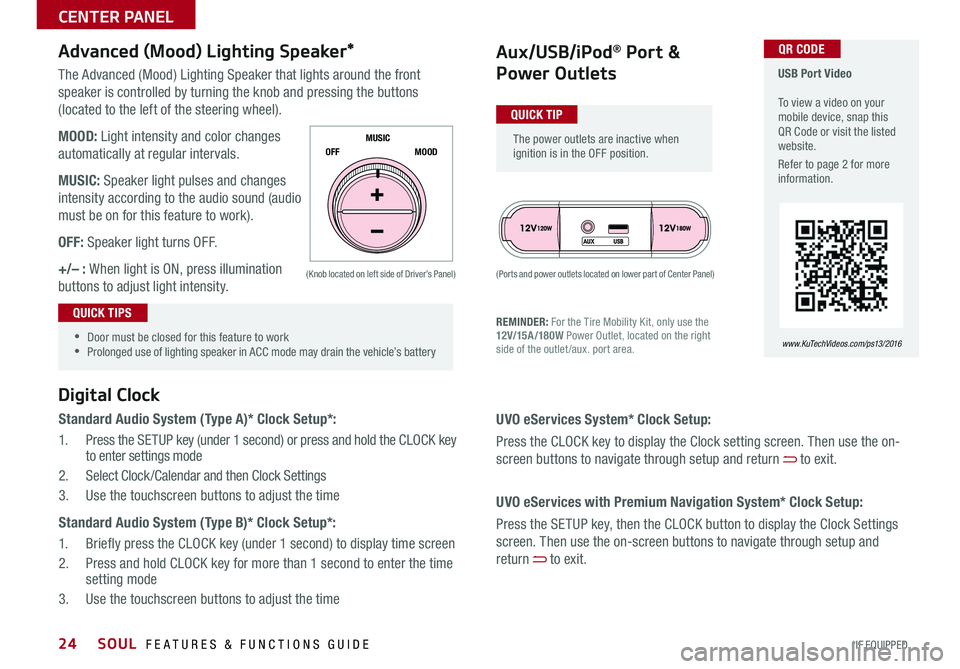
The Advanced (Mood) Lighting Speaker that lights around the front
speaker is controlled by turning the knob and pressing the buttons
(located to the left of the steering wheel)
MOOD: Light intensity and color changes
automatically at regular intervals
MUSIC: Speaker light pulses and changes
intensity according to the audio sound (audio
must be on for this feature to work)
OFF: Speaker light turns OFF
+/– : When light is ON, press illumination
buttons to adjust light intensity
Aux/USB/iPod® Port &
Power Outlets
Digital Clock
Standard Audio System (Type A)* Clock Setup*:
1 Press the SETUP key (under 1 second) or press and hold the CLOCK key
to enter settings mode
2 Select Clock /Calendar and then Clock Settings
3 Use the touchscreen buttons to adjust the time
Standard Audio System (Type B)* Clock Setup*:
1 Briefly press the CLOCK key (under 1 second) to display time screen
2 Press and hold CLOCK key for more than 1 second to enter the time
setting mode
3 Use the touchscreen buttons to adjust the time
Advanced (Mood) Lighting Speaker*
OFF MOOD
MUSIC
REMINDER: For the Tire Mobility Kit, only use the
12V/15A/180W
Power Outlet, located on the right
side of the outlet /aux port area
(Ports and power outlets located on lower part of Center Panel)
(Knob located on left side of Driver’s Panel)
UVO eServices System* Clock Setup:
Press the CLOCK key to display the Clock setting screen Then use the on-
screen buttons to navigate through setup and return
to exit
UVO eServices with Premium Navigation System* Clock Setup:
Press the SETUP key, then the CLOCK button to display the Clock Settings
screen Then use the on-screen buttons to navigate through setup and
return
to exit
•
•Door must be closed for this feature to work
•Prolonged use of lighting speaker in ACC mode may drain the vehicle’s battery
The power outlets are inactive when
ignition is in the OFF position
USB Port Video
To view a video on your
mobile device, snap this
QR Code or visit the listed
website
Refer to page 2 for more
information
www. KuTechVideo s.c om/p s13/2016
QUICK TIP
QUICK TIPS
QR CODE
SOUL FEATURES & FUNCTIONS GUIDE
*IF EQUIPPED
CENTER PANEL
Page 30 of 50

28
When shifting into gears 1-6, the Shift Lever can be moved without pulling the Shift Lever Ring
Manual Gear Shift*
Starting the Engine
1 Pull up to apply Parking Brake
A
2 Depress Clutch fully
B
3 Shift into Neutral
C
4 Turn Ignition to START
Shifting into Reverse
1 Depress Clutch fully
B
2 Shift into Neutral
C
3 Pull up on Shift Lever Ring
D
4 Shift into Reverse
E
A
DC
B
E
QUICK TIP
SOUL FEATURES & FUNCTIONS GUIDE
*IF EQUIPPED
CENTER PANEL
Page 31 of 50

29
Seat Warmers*
Press button once for high setting (2 LEDs
lit) Press button twice for low setting
(1 LED lit) Press again to turn OFF
Seat Warmers / Ventilated Seats*
Seat Warmers – Press top of button once
for high setting (3 LEDs lit) Press button
twice for medium setting (2 LEDs lit) Press
a third time for low setting (1 LED lit) and
again to turn OFF
Ventilated Seats – Press bottom of button
once for high setting (3 LEDs lit) Press
twice for medium setting (2 LEDs lit) Press
a third time for low setting (1 LED lit) and
again to turn OFF
Warming ( Yellow LED)
( Type B)
(Button located on Center Panel)
(Button located on Center Panel)
Ventilating (Blue LED)
•
•System turns OFF when ignition is cycled To turn system ON, press the seat
warmer switch
•With the seat warmer switch in the ON position, the heating system in the seat
turns off or on automatically depending on the seat temperature
QUICK TIPS
Power Adjustable Driver’s Seat*
Move/Press controls to adjust Seat forward/backward, Seat
Cushion height, Seatback recline or Lumbar forward/backward
A
AABC
B
C
SeatbackLumbar
Seat Seat Cushion
ALWAYS CHECK THE OWNER’S MANUAL FOR COMPLETE OPER ATING INFORMATION AND SAFET Y WARNINGS. *IF EQUIPPED
SEATING