2016 KIA Soul EV parking brake
[x] Cancel search: parking brakePage 428 of 524
Maintenance
54
7
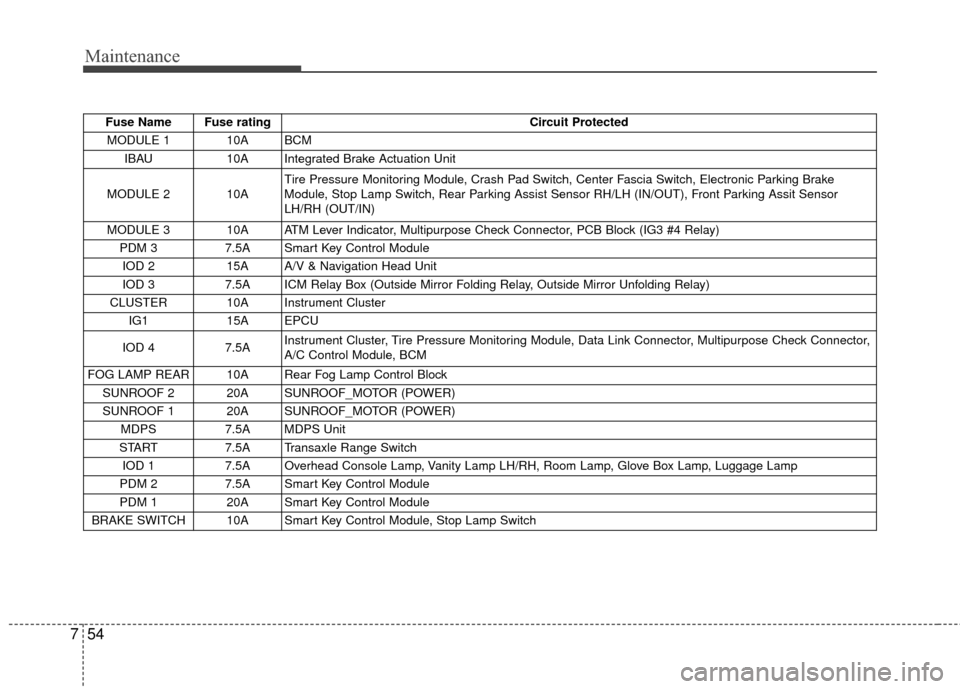
Fuse Name Fuse rating Circuit Protected
MODULE 1 10A BCM IBAU 10A Integrated Brake Actuation Unit
MODULE 2 10A Tire Pressure Monitoring Module, Crash Pad Switch, Center Fascia Switch, Electronic Parking Brake
Module, Stop Lamp Switch, Rear Parking Assist Sensor RH/LH (IN/OUT), Front Parking Assit Sensor
LH/RH (OUT/IN)
MODULE 3 10A ATM Lever Indicator, Multipurpose Check Connector, PCB Block (IG3 #4 Relay) PDM 3 7.5A Smart Key Control Module
IOD 2 15A A/V & Navigation Head Unit
IOD 3 7.5A ICM Relay Box (Outside Mirror Folding Relay, Outside Mirror Unfolding Relay)
CLUSTER 10A Instrument Cluster IG1 15A EPCU
IOD 4 7.5A Instrument Cluster, Tire Pressure Monitoring Module, Data Link Connector, Multipurpose Check Connector,
A/C Control Module, BCM
FOG LAMP REAR 10A Rear Fog Lamp Control Block SUNROOF 2 20A SUNROOF_MOTOR (POWER)
SUNROOF 1 20A SUNROOF_MOTOR (POWER) MDPS 7.5A MDPS Unit
START 7.5A Transaxle Range Switch
IOD 1 7.5A Overhead Console Lamp, Vanity Lamp LH/RH, Room Lamp, Glove Box Lamp, Luggage Lamp
PDM 2 7.5A Smart Key Control Module
PDM 1 20A Smart Key Control Module
BRAKE SWITCH 10A Smart Key Control Module, Stop Lamp Switch
Page 431 of 524
757
Maintenance
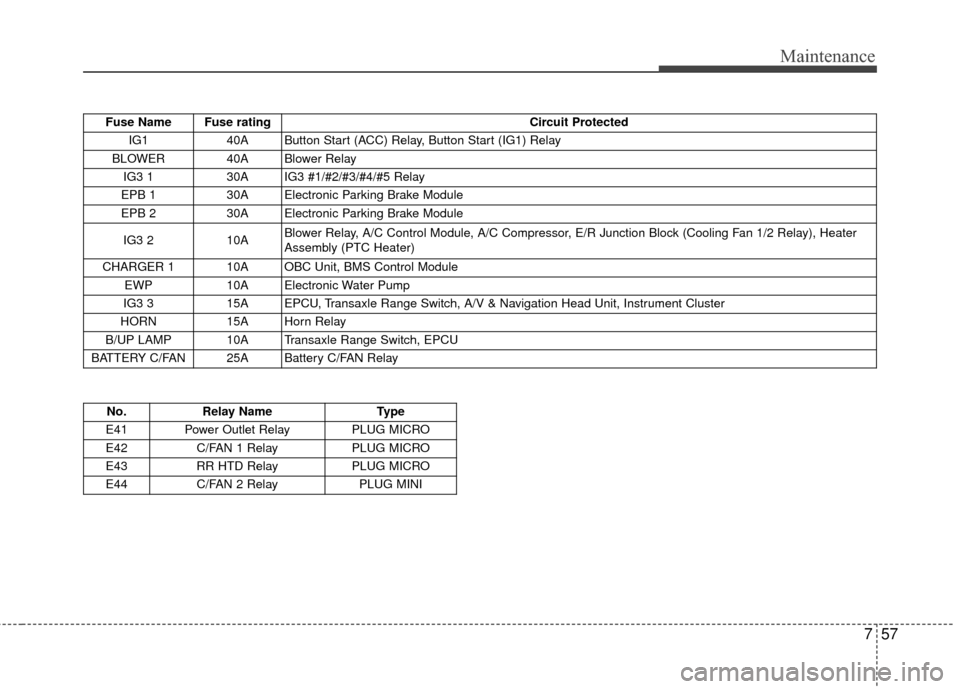
Fuse Name Fuse ratingCircuit Protected
IG1 40A Button Start (ACC) Relay, Button Start (IG1) Relay
BLOWER 40A Blower Relay IG3 1 30A IG3 #1/#2/#3/#4/#5 Relay
EPB 1 30A Electronic Parking Brake Module
EPB 2 30A Electronic Parking Brake Module
IG3 2 10A Blower Relay, A/C Control Module, A/C Compressor, E/R Junction Block (Cooling Fan 1/2 Relay), Heater
Assembly (PTC Heater)
CHARGER 1 10A OBC Unit, BMS Control Module EWP 10A Electronic Water Pump
IG3 3 15A EPCU, Transaxle Range Switch, A/V & Navigation Head Unit, Instrument Cluster
HORN 15A Horn Relay
B/UP LAMP 10A Transaxle Range Switch, EPCU
BATTERY C/FAN 25A Battery C/FAN Relay
No. Relay Name Type
E41 Power Outlet Relay PLUG MICRO
E42 C/FAN 1 Relay PLUG MICRO
E43 RR HTD Relay PLUG MICRO
E44 C/FAN 2 Relay PLUG MINI
Page 433 of 524
759
Maintenance
LIGHT BULBS
Use only the bulbs of the specifiedwattage.
If you don’t have necessary tools, the correct bulbs and the expertise,
consult an authorized Kia dealer. In
many cases, it is difficult to replace
vehicle light bulbs because other
parts of the vehicle must be
removed before you can get to the
bulb. This is especially true if you
have to remove the headlight
assembly to get to the bulb(s).
Removing/installing the headlight
assembly can result in damage to
the vehicle.
Do not install additional bulb or LED. If you install that, the lamp
may not be operated properly and
fuse box or electric wiring system
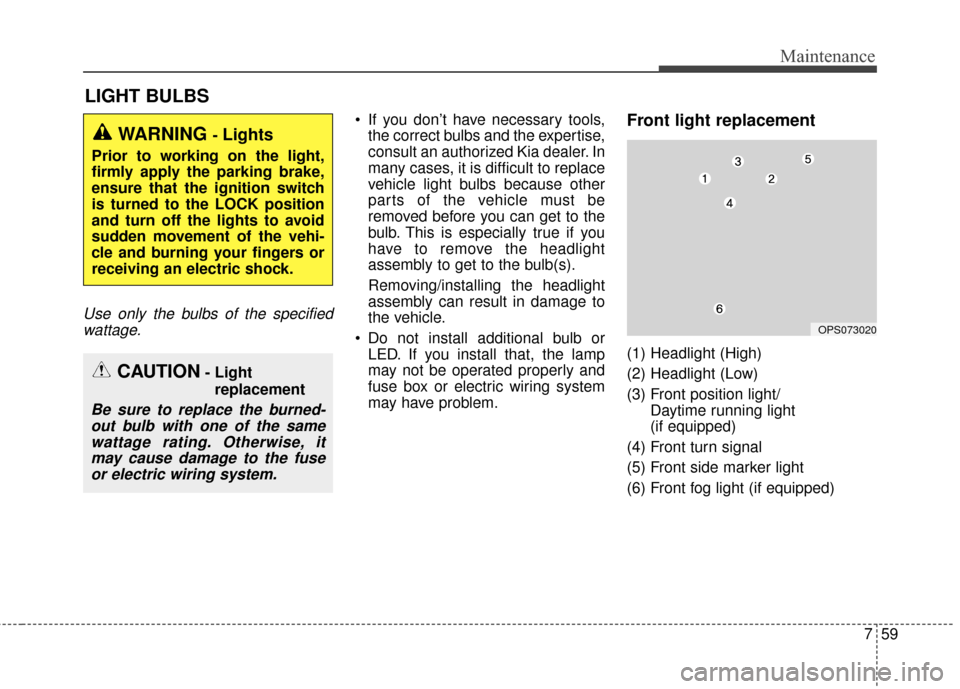
may have problem.Front light replacement
(1) Headlight (High)
(2) Headlight (Low)
(3) Front position light/ Daytime running light
(if equipped)
(4) Front turn signal
(5) Front side marker light
(6) Front fog light (if equipped)
WARNING - Lights
Prior to working on the light,
firmly apply the parking brake,
ensure that the ignition switch
is turned to the LOCK position
and turn off the lights to avoid
sudden movement of the vehi-
cle and burning your fingers or
receiving an electric shock.
CAUTION- Light replacement
Be sure to replace the burned-out bulb with one of the samewattage rating. Otherwise, itmay cause damage to the fuseor electric wiring system.
OPS073020
Page 460 of 524
I3
Index
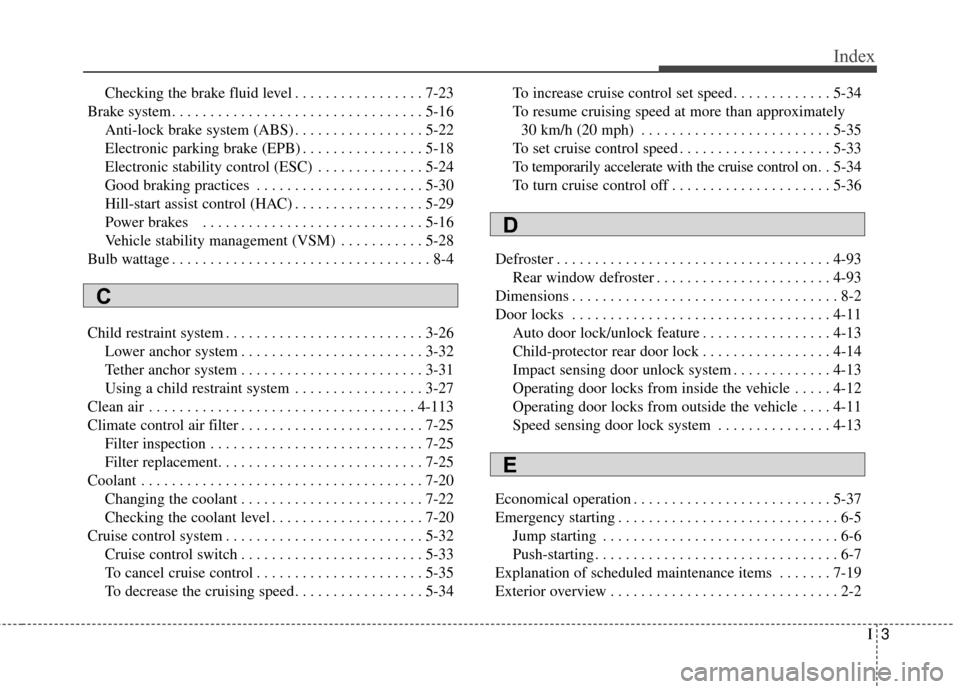
Checking the brake fluid level . . . . . . . . . . . . . . . . . 7-23
Brake system. . . . . . . . . . . . . . . . . . . . . . . . . . . . . . . . . 5-16 Anti-lock brake system (ABS) . . . . . . . . . . . . . . . . . 5-22
Electronic parking brake (EPB) . . . . . . . . . . . . . . . . 5-18
Electronic stability control (ESC) . . . . . . . . . . . . . . 5-24
Good braking practices . . . . . . . . . . . . . . . . . . . . . . 5-30
Hill-start assist control (HAC) . . . . . . . . . . . . . . . . . 5-29
Power brakes . . . . . . . . . . . . . . . . . . . . . . . . . . . . . 5-16
Vehicle stability management (VSM) . . . . . . . . . . . 5-28
Bulb wattage . . . . . . . . . . . . . . . . . . . . . . . . . . . . . . . . . . 8-4
Child restraint system . . . . . . . . . . . . . . . . . . . . . . . . . . 3-26 Lower anchor system . . . . . . . . . . . . . . . . . . . . . . . . 3-32
Tether anchor system . . . . . . . . . . . . . . . . . . . . . . . . 3-31
Using a child restraint system . . . . . . . . . . . . . . . . . 3-27
Clean air . . . . . . . . . . . . . . . . . . . . . . . . . . . . . . . . . . . 4-\
113
Climate control air filter . . . . . . . . . . . . . . . . . . . . . . . . 7-25 Filter inspection . . . . . . . . . . . . . . . . . . . . . . . . . . . . 7-25
Filter replacement. . . . . . . . . . . . . . . . . . . . . . . . . . . 7-25
Coolant . . . . . . . . . . . . . . . . . . . . . . . . . . . . . . . . . . . . \
. 7-20 Changing the coolant . . . . . . . . . . . . . . . . . . . . . . . . 7-22
Checking the coolant level . . . . . . . . . . . . . . . . . . . . 7-20
Cruise control system . . . . . . . . . . . . . . . . . . . . . . . . . . 5-32 Cruise control switch . . . . . . . . . . . . . . . . . . . . . . . . 5-33
To cancel cruise control . . . . . . . . . . . . . . . . . . . . . . 5-35
To decrease the cruising speed . . . . . . . . . . . . . . . . . 5-34 To increase cruise control set speed . . . . . . . . . . . . . 5-34
To resume cruising speed at more than approximately
30 km/h (20 mph) . . . . . . . . . . . . . . . . . . . . . . . . . 5-35
To set cruise control speed . . . . . . . . . . . . . . . . . . . . 5-33
To temporarily accelerate with the cruise control on. . 5-34
To turn cruise control off . . . . . . . . . . . . . . . . . . . . . 5-36
Defroster . . . . . . . . . . . . . . . . . . . . . . . . . . . . . . . . . . . . \
4-93 Rear window defroster . . . . . . . . . . . . . . . . . . . . . . . 4-93
Dimensions . . . . . . . . . . . . . . . . . . . . . . . . . . . . . . . . . . . 8-\
2
Door locks . . . . . . . . . . . . . . . . . . . . . . . . . . . . . . . . . . 4-11\
Auto door lock/unlock feature . . . . . . . . . . . . . . . . . 4-13
Child-protector rear door lock . . . . . . . . . . . . . . . . . 4-14
Impact sensing door unlock system . . . . . . . . . . . . . 4-13
Operating door locks from inside the vehicle . . . . . 4-12
Operating door locks from outside the vehicle . . . . 4-11
Speed sensing door lock system . . . . . . . . . . . . . . . 4-13
Economical operation . . . . . . . . . . . . . . . . . . . . . . . . . . 5-37
Emergency starting . . . . . . . . . . . . . . . . . . . . . . . . . . . . . 6-5 Jump starting . . . . . . . . . . . . . . . . . . . . . . . . . . . . . . . 6-6
Push-starting . . . . . . . . . . . . . . . . . . . . . . . . . . . . . . . . 6-7
Explanation of scheduled maintenance items . . . . . . . 7-19
Exterior overview . . . . . . . . . . . . . . . . . . . . . . . . . . . . . . 2-2
C
D
E
Page 465 of 524
Index
8I
Warning and indicator lights. . . . . . . . . . . . . . . . . . . . . 4-65Indicator Lights . . . . . . . . . . . . . . . . . . . . . . . . . . . . 4-72
Warning lights . . . . . . . . . . . . . . . . . . . . . . . . . . . . . 4-65
Washer fluid . . . . . . . . . . . . . . . . . . . . . . . . . . . . . . . . . 7-24 Checking the washer fluid level . . . . . . . . . . . . . . . . 7-24
Windows . . . . . . . . . . . . . . . . . . . . . . . . . . . . . . . . . . . 4-\
17 Power windows . . . . . . . . . . . . . . . . . . . . . . . . . . . . 4-18
Windshield defrosting and defogging. . . . . . . . . . . . . 4-110 Automatic climate control system . . . . . . . . . . . . . 4-110
Defogging logic . . . . . . . . . . . . . . . . . . . . . . . . . . . 4-112
Winter driving . . . . . . . . . . . . . . . . . . . . . . . . . . . . . . . . 5-44 Carry emergency equipment . . . . . . . . . . . . . . . . . . 5-46
Check battery and cables . . . . . . . . . . . . . . . . . . . . . 5-45
Don’t let your parking brake freeze . . . . . . . . . . . . . 5-46
Don't let ice and snow accumulate underneath . . . . 5-46
Snowy or icy conditions . . . . . . . . . . . . . . . . . . . . . . 5-44
To keep locks from freezing. . . . . . . . . . . . . . . . . . . 5-45
Use approved window washer anti-freeze in system . . 5-45
Use high quality ethylene glycol coolant. . . . . . . . . 5-45
Wiper blades . . . . . . . . . . . . . . . . . . . . . . . . . . . . . . . . . 7-27 Blade inspection . . . . . . . . . . . . . . . . . . . . . . . . . . . . 7-27
Blade replacement . . . . . . . . . . . . . . . . . . . . . . . . . . 7-27
Wipers and washers . . . . . . . . . . . . . . . . . . . . . . . . . . . 4-87 Rear window wiper and washer switch . . . . . . . . . . 4-89
Rear window wiper/washer . . . . . . . . . . . . . . . . . . . 4-87
Windshield washers . . . . . . . . . . . . . . . . . . . . . . . . . 4-88 Windshield wiper/washer . . . . . . . . . . . . . . . . . . . . . 4-87
Windshield wipers . . . . . . . . . . . . . . . . . . . . . . . . . . 4-87
W
Page 486 of 524
21
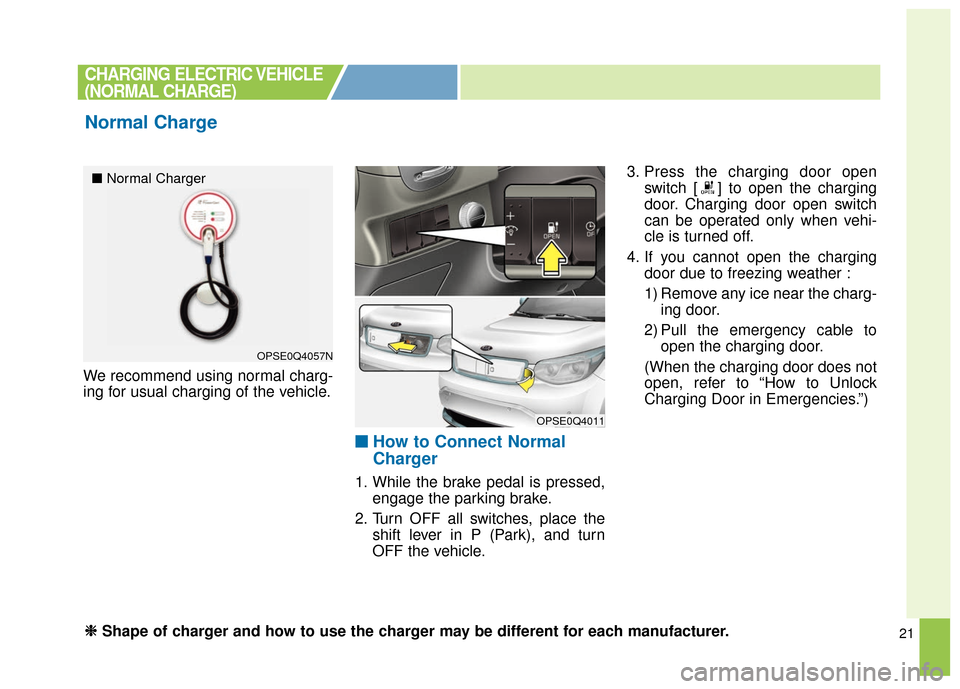
We recommend using normal charg-
ing for usual charging of the vehicle.
■ ■How to Connect Normal
Charger
1. While the brake pedal is pressed,
engage the parking brake.
2. Turn OFF all switches, place the shift lever in P (Park), and turn
OFF the vehicle. 3. Press the charging door open
switch [ ] to open the charging
door. Charging door open switch
can be operated only when vehi-
cle is turned off.
4. If you cannot open the charging door due to freezing weather :
1) Remove any ice near the charg-ing door.
2) Pull the emergency cable to open the charging door.
(When the charging door does not
open, refer to “How to Unlock
Charging Door in Emergencies.”)
CHARGING ELECTRIC VEHICLE
(NORMAL CHARGE)
Normal Charge
OPSE0Q4057N
OPSE0Q4011
■ Normal Charger
❈ ❈
Shape of charger and how to use the charger may be different for each manufacturer.
Page 492 of 524
27
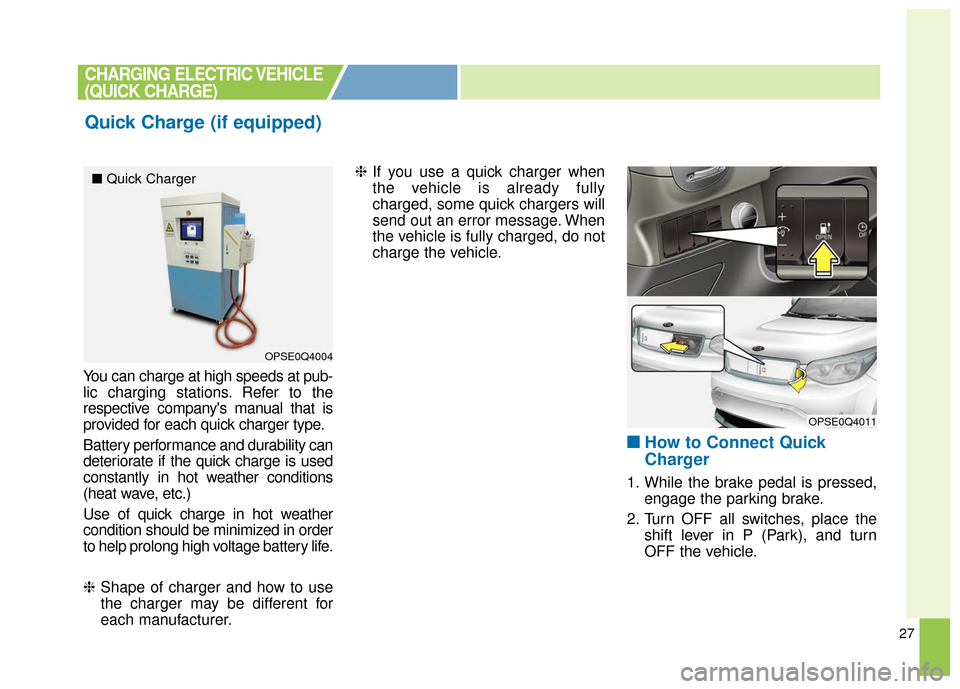
You can charge at high speeds at pub-
lic charging stations. Refer to the
respective company's manual that is
provided for each quick charger type.
Battery performance and durability can
deteriorate if the quick charge is used
constantly in hot weather conditions
(heat wave, etc.)
Use of quick charge in hot weather
condition should be minimized in order
to help prolong high voltage battery life.
❈Shape of charger and how to use
the charger may be different for
each manufacturer. ❈
If you use a quick charger when
the vehicle is already fully
charged, some quick chargers will
send out an error message. When
the vehicle is fully charged, do not
charge the vehicle.
■ ■
How to Connect Quick
Charger
1. While the brake pedal is pressed,
engage the parking brake.
2. Turn OFF all switches, place the shift lever in P (Park), and turn
OFF the vehicle.
Quick Charge (if equipped)
CHARGING ELECTRIC VEHICLE
(QUICK CHARGE)
OPSE0Q4004
OPSE0Q4011
■ Quick Charger
Page 499 of 524
![KIA Soul EV 2016 2.G Owners Manual 34
3. While the brake pedal is pressed,engage the parking brake.
4. Turn OFF all switches, place the shift lever in P (Park), and turn
OFF the vehicle. 5. Press the charging door open
switch [ ] to op KIA Soul EV 2016 2.G Owners Manual 34
3. While the brake pedal is pressed,engage the parking brake.
4. Turn OFF all switches, place the shift lever in P (Park), and turn
OFF the vehicle. 5. Press the charging door open
switch [ ] to op](/manual-img/2/2980/w960_2980-498.png)
34
3. While the brake pedal is pressed,engage the parking brake.
4. Turn OFF all switches, place the shift lever in P (Park), and turn
OFF the vehicle. 5. Press the charging door open
switch [ ] to open the charging
door. Charging door open switch
can be operated only when vehi-
cle is turned off.
6. If you cannot open the charging door due to freezing weather :
1) Remove any ice near the charg-ing door.
2) Pull the emergency cable to open the charging door.
(When the charging door does not
open, refer to “How to Unlock
Charging Door in Emergencies.”) 7. Open the charging door and press
the normal charging inlet release
tab (1) to open the normal charg-
ing inlet cover.
8. Before connecting the charging connector, make sure the door
lock is released.
When the door is locked, the
charging connector lock system
will be triggered. And the charging
connector will not be connected.
CHARGING ELECTRIC VEHICLE
(TRICKLE CHARGE)
OPSE0Q4011
OPSE0Q4012