Page 372 of 524
621
What to do in an emergency
When towing your vehicle in an
emergency without wheel dollies :
1. Set the ignition switch in the ACCposition.
2. Place the transaxle shift lever in N (Neutral).
3. Release the parking brake.Removable towing hook
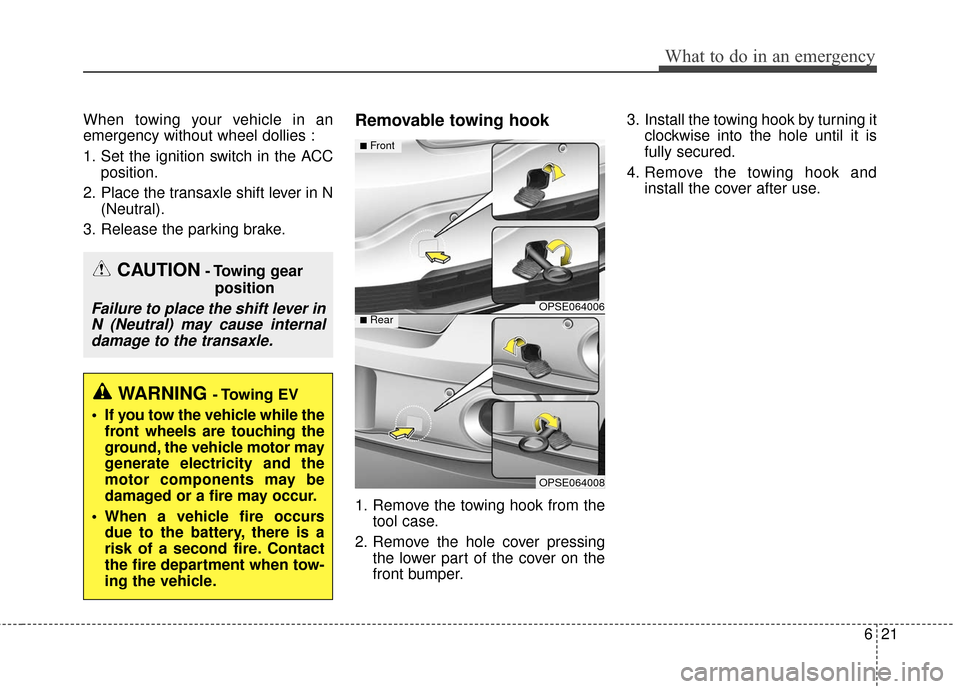
1. Remove the towing hook from the tool case.
2. Remove the hole cover pressing the lower part of the cover on the
front bumper. 3. Install the towing hook by turning it
clockwise into the hole until it is
fully secured.
4. Remove the towing hook and install the cover after use.
CAUTION- Towing gear
position
Failure to place the shift lever inN (Neutral) may cause internaldamage to the transaxle.
WARNING - Towing EV
If you tow the vehicle while the front wheels are touching the
ground, the vehicle motor may
generate electricity and the
motor components may be
damaged or a fire may occur.
When a vehicle fire occurs due to the battery, there is a
risk of a second fire. Contact
the fire department when tow-
ing the vehicle.
OPSE064006
OPSE064008
■Front
■Rear
Page 374 of 524
623
What to do in an emergency
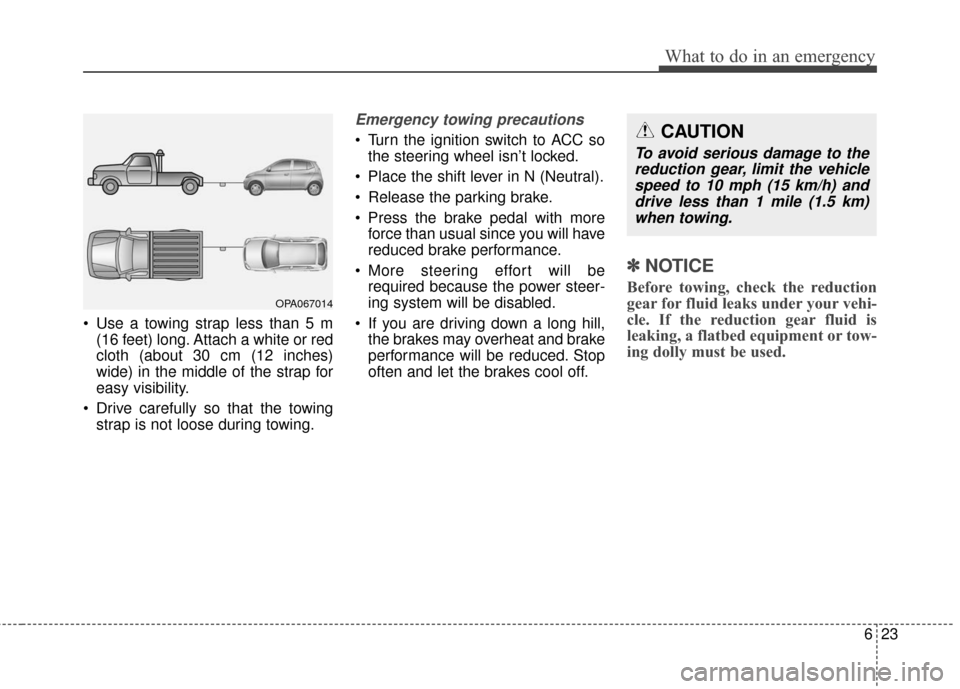
Use a towing strap less than 5 m(16 feet) long. Attach a white or red
cloth (about 30 cm (12 inches)
wide) in the middle of the strap for
easy visibility.
Drive carefully so that the towing strap is not loose during towing.
Emergency towing precautions
Turn the ignition switch to ACC sothe steering wheel isn’t locked.
Place the shift lever in N (Neutral).
Release the parking brake.
Press the brake pedal with more force than usual since you will have
reduced brake performance.
More steering effort will be required because the power steer-
ing system will be disabled.
If you are driving down a long hill, the brakes may overheat and brake
performance will be reduced. Stop
often and let the brakes cool off.
✽ ✽ NOTICE
Before towing, check the reduction
gear for fluid leaks under your vehi-
cle. If the reduction gear fluid is
leaking, a flatbed equipment or tow-
ing dolly must be used.OPA067014
CAUTION
To avoid serious damage to the
reduction gear, limit the vehiclespeed to 10 mph (15 km/h) anddrive less than 1 mile (1.5 km)when towing.
Page 379 of 524
75
Maintenance
OWNER MAINTENANCE
The following lists are vehicle checks
and inspections that should be per-
formed by the owner or an author-
ized Kia dealer at the frequencies
indicated to help ensure safe,
dependable operation of your vehi-
cle.
Any adverse conditions should be
brought to the attention of your deal-
er as soon as possible.
These Owner Maintenance Checks
are generally not covered by war-
ranties and you may be charged for
labor, parts and lubricants used.Owner maintenance schedule
When you stop for fuel:
Check the coolant level in thecoolant reservoir.
Check the windshield washer fluid level.
Look for low or under-inflated tires. Check if the front of the radiator
and condenser are clean and not
blocked with leaves, dirt or insects
etc. If any of the above parts are
extremely dirty or you are not sure
of their condition, take your vehicle
to an authorized Kia dealer.
While operating your vehicle:
Check for vibrations in the steeringwheel. Notice any increased steer-
ing effort or looseness in the steer-
ing wheel, or change in its straight-
ahead position.
Notice if your vehicle constantly turns slightly or “pulls” to one side
when traveling on smooth, level
road.
When stopping, listen and check for unusual sounds, pulling to one
side, increased brake pedal travel
or “hard-to-push” brake pedal.
If any slipping or changes in the operation of your transaxle occurs,
check the transaxle fluid level.
Check the reduction gear P (Park) function.
Check the parking brake.
Check for fluid leaks under your vehicle (water dripping from the air
conditioning system during or after
use is normal).
Page 380 of 524
Maintenance
67
At least monthly:
Check the coolant level in thecoolant reservoir.
Check the operation of all exterior lights, including the stoplights, turn
signals and hazard warning flash-
ers.
Check the inflation pressures of all tires including the spare.
At least twice a year
(i.e., every Spring and Fall):
Check the radiator, heater and air conditioning hoses for leaks or
damage.
Check the windshield washer spray and wiper operation. Clean
the wiper blades with clean cloth
dampened with washer fluid.
Check the headlight alignment.
Check the muffler, exhaust pipes, shields and clamps.
Check the lap/shoulder belts for wear and function.
Check for worn tires and loose wheel lug nuts.
At least once a year:
Clean the body and door drainholes.
Lubricate the door hinges and checks, and hood hinges.
Lubricate the door and hood locks and latches.
Lubricate the door rubber weather- strips.
Check the air conditioning system.
Inspect and lubricate the reduction gear linkage and controls.
Clean the battery and terminals.
Check the brake fluid level.
Page 394 of 524
Maintenance
20
7
COOLANT
The high-pressure cooling system
has a reservoir filled with year round
antifreeze coolant. The reservoir is
filled at the factory.
Check the antifreeze protection and
coolant level at least once a year, at
the beginning of the winter season,
and before traveling to a colder cli-
mate.Checking the coolant levelTurn the vehicle off and wait until it
cools down. Use extreme care when
removing the radiator cap. Wrap a
thick towel around it, and turn it
counterclockwise slowly to the first
stop. Step back while the pressure is
released from the cooling system.
When you are sure all the pressure
has been released, press down on
the cap, using a thick towel, and con-
tinue turning counterclockwise to
remove it.
WARNING
Removing radiator
cap
Never attempt to remove the
radiator cap while the motor
compartment is operating or
hot. Doing so might lead to
cooling system damage and
could result in serious personal
injury from escaping hot
coolant or steam.
Page 402 of 524
Maintenance
28
7
Front windshield wiper blade
Type A
1. Raise the wiper arm and turn the
wiper blade assembly to expose
the plastic locking clip.
2. Compress the clip and slide theblade assembly downward.
3. Lift it off the arm.
4. Install the blade assembly in the reverse order of removal. Type B
1. Raise the wiper arm.
1LDA5023
CAUTION- Wiper arms
Do not allow the wiper arm to
fall against the windshield,since it may chip or crack thewindshield.
1JBA7037
1JBA7038
OHM078059
Page 411 of 524
737
Maintenance
Wheel alignment and tire bal-
ance
The wheels on your vehicle were
aligned and balanced carefully at the
factory to give you the longest tire life
and best overall performance.
In most cases, you will not need to
have your wheels aligned again.
However, if you notice unusual tire
wear or your vehicle pulling one way
or the other, the alignment may need
to be reset.
If you notice your vehicle vibrating
when driving on a smooth road, your
wheels may need to be rebalanced.
Tire replacement
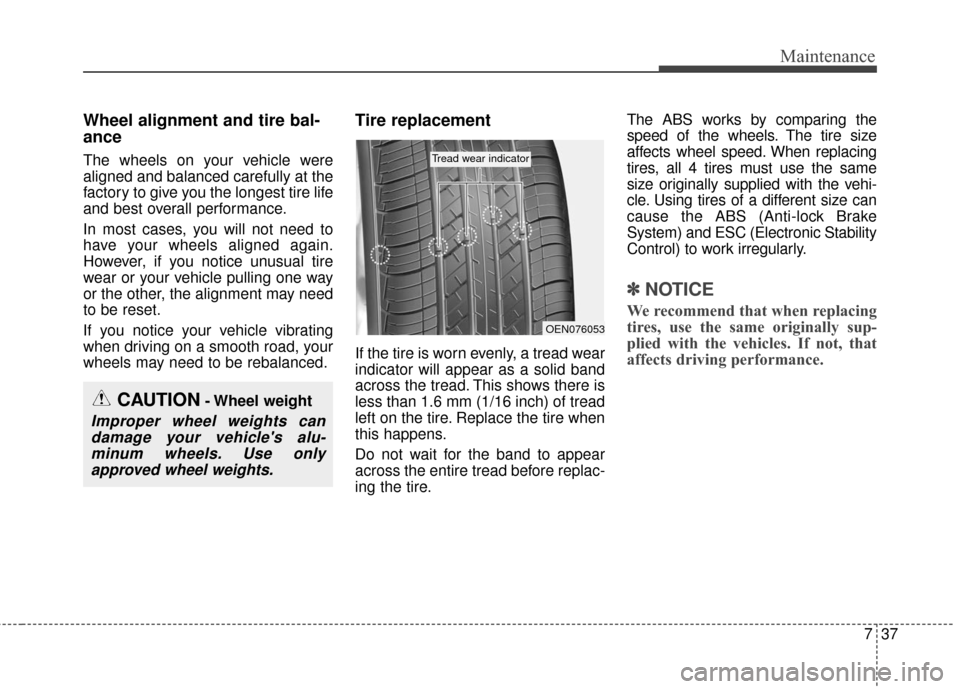
If the tire is worn evenly, a tread wear
indicator will appear as a solid band
across the tread. This shows there is
less than 1.6 mm (1/16 inch) of tread
left on the tire. Replace the tire when
this happens.
Do not wait for the band to appear
across the entire tread before replac-
ing the tire.The ABS works by comparing the
speed of the wheels. The tire size
affects wheel speed. When replacing
tires, all 4 tires must use the same
size originally supplied with the vehi-
cle. Using tires of a different size can
cause the ABS (Anti-lock Brake
System) and ESC (Electronic Stability
Control) to work irregularly.
✽ ✽
NOTICE
We recommend that when replacing
tires, use the same originally sup-
plied with the vehicles. If not, that
affects driving performance.
CAUTION- Wheel weight
Improper wheel weights can
damage your vehicle's alu-minum wheels. Use onlyapproved wheel weights.
OEN076053
Tread wear indicator
Page 424 of 524
Maintenance
50
7
Fuse switch
Always, put the fuse switch at the ON
position.
If you move the switch to the OFF
position, some items such as audio
and digital clock must be reset and
transmitter (or smart key) may not
work properly.
✽ ✽
NOTICE
If you need to park your vehicle for
prolonged periods more than 1
month, move the transportation fuse
switch to the OFF position to pre-
vent the battery being discharged.
Motor compartment fuse
replacement
1. Turn the ignition switch and all
other switches off.
2. Remove the fuse panel cover by pressing the tab and pulling the
cover up.
3. Check the removed fuse; replace it if it is blown. To remove or insert
the fuse, use the fuse puller in the
motor compartment fuse panel.
4. Push in a new fuse of the same rating, and make sure it fits tightly
in the clips. If it fits loosely, consult
an authorized Kia dealer.
OPSE074009
OPSE075008N