Page 136 of 644

Features of your vehicle
34
4
POWER SLIDING DOOR AND POWER TAILGATE (IF EQUIPPED)
(1) Left power sliding door control
button
(2) Right power sliding door control button
(3) Power tailgate control button*
(4) Power door ON/OFF button
*: if equipped
The power sliding doors and power
tailgate can be opened and closed
automatically with the folding key or
smart key, the main control buttons
on the overhead console or the sub
control buttons on the center pillar
trim and the tailgate.
When the power door ON/OFF but-
ton is OFF (depressed), the power
sliding door and power tailgate can
be opened and closed manually by
pulling the door handles from inside
or outside vehicle.
✽ ✽ NOTICE
If the power sliding door is open
approximately 6 hours, the ECU will
enter Sleep mode to conserve bat-
tery power and the door might not
close automatically. Close the door
or tailgate manually and then oper-
ate the door with the power operat-
ing system.
OYP044017K
OYP044018K
OYP044027N
On the center pillar trim
On the tailgate
On the overhead console
WARNING - Unattended
children/pets
Never leave children or animals
unattended in your vehicle.
Children or animals might oper-
ate the power sliding door or
power tailgate that could result
in injury to themselves or oth-
ers or damage to the vehicle.
Page 145 of 644

443
Features of your vehicle
✽
✽NOTICE
If the power tailgate does not oper-
ate normally, first check the follow-
ing condition before using the power
tailgate.
• Make sure the shift lever is in
Park
• Make sure the Power Tailgate Off switch is not pressed.
If any of the power tailgate buttons
are pressed while the power tailgate
is in operation, the power tailgate
will stop. If any button is pressed
again the power tailgate will reverse
direction.
Even though the Power door ON/OFF button is in the OFF
(depressed) position, if the tailgate
is manually closed to the secondary
latch position, the tailgate will be
electrically moved to the fully
latched position. Make sure that
face, arms, hands, and other
obstructions are safely out of the
way before operating the tailgate.
The chime will sound and the haz- ard warning flasher will blink 10
times if you drive with the tailgate
closed but not fully secured. Stop
your vehicle immediately at a safe
place to check if your tailgate is
securely locked.
Make sure there are no people or objects around the tailgate before
operating the power tailgate. Wait
until the tailgate is open fully and
stopped before loading or unload-
ing cargo or passengers from the
vehicle. Make sure the tailgate is closed
firmly before driving. If the tailgate
is open, you will draw dangerous
exhaust fumes into your vehicle
which can cause serious injury or
death to vehicle occupants.
If the power tailgate is not closed and latched completely after power
closing operation, the chime will
sound and hazard warning lights
will blink 10 times. Stop the driving
immediately and close the tailgate
securely at the safe place.
If the power tailgate is operated while the tailgate is in the partially opened
position (more than 9degrees), the
tailgate will stop the operation. If you
operate the power tailgate again, the
power tailgate will be operate in the
opposite direction.
Page 159 of 644
457
Features of your vehicle
Closing the hood
1. Before closing the hood, check thefollowing:
partment must be correctly
installed.
bustible material must be
removed from the engine com-
partment.
2. Return the support rod to its clip to prevent it from rattling.
3. Lower the hood until it is about 30 cm (1 ft.) above the closed posi-
tion and let it drop. Make sure that
it locks into place. The support rod must be inserted
completely into the hole whenever
you inspect the engine compartment.
This will prevent the hood from falling
and possibly injuring you.
WARNING- Fire risk
Do not leave gloves, rags or any
other combustible material in the
engine compartment. Doing so
may cause a heat-induced fire.
WARNING - Unsecured
engine hood
Always double check to be sure
that the hood is firmly latched
before driving away. If it is not
latched, the hood could fly open
while the vehicle is being driv-
en, causing a total loss of visi-
bility, which might result in an
accident.
Page 160 of 644

Features of your vehicle
58
4
Opening the fuel filler lid
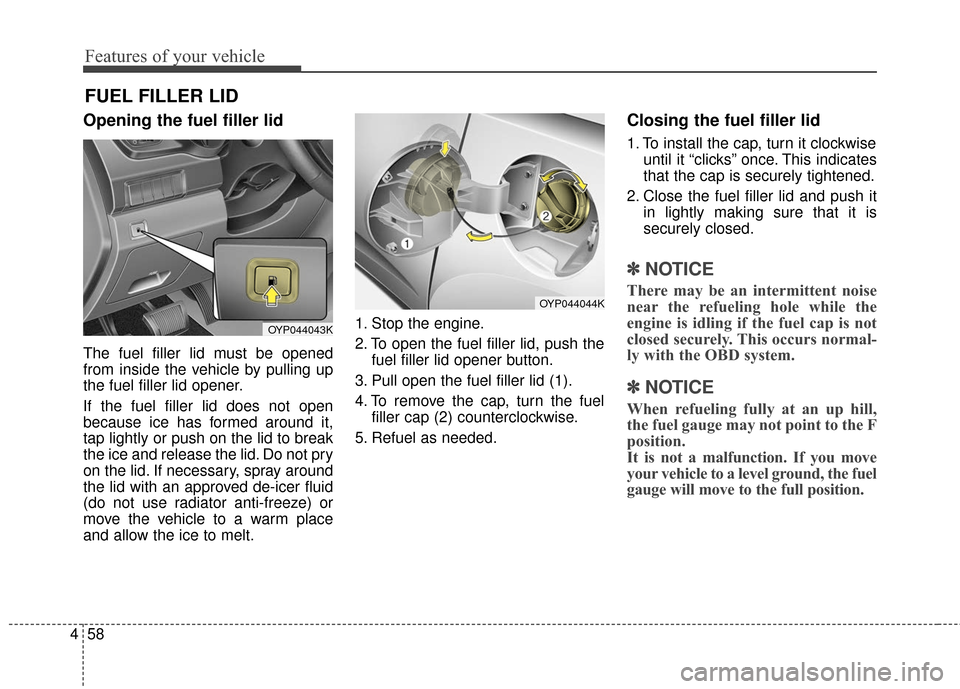
The fuel filler lid must be opened
from inside the vehicle by pulling up
the fuel filler lid opener.
If the fuel filler lid does not open
because ice has formed around it,
tap lightly or push on the lid to break
the ice and release the lid. Do not pry
on the lid. If necessary, spray around
the lid with an approved de-icer fluid
(do not use radiator anti-freeze) or
move the vehicle to a warm place
and allow the ice to melt. 1. Stop the engine.
2. To open the fuel filler lid, push the
fuel filler lid opener button.
3. Pull open the fuel filler lid (1).
4. To remove the cap, turn the fuel filler cap (2) counterclockwise.
5. Refuel as needed.
Closing the fuel filler lid
1. To install the cap, turn it clockwise until it “clicks” once. This indicates
that the cap is securely tightened.
2. Close the fuel filler lid and push it in lightly making sure that it is
securely closed.
✽ ✽NOTICE
There may be an intermittent noise
near the refueling hole while the
engine is idling if the fuel cap is not
closed securely. This occurs normal-
ly with the OBD system.
✽ ✽NOTICE
When refueling fully at an up hill,
the fuel gauge may not point to the F
position.
It is not a malfunction. If you move
your vehicle to a level ground, the fuel
gauge will move to the full position.
FUEL FILLER LID
OYP044044K
OYP044043K
Page 161 of 644

459
Features of your vehicle
Always check that the fuel cap is
installed securely to prevent fuel
spillage in the event of an accident.
✽ ✽NOTICE
Tighten the cap until it clicks once,
otherwise the fuel cap open warning
indicator light will illuminate
WARNING- Fire/explo-
sion risk
Read and follow all warnings
posted at the gas station facili-
ty. Failure to follow all warnings
will result in severe personal
injury, severe burns or death
due to fire or explosion.WARNING- Static electricity
Before touching the fuel noz- zle, you should eliminate
potentially dangerous static
electricity discharge by touch-
ing another metal part of the
vehicle, a safe distance away
from the fuel filler neck, noz-
zle, or other gas source.
Do not get back into a vehicle once you have begun refueling
since you can generate static
electricity by touching, rubbing
or sliding against any item or
fabric (polyester, satin, nylon,
etc.) capable of producing stat-
ic electricity. Static electricity
discharge can ignite fuel
vapors resulting in rapid burn-
ing. If you must reenter the
vehicle, you should once again
eliminate potentially danger-
ous static electricity discharge
by touching a metal part of the
vehicle, away from the fuel filler
neck, nozzle or other gasoline
source.WARNING- Refueling
Always remove the fuel cap
carefully and slowly. If the cap
is venting fuel or if you hear a
hissing sound, wait until the
condition stops before com-
pletely removing the cap. If
pressurized fuel sprays out, it
can cover your clothes or skin
and subject you to the risk of
fire and burns.
Page 162 of 644

Features of your vehicle
60
4
WARNING- Cell phone
fires
Do not use cellular phones
while refueling. Electric current
and/or electronic interference
from cellular phones can poten-
tially ignite fuel vapors causing
a fire.
WARNING- Smoking
DO NOT use matches or a lighter
and DO NOT SMOKE or leave a lit
cigarette in your vehicle while at
a gas station especially during
refueling. Automotive fuel is
highly flammable and can, when
ignited, result in fire.
WARNING- Refueling & Vehicle fires
When refueling, always shut the
engine off. Sparks produced by
electrical components related
to the engine can ignite fuel
vapors causing a fire. Once
refueling is complete, check to
make sure the filler cap and
filler door are securely closed,
before starting the engine.WARNING- Portable fuel container
When using an approved
portable fuel container, be sure
to place the container on the
ground prior to refueling. Static
electricity discharge from the
container can ignite fuel vapors
causing a fire. Once refueling
has begun, contact with the
vehicle should be maintained
until the filling is complete. Use
only approved portable plastic
fuel containers designed to
carry and store gasoline.
Page 168 of 644
Features of your vehicle
66
4
5. Push the sunroof control lever for-
ward in the direction of close, until
the sunroof operates as follows
again:
The sunroof glass slide open → The sunroof glass slide close
Then, release the lever.
When this is complete, the sunroof
system has been reset.
✽ ✽ NOTICE
If you do not reset the sunroof, it
may not work properly.
Rear sunroof lock
When the power window lock switch
is pressed, the rear sunroof control
cannot operate the rear sunroof. But
The front master sunroof control can
operate both front and rear sunroofs
(if equipped).
Sunroof open warning
(if equipped)
If the driver removes the ignition key
(smart key : turns off the engine)
when the sunroof is not fully closed,
the warning chime will sound for a
few seconds and a message will
appear on the LCD display or warn-
ing indicator will illuminate.
Close the sunroof securely when
leaving your vehicle.
OYP044155K
■ for B, C type cluster
Page 174 of 644

Features of your vehicle
72
4
HomeLink®Wireless Control System
Your new mirror comes with an inte-
grated HomeLink Universal
Transceiver, which allows you to pro-
gram the mirror to activate your
garage door(s), estate gate, home
lighting, etc. The mirror actually
learns the codes from your various
existing transmitters. Retain the original transmitter for
future programming procedures (i.e.,
new vehicle purchase). It is also sug-
gested that upon the sale of the vehi-
cle, the programmed HomeLink but-
tons be erased for security purposes
(follow step 1 in the “Programming”
portion of this text).
Programming
Your vehicle may require the ignition
switch to be turned to the ACC posi-
tion for programming and/or opera-
tion of HomeLink. It is also recom-
mended that a new battery be
replaced in the hand-held transmitter
of the device being programmed to
HomeLink for quicker training and
accurate transmission of the radio-
frequency.
Follow these steps to train your
HomeLink mirror:
1. When programming the buttons for
the first time, press and hold the
left and center buttons ( ,)
simultaneously until the indicator
light begins to flash after approxi-
mately 20 seconds. (This proce-
dure erases the factory-set default
codes. Do not perform this step
when programming the additional
HomeLink buttons.)
OHD046305N
Glare detection sensor
Indicator light
Homelink buttonsOHD046306N
Flashing