Page 276 of 644

Features of your vehicle
174
4
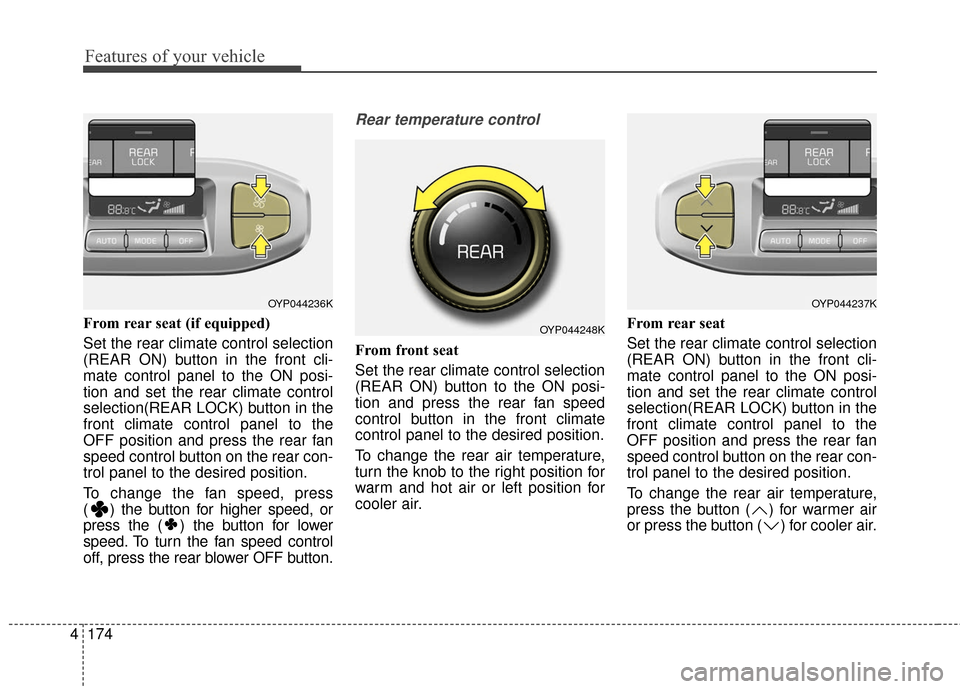
From rear seat (if equipped)
Set the rear climate control selection
(REAR ON) button in the front cli-
mate control panel to the ON posi-
tion and set the rear climate control
selection(REAR LOCK) button in the
front climate control panel to the
OFF position and press the rear fan
speed control button on the rear con-
trol panel to the desired position.
To change the fan speed, press
( ) the button for higher speed, or
press the ( ) the button for lower
speed. To turn the fan speed control
off, press the rear blower OFF button.
Rear temperature control
From front seat
Set the rear climate control selection
(REAR ON) button to the ON posi-
tion and press the rear fan speed
control button in the front climate
control panel to the desired position.
To change the rear air temperature,
turn the knob to the right position for
warm and hot air or left position for
cooler air. From rear seat
Set the rear climate control selection
(REAR ON) button in the front cli-
mate control panel to the ON posi-
tion and set the rear climate control
selection(REAR LOCK) button in the
front climate control panel to the
OFF position and press the rear fan
speed control button on the rear con-
trol panel to the desired position.
To change the rear air temperature,
press the button ( ) for warmer air
or press the button ( ) for cooler air.
OYP044236K
OYP044248K
OYP044237K
Page 277 of 644
4175
Features of your vehicle
Rear mode selection (if equipped)
Front climate control is :Rear air blows from the upper
vents on the rear ceiling.
Front climate control is : Rear air blows from the upper
vents on the rear ceiling and the
lower vents on the right rear trim
together.
Front climate control is , : Rear air blows from the lower vents
on the right rear trim together. When the rear climate control selec-
tion (REAR ON) button in the front
climate control panel is in the ON
position and set the rear climate con-
trol selection (REAR LOCK) button in
the front climate control panel to the
OFF position and the rear mode is
selected by pushing the rear mode
selection button on the rear control
panel as follows: : Rear air blows from the upper
vents on the rear ceiling.
: Rear air blows from the upper vents on the rear ceil-
ing and the lower vents on
the right rear trim together.
: Rear air blows from the lower vents on the right rear trim.
OYP044217K
OYP044239K
Page 279 of 644

4177
Features of your vehicle
Operation Tips
To keep dust or unpleasant fumesfrom entering the vehicle through
the ventilation system, temporarily
set the air intake control to the
recirculated air position. Be sure to
return the control to the fresh air
position when the irritation has
passed to keep fresh air in the
vehicle. This will help keep the driv-
er alert and comfortable.
Air for the heating/cooling system is drawn in through the grilles just
ahead of the windshield. Care
should be taken that these are not
blocked by leaves, snow, ice or
other obstructions.
To prevent interior fog on the wind- shield, set the air intake control to
the fresh air position and fan speed
to the desired position, turn on the
air conditioning system, and adjust
the temperature control to desired
temperature.Air conditioning (if equipped)
All Kia Air Conditioning Systems are
filled with R-134a refrigerant.
1. Start the engine. Press the air con- ditioning button.
2. Set the mode to the position.
3. Set the air intake control to the out- side air or recirculated air position.
4. Adjust the fan speed control and temperature control to maintain
maximum comfort.
When maximum cooling is desired, set the temperature control to the
extreme left position, set the mode
control to the MAX A/C position,
then set the fan speed control to
the highest speed.CAUTION- Excessive A/C
When using the air conditioningsystem, monitor the enginecoolant closely while driving uphills or in heavy traffic when out-side temperatures are high. Airconditioning system operationmay cause engine overheatingand potential engine damage.Continue to use the blower fanbut turn the air conditioning sys-tem off if the engine coolanttemperature gauge indicatesengine overheating.
Page 290 of 644
Features of your vehicle
188
4
Glove box
The glove box can be locked and
unlocked with a master key. (if
equipped)
To open the glove box, pull the han-
dle and the glove box will automati-
cally open. Close the glove box after
use.
✽ ✽
NOTICE
If the temperature control knob is in
the warm or hot position, warm or
hot air will flow into the glove box.
Sunglass holder
To open the sunglass holder, move
the sliding storage to backward.
OYP044188KOYP044076K
WARNING
To reduce the risk of injury in an
accident or sudden stop, always
keep the glove box door closed
while driving.
Page 298 of 644
Features of your vehicle
196
4
Clock (if equipped)
Hour (1)
Pressing the H button will advance
the time displayed by one hour.
Minute (2)
Pressing the M button will advance
the time displayed by one minute.
To change the 24 hour format to the
12 hours format (if equipped), while
pressing the “H” button, press the “M”
button for 3 seconds or more. For
example, if the “H” and “M” buttons
are pressed for more than 3 seconds
while the time is 22:15, the display
will change to 10:15.
Clothes hanger (if equipped)
❈ This actual feature may differ from the illus-
tration.
To use the hanger, pull down the
upper portion of hanger.
OYP044191KOYP044164K
CAUTION - Hanging
clothing
Do not hang heavy clothes, since those may damage the hook.
Page 307 of 644

4205
Features of your vehicle
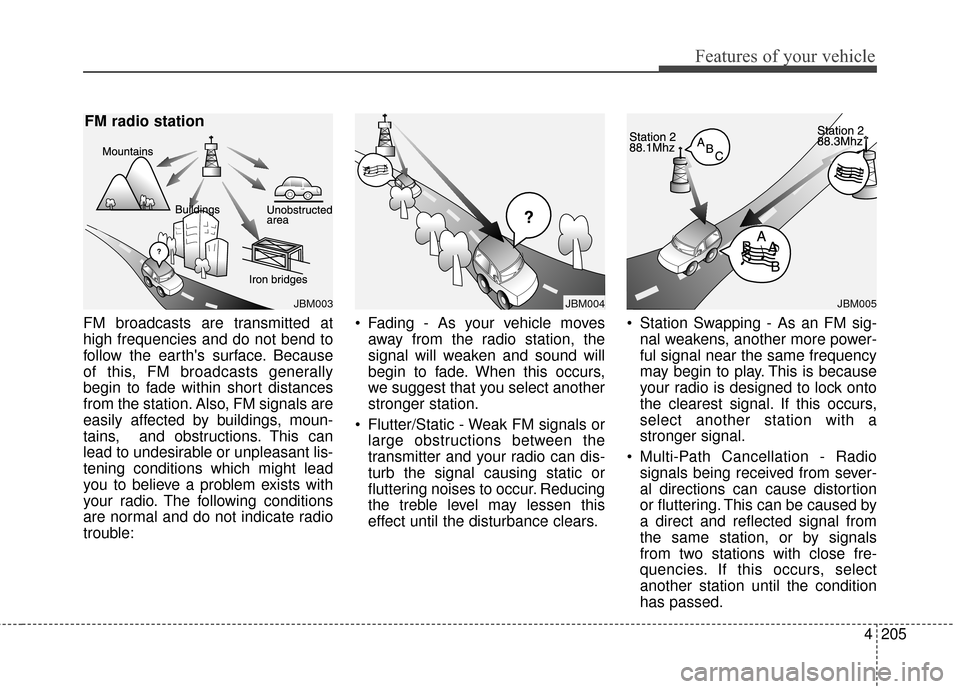
FM broadcasts are transmitted at
high frequencies and do not bend to
follow the earth's surface. Because
of this, FM broadcasts generally
begin to fade within short distances
from the station. Also, FM signals are
easily affected by buildings, moun-
tains, and obstructions. This can
lead to undesirable or unpleasant lis-
tening conditions which might lead
you to believe a problem exists with
your radio. The following conditions
are normal and do not indicate radio
trouble: Fading - As your vehicle moves
away from the radio station, the
signal will weaken and sound will
begin to fade. When this occurs,
we suggest that you select another
stronger station.
Flutter/Static - Weak FM signals or large obstructions between the
transmitter and your radio can dis-
turb the signal causing static or
fluttering noises to occur. Reducing
the treble level may lessen this
effect until the disturbance clears. Station Swapping - As an FM sig-
nal weakens, another more power-
ful signal near the same frequency
may begin to play. This is because
your radio is designed to lock onto
the clearest signal. If this occurs,
select another station with a
stronger signal.
Multi-Path Cancellation - Radio signals being received from sever-
al directions can cause distortion
or fluttering. This can be caused by
a direct and reflected signal from
the same station, or by signals
from two stations with close fre-
quencies. If this occurs, select
another station until the condition
has passed.
JBM003
FM radio station
JBM005JBM004
Page 416 of 644

Driving your vehicle
45
Before entering vehicle
• Be sure that all windows, outsidemirror(s), and outside lights are
clean.
Check the condition of the tires.
Check under the vehicle for any sign of leaks.
Be sure there are no obstacles behind you if you intend to back up.
Necessary inspections
Fluid levels, such as engine oil,
engine coolant, brake fluid, and
washer fluid should be checked on a
regular basis, at the exact interval
depending on the fluid. Further
details are provided in chapter 7,
“Maintenance”.
Before starting
Close and lock all doors.
Position the seat so that all con-trols are easily reached.
Buckle your seat belt.
Adjust the inside and outside rearview mirrors.
Be sure that all lights work.
Check all gauges.
Check the operation of warning lights when the ignition switch is
turned to the ON position.
Release the parking brake and make sure the brake warning light
goes out.
For safe operation, be sure you are
familiar with your vehicle and its
equipment.
BEFORE DRIVING
WARNING - Distracted driving
Focus on the road while driving.
The driver's primary responsi-
bility is in the safe and legal
operation of the vehicle. Use of
any handled devices, other
equipment or vehicle systems
that distract the drive should
not be used during vehicle
operation.
Page 418 of 644
Driving your vehicle
65
Illuminated ignition switch
Whenever a front door is opened, the
ignition switch will illuminate for your
convenience, provided the ignition
switch is not in the ON position. The
light will go off immediately when the
ignition switch is turned on. It will
also go off after about 30 seconds
when the door is closed.
Ignition switch position
LOCK
The steering wheel locks to protect
against theft (if equipped). The igni-
tion key can be removed only in the
LOCK position.
ACC (Accessory)
The steering wheel is unlocked and
electrical accessories are operative.
If difficulty is experienced turning the
ignition switch to the ACC position,
turn the key while turning the steer-
ing wheel right and left to release the
tension.
KEY POSITIONS (IF EQUIPPED)
OYP054028K
OYP054029K