Page 5 of 54
3
(Type B Cluster)
AC
BB
F
DEH
G
Instrument Cluster Overview
[A] Tachometer
[B] Turn Signal Indicators
[C] Speedometer
[D] Engine Temperature Gauge
[E] Indicators & Warning Lights
[F] Gear Shift Position Indicator
[G] Odometer/ Trip Computer/ Tripmeter
[H] Fuel Gauge
REMINDERS:
• Your vehicle’s instrument cluster & indicator light locations may differ from those in the illustrations
• For more information on the instrument cluster and the function of all indicator and warning lights, please refer to the Owner’s Manual
A
B
C
D
E
F
G
H
ALWAYS CHECK THE OWNER’S MANUAL FOR COMPLETE OPER ATING INFORMATION AND SAFET Y WARNINGS. *IF EQUIPPED
INSTRUMENT CLUSTER
Page 6 of 54

4
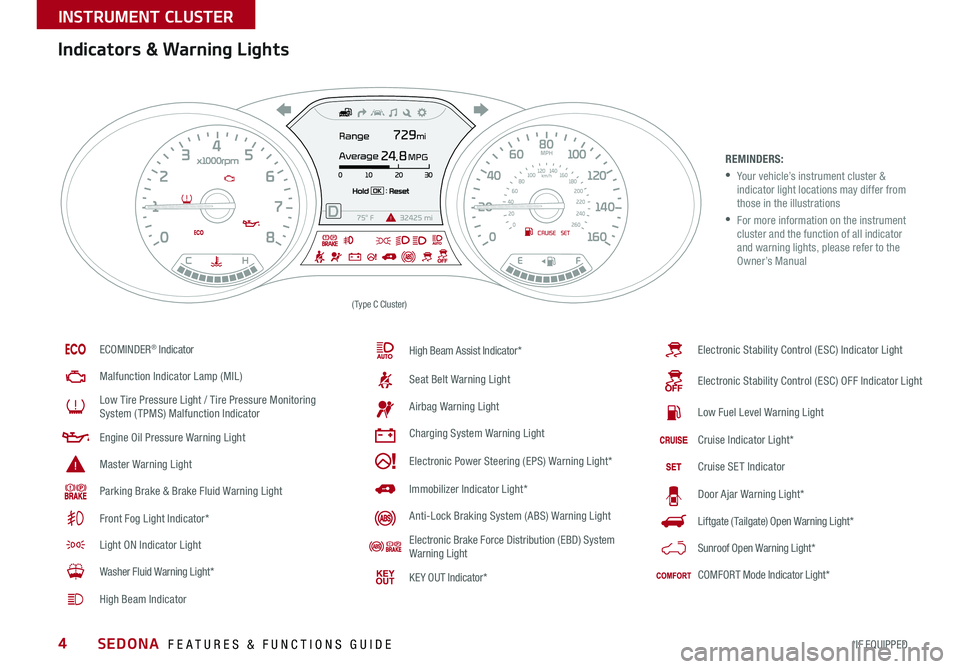
Indicators & Warning Lights
REMINDERS:
• Your vehicle’s instrument cluster & indicator light locations may differ from those in the illustrations
• For more information on the instrument cluster and the function of all indicator and warning lights, please refer to the Owner’s Manual
ECOMINDER® Indicator
Malfunction Indicator Lamp (MIL)
Low Tire Pressure Light / Tire Pressure Monitoring System (TPMS) Malfunction Indicator
Engine Oil Pressure Warning Light
Master Warning Light
Parking Brake & Brake Fluid Warning Light
Front Fog Light Indicator*
Light ON Indicator Light
Washer Fluid Warning Light*
High Beam Indicator
High Beam Assist Indicator*
Seat Belt Warning Light
Airbag Warning Light
Charging System Warning Light
Electronic Power Steering (EPS) Warning Light*
Immobilizer Indicator Light*
Anti-Lock Braking System (ABS) Warning Light
Electronic Brake Force Distribution (EBD) System Warning Light
KE Y OUT Indicator*
Electronic Stability Control (ESC) Indicator Light
Electronic Stability Control (ESC) OFF Indicator Light
Low Fuel Level Warning Light
Cruise Indicator Light*
Cruise SET Indicator
Door Ajar Warning Light*
Liftgate (Tailgate) Open Warning Light*
Sunroof Open Warning Light*
COMFORT Mode Indicator Light*
(Type C Cluster)
SEDONA FEATURES & FUNCTIONS GUIDE
*IF EQUIPPED
INSTRUMENT CLUSTER
Page 8 of 54

6
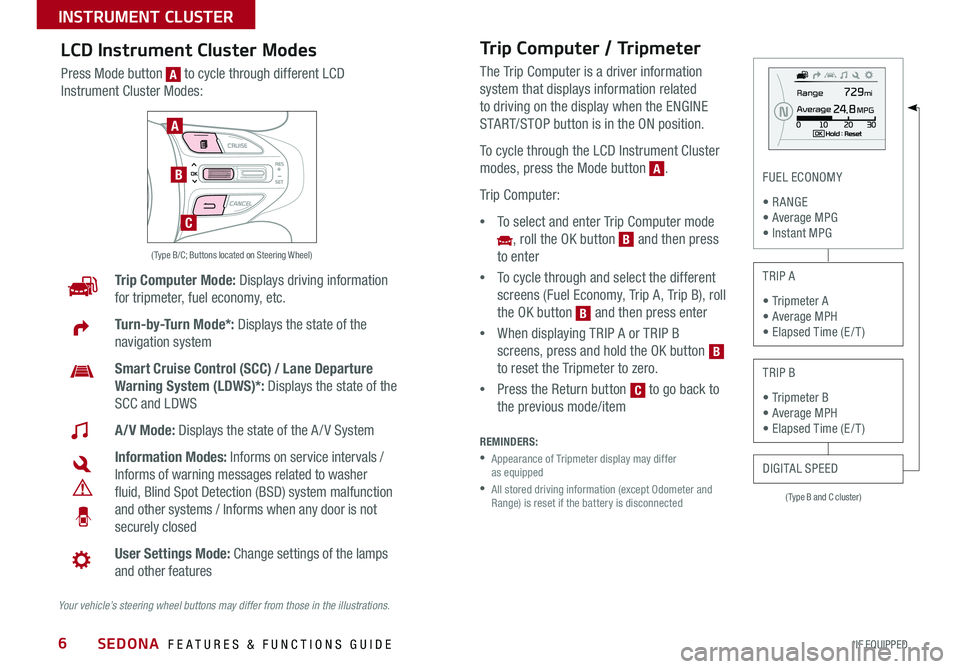
( Type B and C cluster)
FUEL ECONOMY
• R ANGE • Average MPG • Instant MPG
TRIP A
• Tripmeter A • Average MPH • Elapsed Time (E / T )
TRIP B
• Tripmeter B • Average MPH • Elapsed Time (E / T )
DIGITAL SPEED
Trip Computer Mode: Displays driving information
for tripmeter, fuel economy, etc .
Turn-by-Turn Mode*: Displays the state of the
navigation system
Smart Cruise Control (SCC) / Lane Departure
Warning System (LDWS)*: Displays the state of the
SCC and LDWS
A/V Mode: Displays the state of the A / V System
Information Modes: Informs on service intervals /
Informs of warning messages related to washer
fluid, Blind Spot Detection (BSD) system malfunction
and other systems / Informs when any door is not
securely closed
User Settings Mode: Change settings of the lamps
and other features
Your vehicle’s steering wheel buttons may differ from those in the illustrations.
( Type B/C; Buttons located on Steering Wheel)
A
B
C
Trip Computer / Tripmeter
The Trip Computer is a driver information
system that displays information related
to driving on the display when the ENGINE
START/STOP button is in the ON position .
To cycle through the LCD Instrument Cluster
modes, press the Mode button [A] .
Trip Computer:
•To select and enter Trip Computer mode
[~], roll the OK button [B] and then press
to enter
•To cycle through and select the different
screens (Fuel Economy, Trip A, Trip B), roll
the OK button [B] and then press enter
•When displaying TRIP A or TRIP B
screens, press and hold the OK button [B]
to reset the Tripmeter to zero .
•Press the Return button [C] to go back to
the previous mode/item
REMINDERS:
• Appearance of Tripmeter display may differ as equipped
• All stored driving information (except Odometer and Range) is reset if the battery is disconnected
B
B
C
A
LCD Instrument Cluster Modes
Press Mode button [A] to cycle through different LCD
Instrument Cluster Modes:
A
B
SEDONA FEATURES & FUNCTIONS GUIDE
*IF EQUIPPED
INSTRUMENT CLUSTER
Page 9 of 54

7
( Type B/C clusters):
Driving Assist •Smart Cruise Control Response*
•Rear Cross Traffic Alert*
•Forward Collision Warning*
Door/Liftgate (Tailgate) •Automatic Unlock
•Two Press Unlock
•Horn Feedback
•Smart Liftgate (Tailgate)*
Lights •One-Touch Turn Signal
•Head Lamp Delay*
•Welcome Light*
Sound •Park Assist System Volume*
•Blind Spot Detection Sound*
•Welcome Sound*
Seat/Steering •Easy Seat Access*
•Steering Position
Service Interval •ON/OFF
•Set mileage/months
Other Features •Fuel Economy Auto Reset ON/OFF
•Auto Rear Wiper (Reverse)
•Fuel Economy Unit
•Temperature Unit
•Language
To view these videos on your mobile device, snap these QR Codes or visit the listed website .
Refer to page 2 for more information .
LCD Display Video
LCD Display: Maintenance Video
QR CODES
www.KuTechVideos.com/yp13/2016
www.KuTechVideos.com/yp13/2016
(Type B cluster)
(Buttons located on right side of steering wheel)
A
B
C
User Settings
To enter the User Settings mode in the LCD
Instrument Cluster Modes, press the Mode
button [A] when the vehicle is at a standstill
and with the ENGINE START/ STOP button in
the ON position and select User Settings [~] by
pressing the OK button [B] .
You can navigate the selections on the display
by rolling the OK button [B], and then selecting
the item by pressing the OK button [B] .
Press the Return button [C] to go back to the previous mode/item
User Settings modes
A
B
B
B
C
Service Mode
To enter Service Mode, press the Mode button [A], scroll
to Service Mode [~] by rolling the OK button [B] . Then
press the OK button [B] to enter . System will display
number of miles remaining until next service is due, as
well as the type of service due .
When service is required, the following will be displayed:
Service Required .
To reset the Service Mode system, press and hold the
OK button [B] for more than 1 second .
Press the Return button [C] to go back to the previous
mode/item
To turn Service In OFF, go to User Settings .
Service Interval Setting
To set the service interval in User
Settings mode:
•Press the Mode button [A]
to cycle to User Settings and
press the OK button [B] to enter
•If Service Interval is OFF, press
the OK button [B] to turn ON
•Roll the OK button [B] to select /
change the interval setting
•Press the OK button [B] to
select the interval
C
B
B
A
B
A
B
B
B
B
ALWAYS CHECK THE OWNER’S MANUAL FOR COMPLETE OPER ATING INFORMATION AND SAFET Y WARNINGS. *IF EQUIPPED
INSTRUMENT CLUSTER