Page 110 of 488

435
Features of your vehicle
Electronic power steering (if equipped)
Power steering uses the motor to assist
you in steering the vehicle. If the engine
is off or if the power steering system
becomes inoperative, the vehicle may
still be steered, but it will require
increased steering effort.
The motor driven power steering is con-
trolled by the power steering control unit
which senses the steering wheel torque,
steering wheel position and vehicle
speed to command the motor.
The steering wheel becomes heavier as
the vehicle’s speed increases and
becomes lighter as the vehicle’s speed
decreases for better control of the steer-ing wheel.
Should you notice any change in the
effort required to steer during normal
vehicle operation, we recommend that
the system be checked by an authorized
Kia dealer.✽✽NOTICE
The following symptoms may occur dur-
ing normal vehicle operation:
The EPS warning light does not illu- minate.
The steering effort is high immediate- ly after turning the ignition switch on.
This happens as the system performs
the EPS system diagnostics. When the
diagnostics is completed, the steering
wheel will return to its normal condi-
tion.
A click noise may be heard from the
EPS relay after the ignition switch is
turned to the ON or LOCK position.
Motor noise may be heard when the vehicle is at a stop or at a low driving
speed.
If the Electric Power Steering System
does not operate normally, the warn-
ing light will illuminate on the instru-
ment cluster. The steering wheel may
become difficult to control or operate
abnormally. We recommend that you
contact an authorized Kia dealer. (Continued)(Continued)
The steering effort increases if the
steering wheel is rotated continuously
when the vehicle is not in motion.
However, after a few minutes, it will
return to its normal conditions.
When you operate the steering wheel in low temperature, abnormal noise
could occur. If temperature rises, the
noise will disappear. This is a normal
condition.
STEERING WHEEL
Page 357 of 488

613
What to do in an emergency
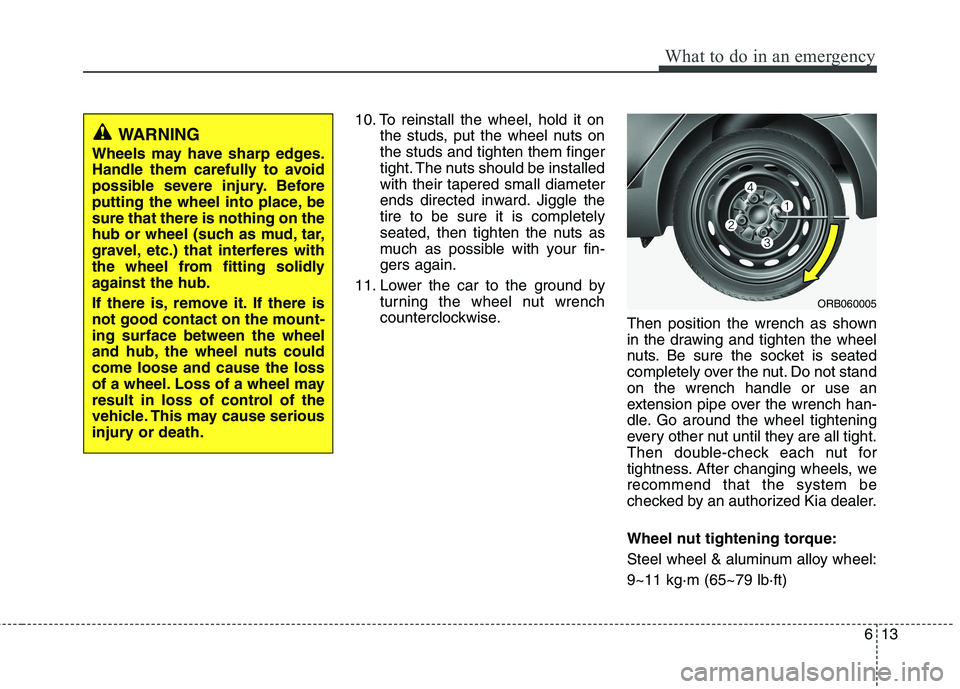
10. To reinstall the wheel, hold it onthe studs, put the wheel nuts on the studs and tighten them finger
tight. The nuts should be installedwith their tapered small diameter
ends directed inward. Jiggle thetire to be sure it is completely
seated, then tighten the nuts as
much as possible with your fin-gers again.
11. Lower the car to the ground by turning the wheel nut wrench
counterclockwise. Then position the wrench as shown
in the drawing and tighten the wheel
nuts. Be sure the socket is seated
completely over the nut. Do not standon the wrench handle or use an
extension pipe over the wrench han-
dle. Go around the wheel tightening
every other nut until they are all tight.
Then double-check each nut for
tightness. After changing wheels, werecommend that the system be
checked by an authorized Kia dealer.
Wheel nut tightening torque:
Steel wheel & aluminum alloy wheel:9~11 kg·m (65~79 lb·ft)
WARNING
Wheels may have sharp edges.
Handle them carefully to avoid
possible severe injury. Before
putting the wheel into place, besure that there is nothing on the
hub or wheel (such as mud, tar,
gravel, etc.) that interferes with
the wheel from fitting solidly
against the hub.
If there is, remove it. If there is not good contact on the mount-ing surface between the wheel
and hub, the wheel nuts couldcome loose and cause the loss
of a wheel. Loss of a wheel may
result in loss of control of the
vehicle. This may cause serious
injury or death.
ORB060005
Page 401 of 488

723
Maintenance
Rear brake drums and linings (if equipped)
Check the rear brake drums and linings
for scoring, burning, leaking fluid, broken
parts, and excessive wear.
Brake discs, pads, calipers and
rotors
Check the pads for excessive wear, discs
for run out and wear, and calipers for fluid
leakage.
For more information on checking the
pads or lining wear limit, we recommend
to refer to the Kia web site. (http://brakeman
ual.kia.co.kr) Suspension mounting bolts
Check the suspension connections for
looseness or damage. Retighten to the
specified torque.
Steering gear box, linkage &
boots/lower arm ball joint
With the vehicle stopped and engine off,
check for excessive free-play in the
steering wheel.
Check the linkage for bends or damage.
Check the dust boots and ball joints for
deterioration, cracks, or damage.
Replace any damaged parts.
Drive shafts and boots
Check the drive shafts, boots and clamps
for cracks, deterioration, or damage.
Replace any damaged parts and, if nec-
essary, repack the grease.
Air conditioning refrigerant (if equipped)
Check the air conditioning lines and con-
nections for leakage and damage.
Page 465 of 488

83
Specifications & Consumer information
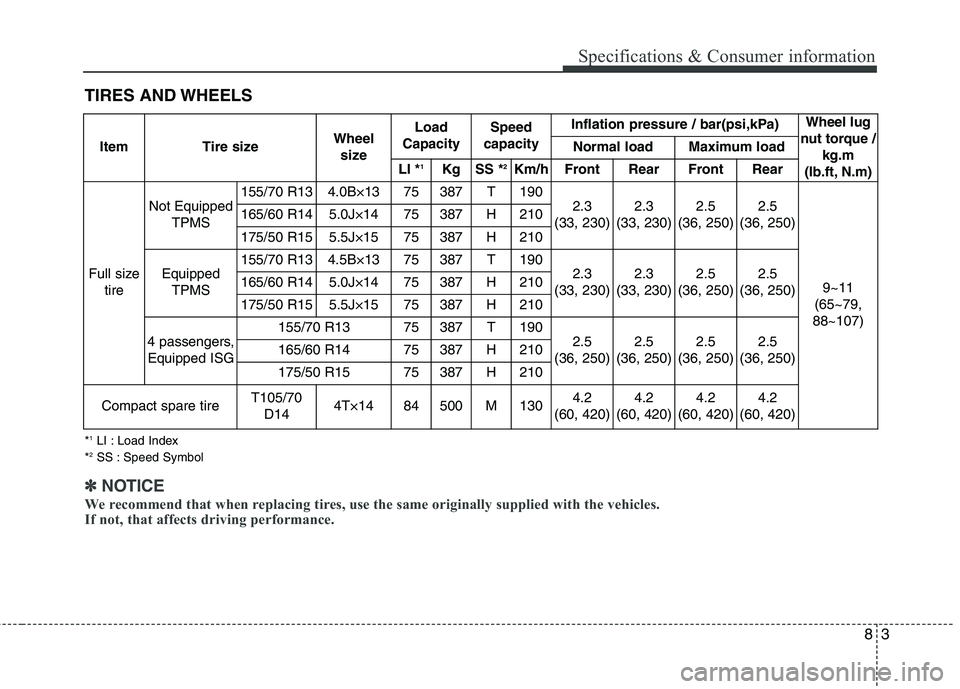
TIRES AND WHEELSItem Tire size Wheel
size Load
Capacity Speed
capacity Inflation pressure / bar(psi,kPa)
Wheel lug
nut torque / kg.m
(lb.ft, N.m)
Normal load Maximum load
LI * 1
Kg SS * 2
Km/h Front Rear Front Rear
Full size tire
Not Equipped TPMS155/70 R13 4.0B×13 75 387 T 190 2.3
(33, 230) 2.3
(33, 230) 2.5
(36, 250) 2.5
(36, 250)
9~11
(65~79,
88~107)
165/60 R14 5.0J×14 75 387 H 210
175/50 R15 5.5J×15 75 387 H 210
Equipped TPMS155/70 R13 4.5B×13 75 387 T 190 2.3
(33, 230) 2.3
(33, 230) 2.5
(36, 250) 2.5
(36, 250)
165/60 R14 5.0J×14 75 387 H 210
175/50 R15 5.5J×15 75 387 H 210
4 passengers, Equipped ISG155/70 R13 75 387 T 190 2.5
(36, 250) 2.5
(36, 250) 2.5
(36, 250) 2.5
(36, 250)
165/60 R14 75 387 H 210
175/50 R15 75 387 H 210
Compact spare tire
T105/70 D14 4T×14 84 500 M 130 4.2
(60, 420) 4.2
(60, 420) 4.2
(60, 420) 4.2
(60, 420)
✽✽ NOTICE
We recommend that when replacing tires, use the same originally supplied with the ve hicles.
If not, that affects driving performance.
* 1
LI : Load Index
* 2
SS : Speed Symbol