Page 32 of 643
315
Safety features of your vehicle
Adjusting the height up and down
To raise the headrest, pull it up to the
desired position (1). To lower the head-
rest, push and hold the release button (2)
on the headrest support and lower theheadrest to the desired position (3).Removal and installation
To remove the headrest, raise it as far as
it can go then press the release button(1) while pulling the headrest up (2).
To reinstall the headrest, put the head- rest poles (3) into the holes while press-
ing the release button (1). Then adjust it
to the appropriate height.Armrest (if equipped)
To use the armrest, pull it forward from
the seatback.
OJD032014OJD032015
WARNING
Make sure the headrest locks in
position after adjusting it to proper-
ly protect the occupants.
OJD032016
JD PE eng 3.QXP 9/9/2015 4:14 PM Page 15
Page 33 of 643

Safety features of your vehicle
16
3
Folding the rear seat
The rear seatbacks (or cushions) may be
folded to facilitate carrying long items orto increase the luggage capacity of the
vehicle.
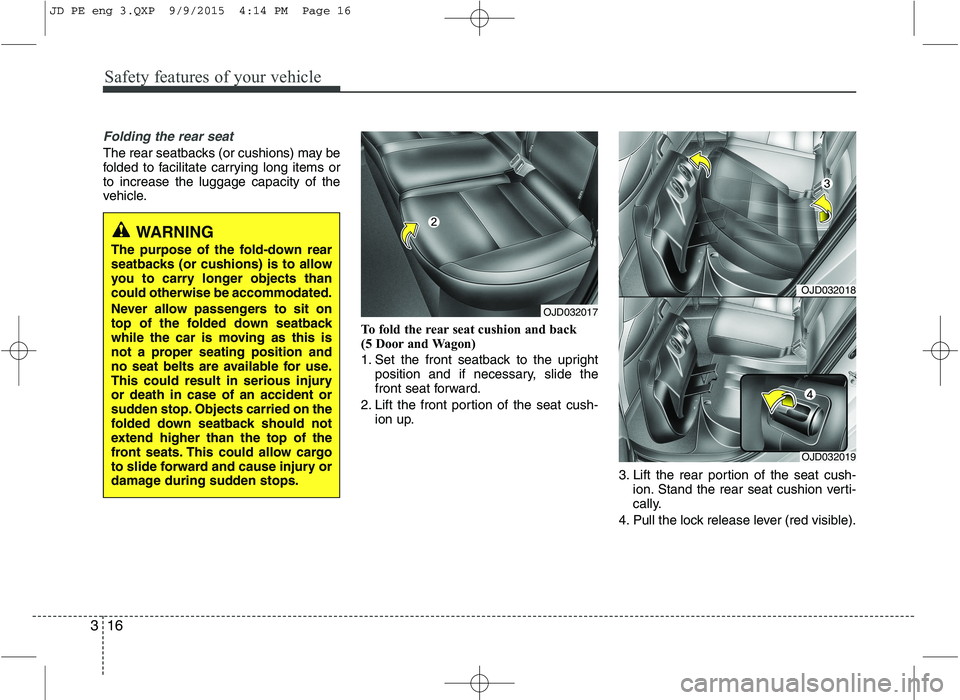
To fold the rear seat cushion and back
(5 Door and Wagon)
1. Set the front seatback to the uprightposition and if necessary, slide the
front seat forward.
2. Lift the front portion of the seat cush- ion up.
3. Lift the rear portion of the seat cush-ion. Stand the rear seat cushion verti-
cally.
4. Pull the lock release lever (red visible).
OJD032018
OJD032019
OJD032017
WARNING
The purpose of the fold-down rear
seatbacks (or cushions) is to allow
you to carry longer objects thancould otherwise be accommodated.
Never allow passengers to sit on
top of the folded down seatback
while the car is moving as this is
not a proper seating position and
no seat belts are available for use.
This could result in serious injuryor death in case of an accident or
sudden stop. Objects carried on the
folded down seatback should not
extend higher than the top of the
front seats. This could allow cargo
to slide forward and cause injury or
damage during sudden stops.
JD PE eng 3.QXP 9/9/2015 4:14 PM Page 16
Page 34 of 643
317
Safety features of your vehicle
5. Remove the headrest from the rearseatback.
6. Stow the headrest by inserting the headrest poles into the holder on the bottom of the seat cushion. 7. Fold the rear seatback forward and
down firmly. 8. To use the rear seat, reposition the
headrest on the seatback and adjust itto the desired position.
9. Lift and push the seatback backward firmly until it clicks into place. Make
sure the seatback is locked in place
(red invisible).
OJD032020OJD032021OJD032022
JD PE eng 3.QXP 9/9/2015 4:14 PM Page 17
Page 35 of 643
Safety features of your vehicle
18
3
10. Return the seat cushion to the origi-
nal position by pushing down the rear
side of the seat cushion first. Make
sure the seat cushion is locked in
place.
11. Return the rear seat belt to the prop- er position. To fold down the rear seatback
(for 3 Door):
1. Set the front seatback to the upright
position and if necessary, slide the
front seat forward.
2. Lower the rear headrests to the lowest position. 3. Pull the lock release lever (1) and fold
the rear seatback forward and down
firmly.
If the seat belt locks after unfolding the
rear seatback, pull out the locked seatbelt, release it then pull it out again.
OJD032023OJD035076LOJD033067
JD PE eng 3.QXP 9/9/2015 4:14 PM Page 18
Page 36 of 643

319
Safety features of your vehicle
To unfold the rear seat
1. To use the rear seat, lift and pull theseatback backward. Pull the seatback
firmly until it clicks into place. Make
sure the seatback is locked in place.
When you return the seatback to its
upright position, always be sure it has
locked into position by pushing on the
top of the seatback.
If you can not see the red line at the
bottom of folding lever, it means the
seatback is locked completely.
2. Return the rear seat belt to the proper position.
3. When the seatback is completely installed, check the seatback folding
lever again.
WARNING
When you return the rear seatback to its upright position after being
folded down:
Be careful not to damage the seat
belt webbing or buckle. Do not
allow the seat belt webbing or
buckle to get caught or pinched in
the rear seat. Ensure that the seat-
back is completely locked into its
upright position by pushing on the
top of the seatback. Otherwise, in
an accident or sudden stop, the
seat could fold down and allow
cargo to enter the passenger com-
partment, which could result in
serious injury or death.
CAUTION - Rear seat belts
When returning the rear seatbacks
to the upright position, remember to return the rear shoulder belts totheir proper position.
WARNING - Cargo
Cargo should always be secured to
prevent it from being thrown about
the vehicle in a collision and caus-
ing injury to the vehicle occupants.Special care should be taken ofobjects placed in the rear seats,
since those may hit the front seat
occupants in a frontal collision.
WARNING - Cargo loading
Make sure the engine is off, the
automatic transaxle is in P (Park)
or the manual transaxle is in R
(Reverse) or 1st, and the parking
brake is securely applied whenever
loading or unloading cargo. Failure
to take these steps may allow the
vehicle to move if the shift lever is
inadvertently moved to anotherposition.
JD PE eng 3.QXP 9/9/2015 4:14 PM Page 19
Page 40 of 643

323
Safety features of your vehicle
And then, the rear corresponding seat
belt warning light will illuminate for
approximately 35 seconds, if any of fol-
lowing occurs;
- You start the engine when the rear beltis not fastened.
- You drive over 9km/h when the rear belt is not fastened.
- The rear belt is disconnected when driving under 20km/h.
If the rear seat belt is fastened, the warn-
ing light will turn off immediately. If the rear seat belt is disconnected when
you drive over the 20km/h, the corre-
sponding seat belt warning light will blink
and warning chime will sound for 35 sec-
onds. But, if the rear passenger's lap/shoulder belt is/are connected and disconnectedtwice within 9 seconds after the belt is
fastened, the corresponding seat belt
warning light will not operate.
Lap/shoulder belt
Height adjustment (5 Door and Wagon)
You can adjust the height of the shoulder
belt anchor to one of 4 positions for max-
imum comfort and safety. The height of the adjusting seat belt
should not be too close to your neck. You
will not be getting the most effective pro-
tection. The shoulder portion should be
adjusted so that it lies across your chest
and midway over your shoulder near the
door and not your neck.
To adjust the height of the seat belt
anchor, lower or raise the height adjuster
into an appropriate position. To raise the height adjuster, pull it up (1).
To lower it, push it down (3) while press-
ing the height adjuster button (2).
Release the button to lock the anchor
into position. Try sliding the height
adjuster to make sure that it has lockedinto position.
OLM039026
■
Front seat
JD PE eng 3.QXP 9/9/2015 4:15 PM Page 23
Page 41 of 643

Safety features of your vehicle
24
3
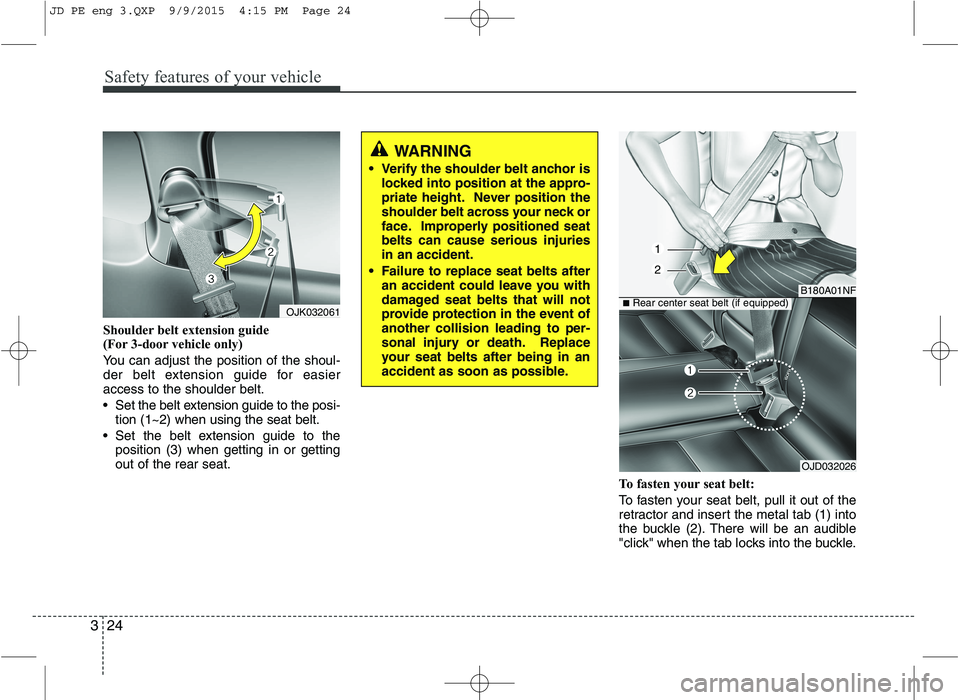
Shoulder belt extension guide
(For 3-door vehicle only)
You can adjust the position of the shoul-
der belt extension guide for easieraccess to the shoulder belt.
Set the belt extension guide to the posi-
tion (1~2) when using the seat belt.
Set the belt extension guide to the position (3) when getting in or getting out of the rear seat.
To fasten your seat belt:
To fasten your seat belt, pull it out of the
retractor and insert the metal tab (1) into
the buckle (2). There will be an audible
"click" when the tab locks into the buckle.
WARNING
Verify the shoulder belt anchor is locked into position at the appro-
priate height. Never position the
shoulder belt across your neck or
face. Improperly positioned seatbelts can cause serious injuriesin an accident.
Failure to replace seat belts after an accident could leave you with
damaged seat belts that will not
provide protection in the event ofanother collision leading to per-
sonal injury or death. Replace
your seat belts after being in an
accident as soon as possible.
OJK032061
B180A01NF
1
2
OJD032026
■Rear center seat belt (if equipped)
JD PE eng 3.QXP 9/9/2015 4:15 PM Page 24
Page 42 of 643

325
Safety features of your vehicle
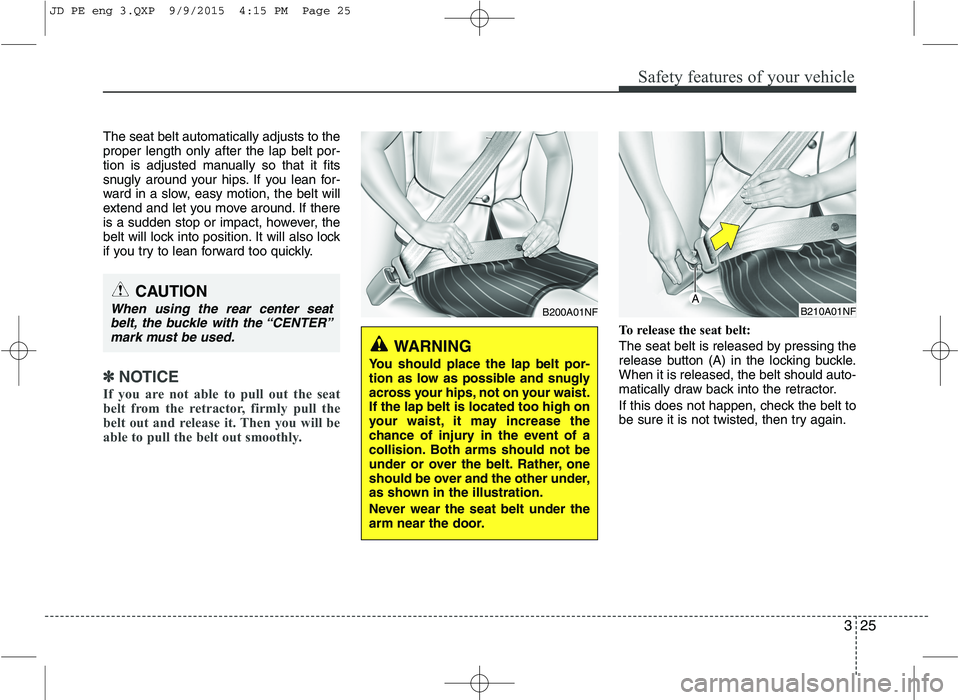
The seat belt automatically adjusts to the proper length only after the lap belt por-
tion is adjusted manually so that it fits
snugly around your hips. If you lean for-
ward in a slow, easy motion, the belt will
extend and let you move around. If there
is a sudden stop or impact, however, the
belt will lock into position. It will also lock
if you try to lean forward too quickly.
✽✽NOTICE
If you are not able to pull out the seat
belt from the retractor, firmly pull the
belt out and release it. Then you will be
able to pull the belt out smoothly.
To release the seat belt:
The seat belt is released by pressing the
release button (A) in the locking buckle.When it is released, the belt should auto-
matically draw back into the retractor.
If this does not happen, check the belt to
be sure it is not twisted, then try again.
CAUTION
When using the rear center seat belt, the buckle with the “CENTER”
mark must be used.B200A01NF
WARNING
You should place the lap belt por-
tion as low as possible and snugly
across your hips, not on your waist.If the lap belt is located too high on
your waist, it may increase the
chance of injury in the event of a
collision. Both arms should not be
under or over the belt. Rather, one
should be over and the other under,
as shown in the illustration.
Never wear the seat belt under the
arm near the door.
B210A01NFA
JD PE eng 3.QXP 9/9/2015 4:15 PM Page 25