Page 78 of 705

Before buying any restraint system, make sure that it has
a label certifying that it meets all applicable Safety
Standards. You should also make sure that you can install
it in the vehicle where you will use it.
NOTE:
•
For additional information, refer to www.seatcheck.org
or call 1-866-732-8243.
•Canadian residents should refer to Transport Canada’s
website for additional information: www.tc.gc.ca/eng/
motorvehiclesafety/safedrivers-childsafety-index-53.htm
Summary Of Recommendations For Restraining Children In Vehicles
Child Size, Height, Weight Or Age Recommended Type Of Child Restraint
Infants and Toddlers
Children who are two years old or younger and who have not reached the height or weight limits of their child restraintEither an Infant Carrier or a Convertible
Child Restraint, facing rearward in the rear seat of the vehicle
Small Children Children who are at least two years old or who have out-grown the height or weightlimit of their rear-facing child restraint Forward-Facing Child Restraint with a
five-point Harness, facing forward in the rear seat of the vehicle
76 THINGS TO KNOW BEFORE STARTING YOUR VEHICLE
Page 79 of 705

Child Size, Height, Weight Or Age Recommended Type Of Child Restraint
Larger Children Children who have out-grown their forward-facing child restraint, but are too
small to properly fit the vehicle’s seat belt Belt Positioning Booster Seat and the ve-
hicle seat belt, seated in the rear seat of the vehicle
Children Too Large
for Child Restraints Children 12 years old or younger, who
have out-grown the height or weight limit of their booster seat Vehicle Seat Belt, seated in the rear seat of
the vehicle
Infants And Child Restraints
Safety experts recommend that children ride rear-facing
in the vehicle until they are two years old or until they
reach either the height or weight limit of their rear-facing
child restraint. Two types of child restraints can be used
rear-facing: infant carriers and convertible child seats.
The infant carrier is only used rear-facing in the vehicle.
It is recommended for children from birth until they
reach the weight or height limit of the infant carrier.
Convertible child seats can be used either rear-facing or forward-facing in the vehicle. Convertible child seats
often have a higher weight limit in the rear-facing
direction than infant carriers do, so they can be used
rear-facing by children who have outgrown their infant
carrier but are still less than at least two years old.
Children should remain rear-facing until they reach the
highest weight or height allowed by their convertible
child seat.
2
THINGS TO KNOW BEFORE STARTING YOUR VEHICLE 77
Page 80 of 705

WARNING!
•Never place a rear-facing child restraint in front of
an air bag. A deploying passenger Advanced Front
Air Bag can cause death or serious injury to a child
12 years or younger, including a child in a rear-
facing child restraint.
• Only use a rear-facing child restraint in a vehicle
with a rear seat.
Older Children And Child Restraints
Children who are two years old or who have outgrown
their rear-facing convertible child seat can ride forward-
facing in the vehicle. Forward-facing child seats and
convertible child seats used in the forward-facing direc-
tion are for children who are over two years old or who
have outgrown the rear-facing weight or height limit of
their rear-facing convertible child seat. Children should remain in a forward-facing child seat with a harness for
as long as possible, up to the highest weight or height
allowed by the child seat.
All children whose weight or height is above the
forward-facing limit for the child seat should use a
belt-positioning booster seat until the vehicle’s seat belts
fit properly. If the child cannot sit with knees bent over
the vehicle’s seat cushion while the child’s back is against
the seatback, they should use a belt-positioning booster
seat. The child and belt-positioning booster seat are held
in the vehicle by the seat belt.
WARNING!
•
Improper installation can lead to failure of an
infant or child restraint. It could come loose in a
collision. The child could be badly injured or
killed. Follow the child restraint manufacturer ’s
(Continued)
78 THINGS TO KNOW BEFORE STARTING YOUR VEHICLE
Page 83 of 705
Recommendations For Attaching Child Restraints
Restraint Type CombinedWeight of the
Child + Child Restraint Use any attachment method shown with an “X” Below
LATCH –
Lower Anchors Only Seat Belt Only LATCH –
Lower Anchors+ Top Tether Anchor Seat Belt + Top
Tether Anchor
Rear-Facing
Child Restraint Up to 65 lbs
(29.5 kg) XX
Rear-Facing
Child Restraint More than
65 lbs (29.5 kg) X
Forward-Facing Child Restraint Up to 65 lbs
(29.5 kg) XX
Forward-Facing Child Restraint More than
65 lbs (29.5 kg) X2
THINGS TO KNOW BEFORE STARTING YOUR VEHICLE 81
Page 86 of 705

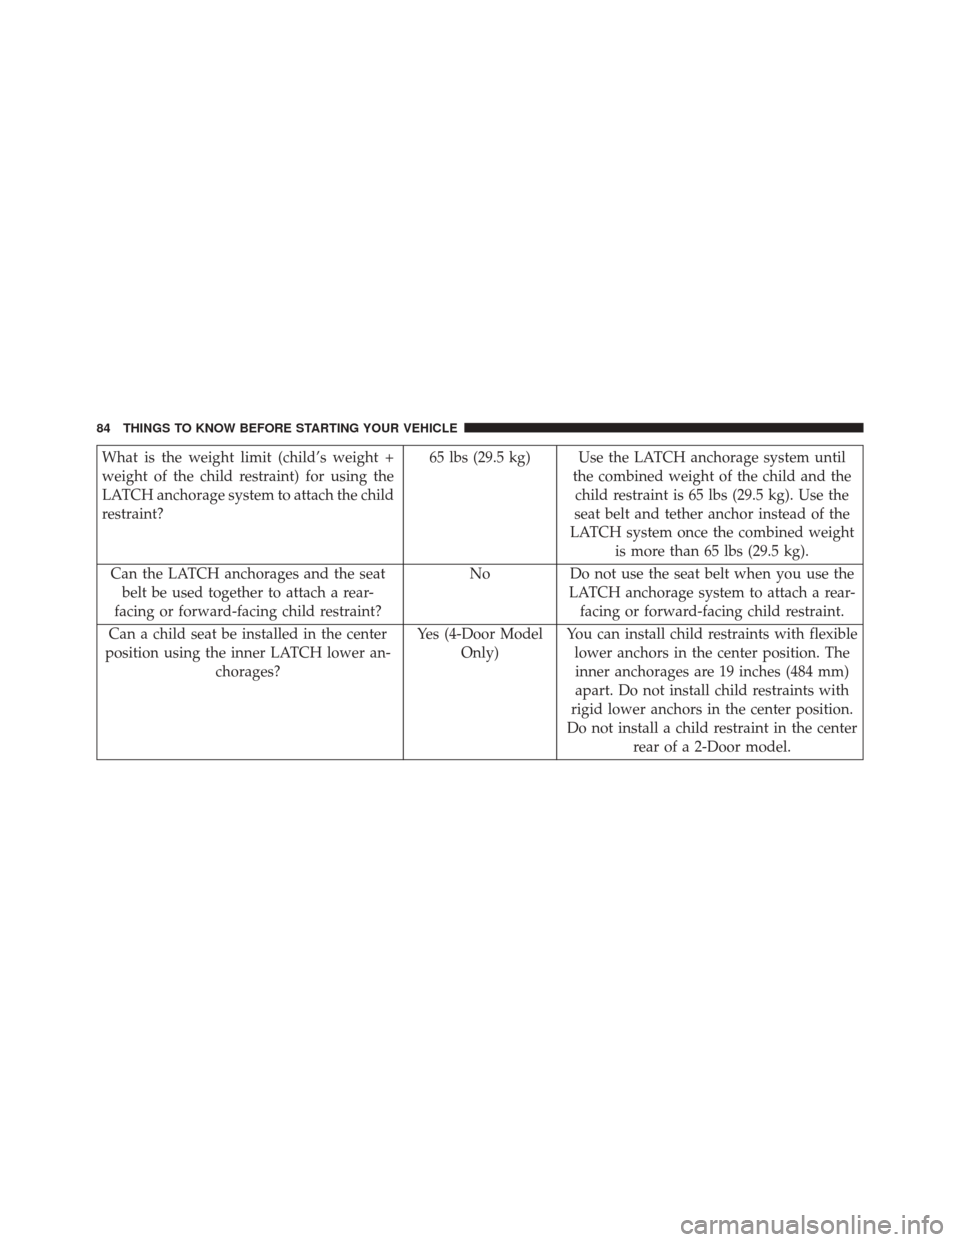
What is the weight limit (child’s weight +
weight of the child restraint) for using the
LATCH anchorage system to attach the child
restraint?65 lbs (29.5 kg) Use the LATCH anchorage system until
the combined weight of the child and thechild restraint is 65 lbs (29.5 kg). Use the
seat belt and tether anchor instead of the
LATCH system once the combined weight is more than 65 lbs (29.5 kg).
Can the LATCH anchorages and the seat belt be used together to attach a rear-
facing or forward-facing child restraint? No
Do not use the seat belt when you use the
LATCH anchorage system to attach a rear- facing or forward-facing child restraint.
Can a child seat be installed in the center
position using the inner LATCH lower an- chorages? Yes (4-Door Model
Only) You can install child restraints with flexible
lower anchors in the center position. Theinner anchorages are 19 inches (484 mm)apart. Do not install child restraints with
rigid lower anchors in the center position.
Do not install a child restraint in the center rear of a 2-Door model.
84 THINGS TO KNOW BEFORE STARTING YOUR VEHICLE
Page 95 of 705
What is the weight limit (child’s
weight + weight of the child re-
straint) for using the Tether Anchor
with the seat belt to attach a forward
facing child restraint?Weight limit of the Child Restraint Always use the tether anchor when
using the seat belt to install a for-ward facing child restraint, up to
the recommended weight limit of the child restraint.
Can the rear-facing child restraint touch the back of the front passenger seat? Yes
Contact between the front passen-
ger seat and the child restraint is allowed, if the child restraint
manufacturer also allows contact.
Can the head restraints be removed? Yes (2-Door Model only) Head restraints cannot be removed
in the 4-Door model.
Can the buckle stalk be twisted to
tighten the seat belt against the belt path of the child restraint? No
Do not twist the buckle stalk in a
seating position with an ALR retractor.
2
THINGS TO KNOW BEFORE STARTING YOUR VEHICLE 93
Page 344 of 705

Average Fuel Economy / Distance To Empty (DTE)
/ Elapsed Time
•Average Fuel Economy
Shows the average fuel economy since the last reset.
When the fuel economy is reset, the digits will go blank
while the history information is erased. The averaging
will restart when enough new distance and fuel data is
accumulated.
• Distance To Empty (DTE)
Shows the estimated distance that can be traveled with
the fuel remaining in the tank. This estimated distance is
determined by a weighted average of the instantaneous
and average fuel economy, according to the current fuel
tank level. DTE cannot be reset. •
Elapsed Time
Shows the total elapsed time of travel since the last reset.
Elapsed time will increment when the ignition switch is
in the RUN or START positions. The elapsed timer
displays minutes:seconds. After 59minutes:59seconds, it
displays hours:minutes:seconds.
Trip Conditions
Trip Odometer (ODO) / ECO (Fuel Saver Indicator)
— If Equipped
This display shows the distance traveled since the last
reset. Push and release the right button (on the instru-
ment cluster) to switch from odometer to Trip A or Trip B
or to ECO. Push and hold the right button while the
odometer/trip odometer is displayed to reset.
342 UNDERSTANDING YOUR INSTRUMENT PANEL
Page 353 of 705

To Change The Compass Variance:
1. Turn the ignition switch RUN (it is not necessary tostart the engine).
2. Push the MENU button until Personal Settings (Customer-Programmable Features) displays in the
EVIC.
3. Push the DOWN button until “Compass Variance” message and the last variance zone number displays
in the EVIC.
4. Push and release the RIGHT button until the proper variance zone is selected according to the map.
5. Push and release the COMPASS button to exit.
Digital Speedometer
Shows the actual vehicle speed in mph or km/h.
Average Fuel Economy
Shows the average fuel economy since the last reset. Average
Fuel Economy can be reset by pushing and holding the
RIGHT
arrow button (as prompted in the EVIC
display). Upon reset, the history information will be
erased, and the averaging will continue from the last
fuel average reading before the reset.
Distance To Empty (DTE)
Shows the estimated distance that can be traveled with
the fuel remaining in the tank. This estimated distance is
determined by a weighted average of the instantaneous
and average fuel economy, according to the current fuel
tank level. DTE cannot be reset.
NOTE: Significant changes in driving style or vehicle
loading will greatly affect the actual drivable distance of
the vehicle, regardless of the DTE display value.
4
UNDERSTANDING YOUR INSTRUMENT PANEL 351