Page 434 of 587
Inflation Pressure
This is the cold tire inflation pressure for your vehicle for
all loading conditions up to full GAWR.
Curb Weight
The curb weight of a vehicle is defined as the total weight
of the vehicle with all fluids, including vehicle fuel, at full
capacity conditions, and with no occupants or cargo
loaded into the vehicle. The front and rear curb weight
values are determined by weighing your vehicle on a
commercial scale before any occupants or cargo are
added.
Overloading
The load carrying components (springs, tires, wheels,
etc.) of your vehicle will provide satisfactory service as
long as you do not exceed the GVWR.The best way to figure out the total weight of your
vehicle is to weigh it when it is fully loaded and ready for
operation. Weigh it on a commercial scale to ensure that
it is not over the GVWR.
Overloading can cause potential safety hazards and
shorten useful service life. Heavier suspension compo-
nents do not necessarily increase the vehicle’s GVWR.
Loading
To load your vehicle properly, first figure out its empty
weight. Store heavier items down low and be sure you
distribute their weight as evenly as possible. Stow all
loose items securely before driving. Improper weight
distribution can have an adverse effect on the way your
vehicle steers and handles, and the way the brakes
operate.
432 STARTING AND OPERATING
Page 443 of 587

WARNING!(Continued)
•Total weight must be distributed between the tow
vehicle and the trailer such that the following four
ratings are not exceeded:
1. GVWR
2. GTW
3. GAWR
4. Tongue weight rating for the trailer hitch uti-
lized.
Towing Requirements — Tires
• Do not attempt to tow a trailer while using a compact
spare tire. •
Proper tire inflation pressures are essential to the safe
and satisfactory operation of your vehicle. Refer to
“Tires – General Information” in “Starting And Oper-
ating” for proper tire inflation procedures.
• Check the trailer tires for proper tire inflation pres-
sures before trailer usage.
• Check for signs of tire wear or visible tire damage
before towing a trailer. Refer to “Tires – General
Information” in “Starting And Operating” for the
proper inspection procedure.
• When replacing tires, refer to “Tires – General Infor-
mation” in “Starting And Operating” for the proper
tire replacement procedures. Replacing tires with a
higher load carrying capacity will not increase the
vehicle’s GVWR and GAWR limits.
5
STARTING AND OPERATING 441
Page 459 of 587

WARNING!(Continued)
•Do not let anyone sit in the vehicle when it is on a
jack.
• Do not get under the vehicle when it is on a jack. If
you need to get under a raised vehicle, take it to a
service center where it can be raised on a lift.
• Only use the jack in the positions indicated and for
lifting this vehicle during a tire change.
• If working on or near a roadway, be extremely
careful of motor traffic.
• To assure that spare tires, flat or inflated, are
securely stowed, spares must be stowed with the
valve stem facing the ground. NOTE:
Refer to “Tires — General Information” in “Start-
ing And Operating” for further information about the
spare tire, it’s use, and operation.
1. Remove the scissors jack and lug wrench from the spare wheel as an assembly. Turn the jack screw to the
left to loosen the lug wrench and remove the wrench
from the jack assembly.
NOTE: The jack handle attaches to the side of the jack
with two attachment points. When the jack is partially
expanded, the tension between the two attachment
points holds the jack handle in place.
Jack Warning Label
6
WHAT TO DO IN EMERGENCIES 457
Page 464 of 587

WARNING!
To avoid possible personal injury, handle the wheel
covers with care to avoid contact with any sharp
edges.
NOTE: The wheel cover is held on the wheel by the
wheel nuts. When reinstalling the original wheel, prop-
erly align the wheel cover to the valve stem, place the
wheel cover onto the wheel, then install the wheel nuts.
6. Lower the vehicle by turning the jack screw to the left.
7. Finish tightening the lug nuts. Push down on the wrench while at the end of the handle for increased
leverage. Tighten the lug nuts in a star pattern until
each nut has been tightened twice. Refer to “Torque
Specifications” in this section for the correct lug nut
torque. If you doubt that you have tightened the nuts correctly, have them checked with a torque wrench by
your authorized dealer or service station.
8. Remove the wheel blocks and lower the jack until it is free. Release the parking brake. Reassemble the lug
wrench to the jack assembly and stow it in the spare
tire area. Secure the assembly using the means pro-
vided.
WARNING!
A loose tire or jack thrown forward in a collision or
hard stop could endanger the occupants of the ve-
hicle. Always stow the jack parts and the spare tire in
the places provided.
9. Place the deflated (flat) tire in the cargo area, have the
tire repaired or replaced as soon as possible.
462 WHAT TO DO IN EMERGENCIES
Page 465 of 587
WARNING!
A loose tire thrown forward in a collision or hard
stop could injure the occupants in the vehicle. Have
the deflated (flat) tire repaired or replaced immedi-
ately.
10. Check the spare tire pressure as soon as possible. Correct the tire pressure as required.
Road Tire Installation
Vehicles Equipped With Wheel Covers
1. Mount the road tire on the axle.
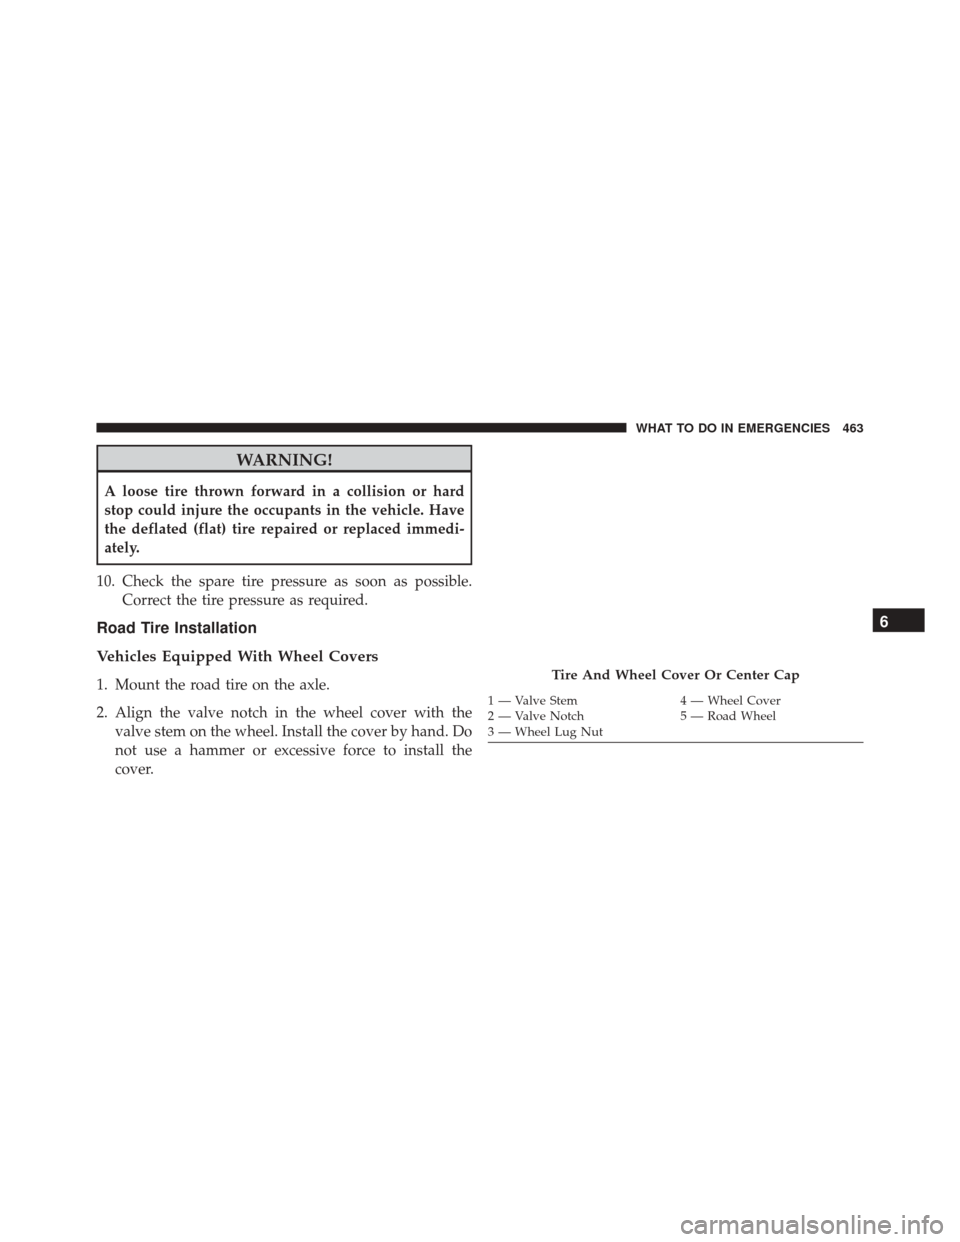
2. Align the valve notch in the wheel cover with thevalve stem on the wheel. Install the cover by hand. Do
not use a hammer or excessive force to install the
cover.Tire And Wheel Cover Or Center Cap
1 — Valve Stem 4 — Wheel Cover
2 — Valve Notch 5 — Road Wheel
3 — Wheel Lug Nut
6
WHAT TO DO IN EMERGENCIES 463
Page 468 of 587

Tire Service Kit Components And OperationUsing The Mode Select Knob And Hoses
Your Tire Service Kit is equipped with the following
symbols to indicate the air or sealant mode.
Selecting Air Mode
Push in the Mode Select Knob (5) and turn to this
position for air pump operation only. Use the
Black Air Pump Hose (7) when selecting this mode.
Selecting Sealant Mode
Push in the Mode Select Knob (5) and turn to this
position to inject the Tire Service Kit Sealant and
to inflate the tire. Use the Sealant Hose (clear hose) (6)
when selecting this mode.
Using The Power Button
Push and release the Power Button (4) once to
turn On the Tire Service Kit. Push and release the Power
Button (4) again to turn Off the Tire Service Kit.
Tire Service Kit Components
1 — Sealant Bottle 5 — Mode Select Knob
2 — Deflation Button 6 — Sealant Hose (Clear)
3 — Pressure Gauge 7 — Air Pump Hose (Black)
4 — Power Button 8 — Power Plug (located on the bot-
tom side of the Tire Service Kit)
466 WHAT TO DO IN EMERGENCIES
Page 469 of 587
Using The Deflation ButtonPush the Deflation Button (2) to reduce the air
pressure in the tire if it becomes over-inflated.
Tire Service Kit Usage Precautions
•Replace the Tire Service Kit Sealant Bottle (1) and
Sealant Hose (6) prior to the expiration date (printed at
the lower right hand corner on the bottle label) to
assure optimum operation of the system. Refer to
“Sealing a Tire with Tire Service Kit” section (F)
“Sealant Bottle and Hose Replacement”.
•The Sealant Bottle (1) and Sealant Hose (6) are a one
tire application use and need to be replaced after each
use. Always replace these components immediately at
your original equipment vehicle dealer.
• When the Tire Service Kit sealant is in a liquid form,
clean water, and a damp cloth will remove the material
Tire Service Kit Expiration Date Location
6
WHAT TO DO IN EMERGENCIES 467
Page 470 of 587

from the vehicle or tire and wheel components. Once
the sealant dries, it can easily be peeled off and
properly discarded.
• For optimum performance, make sure the valve stem
on the wheel is free of debris before connecting the Tire
Service Kit.
• You can use the Tire Service Kit air pump to inflate
bicycle tires. The kit also comes with two needles,
located in the Accessory Storage Compartment (on the
bottom of the air pump) for inflating sport balls, rafts,
or similar inflatable items. However, use only the Air
Pump Hose (7) and make sure the Mode Select Knob
(5) is in the Air Mode when inflating such items to
avoid injecting sealant into them. The Tire Service Kit
Sealant is only intended to seal punctures less than 1/4
inch (6 mm) diameter in the tread of your vehicle.
• Do not lift or carry the Tire Service Kit by the hoses.WARNING!
•Do not attempt to seal a tire on the side of the
vehicle closest to traffic. Pull far enough off the
road to avoid the danger of being hit when using
the Tire Service Kit.
• Do not use Tire Service Kit or drive the vehicle
under the following circumstances:
– If the puncture in the tire tread is approximately 1/4 inch (6 mm) or larger.
– If the tire has any sidewall damage.
– If the tire has any damage from driving with extremely low tire pressure.
– If the tire has any damage from driving on a flat tire.
– If the wheel has any damage.
– If you are unsure of the condition of the tire or the wheel.
(Continued)
468 WHAT TO DO IN EMERGENCIES