Page 403 of 745

3. Press the 1 or 2 buttons on the touchscreen, and theselect source button on the touchscreen. Press the
DISC button on the touchscreen in the MEDIA col-
umn. To exit, press the X at the top right of the screen.
NOTE: Pressing the screen on the radio while a DVD or
Blu-ray Disc is playing, brings up the basic remote control functions for DVD play such as scene selection,
Play, Pause, FF, RW, and Stop. Pressing the X in the upper
corner will turn OFF the remote control screen functions.
Important Notes For Dual Video Screen System
•The Rear Seat Entertainment System is able to transmit
two channels of stereo audio and video simultaneously.
• The Blu-ray Disc Player can play CDs, DVDs and
Blu-ray Discs.
• When selecting a video source on Rear 1, the video
source will display on Rear 1 and can be heard on
Rear 1.
• When selecting a video source on Rear 2, the video
source will display on Rear 2 and can be heard on
Rear 2.
• Audio can be heard through the headphones even
when the screen(s) are closed.
Rear Seat Entertainment Source Screen
4
UNDERSTANDING YOUR INSTRUMENT PANEL 401
Page 405 of 745
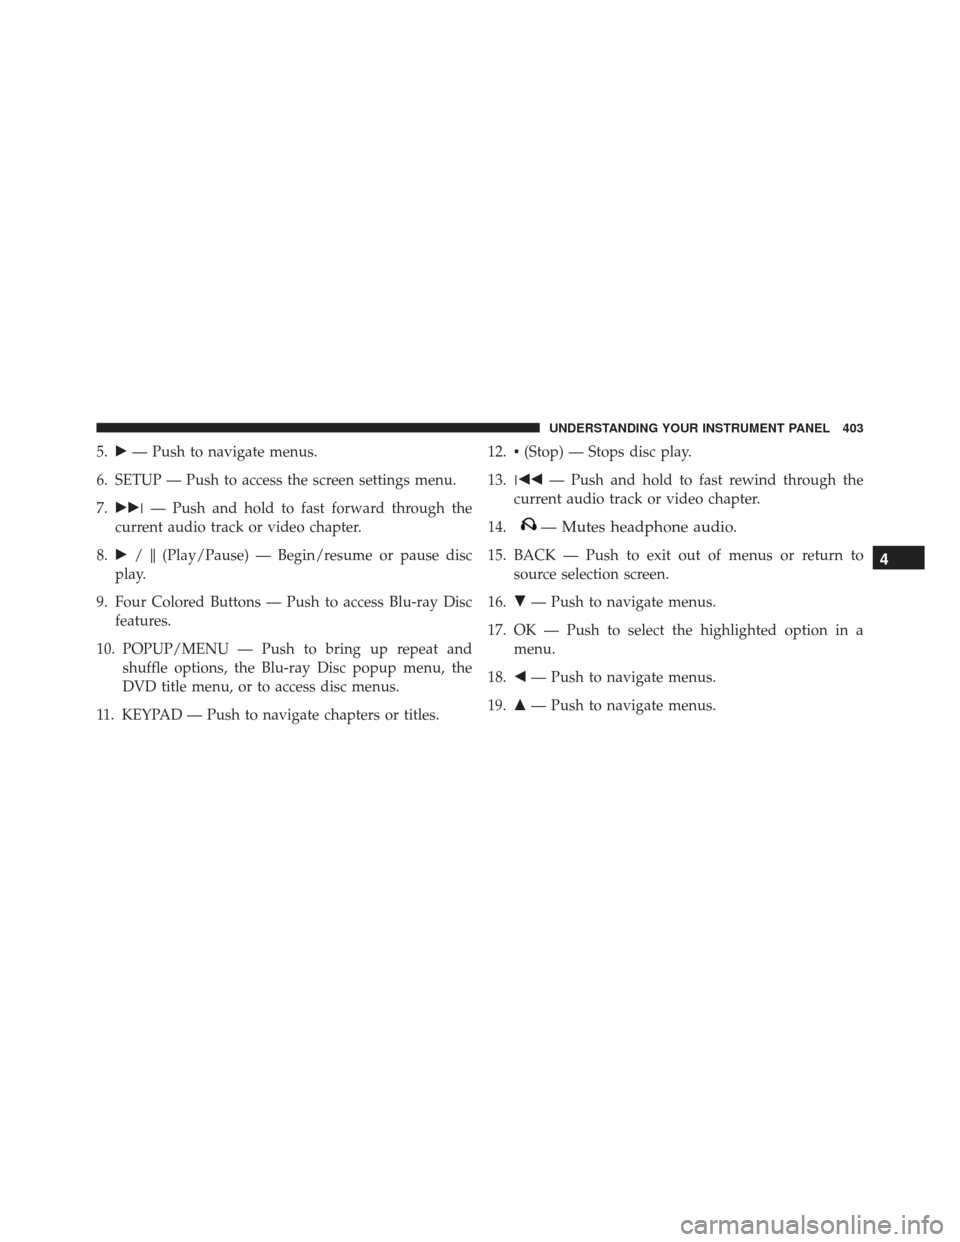
5.�— Push to navigate menus.
6. SETUP — Push to access the screen settings menu.
7. ��� — Push and hold to fast forward through the
current audio track or video chapter.
8. � /�(Play/Pause) — Begin/resume or pause disc
play.
9. Four Colored Buttons — Push to access Blu-ray Disc features.
10. POPUP/MENU — Push to bring up repeat and shuffle options, the Blu-ray Disc popup menu, the
DVD title menu, or to access disc menus.
11. KEYPAD — Push to navigate chapters or titles. 12.
▪(Stop) — Stops disc play.
13. ��� — Push and hold to fast rewind through the
current audio track or video chapter.
14.
— Mutes headphone audio.
15. BACK — Push to exit out of menus or return to source selection screen.
16. �— Push to navigate menus.
17. OK — Push to select the highlighted option in a menu.
18. �— Push to navigate menus.
19. �— Push to navigate menus.4
UNDERSTANDING YOUR INSTRUMENT PANEL 403
Page 407 of 745

Controls
The headphone power indicator and controls are located
on the right ear cup.
NOTE:The rear video system must be turned on before
sound can be heard from the headphones. To conserve
battery life, the headphones will automatically turn off
approximately three minutes after the rear video system
is turned off.
Changing the Audio Mode for Headphones
1. Ensure the Remote Control channel/screen selector switch is in the same position as the headphone
selector switch.
NOTE: •When both the headphone and the remote control
channel selector switches are on Channel 1, the
Remote is controlling Channel 1 and the headphones
are tuned to the audio on Channel 1. •
When both the headphone and the remote control
channel selector switches are on Channel 2, the
Remote is controlling Channel 2 and the headphones
are tuned to the audio on Channel 2.
2. Push the SOURCE button on the remote control.
3. Pushing the SOURCE button will advance to the next mode.
4. When the Mode Selection menu appears on screen, use the cursor buttons on the remote control to navi-
gate to the available modes and push the OK button to
select the new mode.
5. To cancel out of the Mode Selection menu, push the BACK button on the remote control.
4
UNDERSTANDING YOUR INSTRUMENT PANEL 405
Page 410 of 745
Display Settings
When watching a video source (Blu-ray Disc or DVD
Video with the disc in Play mode, Aux Video, etc.),
pushing the remote control’s SETUP button activates theDisplay Settings menu. These settings control the appear-
ance of the video on the screen. The factory default
settings are already set for optimum viewing, so there is
no need to change these settings under normal circum-
stances.
To change the settings, push the remote control’s naviga-
tion buttons (�,
�) to select an item, then push the
remote control’s navigation buttons (�, �) to change the
value for the currently selected item. To reset all values
back to the original settings, select the Default Settings
menu option and push the remote control’s ENTER/OK
button.
Disc Features control the remote Blu-ray Disc player’s
settings of DVD being watched in the remote player.
Video Screen Display Settings
408 UNDERSTANDING YOUR INSTRUMENT PANEL
Page 420 of 745
General Overview
Buttons On The Faceplate
The buttons on the faceplate are located below the
Uconnect screen.Buttons On The Touchscreen
The buttons on the touchscreen are accessible on the
Uconnect system screen.
Automatic Climate Controls — Buttons On The
Faceplate
Uconnect 5.0 Automatic Temperature Controls — ButtonsOn The Touchscreen
418 UNDERSTANDING YOUR INSTRUMENT PANEL
Page 421 of 745
Button Descriptions (Applies To Both The Buttons On
The Faceplate And The Buttons On The Touchscreen)
1. MAX A/C Button
Press and release to change the current setting, the
indicator illuminates when MAX A/C is ON. Performing
this function again will cause the MAX A/C operation to
switch into manual mode and the MAX A/C indicator
will turn off.
2. A/C Button
Press and release to change the current setting, the
indicator illuminates when A/C is ON. Performing this
function again will cause the A/C operation to switch
into manual mode and the A/C indicator will turn off.
3. Recirculation Button
Press and release to change the current setting, the
indicator illuminates when ON.
Uconnect 8.4 Automatic Temperature Controls — ButtonsOn The Touchscreen
4
UNDERSTANDING YOUR INSTRUMENT PANEL 419
Page 424 of 745

10. Blower Control
Blower control is used to regulate the amount of air forced
through the climate system. There are seven blower speeds
available. Adjusting the blower will cause automatic mode
to switch to manual operation. The speeds can be selected
using either the blower control knob on the faceplate or
buttons on the touchscreen as follows:
Blower Control Knob On The Faceplate
The blower speed increases as you turn the blower
control knob clockwise from the lowest blower setting.
The blower speed decreases as you turn the blower
control knob counterclockwise.
Button On The Touchscreen
Use the small blower icon to reduce the blower setting
and the large blower icon to increase the blower setting.
Blower can also be selected by pressing the blower bar
area between the icons.11. Modes
The airflow distribution mode can be adjusted so air
comes from the instrument panel outlets, floor outlets,
and demist outlets. The Mode settings are as follows:
•Panel Mode
Air comes from the outlets in the instrument
panel. Each of these outlets can be individu-
ally adjusted to direct the flow of air. The air vanes of
the center outlets and outboard outlets can be moved
up and down or side to side to regulate airflow
direction. There is a shut off wheel located below the
air vanes to shut off or adjust the amount of airflow
from these outlets.
• Bi-Level Mode
Air comes from the instrument panel outlets
and floor outlets. A slight amount of air is
directed through the defrost and side window demis-
ter outlets.
422 UNDERSTANDING YOUR INSTRUMENT PANEL
Page 428 of 745

Automatic Operation
1. Push the AUTO button on the faceplate or press the“AUTO” button on the touchscreen.
2. Adjust the temperature you would like the system t")
Automatic Temperature Control (ATC)
Automatic Operation
1. Push the AUTO button on the faceplate or press the“AUTO” button on the touchscreen.
2. Adjust the temperature you would like the system to maintain by adjusting the driver and passenger tem-
perature buttons on the faceplate or buttons on the
touchscreen. Once the desired temperature is dis-
played, the system will achieve and automatically
maintain that comfort level.
3. When the system is set up for your comfort level, it is not necessary to change the temperature. You will
experience the greatest efficiency by simply allowing
the system to function automatically. NOTE:
•
It is not necessary to move the temperature settings.
The system automatically adjusts the temperature,
mode, and blower speed to provide comfort as quickly
as possible.
•
The temperature can be displayed in U.S. or Metric units
by selecting the Uconnect customer-programmable fea-
ture. Refer to the “Uconnect System Settings” in this
section of the manual.
To provide you with maximum comfort in the Automatic
mode, during cold start-ups the blower fan will remain
on low until the engine warms up. The blower will
increase in speed and transition into Auto mode.
Manual Operation Override
The system allows for manual selection of blower speed,
air distribution mode, A/C status and recirculation control.
426 UNDERSTANDING YOUR INSTRUMENT PANEL
,
pushing the remote control’s SETUP button activates theDisplay Settings menu. T")


1. MAX A/C Button
Press and release to change the current setting, the
indicator illuminates when")