2016 INFINITI QX60 key
[x] Cancel search: keyPage 17 of 40

15
Headlight Control Switch
HEADLIGHT CONTROL
Turn the headlight control switch to the
position 1 to turn on the front parking, tail, license
plate and instrument panel lights. Turn the switch to
the
position 2 to turn on the headlights.
AUTOLIGHT SYSTEM
The autolight system will automatically turn the headlights on when it i\
s dark and off when
it is light. The system will keep the headlights on for a period of time\
after you turn the
ignition off and all doors are closed.
To activate the autolight system, turn the headlight control switch to t\
he AUTO position 3
then push the ignition switch to ON. To deactivate the autolight system,\
turn the headlight
control switch to the OFF,
position 1 or position 2.
HIGH BEAM SELECT
With the headlights ON (either in the AUTO or
position), push the headlight control switch forward
to select the high beam function. The blue indicator
light
will illuminate in the instrument panel. Pull
the headlight switch back to the original position to
select the low beam. The blue indicator light
will extinguish.
Pull and release the headlight control switch 5
to flash the headlight high beams on and off.
FOG LIGHT SWITCH
The headlights must be on and the low beams
selected for the fog lights to operate.
Turn the switch (inside collar) to the position 6
to turn the fog lights on.
Turn the switch (inside collar) to the OFF position to
turn the fog lights off.
3
4
6
1
5
2
Starting/Stopping the Engine
It is important to make sure the Infiniti Intelligent
Key is with you (that is, in your pocket or purse).
Depress the brake pedal.
Press the ignition switch START/STOP button to
start the engine.
TURNING THE ENGINE OFF
Move the shift lever to the P (PARK) position and apply the parking brake.
Press the ignition switch START/STOP button to turn the engine off.
For more information, refer to the “Starting and driving (section 5)” of your Owner’s Manual.
2460934_16b_Infiniti_QX60_QRG_031716_b.indd 153/17/16 2:20 PM
Page 25 of 40
23
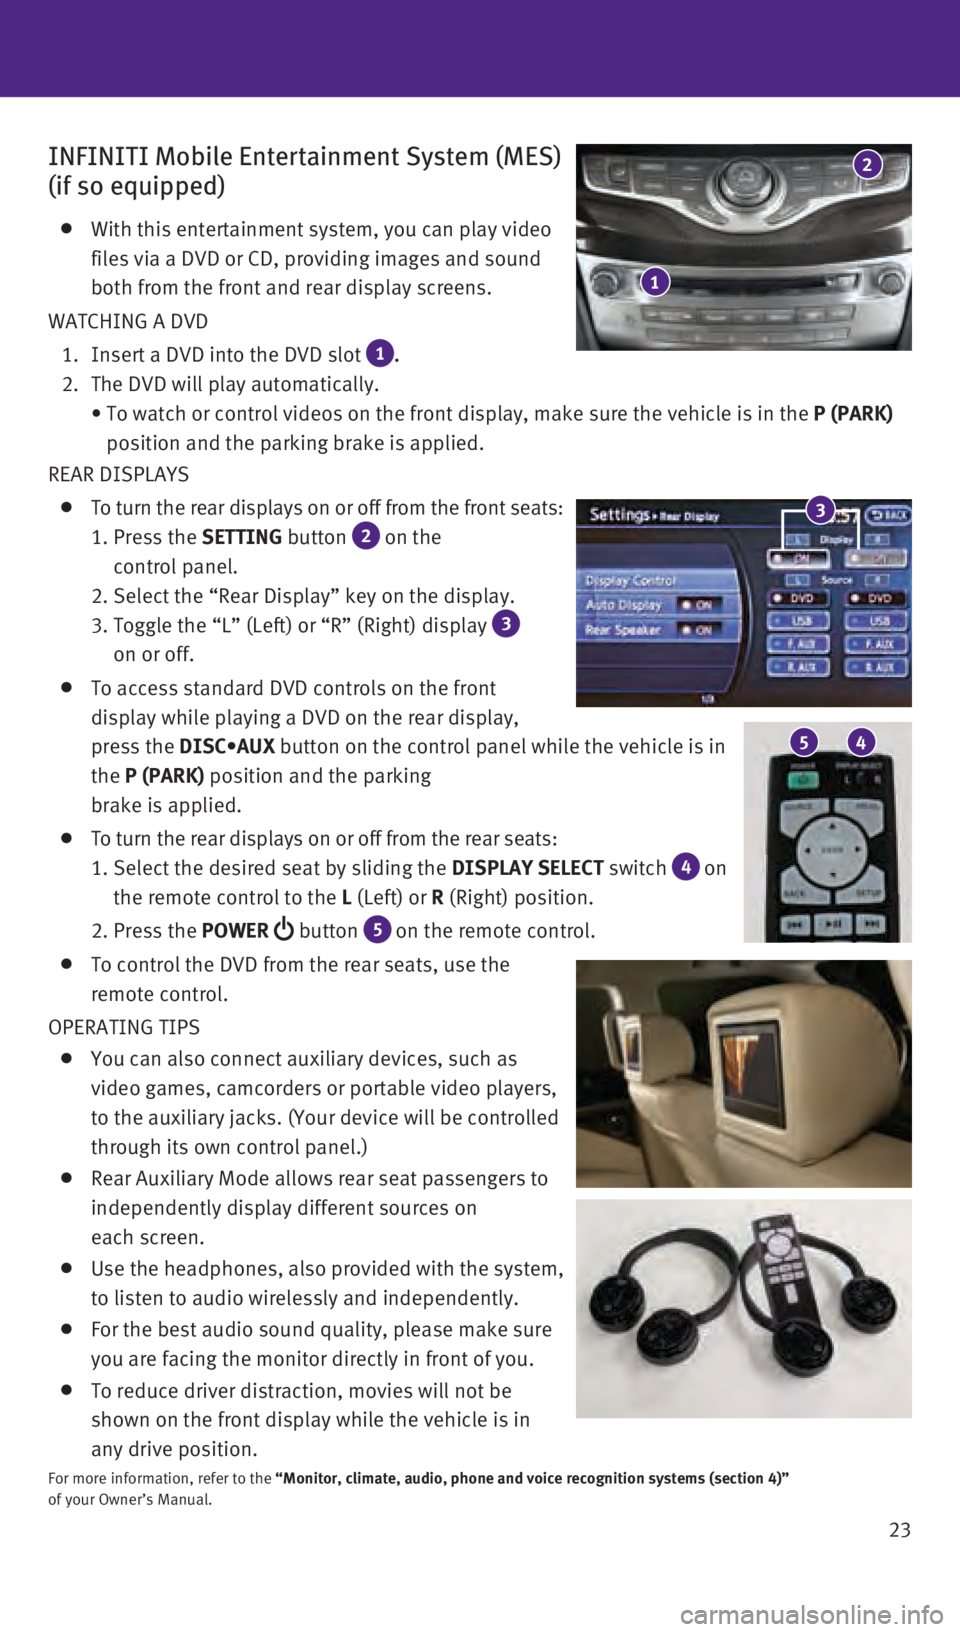
INFINITI Mobile Entertainment System (MES)
(if so equipped)
With this entertainment system, you can play video
files via a DVD or CD, providing images and sound
both from the front and rear display screens.
WATCHING A DVD
1. Insert a DVD into the DVD slot 1 .
2. The DVD will play automatically.
•
To watch or control videos on the front display, make sure the vehicle i\
s in the P (PARK)
position and the parking brake is applied.
REAR DISPLAYS
To turn the rear displays on or off from the front seats:
1. Press the SETTING
button
2 on the
control panel.
2. Select the “Rear Display” key on the display.
3. Toggle the “L” (Left) or “R” (Right) display 3
on or off.
To access standard DVD controls on the front
display while playing a DVD on the rear display,
press the DISC•AUX
button on the control panel while the vehicle is in
the P (PARK) position and the parking
brake is applied.
To turn the rear displays on or off from the rear seats:
1. Select the desired seat by sliding the DISPLAY SELECT
switch
4 on
the remote control to the L (Left) or R (Right) position.
2. Press the POWER
button 5 on the remote control.
To control the DVD from the rear seats, use the
remote control.
OPERATING TIPS
You can also connect auxiliary devices, such as
video games, camcorders or portable video players,
to the auxiliary jacks. (Your device will be controlled
through its own control panel.)
Rear Auxiliary Mode allows rear seat passengers to
independently display different sources on
each screen.
Use the headphones, also provided with the system,
to listen to audio wirelessly and independently.
For the best audio sound quality, please make sure
you are facing the monitor directly in front of you.
To reduce driver distraction, movies will not be
shown on the front display while the vehicle is in
any drive position.
For more information, refer to the “Monitor, climate, audio, phone and voice recognition systems (secti\
on 4)”
of your Owner’s Manual.
5 4
3
1
2
2460934_16b_Infiniti_QX60_QRG_031716_b.indd 233/17/16 2:22 PM
Page 26 of 40
24 SETTINGS
The setting mode allows you to change the information displayed in the v\
ehicle
information display:
Driver Assistance (if so equipped) Main Menu Selection Body Color Maintenance Alarms
Vehicle Settings Language Unit Welcome Effects
For more information, refer to the “Instruments and controls (section 2)” of your Owner’s Manual.
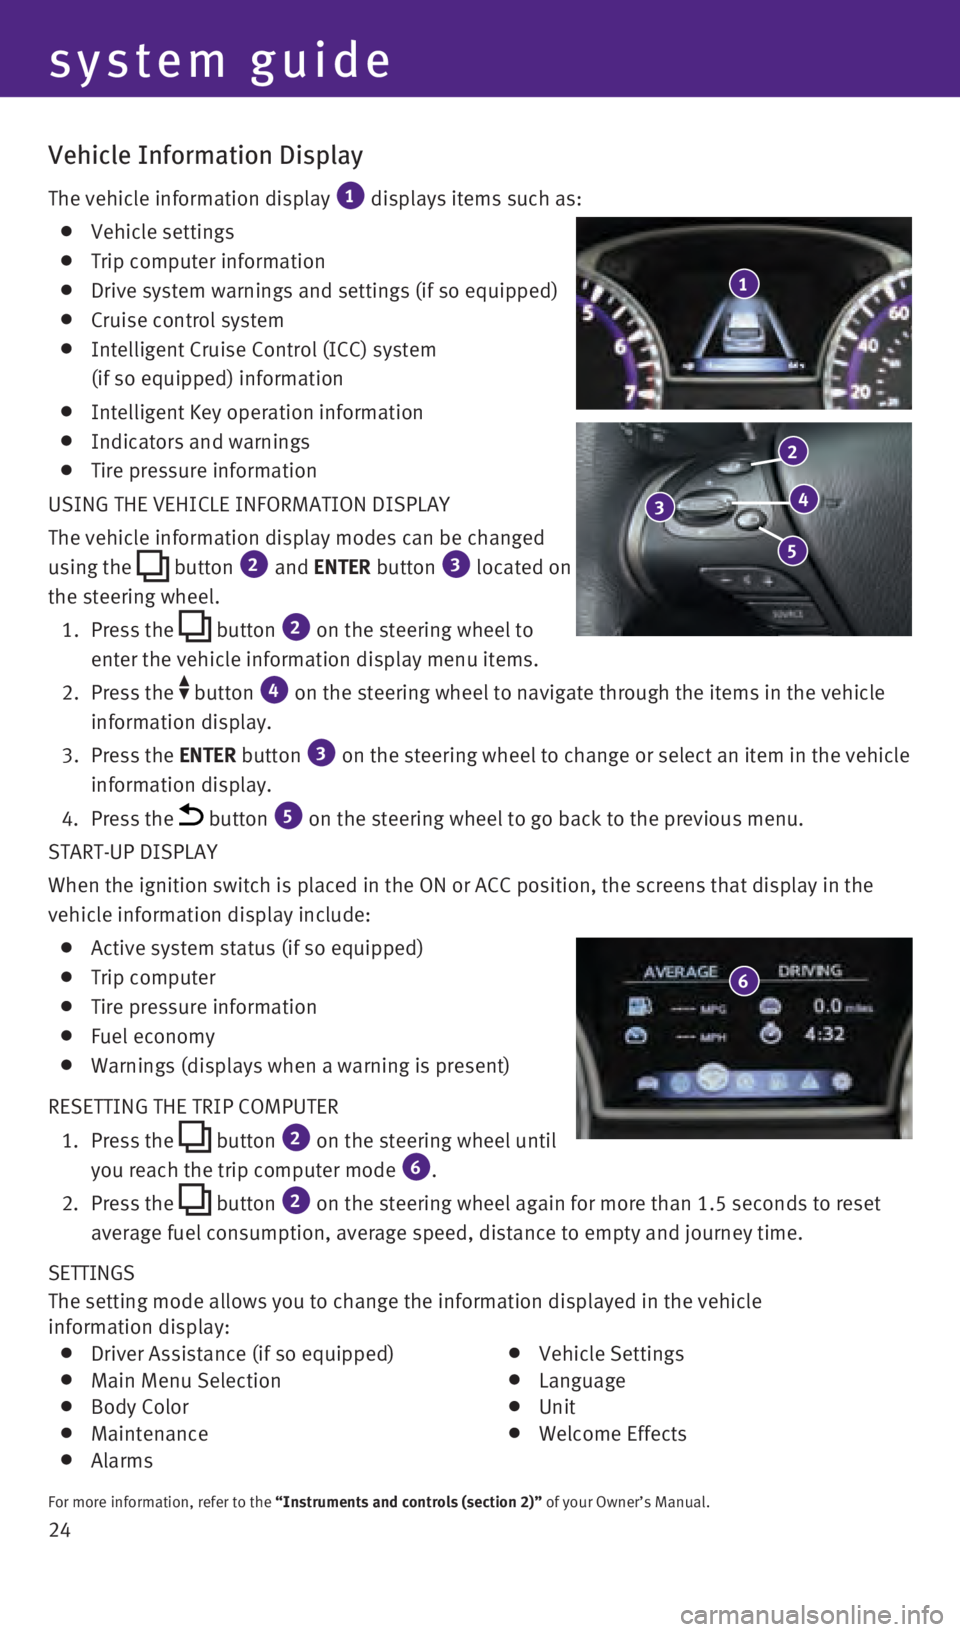
Vehicle Information Display
The vehicle information display 1 displays items such as:
Vehicle settings
Trip computer information
Drive system warnings and settings (if so equipped)
Cruise control system
Intelligent Cruise Control (ICC) system
(if so equipped) information
Intelligent Key operation information
Indicators and warnings
Tire pressure information
USING THE VEHICLE INFORMATION DISPLAY
The vehicle information display modes can be changed
using the
button 2 and ENTER button 3 located on
the steering wheel.
1.
Press
the
button 2 on the steering wheel to
enter the vehicle information display menu items.
2.
Press
the
button 4 on the steering wheel to navigate through the items in the vehicle
information display.
3.
Press
the ENTER button
3 on the steering wheel to change or select an item in the vehicle
information display.
4. Press the button 5 on the steering wheel to go back to the previous menu.
START-UP DISPLAY
When the ignition switch is placed in the ON or ACC position, the screen\
s that display in the
vehicle information display include:
Active system status (if so equipped)
Trip computer
Tire pressure information
Fuel economy
Warnings (displays when a warning is present)
RESETTING THE TRIP COMPUTER
1.
Press
the
button 2 on the steering wheel until
you reach the trip computer mode 6.
2. Press
the
button 2 on the steering wheel again for more than 1.5 seconds to reset
average fuel consumption, average speed, distance to empty and journey t\
ime.
1
system guide
3
2
4
5
6
2460934_16b_Infiniti_QX60_QRG_031716_b.indd 243/17/16 2:22 PM
Page 30 of 40
28
system guide
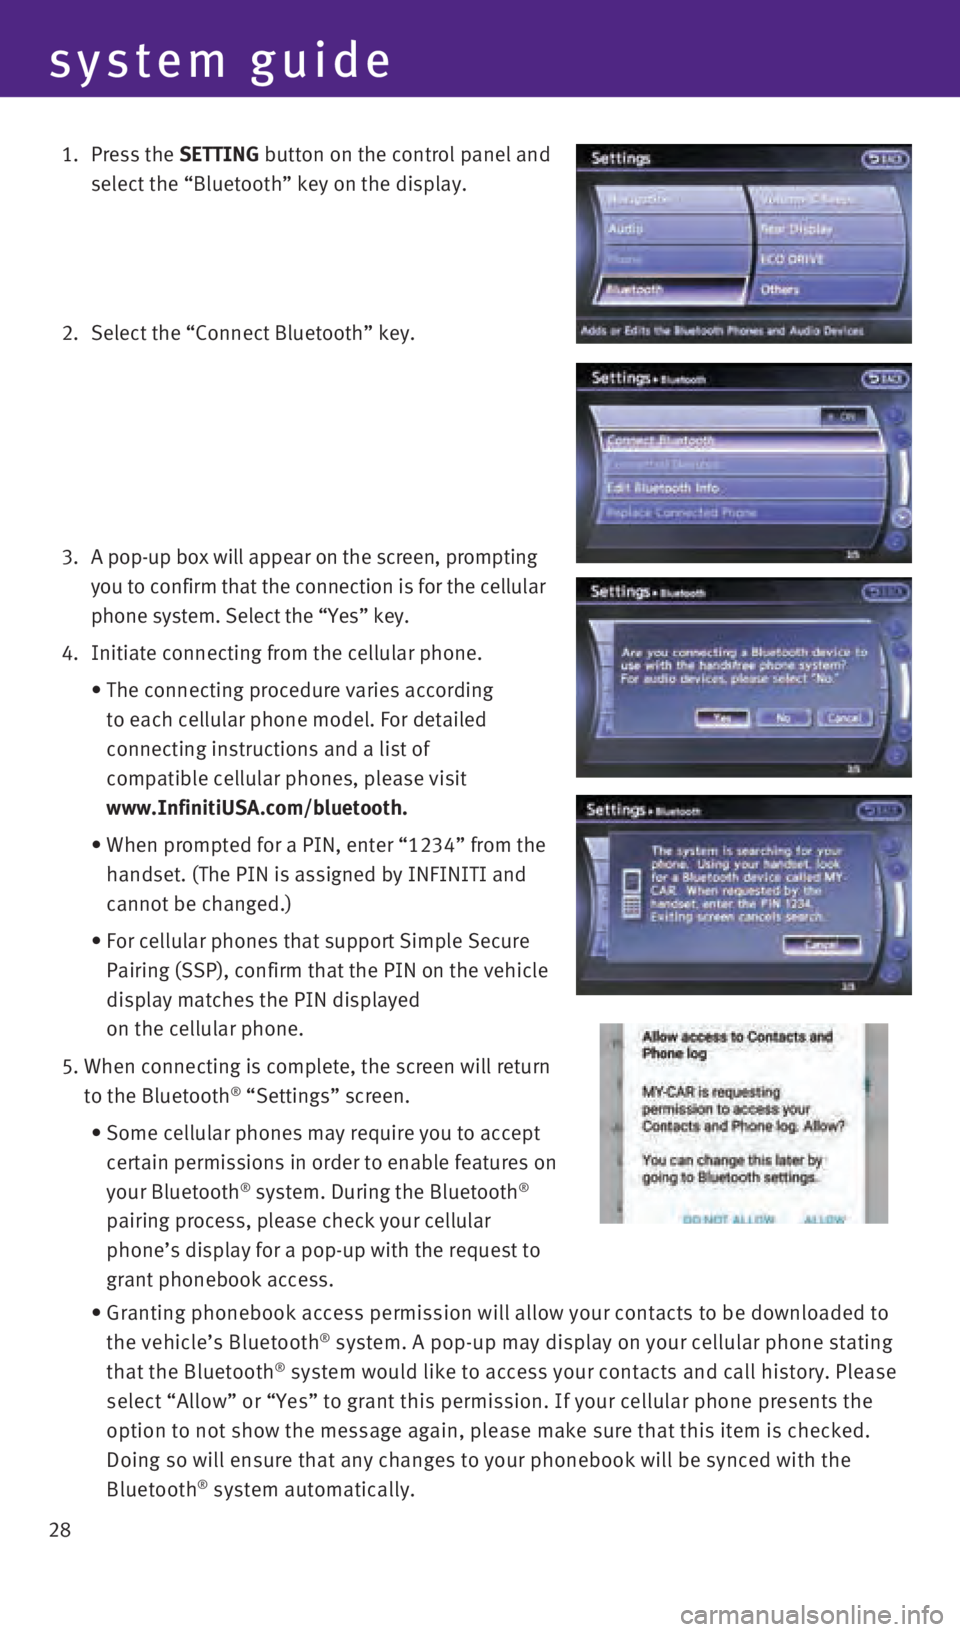
1. Press the SETTING button on the control panel and
select the “Bluetooth” key on the display.
2. Select the “Connect Bluetooth” key.
3.
A pop-up box will appear on the screen, prompting
you to confirm that the connection is for the cellular
phone system. Select the “Yes” key.
4. Initiate connecting from the cellular phone.
•
The connecting procedure varies according
to each cellular phone model. For detailed
connecting instructions and a list of
compatible cellular phones, please visit
www.InfinitiUSA.com/bluetooth.
•
When prompted for a PIN, enter “1234” from the
handset. (The PIN is assigned by INFINITI and
cannot be changed.)
•
For cellular phones that support Simple Secure
Pairing (SSP), confirm that the PIN on the vehicle
display matches the PIN displayed
on the cellular phone.
5. When connecting is complete, the screen will return
to the Bluetooth® “Settings” screen.
• Some cellular phones may require you to accept
certain permissions in order to enable features on
your Bluetooth
® system. During the Bluetooth®
pairing process, please check your cellular
phone’s display for a pop-up with the request to
grant phonebook access.
• Granting phonebook access permission will allow your contacts to be down\
loaded to
the vehicle’s Bluetooth® system. A pop-up may display on your cellular phone stating
that the Bluetooth® system would like to access your contacts and call history. Please
select “Allow” or “Yes” to grant this permission. If your ce\
llular phone presents the
option to not show the message again, please make sure that this item is\
checked.
Doing so will ensure that any changes to your phonebook will be synced w\
ith the
Bluetooth
® system automatically.
2460934_16b_Infiniti_QX60_QRG_031716_b.indd 283/17/16 2:23 PM
Page 31 of 40
29
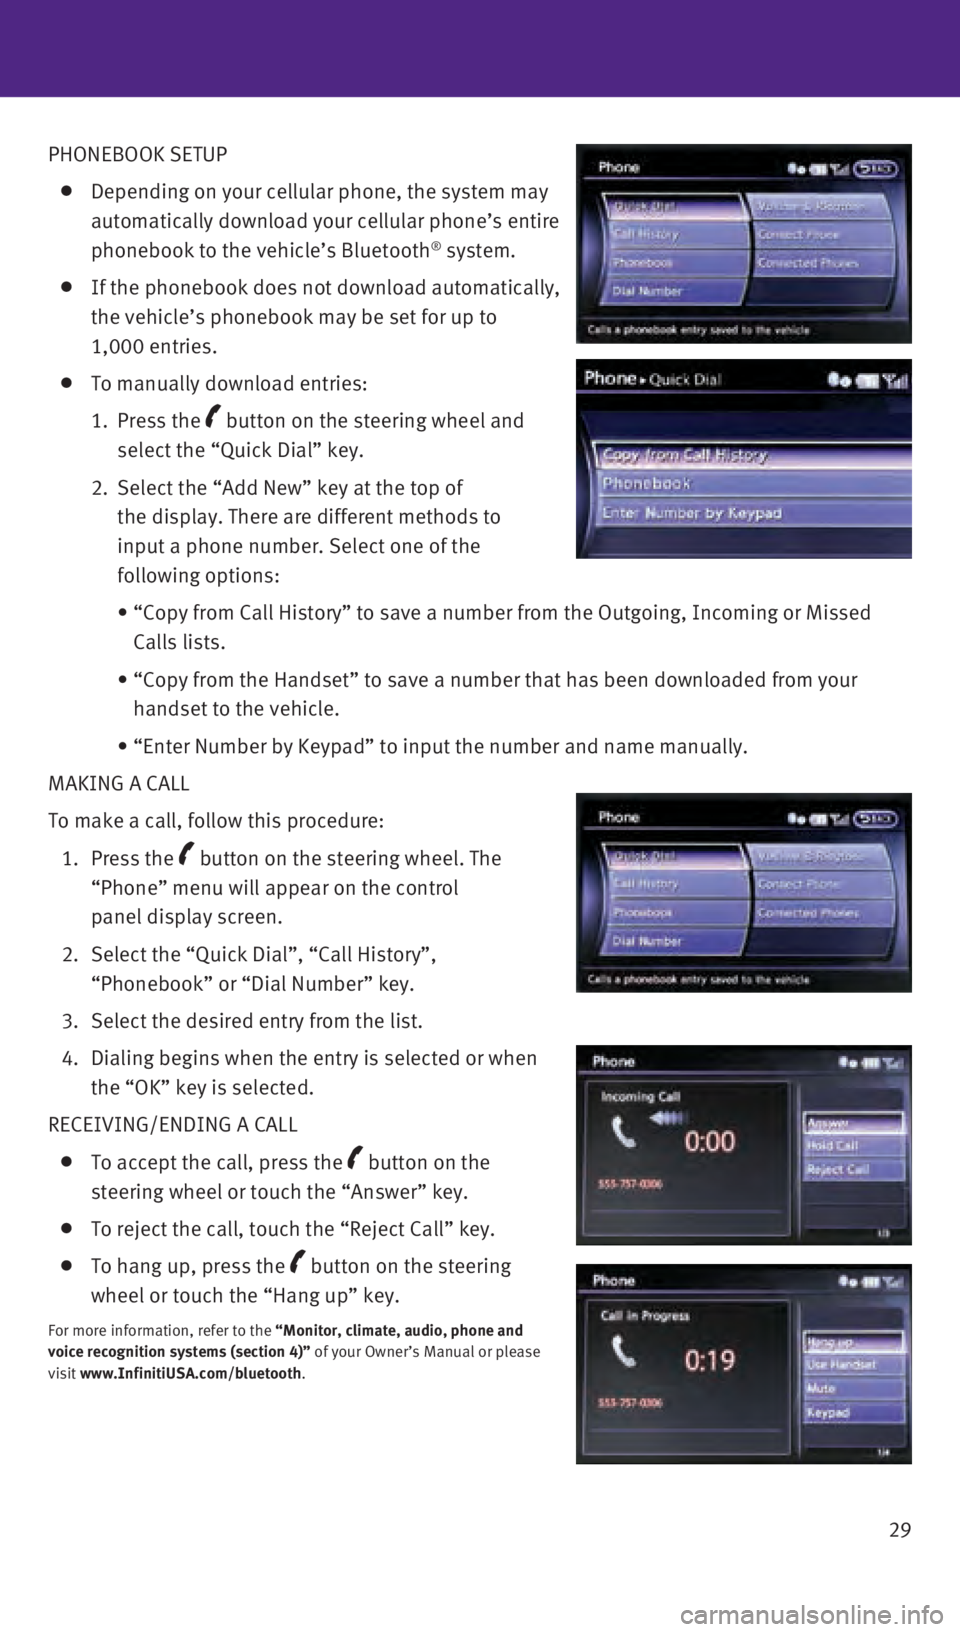
PHONEBOOK SETUP
Depending on your cellular phone, the system may
automatically download your cellular phone’s entire
phonebook to the vehicle’s Bluetooth
® system.
If the phonebook does not download automatically,
the vehicle’s phonebook may be set for up to
1,000 entries.
To manually download entries:
1.
Press
the
button on the steering wheel and
select the “Quick Dial” key.
2.
Select the “Add New” key at the top of
the display. There are different methods to
input a phone number. Select one of the
following options:
• “Copy from Call History” to save a number from the Outgoing, Incom\
ing or Missed
Calls lists.
• “Copy from the Handset” to save a number that has been downloaded \
from your
handset to the vehicle.
• “Enter Number by Keypad” to input the number and name manually.
MAKING A CALL
To make a call, follow this procedure:
1.
Press
the
button on the steering wheel. The
“Phone” menu will appear on the control
panel display screen.
2.
Select the “Quick Dial”, “Call History”,
“Phonebook” or “Dial Number” key.
3. Select the desired entry from the list.
4.
Dialing begins when the entry is selected or when
the “OK” key is selected.
RECEIVING/ENDING A CALL
To accept the call, press the button on the
steering wheel or touch the “Answer” key.
To reject the call, touch the “Reject Call” key.
To hang up, press the button on the steering
wheel or touch the “Hang up” key.
For more information, refer to the “Monitor, climate, audio, phone and
voice recognition systems (section 4)” of your Owner’s Manual or please
visit www.InfinitiUSA.com/bluetooth.
2460934_16b_Infiniti_QX60_QRG_031716_b.indd 293/17/16 2:23 PM
Page 32 of 40
30
system guide
Bluetooth® Streaming Audio with Navigation (if so equipped)
If you have a compatible Bluetooth® device with streaming audio (A2DP and AVRCP
profiles), you can set up the wireless connection between your Bluetoot\
h® device and your
vehicle’s audio system. This connection allows you to listen to audio\
from the Bluetooth®
device using your vehicle’s speakers.
A cellular telephone should not be used while driving so full attention \
may be given to
vehicle operation.*
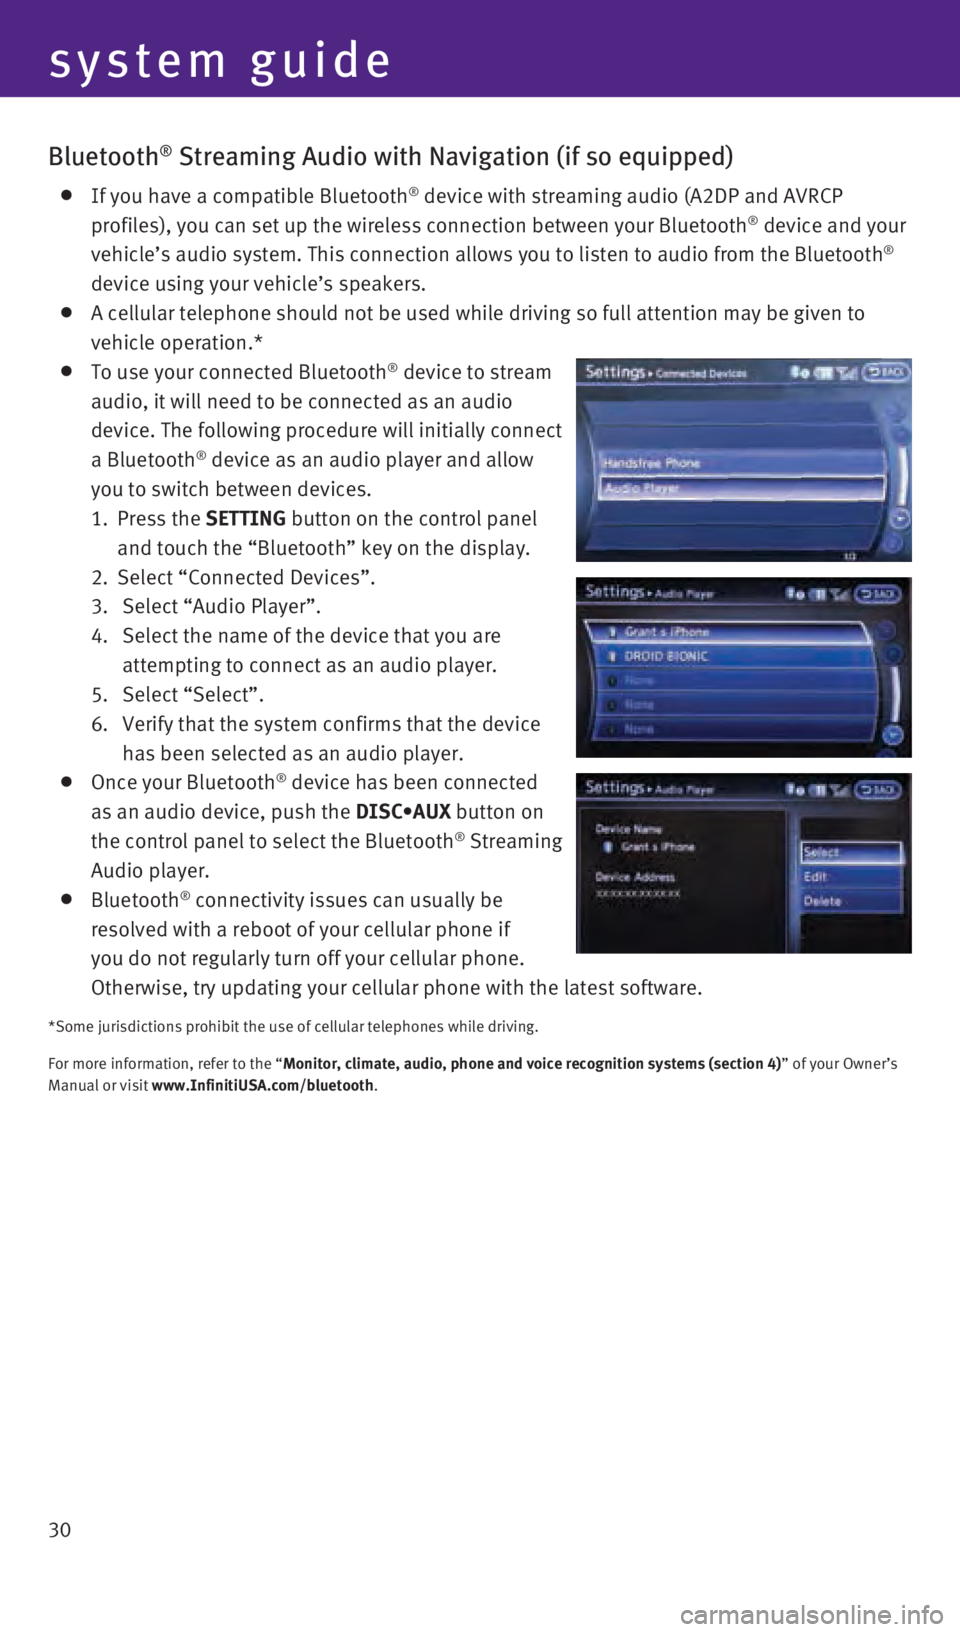
To use your connected Bluetooth® device to stream
audio, it will need to be connected as an audio
device. The following procedure will initially connect
a Bluetooth
® device as an audio player and allow
you to switch between devices.
1.
Press
the SETTING button on the control panel
and touch the “Bluetooth” key on the display.
2.
Select “Connected Devices”.
3.
Select “Audio Player”.
4. Select the name of the device that you are
attempting to connect as an audio player.
5.
Select “Select”.
6.
Verify that the system confirms that the device
has been selected as an audio player.
Once your Bluetooth® device has been connected
as an audio device, push the DISC•AUX button on
the control panel to select the Bluetooth
® Streaming
Audio player.
Bluetooth® connectivity issues can usually be
resolved with a reboot of your cellular phone if
you do not regularly turn off your cellular phone.
Otherwise, try updating your cellular phone with the latest software.
*Some jurisdictions prohibit the use of cellular telephones while drivin\
g.
For more information, refer to the “Monitor, climate, audio, phone and voice recognition systems (section 4\
) ” of your Owner’s
Manual or visit www.InfinitiUSA.com/bluetooth.
2460934_16b_Infiniti_QX60_QRG_031716_b.indd 303/17/16 2:23 PM
Page 33 of 40

31
2
3
46
8
17
10
7
1
Navigation System (if so equipped)
Your Navigation System can calculate a route from your current location \
to a preferred
destination. The real-time map display and turn-by-turn voice guidance w\
ill lead you along
the route.
The Navigation System will continually update your vehicle’s position\
. If you have deviated
from the original route, it will recalculate the route from your current\
location.
SYSTEM OPERATION
Move through the menus and on-screen keys by sliding or rotating the Inf\
initi controller 1 to highlight an item on the screen and pressing the ENTER button 2 to select the
highlighted item, or touch the desired key on the touch-screen display.
Press the BACK button 3 to return to the previous screen. In a settings screen, this
button can also be used to apply the setting. In a character input scree\
n, this button can
also delete the characters that have been entered.
Press the MAP button 4 to display the map. While following a programed route, press
multiple times to change the type of route information.
To display the vehicle, traffic (if so equipped), weather (if so equi\
pped) or Voice
Recognition information, press the INFO (information) button 5.
Press the OFF button 6 to switch between the day screen (bright) and the night
screen (dark). Press and hold the button to turn the display off. Pres\
s again to turn the
display on.
To display system settings, press the SETTING button 7.
5
2460934_16b_Infiniti_QX60_QRG_031716_b.indd 313/17/16 2:23 PM
Page 34 of 40

32
SETTING A ROUTE
To set a route, first ensure that the correct region is selected on the \
touch-screen.
1. Press the DEST
button
8 on the control panel.
2. Select the “Change Region” key 9.
3. Select the preferred region.
Once this is complete, select your destination:
1. Press the DEST
button
8 on the control panel.
2. Select the preferred destination setting method.
3.
Enter the address number, street name, and city
as prompted by the screen.
CANCELING A ROUTE
1. Press the ROUTE
button
10 on the control panel.
2. Select the “Cancel Route” key 11.
MOVING AROUND THE MAP
To scroll the map, slide the Infiniti controller 1 in
the direction you want to scroll.
CHANGING THE MAP VIEW
It is possible to switch between two different map views: 2D and bird’\
s-eye view (3D).
To switch to the preferred map view:
1.
With the map displayed, press the ENTER
button
2 on the control panel.
2.
Select the “Change View” key 12 to change the
view to 2D or bird’s-eye view (3D).
3.
Select the “Map Settings” key 13 to change the
orientation of the map.
VOICE GUIDANCE
To activate voice guidance:
1. Press the ROUTE
button
10 on the control panel.
2.
Select the “Guidance Settings” key 14.
3.
To ensure that voice guidance is activated, select
the “Guidance Voice” key 15. The indicator
illuminates if voice guidance is activated.
To adjust the guidance volume, select the
“Guidance Volume” key 16.
To hear the current guidance during a programed
route, press the VOICE button 17.
For more information, refer to your Navigation System Owner’s Manual.\
11
14
12
13
15
16
9
system guide
2460934_16b_Infiniti_QX60_QRG_031716_b.indd 323/17/16 2:24 PM