2016 INFINITI QX60 HYBRID key
[x] Cancel search: keyPage 14 of 40

12
Power Liftgate
When the liftgate is closed and locked, the liftgate
will open automatically by:
• Pushing the power liftgate switch 1 on the
instrument panel.
• Pushing the liftgate opener switch 2; the
liftgate must be unlocked, or you must have the
Intelligent Key with you (that is, in your pocket
or purse).
• Pressing the button 3 on the
Infiniti Intelligent Key for more than
1 second.
The power liftgate operation can be
turned on or off by the power liftgate
main switch
4 on the instrument panel.
• When the power liftgate main switch4 is pushed
to the OFF position, power operation is not
available using the liftgate close switch
5 or the
liftgate opener switch
2.
For more information, refer to the “Pre-driving checks and adjustments
(section 3)” of your Owner’s Manual.
2
53
To control the DVD from the rear seats, use the
remote control.
OPERATING TIPS
You can also connect auxiliary devices, such as
video games, camcorders or portable video players,
to the auxiliary jacks. (Your device will be controlled
through its own control panel.)
Rear Auxiliary Mode allows rear seat passengers to
independently display different sources on each screen.
Use the headphones, also provided with the system,
to listen to audio wirelessly and independently.
For the best audio sound quality, please make sure
you are facing the monitor directly in front of you.
To reduce driver distraction, movies will not be
shown on the front display while the vehicle is in
any drive position.
For more information, refer to the “Monitor, climate, audio, phone and voice recognition systems (section 4\
) ” of your
Owner’s Manual.
first drive features
41
Page 17 of 40

15
Automatic Drive Positioner (if so equipped)
Two positions for the driver’s seat, steering column
and outside mirrors can be stored in the automatic
drive positioner
1 memory.
Follow this procedure to set the memory positions:
• Confirm the shift lever is in the P (PARK) position.
• Push the ignition switch to the ON position.
• Adjust the driver’s seat, steering column and
outside mirrors to the desired positions using the adjusting switches fo\
r each feature.
• Push the SET switch, and within 5 seconds, push the memory switch (
1 or 2).
• The indicator light on the memory switch you select will illuminate for \
approximately 5
seconds, and a chime will sound (if so equipped) when the memory is st\
ored correctly.
• The driver’s seat, steering column and outside mirror positions are n\
ow set to
your preferences.
These memorized positions can also be linked to your Infiniti Intelligen\
t Key. To link a
memorized position to your Infiniti Intelligent Key, press the unlock bu\
tton on the key fob
after completing the previous step.
For more information, refer to the “Pre-driving checks and adjustments (section 3)” of your Owner’s Manual.
Outside Mirror Control Switch
To select the right or left side mirror, move the
control switch
1 right or left.
Adjust each mirror to the desired position using the
control switch
2.
To fold the outside rearview mirrors, push the
control switch
3 to the position. To unfold the
outside rearview mirrors, push the control switch
3 to the position.
REVERSE TILT-DOWN FEATURE (if so equipped)
The reverse tilt-down feature will turn both outside mirror surfaces dow\
nward to provide
better rear visibility close to the vehicle.
1. Push the ignition switch to the ON position.
2. Choose the right or left outside mirror by operating the control switch \
1.
3. Move the shift lever to the R (REVERSE) position.
4. The outside mirror surfaces will move downward. (The control switch 1 must be out of
the center [neutral] position.)
The outside mirror surfaces will return to their original positions when\
one of the following
conditions has occurred:
• The shift lever is moved to any position other than R (REVERSE).
• The control switch 1 is set to the center (neutral) position.
• The ignition switch is placed in the OFF position.
For more information, refer to the “Pre-driving checks and adjustments (section 3)” of your Owner’s Manual.
1
2
1
3
Page 18 of 40

16
Headlight Control Switch
HEADLIGHT CONTROL
Turn the headlight control switch to the
position
1 to turn on the front parking, tail, license
plate and instrument panel lights. Turn the switch to
the
position 2 to turn on the headlights.
AUTOLIGHT SYSTEM
The autolight system will automatically turn the
headlights on when it is dark and off when it is light.
The system will keep the headlights on for a period
of time after you turn the ignition off and all doors
are closed.
To activate the autolight system, turn the headlight
control switch to the AUTO position
3then push
the ignition switch to ON. To deactivate the autolight
system, turn the headlight control switch to the OFF,
position 1 or position 2.
HIGH BEAM SELECT
With the headlights ON (either in the AUTO or position), push the headlight control
switch forward
4 to select the high beam function. The blue indicator light will
illuminate in the instrument panel. Pull the headlight switch back to th\
e original position
to select the low beam. The blue indicator light will extinguish.
Pull and release the headlight control switch 5 to flash the headlight high beams on
and off.
first drive features
Starting/Stopping the Hybrid System
It is important to make sure the Infiniti Intelligent
Key is with you (that is, in your pocket or purse).
Depress the brake pedal.
Press the ignition switch START/STOP button to
start the hybrid system.
TURNING THE HYBRID SYSTEM OFF
Move the shift lever to the P (PARK) position and
apply the parking brake.
Press the ignition switch START/STOP button to turn the hybrid system off.
For more information, refer to the “Starting and driving (section 5)” of your Owner’s Manual.
3
1
2
4
5
Page 26 of 40
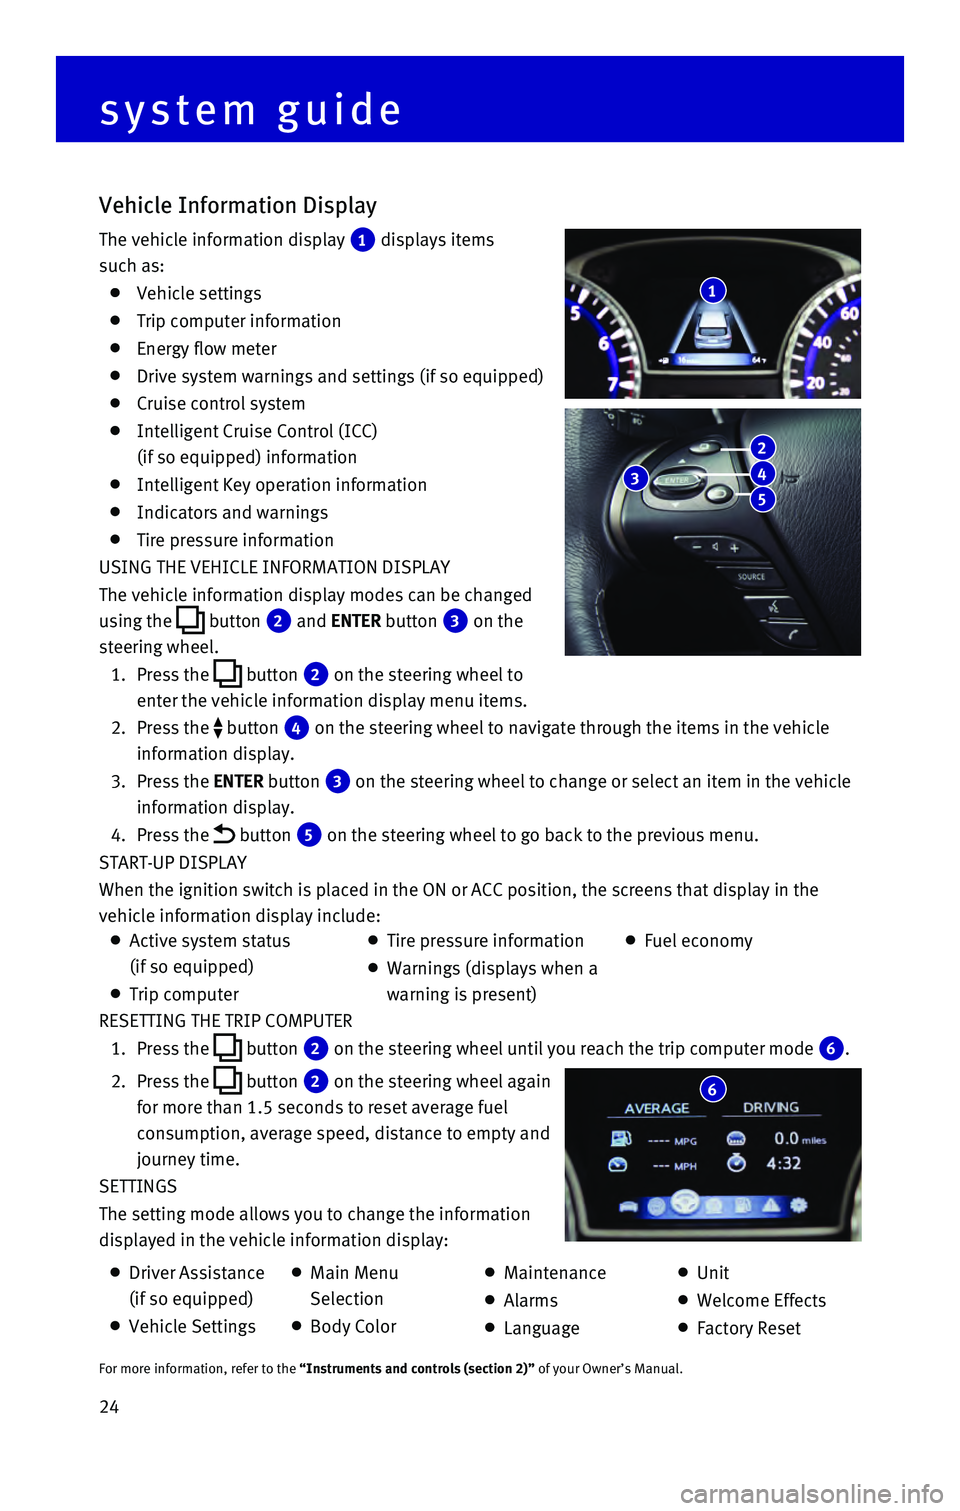
24 RESETTING THE TRIP COMPUTER
1. Press the button 2 on the steering wheel until you reach the trip computer mode 6.
2. Press the button 2 on the steering wheel again
for more than 1.5 seconds to reset average fuel
consumption, average speed, distance to empty and
journey time.
SETTINGS
The setting mode allows you to change the information
displayed in the vehicle information display:
Vehicle Information Display
The vehicle information display 1 displays items
such as:
Vehicle settings
Trip computer information
Energy flow meter
Drive system warnings and settings (if so equipped)
Cruise control system
Intelligent Cruise Control (ICC)
(if so equipped) information
Intelligent Key operation information
Indicators and warnings
Tire pressure information
USING THE VEHICLE INFORMATION DISPLAY
The vehicle information display modes can be changed
using the
button 2 and ENTER button 3 on the
steering wheel.
1. Press the button 2 on the steering wheel to
enter the vehicle information display menu items.
2. Press the button 4 on the steering wheel to navigate through the items in the vehicle
information display.
3. Press the ENTER button 3 on the steering wheel to change or select an item in the vehicle
information display.
4. Press the button 5 on the steering wheel to go back to the previous menu.
START-UP DISPLAY
When the ignition switch is placed in the ON or ACC position, the screen\
s that display in the
vehicle information display include:
1
system guide
6
Active system status
(if so equipped)
Trip computer
Tire pressure information
Warnings (displays when a
warning is present)
Fuel economy
Driver Assistance
(if so equipped)
Vehicle Settings
Main Menu
Selection
Body Color
Maintenance
Alarms
Language
Unit
Welcome Effects
Factory Reset
For more information, refer to the “Instruments and controls (section 2)” of your Owner’s Manual.
3
2
4
5
Page 29 of 40
27
5. The system will speak the transferred entry. Confirm the entry by saying\
“Yes” after
the tone.
MAKING A CALL BY PHONEBOOK ENTRY
In some cases, names stored using all UPPERCASE letters may not be recog\
nized by the
Voice Recognition system.
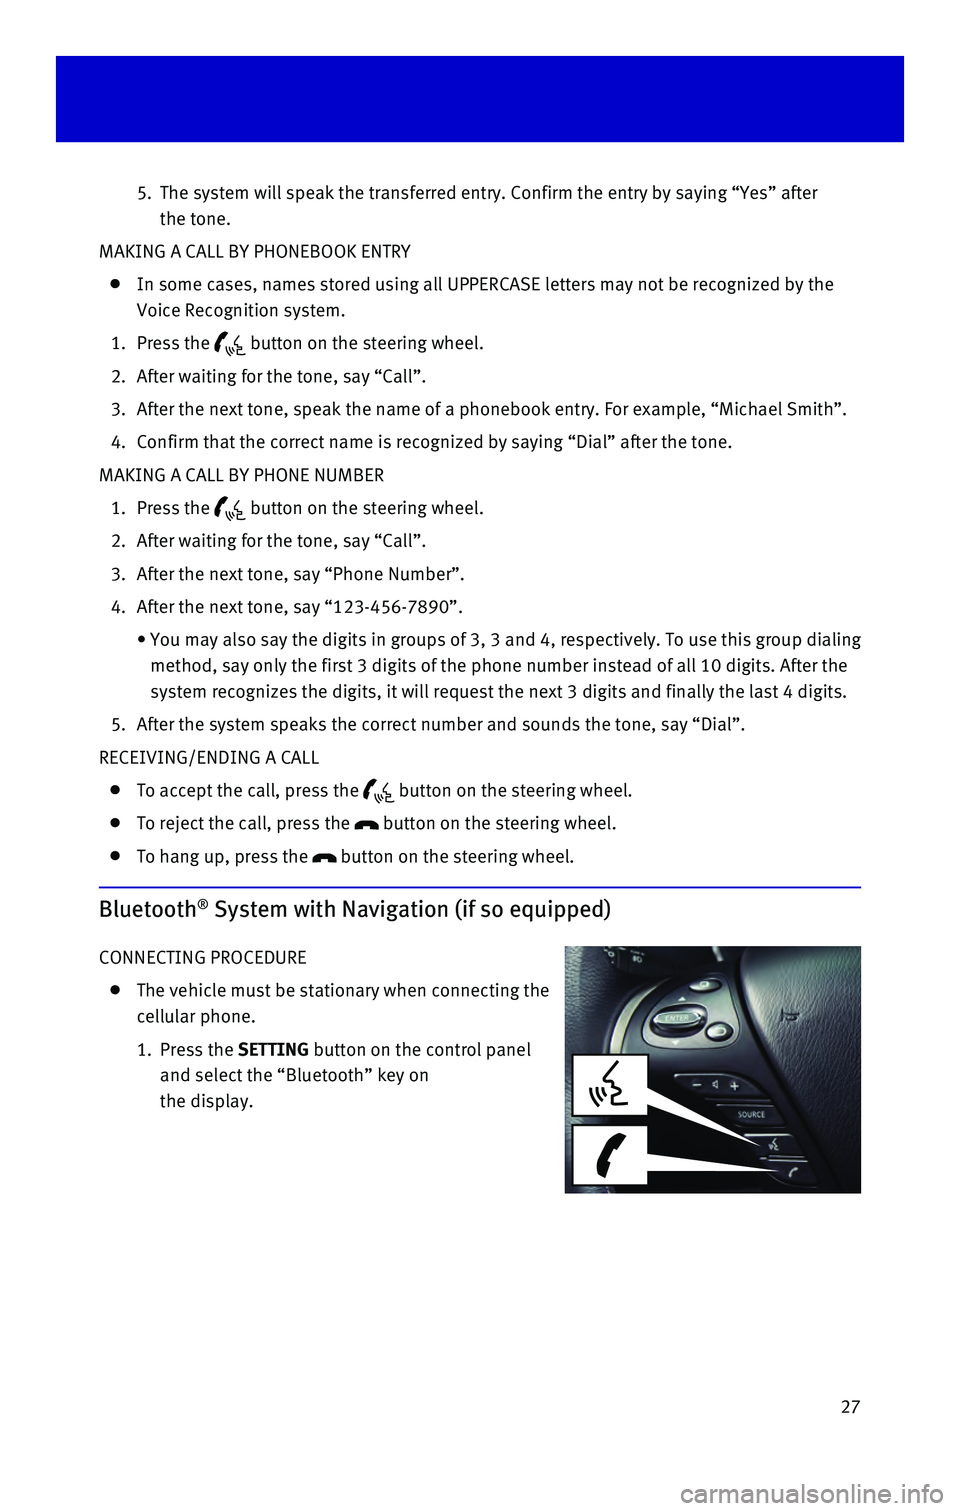
1. Press the button on the steering wheel.
2. After waiting for the tone, say “Call”.
3. After the next tone, speak the name of a phonebook entry. For example, “\
Michael Smith”.
4. Confirm that the correct name is recognized by saying “Dial” after\
the tone.
MAKING A CALL BY PHONE NUMBER
1. Press the button on the steering wheel.
2. After waiting for the tone, say “Call”.
3. After the next tone, say “Phone Number”.
4. After the next tone, say “123-456-7890”.
• You may also say the digits in
groups of 3, 3 and 4, respectively. To use this group dialing
method, say only the first 3 digits of the phone number instead of all 1\
0 digits. After the
system recognizes the digits, it will request the next 3 digits and fina\
lly the last 4 digits.
5. After the system speaks the correct number and sounds the tone, say “\
Dial”.
RECEIVING/ENDING A CALL
To accept the call, press the button on the steering wheel.
To reject the call, press the button on the steering wheel.
To hang up, press the button on the steering wheel.
Bluetooth® System with Navigation (if so equipped)
CONNECTING PROCEDURE
The vehicle must be stationary when connecting the
cellular phone.
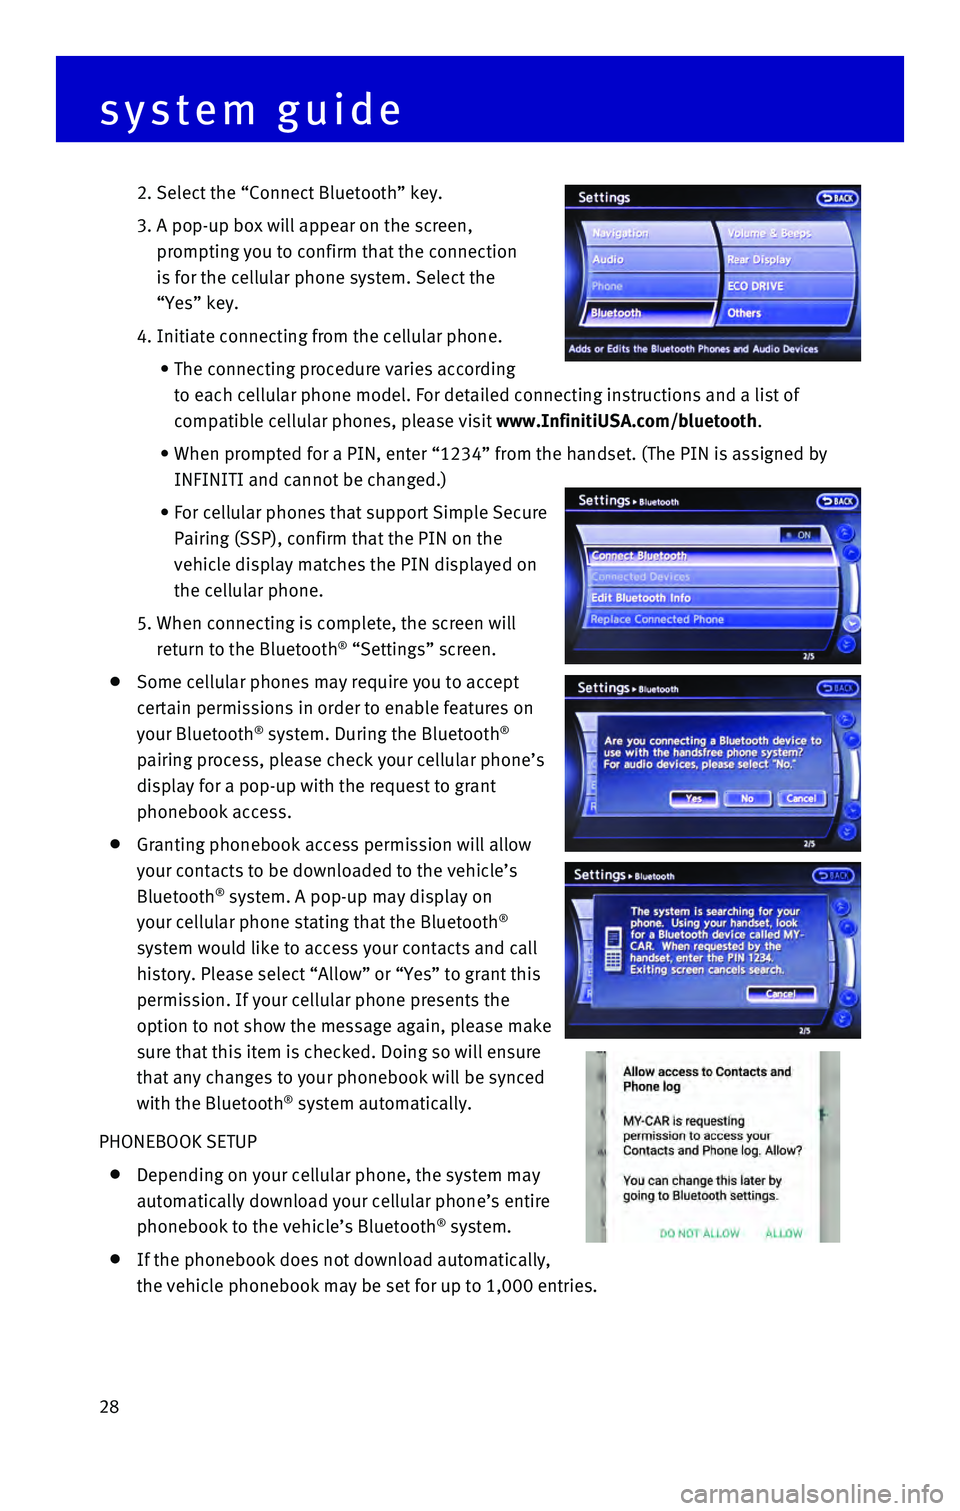
1. Press the SETTING
button on the control panel
and select the “Bluetooth” key on
the display.
Page 30 of 40
28
2. Select the “Connect Bluetooth” key.
3. A pop-up box will appear on the screen,
prompting you to confirm that the connection
is for the cellular phone system. Select the
“Yes” key.
4. Initiate connecting from the cellular phone.
• The connecting procedure varies according
to each cellular phone model. For detailed connecting instructions and a\
list of
compatible cellular phones, please visit www.InfinitiUSA.com/bluetooth.
• When prompted for a PIN, enter “1234” from the handset. (The PIN \
is assigned by
INFINITI and cannot be changed.)
• For cellular phones that support Simple Secure
Pairing (SSP), confirm that the PIN on the
vehicle display matches the PIN displayed on
the cellular phone.
5. When connecting is complete, the screen will
return to the Bluetooth® “Settings” screen.
Some cellular phones may require you to accept
certain permissions in order to enable features on
your Bluetooth
® system. During the Bluetooth®
pairing process, please check your cellular phone’s
display for a pop-up with the request to grant
phonebook access.
Granting phonebook access permission will allow
your contacts to be downloaded to the vehicle’s
Bluetooth
® system. A pop-up may display on
your cellular phone stating that the Bluetooth®
system would like to access your contacts and call
history. Please select “Allow” or “Yes” to grant this
permission. If your cellular phone presents the
option to not show the message again, please make
sure that this item is checked. Doing so will ensure
that any changes to your phonebook will be synced
with the Bluetooth
® system automatically.
PHONEBOOK SETUP
Depending on your cellular phone, the system may
automatically download your cellular phone’s entire
phonebook to the vehicle’s Bluetooth
® system.
If the phonebook does not download automatically,
the vehicle phonebook may be set for up to 1,000 entries.
system guide
Page 31 of 40
29
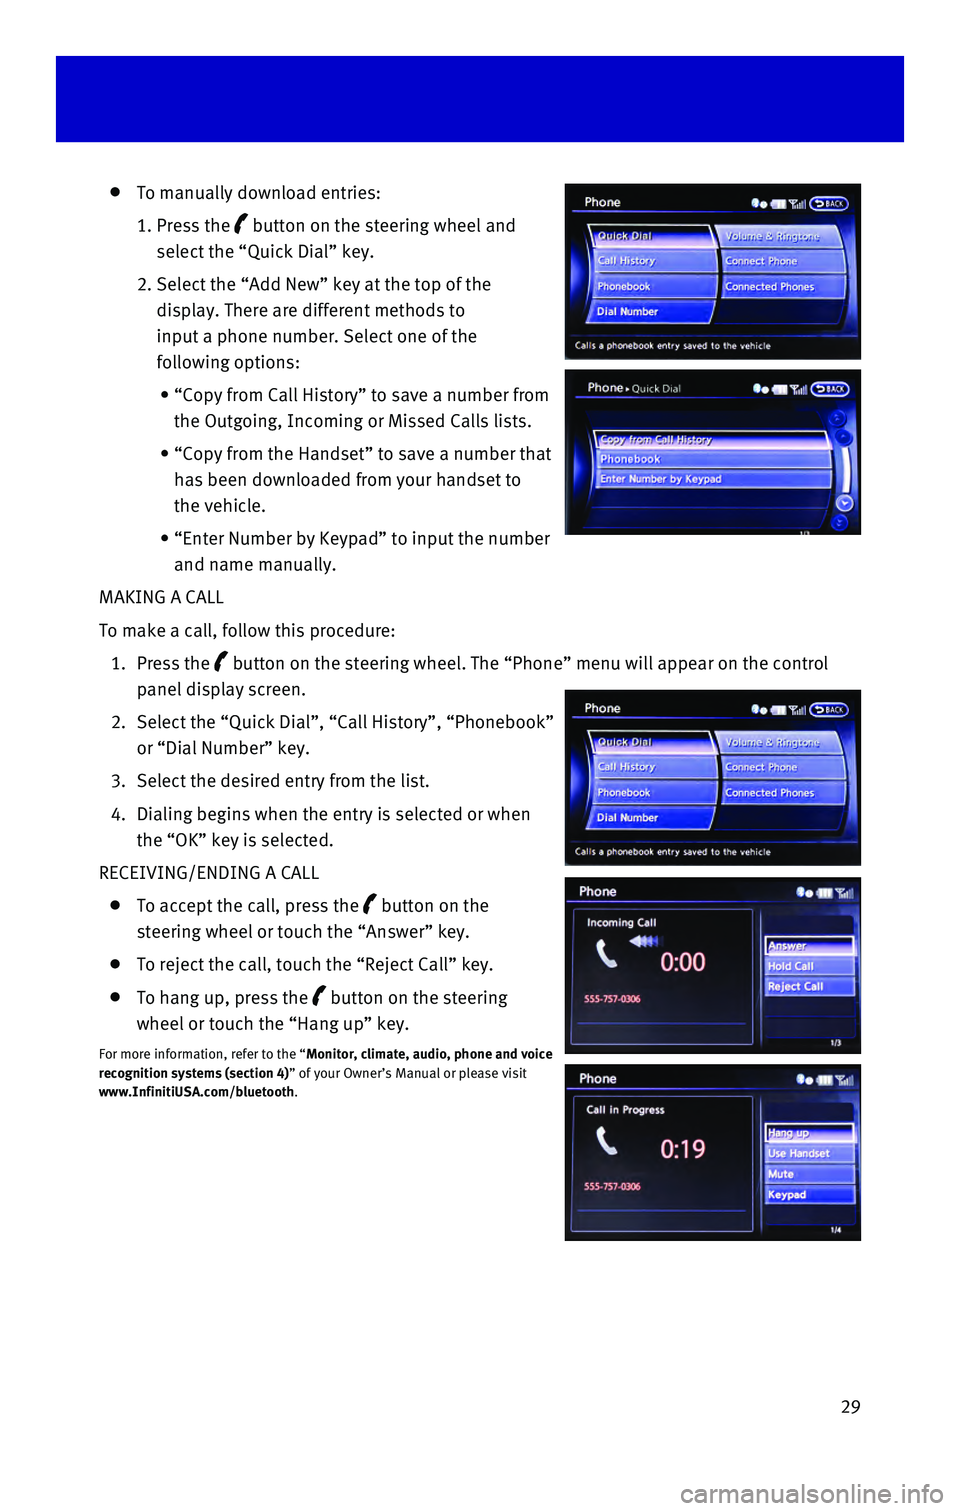
To manually download entries:
1. Press the button on the steering wheel and
select the “Quick Dial” key.
2. Select the “Add New” key at the top of the
display. There are different methods to
input a phone number. Select one of the
following options:
• “Copy from Call History” to save a number from
the Outgoing, Incoming or Missed Calls lists.
• “Copy from the Handset” to save a number that
has been downloaded from your handset to
the vehicle.
• “Enter Number by Keypad” to input the number
and name manually.
MAKING A CALL
To make a call, follow this procedure:
1. Press the button on the steering wheel. The “Phone” menu will appear on the\
control
panel display screen.
2. Select the “Quick Dial”, “Call History”, “Phonebook”
or “Dial Number” key.
3. Select the desired entry from the list.
4. Dialing begins when the entry is selected or when
the “OK” key is selected.
RECEIVING/ENDING A CALL
To accept the call, press the button on the
steering wheel or touch the “Answer” key.
To reject the call, touch the “Reject Call” key.
To hang up, press the button on the steering
wheel or touch the “Hang up” key.
For more information, refer to the “Monitor, climate, audio, phone and voice
recognition systems (section 4)” of your Owner’s Manual or please visit
www.InfinitiUSA.com/bluetooth.
Page 32 of 40
30
Bluetooth® Streaming Audio with Navigation (if so equipped)
If you have a compatible Bluetooth® device with streaming audio (A2DP and AVRCP
profiles), you can set up the wireless connection between your Bluetoot\
h® device and your
vehicle’s audio system. This connection allows you to listen to audio\
from the Bluetooth®
device using your vehicle’s speakers.
A cellular telephone should not be used while driving so full attention \
may be given to
vehicle operation.*
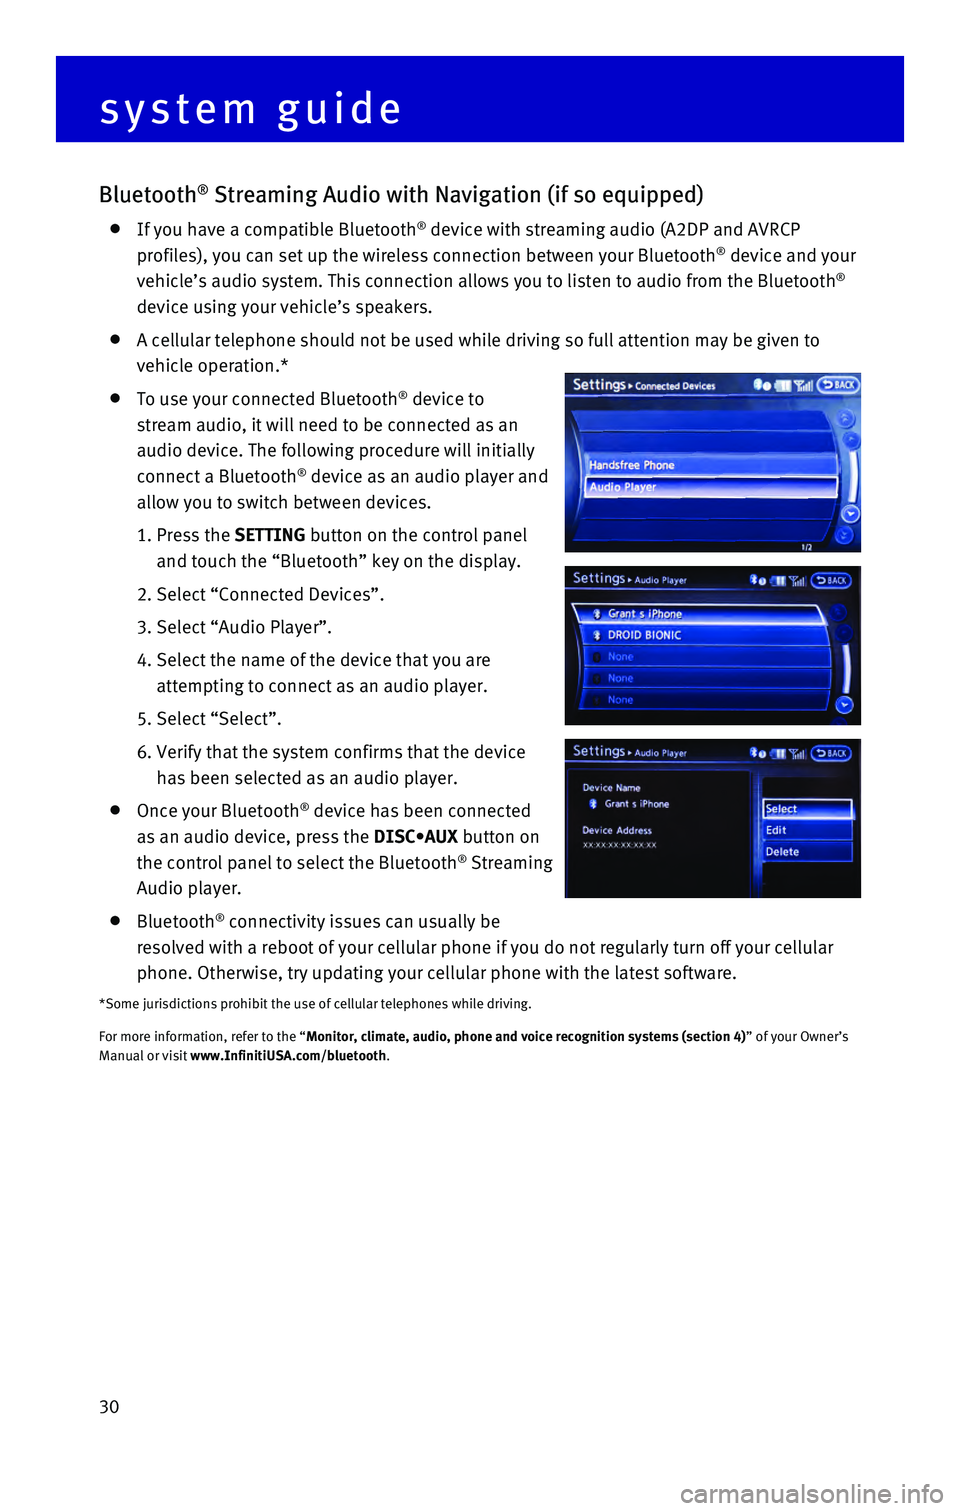
To use your connected Bluetooth® device to
stream audio, it will need to be connected as an
audio device. The following procedure will initially
connect a Bluetooth
® device as an audio player and
allow you to switch between devices.
1. Press the SETTING button on the control panel
and touch the “Bluetooth” key on the display.
2. Select “Connected Devices”.
3. Select “Audio Player”.
4. Select the name of the device that you are
attempting to connect as an audio player.
5. Select “Select”.
6. Verify that the system confirms that the device
has been selected as an audio player.
Once your Bluetooth® device has been connected
as an audio device, press the DISC•AUX button on
the control panel to select the Bluetooth
® Streaming
Audio player.
Bluetooth® connectivity issues can usually be
resolved with a reboot of your cellular phone if you do not regularly tu\
rn off your cellular
phone. Otherwise, try updating your cellular phone with the latest softw\
are.
*Some jurisdictions prohibit the use of cellular telephones while drivin\
g.
For more information, refer to the “Monitor, climate, audio, phone and voice recognition systems (section 4\
) ” of your Owner’s
Manual or visit www.InfinitiUSA.com/bluetooth.
system guide