2016 INFINITI Q50 ECO mode
[x] Cancel search: ECO modePage 6 of 36

4
Tire Pressure Monitoring System (TPMS) with Tire Inflation Indicator
A Flat Tire Visit Dealer or Tire Pressure Low —
Add Air warning message will appear in the vehicle
information display
1 and the low tire pressure
warning light 2 will illuminate when one or more
tires are low in pressure and air is needed.
•
The tire pressures should be checked when
the tires are cold. The tires are considered cold
after the vehicle has been parked for 3 hours
or more or driven less than 1 mi (1.6 km) at
moderate speeds.
When adding air to an under-inflated tire, the TPMS
with Tire Inflation Indicator provides visual and
audible signals to help you inflate the tire to the recommended COLD tir\
e pressure.
To use the Tire Inflation Indicator:
1.
Move the shift lever to the
P (PARK) position and apply the parking brake.
2.
Place the ignition switch in the ON position. Do not start the engine.
3.
Add air to the under-inflated tire, and within a few seconds, the hazard\
warning lights will
start flashing.
4.
When the designated tire pressure is reached, the horn will beep once an\
d the hazard
warning flashers will stop flashing.
5.
Repeat this procedure for any additional under-inflated tires.
After tire pressures are adjusted, drive the vehicle at speeds above 16 \
mph (25 km/h). The
Flat Tire Visit Dealer or Tire Pressure Low — Add Air warning message and low tire pressure
warning light
2 will extinguish.
When the low tire pressure warning light 2 flashes for 1 minute and then remains on, the
TPMS is not functioning properly. Have the system checked. It is recomme\
nded you visit
an INFINITI retailer.
Tire pressure rises and falls depending on the heat caused by the vehicl\
e’s operation and
the outside temperature. Low outside temperature can lower the temperatu\
re of the air
inside the tire, which can cause a lower tire inflation pressure. This m\
ay cause the low tire
pressure warning light
2 to illuminate. If the warning light illuminates, check the tire
pressure in your tires.
•
Check the tire pressure (including the spare tire) often and always pr\
ior to long
distance trips.
The Tire and Loading Information label contains valuable information. Pl\
ea se refer to
the “Technical and consumer information (section 10)” of your Ow\
ner’s Manual for the
location of the Tire and Loading Information label.
For more information, refer to the “Instruments and controls (section 2)”, the “Starting and driving (section 5)” and the
“Maintenance and Do-it-yourself (section 8)” of your Owner’s Manual.
essential information
1
2
1967179_16b_Q50_US_QRG_012916.indd 41/29/16 1:51 PM
Page 17 of 36

15
Heated Seats (if so equipped)
There are two ways to operate the heated seats:
1. Push the heated seat switch 1.
•
Every push of the switch allows you to
cycle through the five different modes of
“AUTO”, “High”, “Mid”, “Low” and “OFF”.
2
.
While on the “CLIMATE” screen on the lower
display, touch the left or right heated seat icon
2.
•
The “Left Heater Settings” or “Right Heater
Settings” screen is displayed with a list of the
five different modes of “AUTO”, “High”, “Mid”,
“Low” and “OFF”.
•
The indicator light on the heated seat switch 1
will illuminate when the system is in “AUTO”, “High”, “Mi\
d” or “Low”.
•
While in “AUTO”, the heated seats will turn on and off automatical\
ly depending on
temperature conditions in the vehicle compartment.
•
To view which of the five modes the system is in, press the CLIMATE
button
3. This
will bring up the “CLIMATE” screen on the lower display. From here\
, you will see the
heated seat icons
2 for the driver’s and passenger’s side, and below the icon is the \
mode the system is in currently.
For more information, refer to the “Heater and air conditioner (section 3)” of your InTouch Owner’s Manual.
2 2
3
1 1
Automatic Drive Positioner (if so equipped)
Two positions for the driver’s seat, steering column
and outside mirrors can be stored in the automatic
drive positioner memory.
Follow this procedure to set the memory positions:
•
Confirm the shift lever is in the
P (PARK) position.
•
Adjust the driver’s seat, steering column and
outside mirrors to the desired positions using the adjusting switches fo\
r each feature.
•
Push the
SET switch, and within 5 seconds, push the memory switch (1 or 2) for at
least 1 second.
•
The indicator light on the memory switch you select will illuminate for \
approximately
5 seconds and a buzzer will sound.
•
The driver’s seat, steering column and outside mirror positions are n\
ow set to
your preferences.
For more information, refer to the “Pre-driving checks and adjustments (section 3)” of your Owner’s Manual.
1967179_16b_Q50_US_QRG_012916.indd 151/29/16 1:53 PM
Page 25 of 36

23
Intelligent Cruise Control (ICC) (if so equipped)
VEHICLE-TO-VEHICLE DISTANCE CONTROL MODE
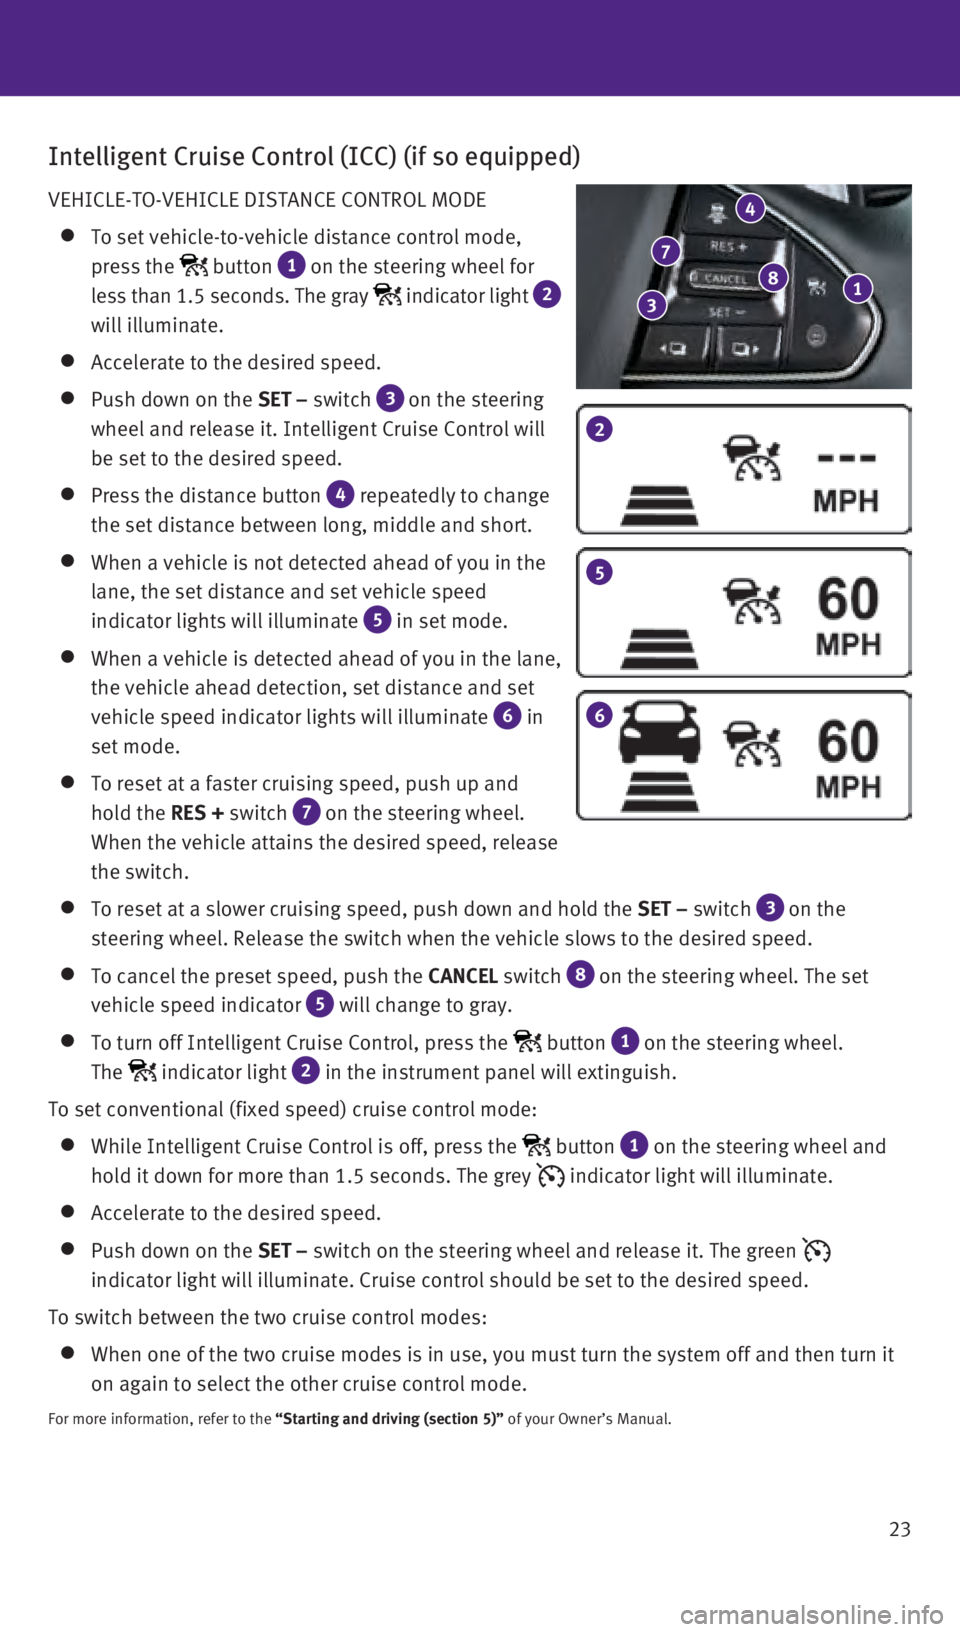
To set vehicle-to-vehicle distance control mode,
press the
button 1 on the steering wheel for
less than 1.5 seconds. The gray
indicator light 2
will illuminate.
Accelerate to the desired speed.
Push down on the SET – switch 3
on the steering
wheel and release it. Intelligent Cruise Control will
be set to the desired speed.
Press the distance button 4 repeatedly to change
the set distance between long, middle and short.
When a vehicle is not detected ahead of you in the
lane, the set distance and set vehicle speed
indicator lights will illuminate
5 in set mode.
When a vehicle is detected ahead of you in the lane,
the vehicle ahead detection, set distance and set
vehicle speed indicator lights will illuminate
6 in
set mode.
To reset at a faster cruising speed, push up and
hold the RES + switch
7 on the steering wheel.
When the vehicle attains the desired speed, release
the switch.
To reset at a slower cruising speed, push down and hold the SET – switch 3
on the
steering wheel. Release the switch when the vehicle slows to the desired\
speed.
To cancel the preset speed, push the CANCEL switch 8
on the steering wheel. The set
vehicle speed indicator
5 will change to gray.
To turn off Intelligent Cruise Control, press the button 1 on the steering wheel.
The
indicator light 2 in the instrument panel will extinguish.
To set conventional (fixed speed) cruise control mode:
While Intelligent Cruise Control is off, press the button 1 on the steering wheel and
hold it down for more than 1.5 seconds. The grey
indicator light will illuminate.
Accelerate to the desired speed.
Push down on the SET – switch on the steering wheel and release it. The green
indicator light will illuminate. Cruise control should be set to the des\
ired speed.
To switch between the two cruise control modes:
When one of the two cruise modes is in use, you must turn the system off\
a nd then turn it
on again to select the other cruise control mode.
For more information, refer to the “Starting and driving (section 5)” of your Owner’s Manual.
2
5
6
1 8
4
7
3
1967179_16b_Q50_US_QRG_012916.indd 231/29/16 1:54 PM
Page 26 of 36

24
Bluetooth® Hands-free Phone System
A cellular telephone should not be used
while driving so full attention may be given
to vehicle operation.*
SYSTEM OPERATING TIPS
If the Voice Recognition system does not recognize
your voice commands:
1.
Be sure to wait for the tone/beep before speaking
a command.
2.
Reduce background noise as much as possible
by closing the windows and moonroof.
3.
Make sure there are no other conversations in
the car at the same time.
4.
Lower HVAC blower fan speed and point vents
away from the ceiling microphone.
5.
Speak naturally. Speaking too fast, too slow,
too soft, or too loud makes voice recognition more difficult.
6.
Confirm that the correct voice commands are being used. Glance at the sc\
reen to see the
currently available commands.
system guide
Vehicle Information Display
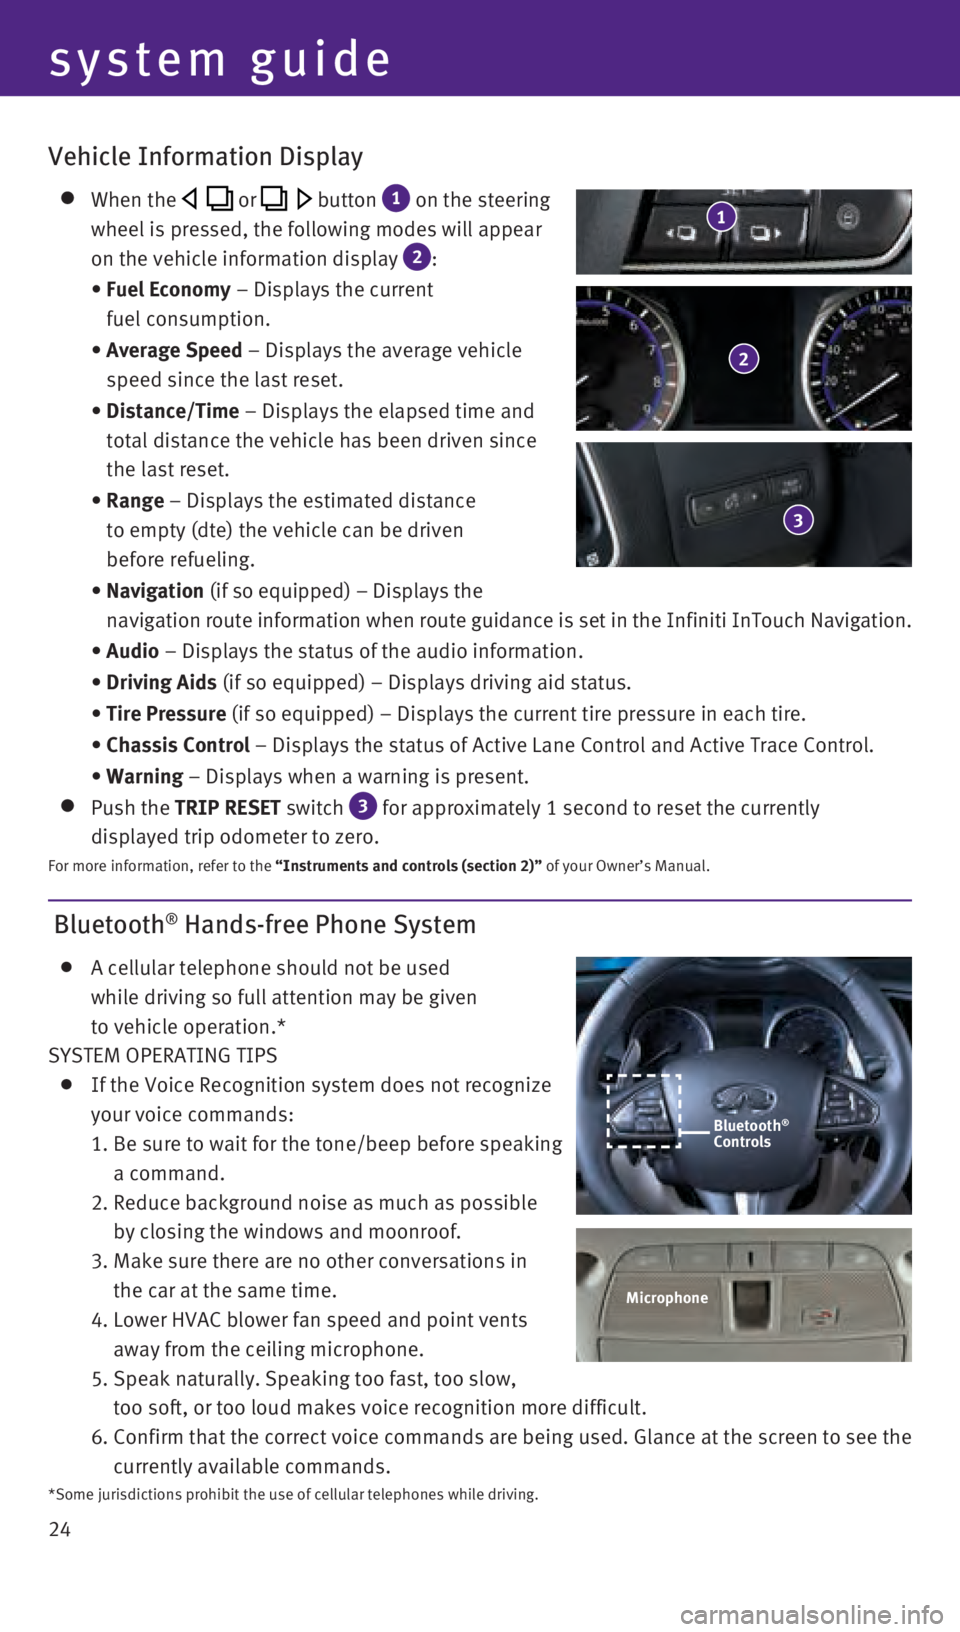
When the or button 1 on the steering
wheel is pressed, the following modes will appear
on the vehicle information display
2:
•
Fuel Economy
– Displays the current
fuel consumption.
•
Average Speed
– Displays the average vehicle
speed since the last reset.
•
Distance/Time
– Displays the elapsed time and
total distance the vehicle has been driven since
the last reset.
•
Range – Displays the estimated distance
to empty (dte) the vehicle can be driven
before refueling.
•
Navigation (if so equipped) – Displays the
navigation route information when route guidance is set in the Infiniti InTouch Navigation.
•
Audio – Displays the status of the audio information.
•
Driving Aids
(if so equipped) – Displays driving aid status.
•
Tire Pressure
(if so equipped) – Displays the current tire pressure in each tire\
.
•
Chassis Control
– Displays the status of Active Lane Control and Active Trace Contro\
l.
•
Warning – Displays when a warning is present.
Push the TRIP RESET switch 3 for approximately 1 second to reset the currently
displayed trip odometer to zero.
For more information, refer to the “Instruments and controls (section 2)” of your Owner’s Manual.
2
3
1
Microphone
Bluetooth®
Controls
*Some jurisdictions prohibit the use of cellular telephones while drivin\
g.
1967179_16b_Q50_US_QRG_012916.indd 241/29/16 1:54 PM
Page 27 of 36

25
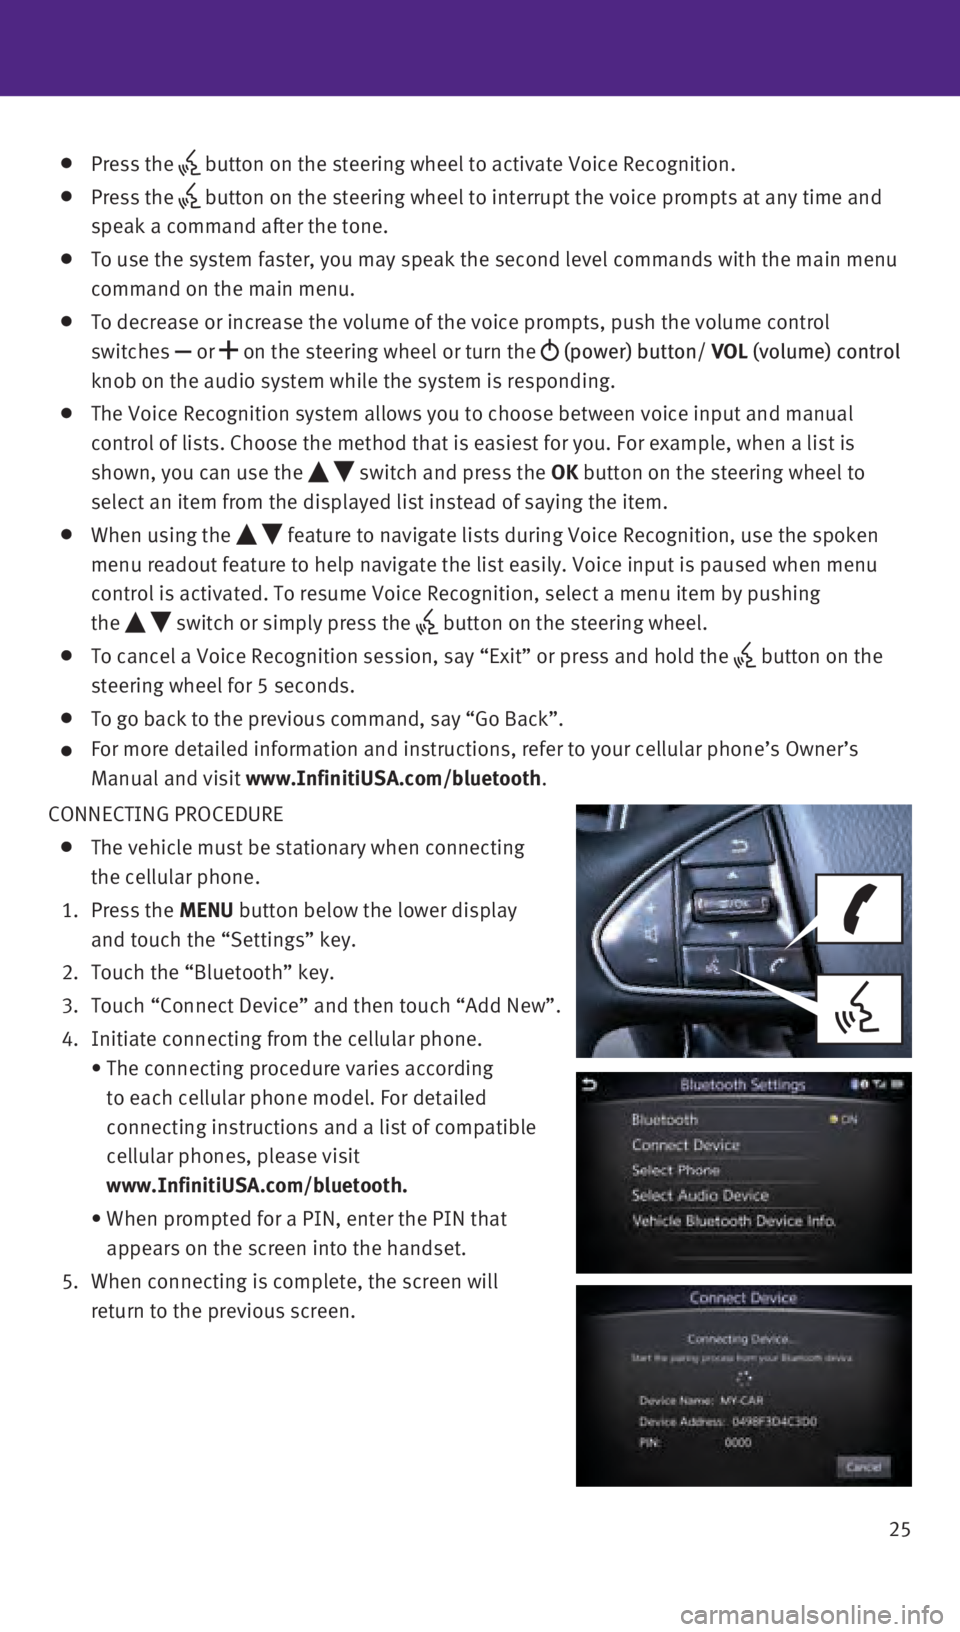
Press the button on the steering wheel to activate Voice Recognition.
Press the
button on the steering wheel to interrupt the voice prompts at any time \
and
speak a command after the tone.
To use the system faster, you may speak the second level commands with t\
he main menu
command on the main menu.
To decrease or increase the volume of the voice prompts, push the volume\
control
switches or
on the steering wheel or turn the
(power) button/ VOL (volume) control
knob on the audio system while the system is responding.
The Voice Recognition system allows you to choose between voice input an\
d manual
control of lists. Choose the method that is easiest for you. For example\
, when a list is
shown, you can use the
switch and press the OK button on the steering wheel to
select an item from the displayed list instead of saying the item.
When using the feature to navigate lists during Voice Recognition, use the spoken
menu readout feature to help navigate the list easily. Voice input is pa\
used when menu
control is activated. To resume Voice Recognition, select a menu item by\
pushing
the
switch or simply press the button on the steering wheel.
To cancel a Voice Recognition session, say “Exit” or press and hol\
d the button on the
steering wheel for 5 seconds.
To go back to the previous command, say “Go Back”.
For more detailed information and instructions, refer to your cellular p\
hone’s Owner’s
Manual and visit
www.InfinitiUSA.com/bluetooth.
CONNECTING PROCEDURE
The vehicle must be stationary when connecting
the cellular phone.
1.
Press the MENU button below the lower display
and touch the “Settings” key.
2.
Touch the “Bluetooth” key.
3.
Touch “Connect Device” and then touch “Add New”.
4.
Initiate connecting from the cellular phone.
•
The connecting procedure varies according
to each cellular phone model. For detailed
connecting instructions and a list of compatible
cellular phones, please visit
www.InfinitiUSA.com/bluetooth.
•
When prompted for a PIN, enter the PIN that
appears on the screen into the handset.
5.
When connecting is complete, the screen will
return to the previous screen.
1967179_16b_Q50_US_QRG_012916.indd 251/29/16 1:54 PM